Looking to integrate NetSuite with Snowflake for better analytics and reporting? A seamless NetSuite to Snowflake integration allows businesses to centralize ERP data in a powerful cloud warehouse, enabling real-time insights, advanced queries, and streamlined operations. Whether you need automated, real-time data sync or a simple manual transfer, this guide covers the two best methods to connect NetSuite to Snowflake – a no-code pipeline and a manual CSV import.
Why Integrate NetSuite with Snowflake?
Integrating Oracle NetSuite (a leading cloud ERP system) with Snowflake (a powerful cloud data warehouse) can unlock a wealth of insights and efficiencies for your business. NetSuite is great for running day-to-day operations, but Snowflake is optimized for analytics – bringing them together means you get the best of both worlds. Here are some key benefits and use cases:
- Unified Financial Reporting: Merge NetSuite’s financial data (invoices, GL, budgets) with other data in Snowflake to create comprehensive reports. For example, you can combine NetSuite accounting data with sales metrics in Snowflake to produce a complete company dashboard, eliminating manual export to spreadsheets.
- Enhanced Operational Insights: With Snowflake’s computing power, run complex queries on NetSuite data (orders, fulfillment, inventory) in seconds. This helps in spotting trends or bottlenecks. E.g., analyze NetSuite order data alongside website analytics in Snowflake to understand conversion funnels.
- Real-Time Visibility: By syncing data continuously, Snowflake becomes an up-to-date replica of your NetSuite data. This enables real-time inventory monitoring, faster financial closes, and on-demand KPI tracking. No more waiting for end-of-day reports – your Snowflake analytics can be as fresh as your NetSuite system.
- Offloading and Performance: Pushing data to Snowflake reduces the load on NetSuite for heavy reporting. Snowflake’s architecture (separate storage and compute) lets you crunch data without impacting NetSuite’s transactional performance. You can run BI dashboards or machine learning on historical NetSuite data in Snowflake without slowing down daily NetSuite operations.
- Data Blend and 360° View: Snowflake acts as a central hub where NetSuite data can join with data from CRM, marketing, or other sources. For instance, combine NetSuite’s customer revenue data with CRM touchpoints to calculate true Customer Lifetime Value, or blend inventory data with e-commerce analytics to optimize supply chain decisions.
In short, connecting NetSuite to Snowflake turns your raw business data into actionable insights by leveraging Snowflake’s scalability and analytics power. Next, we’ll explore exactly how to set up this integration – from understanding each system to executing the data pipeline.
If you’re already familiar with NetSuite and Snowflake and just want the how-to, feel free to jump directly to the integration methods.
What is NetSuite? (Quick Overview for Data Integration)
NetSuite ERP is a cloud-based Enterprise Resource Planning platform that companies use to manage core business processes in one system. It includes modules for accounting, order management, inventory, CRM, e-commerce, and more – all under one roof. By centralizing data and automating workflows, NetSuite helps organizations streamline operations and get real-time visibility into their financial and operational performance
Key features of NetSuite relevant to data integration:
- Unified Data Model: NetSuite holds a wealth of business data – from transactions and invoices to customers and products – all interlinked. This unified model means when we connect to NetSuite, we can extract a 360° view of the business.
- SuiteAnalytics (Saved Searches & Reports): NetSuite allows custom saved searches and reports. Many integration tools (and manual exports) leverage these to pull specific slices of data (e.g., monthly sales by region).
- APIs for Access: NetSuite provides multiple ways to access data programmatically:
- RESTlet/SuiteScript API: Allows custom scripts to expose data via REST endpoints.
- SuiteTalk SOAP API: A web services API that can query and retrieve records (this requires handling XML/SOAP responses).
- SuiteAnalytics Connect (ODBC/JDBC): An ODBC driver that lets you run SQL queries against NetSuite’s data model (this requires an additional license and is read-only).
It’s not necessary to know all the above to integrate NetSuite with Snowflake (tools can abstract these details), but it’s useful to understand that NetSuite’s data is accessible but guarded by APIs and permissions. Large data extracts can be time-consuming via API, and there are API call limits to consider. This is why choosing the right integration method is important – to efficiently get data out without hitting limits or performance issues.
To explore other popular integrations, you can also look into NetSuite to BigQuery and NetSuite to Databricks for even broader analytical applications.
Snowflake Overview: Why It’s Ideal for NetSuite Data
Snowflake is a cloud-native data warehouse platform known for its scalability, speed, and ease of use. It runs on cloud infrastructure (AWS, Azure, GCP) and separates compute from storage, meaning you can scale query power and storage independently. For NetSuite users, Snowflake is an ideal destination because:
- Scalable Analytics: Snowflake can handle massive volumes of data and complex queries with ease. As your NetSuite data grows (years of financial records, millions of transactions), Snowflake scales out to accommodate it. You won’t outgrow it, and you pay only for the compute you use.
- Performance: With Snowflake, you can run heavy-duty aggregations or joins on NetSuite data that might be impractical to do directly in NetSuite (NetSuite is not designed for large-scale analytics). Snowflake’s engine is optimized for set-based operations on large datasets, giving you fast report generation even on billions of rows.
- Concurrency: Multiple teams can query the same NetSuite-derived data in Snowflake at the same time without affecting each other. Snowflake’s multi-cluster architecture prevents one user’s Big Query from slowing others down. This is great for organizations where finance, operations, and analytics teams all want data simultaneously.
- Integration & Sharing: Snowflake connects seamlessly with BI tools (Tableau, Looker, Excel, etc.) and other databases. It also offers the Snowflake Data Marketplace and data sharing capabilities, so you can even join your NetSuite data with external datasets (like benchmarking data or third-party analytics) without complex ETL.
- Zero-Maintenance: As a fully managed service, you don’t need to worry about database management, tuning, or infrastructure for Snowflake. You set up the integration, and Snowflake handles the rest – so your team can focus on analysis rather than maintenance.
In summary: Snowflake turns your NetSuite data into an analytics powerhouse. By offloading data to Snowflake, you gain the ability to do advanced analysis, archival, and sharing that NetSuite alone isn’t built for. Now, let’s look at how to actually move the data from NetSuite to Snowflake.
NetSuite to Snowflake Integration Methods
There are several ways to integrate NetSuite with Snowflake, ranging from fully automated no-code tools to DIY scripts and manual exports. The best method depends on your budget, technical skill, and need for real-time data. In this guide, we’ll focus on two popular approaches:
- Method 1: Using a No-Code Data Pipeline Tool – We’ll use Estuary as an example (a real-time integration platform) to connect NetSuite to Snowflake with just a few clicks. This method requires minimal technical work and supports continuous, automated syncing.
- Method 2: Manual CSV Export and Load – We’ll cover how to manually export data from NetSuite in CSV format and then load it into Snowflake. This is a more hands-on approach, suitable for one-off transfers or very infrequent updates.
(There are other methods as well, like using third-party ETL services or writing custom Python scripts against NetSuite’s API, which we’ll briefly discuss later. But the two methods above are the most common scenarios we see.)
Before diving in, ensure you have the necessary access permissions in both NetSuite and Snowflake:
- NetSuite: You’ll need rights to perform data exports or use any integration tool (likely an Administrator or similarly privileged role). If using an API-based tool, ensure you have SuiteTalk/RESTlet credentials or can create them.
- Snowflake: You should have a Snowflake account with at least one database and schema where you can create tables, and a user role with privileges to create stages, file formats, and load data.
With that in place, let’s start with the streamlined, automated method.
Method 1: Using Estuary to Load Data From NetSuite to Snowflake
The fastest way to get NetSuite data into Snowflake is by using a dedicated integration platform. Estuary is one such platform (a no-code SaaS tool) that provides a pre-built NetSuite connector and Snowflake connector, handling the extraction and loading for you in real-time. This means your data pipeline can be up and running in minutes, and it will continuously sync changes (via CDC – Change Data Capture) without manual effort.
Why choose an automated tool? If you want up-to-date data, minimal maintenance, and an easy setup, this is ideal. Estuary, for example, also ensures data security with encryption and authentication built-in, and can scale to large volumes (it’s designed to handle high throughput, e.g. CDC at 7 GB/s). Essentially, it abstracts away the NetSuite API intricacies and Snowflake loading commands, giving you a simple interface to configure the pipeline.
Prerequisites for Using Estuary
- Estuary Account: Sign up for a free Estuary account if you don’t have one.
- NetSuite Credentials: You’ll need your NetSuite Account ID and an integration token (Consumer Key, Consumer Secret, Token ID, and Token Secret) generated from a role with the right permissions. Token-based authentication is the recommended method for security and reliability.
- Snowflake Details: Have your Snowflake account URL, a user login, warehouse, database, and schema ready. You’ll also need key-pair authentication set up for the user.
Step 1: Configure NetSuite as a Source in Estuary
- Log in to Estuary: Go to the Estuary dashboard (dashboard.estuary.dev) and log in. If you’re new, you can quickly register for a free account – no credit card needed.
- Add a New Source: In the Estuary UI, navigate to the Sources section (left sidebar).
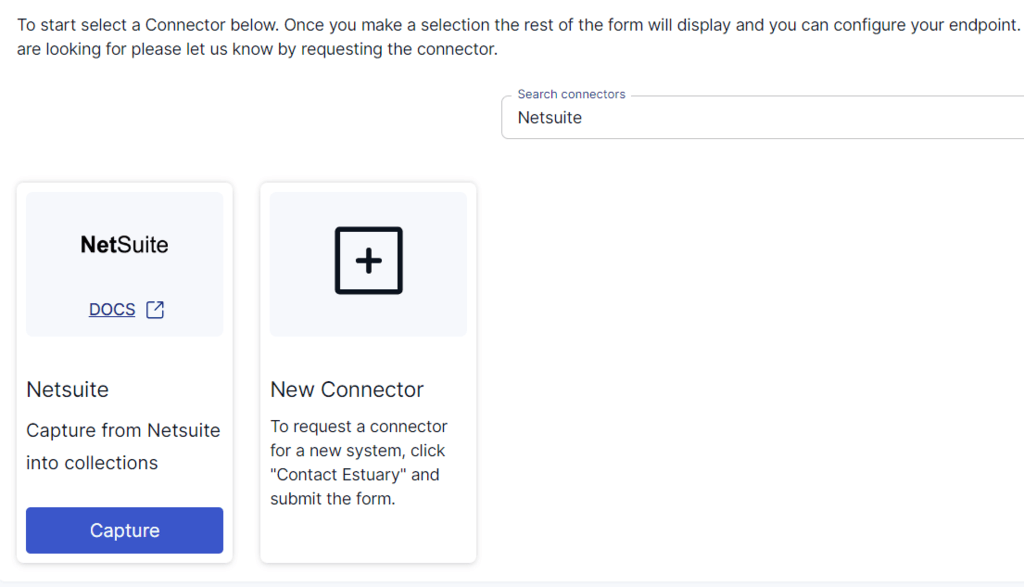
- Create a NetSuite Capture: Click on “+ New Capture”. This opens a list of source connectors. Search for “NetSuite” in the connector list.
- Select NetSuite Connector: You should see a NetSuite connector appear. Click on it (usually labeled NetSuite with the NetSuite logo) and then click “Capture” to start configuring it
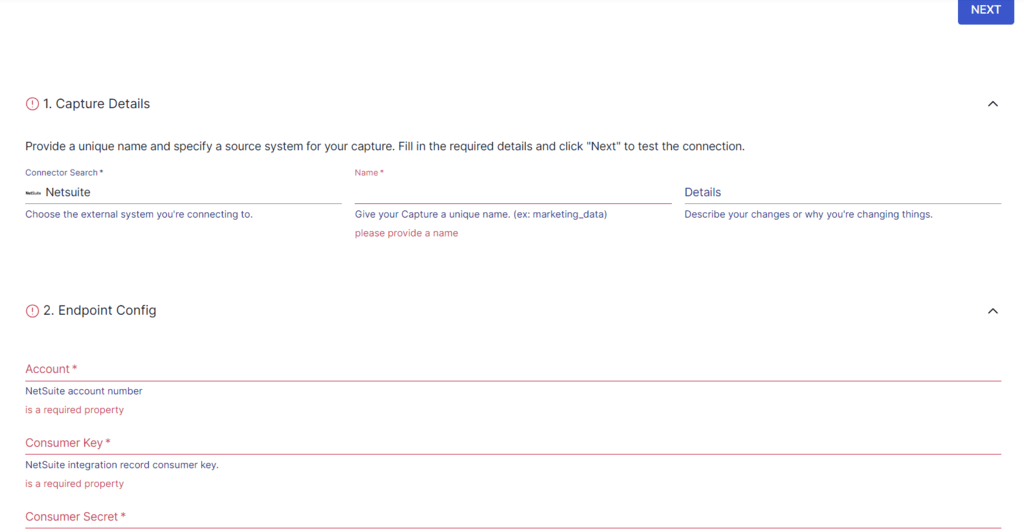
- Enter NetSuite Connection Details: You will be prompted to fill in required fields for NetSuite:
- Name: Enter a descriptive name for your capture (e.g., netsuite-prod).
- Account ID: Your NetSuite Account ID (for example, 1234567 for production or 1234567_SB1 for sandbox).
- Connection Type: Choose SuiteAnalytics (preferred) or SuiteQL. SuiteAnalytics is recommended for faster backfills and full schema discovery.
- Authentication: Provide credentials using token-based authentication. You’ll need the following, which are generated in your NetSuite account setup:
- Consumer Key
- Consumer Secret
- Token ID
- Token Secret
- Click Next → Save and Publish. Estuary will connect to NetSuite, discover the available tables (such as Transactions, Lists, and Reports), and automatically create versioned collections. Estuary will backfill historical records first, then stay in sync with incremental updates.
Step 2: Configure Snowflake as the Destination
Once NetSuite is connected and data capture is set up, you configure Snowflake as the target for that data:
- Add a New Destination: In the Estuary dashboard, either follow the prompt that appears after publishing the source (it might say “Materialize collections” or similar, or manually go to the Destinations section and click “+ New Materialization”.
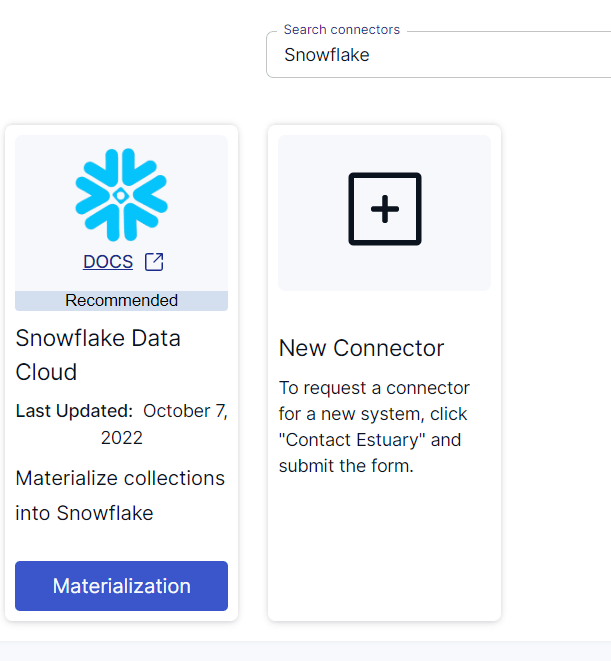
- Select Snowflake Connector: Search the list of destination connectors for Snowflake. Click on the Snowflake connector and then “Materialize” to configure it.
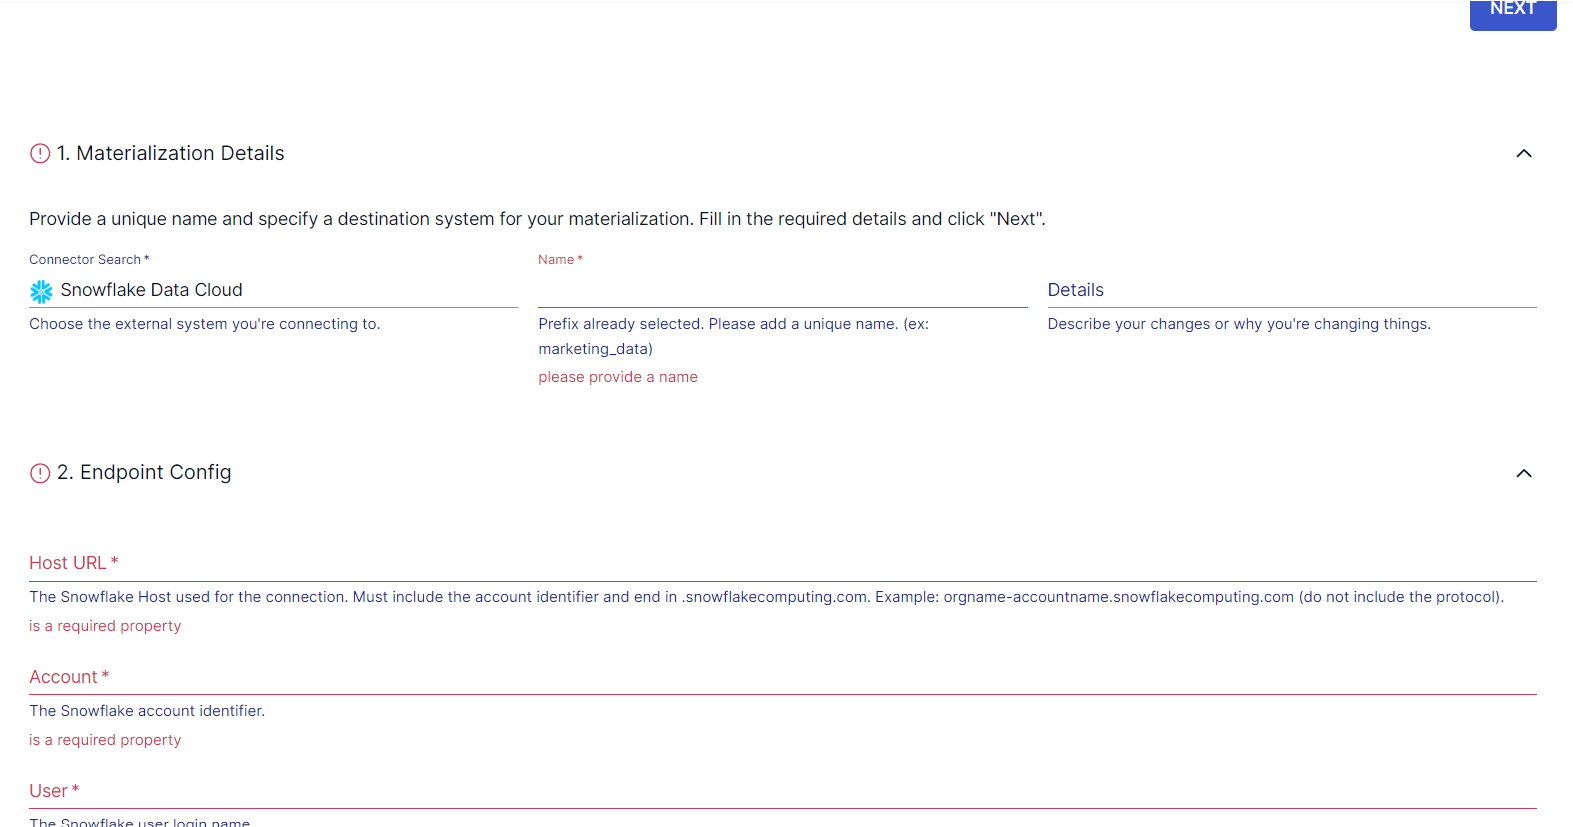
- Enter Snowflake Details: Provide Snowflake connection info:
- Host URL: Your Snowflake account URL, for example, orgname-accountname.snowflakecomputing.com.
- Database and Schema: The location in Snowflake where your NetSuite data should land.
- Warehouse: The Snowflake compute warehouse you want to use.
- User: Your Snowflake username.
- Private Key: The private key associated with your Snowflake user, required for key-pair (JWT) authentication. Password authentication is no longer supported.
- After entering the configuration, click Next.
Estuary will map each NetSuite collection to a corresponding table in Snowflake. You can adjust table names, filter fields, or apply transformations if needed. By default, Estuary uses standard merges, but you can enable delta updates for append-heavy workloads. Delta updates leverage Snowpipe Streaming for near real-time ingestion, reducing latency and costs for large datasets.
- Finally, click Save and Publish to activate the pipeline. Your NetSuite data will begin flowing into Snowflake, starting with a historical backfill followed by continuous updates.
Key Benefits of Using Estuary for NetSuite to Snowflake Integration
- Speed of Setup: As demonstrated, setting up both source and destination can be done in a matter of minutes with just config, not code.
- Real-Time Data: Estuary supports real-time change data capture (CDC). NetSuite doesn’t natively stream changes, but Estuary’s platform can fetch data at short intervals or use webhooks if available. This means your Snowflake data can be updated in near real-time, as opposed to batch dumps.
- Minimal Maintenance: The platform handles schema changes (if, say, you add a new field in NetSuite, the pipeline can adjust) and error retry logic. There’s no cron jobs or manual scripts to maintain – it’s a set-and-forget solution.
- Scalability & Reliability: Estuary is built to handle large volumes – they report being able to ingest up to 7 GB/s via CDC for high throughput needs. It will also manage API rate limits and backpressure gracefully, so you don’t have to throttle manually.
- Security: Data in transit is encrypted, and because Estuary operates within a cloud environment with secure connectors, you avoid risky manual handling of CSV files. Always a plus when dealing with sensitive financial data
- 200+ Connectors: While not directly an integration benefit, note that Estuary (and similar platforms) come with a library of connectors. This means after NetSuite->Snowflake, you could easily plug in other sources or destinations (like Salesforce to Snowflake, or NetSuite to SQL Server) using the same platform – a future-proof bonus
📢 Start Your NetSuite to Snowflake Integration Today
Sign up free to build your first pipeline in minutes — no credit card required. With Estuary’s transparent pricing ($0.50/GB of change data + $0.14/hour per connector), you get enterprise-grade, real-time integration without hidden costs.
Next, we’ll cover the manual CSV method. If you prefer a DIY approach or need a one-time export, read on.
Method 2: Manual CSV Export and Snowflake Load (DIY Approach)
An alternative to using an integration platform is to do it manually: export data from NetSuite as CSV files, then import those files into Snowflake. This approach requires more effort and is not real-time, but it might suit scenarios like a one-off data migration or if you’re experimenting without access to a paid tool.
We’ll break this down into two parts – exporting data from NetSuite, and loading into Snowflake.
Note: This method is practical for small datasets or infrequent updates. If you need continuous sync or have huge volumes, manual processes will quickly become cumbersome (consider using Method 1 or a similar tool in that case).
Step 1: Export Data from NetSuite as CSV
NetSuite has built-in export features that allow you to extract data in CSV format. Here’s a generic process (the exact navigation may depend on your NetSuite version and role permissions):
- Navigate to Export: In NetSuite’s top navigation, go to Setup > Import/Export > Export Tasks > Full CSV Export. This is a menu path to initiate a CSV export of your data.
- Choose Your Data: NetSuite will prompt you to select what data to export. You might choose a specific record type (e.g., Customers, Transactions) or a saved search. For a full data dump, you might have to export multiple CSVs (one for each record type of interest). Start with one – say “Customers” – for testing.
- Submit Export: Click the “Export” or “Submit” button to begin the export. NetSuite will queue the export job.
- Download the File: Once NetSuite prepares the file, a File Download dialog will appear. Choose “Save to disk” and click OK. Save the file to your local machine when prompted, giving it a clear name (e.g., NetSuite_Customers.csv).
- Repeat as Needed: If you need multiple tables of data, repeat the above for other record types (e.g., Orders, Invoices, Items, etc.). NetSuite might also allow a full account export which gives a ZIP of many CSVs at once – if so, that’s convenient: you would download a zip file and extract it to get all the CSV files.
Tips for NetSuite CSV Export:
- Use Saved Searches: If you don’t need all columns or rows, create a Saved Search in NetSuite with filters to get exactly the data you want, then export that. This can reduce file size and prep some data (like combining related records).
- Mind the CSV file size: NetSuite might break very large exports into multiple files or a zip. Note the size and number of records to ensure you got everything.
- The export will likely include a header row with column names which is useful for Snowflake loading.
(Advanced note: If you are comfortable with coding, NetSuite’s SOAP API (SuiteTalk) or RESTlets can be used to script exports in a more controlled way. Some developers write Python scripts to fetch data via these APIs and save to CSV or directly push to databases. That’s beyond the scope of this step-by-step, but be aware it’s an option for a custom integration if you require it.)
Step 2: Load CSV Data into Snowflake (Using the Web Interface)
Snowflake provides multiple ways to load data (including their web interface, command line tools, and SQL commands). Here we’ll use the Snowflake Classic Console’s Load Data wizard for simplicity, assuming you have access to Snowflake’s web UI:
- Prepare Snowflake Table: Before loading, ensure you have a table in Snowflake that corresponds to the data. If you exported “Customers” from NetSuite, create a Snowflake table Customers with columns matching those in the CSV. You can do this manually by writing a CREATE TABLE statement with the right schema (data types guessed based on CSV content). Alternatively, you can use the wizard’s option to create a table during load (Snowflake can infer from the header).
- Open Snowflake Web Interface: Log in to your Snowflake account and go to the Classic Console (the interface with worksheets).
- Select Database & Schema: In the Objects panel, select the target Database and Schema where you want to load the data.
- Go to Tables: Click on the Tables section and find the table you want to load (or if you haven’t created it yet, you can start the load, and Snowflake will prompt to create it).
- Initiate Load Data: There are two ways:
- Click on the specific table, then use the “Load Data” button.
- Or from the Tables list, select the table row, right-click (or use menu) and choose “Load Table”.
- Choose Warehouse: The wizard will ask which compute warehouse to use for the loading. Choose a warehouse you have permission on (and that is suitable size for the data). Click Next.
- Select Source File: Choose “Load files from your computer”, then click “Select Files”. Browse and select the CSV file you exported from NetSuite.
- File Format: Snowflake will ask for a file format. If it’s a plain CSV with a header, you can create a new file format:
- Delimiter = comma
- Header rows to skip = 1 (to skip the header line on import if you will create your own table schema)
- You might also specify text qualifier if needed (e.g. quotes). If you already have a named CSV format saved, you can select it.
- Error Handling: Decide how Snowflake should handle errors:
- “On error” options include abort (stop at first error) or continue (skip bad rows). For initial loads, you might abort on error to catch any issues. If using the wizard, you can likely just proceed with default which usually aborts on error.
- Load Data: Click “Load” to begin the loading process. Snowflake will execute a PUT (to stage the file) and a COPY INTO command behind the scenes. If the table didn’t exist and you opted to create it, Snowflake would infer columns (likely all as TEXT). For better control, we recommended creating the table beforehand with appropriate datatypes (dates, numbers, etc.).
- Finalize: The wizard will show when the load completes. If the warehouse was suspended, Snowflake may take a few minutes to resume it and complete the copy. Once done, you’ll get a success message. Click “OK” to close the wizard.
Now, your NetSuite data from the CSV is in Snowflake! You can query the table to verify rows were inserted correctly. If something failed (say a column had a data type mismatch), Snowflake’s error message will indicate the row number and issue. You may need to adjust the table schema or edit the CSV and try again if that happens.
Repeat for other files: If you have multiple CSVs (different record types), repeat the load process for each, possibly creating separate tables for each dataset (e.g., Orders table for orders CSV, etc.).
Tips for a Smooth Manual Load:
- File Size Consideration: The Snowflake UI wizard has an upload limit (files <= 50 MB as per Snowflake docs). If your CSV is larger, you should use Snowflake’s SnowSQL CLI or the PUT & COPY commands via a worksheet. For large data, it’s often easier to upload the file to a cloud storage (S3, Azure Blob, GCS) and use Snowflake’s external stage to COPY from there. But that adds complexity. For many NetSuite exports, splitting by record type keeps files small enough.
- Automate if Repeatable: If you need to do this regularly (say monthly), consider writing a script using Snowflake’s Python connector or SnowSQL to automate the upload and copy. Also, note down any transformations needed (maybe NetSuite dates need converting to Snowflake date format).
Data Types: CSVs don’t carry type info, so Snowflake might treat all fields as text. Post-load, you might want to cast columns to proper types (e.g., amounts to NUMBER, dates to DATE). This can be done via ALTER TABLE ... ALTER COLUMN ... TYPE commands or by creating the table with the correct schema upfront and using COPY with field definitions.
Limitations of Using CSV Files for NetSuite to Snowflake Integration
- Time-consuming: Extracting data manually from NetSuite to CSV can be time-consuming and prone to human error. This is true, especially if the data is spread across multiple tables or reports.
- Supports Batch Processing: Owing to the delays involved in extracting data as CSV files, this method is suitable only for batch processing. You can’t achieve real-time data synchronization or near real-time analytics with this approach.
- Error Management: It becomes difficult to minimize errors and inconsistencies in the migrated data in CSV files due to a lack of built-in data validation.
- Challenges in Data Synchronization: CSV files do not offer any simpler way to manage incremental updates or changes in the source data. This presents challenges in maintaining data synchronicity.
For these reasons, many teams use the manual method only as a stopgap or for initial one-time population. For ongoing integration, a tool or script-based approach (like Method 1) is generally preferred.
(Optional) Using Python or Code for Integration
If you have developer resources, you might consider writing a custom integration using NetSuite’s API and Snowflake’s connectors. For instance, using Python:
- You could use a library or module to fetch data from NetSuite’s SOAP API (there are community libraries for NetSuite).
- Then connect to Snowflake with the snowflake-connector-python to insert data.
This approach gives full control and can be automated, but requires significant effort to handle all the nuances (authentication, API limits, data type mapping, upsert logic, error retries). Unless your scenario is very custom, leveraging an existing tool is usually more cost-effective. However, it’s good to know that if needed, custom coding offers ultimate flexibility – you can transform data arbitrarily or integrate with other systems as part of the pipeline.
Now that we’ve covered both methods, let’s compare them side by side and help you decide which is right for you.
Comparison of Integration Methods: Automated Tool vs. Manual CSV
| Feature | Estuary | CSV File Transfer |
|---|---|---|
| Ease to Use | High (no-code, intuitive interface) | Low (manual steps, requires technical knowledge) |
| Automation | Fully automated, real-time or scheduled data sync | Manual, batch processing only |
| Scalability | Highly scalable, handles large data volumes | Limited scalability, best for smaller datasets |
| Error Handling | Built-in data validation and error management | Requires manual error checking and correction |
| Data Transformation | Supports data transformation within the pipeline | Limited transformation capabilities |
| Real-Time Updates | Supports real-time or near-real-time data synchronization | No real-time updates, requires manual refresh |
| Cost | Varies based on usage and features. See Pricing. | Generally lower upfront cost, but can be time-consuming |
| Overall | Best for businesses seeking a seamless, automated, and scalable solution | Suitable for simple data transfers with smaller datasets |
As shown, using a platform like Estuary provides convenience and reliability, whereas the manual method might be acceptable only for very limited scenarios.
Video Walkthrough
Here's a short walkthrough on capturing NetSuite data with Estuary:
Conclusion: Choosing the Right NetSuite to Snowflake Integration Method
Both methods described will get your NetSuite data into Snowflake – but which one is right for you depends on your situation:
- Choose an Automated Tool if… You value your time and need up-to-date data continuously. If your company relies on daily or real-time reports, or if you simply don’t want to babysit data pipelines, a solution like Estuary is worth it. It offloads the heavy lifting of integration so you can focus on analyzing data rather than moving it. Many businesses find that the cost of such tools is easily justified by the labor savings and improved data timeliness (how do you put a price on always having fresh data for decision-making?).
- Choose Manual CSV if… You have a very small dataset or a one-time export need. For example, if you’re migrating to Snowflake and just need an initial dump of NetSuite data, doing it manually might be okay. Or if NetSuite is not a critical system and you update the warehouse only monthly or quarterly, you might tolerate manual effort. Additionally, some organizations have strict security where introducing a new third-party tool needs approval, while waiting on that, a manual process could be a temporary solution.
Keep in mind the limitations of the manual route: it’s error-prone and doesn’t support incremental updates well. So, if you start manually and find yourself repeating it often, strongly consider switching to an automated pipeline or investing in a custom script at least. On the other hand, the automated route can usually be tried with minimal commitment (for instance, Estuary offers a free trial).
Next Steps: If you’re ready to streamline your NetSuite to Snowflake integration, you can get started for free with Estuary and build your first pipeline in minutes – no coding required. This will give you a taste of real-time data integration, and you can literally watch your Snowflake tables populate with NetSuite data almost immediately.
Happy integrating, and may your analytics be ever insightful!
FAQs
How do I connect NetSuite to Snowflake in real-time?
To enable real-time data sync from NetSuite to Snowflake, you need a solution that supports Change Data Capture on NetSuite. NetSuite itself doesn’t stream data, but integration platforms (like Estuary, Dell Boomi, etc.) can poll NetSuite frequently or use SuiteAnalytics Connect to pull new data and then push it into Snowflake continuously. By using such a tool, or a custom script that runs on a schedule (e.g., every 5 minutes), you can approximate real-time updates. In contrast, manual methods would only be batch (not real-time)
Does NetSuite have a native Snowflake connector?
NetSuite does not natively include a Snowflake connector out-of-the-box. It provides APIs and the SuiteAnalytics Connect ODBC interface for data export. However, Snowflake’s ecosystem now includes the Snowflake Native App Framework, and some third-party providers have built a NetSuite connector on it (for example, a team offers a Snowflake Native App for NetSuite data). That solution runs within Snowflake’s environment and pulls NetSuite data via SuiteAnalytics Connect. It’s a promising approach, but as of now it may be in beta or require contacting the provider. For most users, the common ways to connect NetSuite to Snowflake are using ETL/ELT tools or building a custom pipeline.
What types of data can I extract from NetSuite to Snowflake?
Nearly all data in NetSuite can be extracted one way or another. This includes:
- Financial Records: General ledger entries, invoices, payments, budget lines, etc.
- Customer and Sales Data: Customer records, sales orders, fulfillments, returns, opportunities.
- Inventory and Product Data: Item master data, inventory levels, warehouse transactions.
- Vendor and Procurement Data: Purchase orders, vendor records, accounts payable data.
- Support/Case Data: If using NetSuite for support tickets or project management, those records too. NetSuite’s API and export tools expose a wide range of entities. Some highly custom or third-party SuiteApps data might need special handling, but generally if you can report on it in NetSuite, you can get it into Snowflake. It’s important to plan your data model in Snowflake to organize these records (fact and dimension tables, etc.) once extracted
Is Snowflake an ETL tool or just a database?
Snowflake is not an ETL tool; it is a cloud data warehouse (database). It’s designed for storing and querying data, not for moving or transforming data from source systems. You will need an ETL/ELT process to get data from NetSuite into Snowflake (that’s what we’ve discussed in this article). Snowflake does offer some features like external functions and stored procedures that can aid in transformations once data is inside it, but it does not connect to NetSuite by itself. Use an ETL tool, integration platform, or custom code for the “E” (Extract) and “L” (Load) parts of the pipeline, and leverage Snowflake’s power for the “T” (Transform and querying) part once the data is there.
By following this guide, you should be well on your way to syncing NetSuite data into Snowflake and empowering your organization with timely, unified data. Good luck, and if you have any questions or need help, feel free to reach out!

About the author
With over 15 years in data engineering, a seasoned expert in driving growth for early-stage data companies, focusing on strategies that attract customers and users. Extensive writing provides insights to help companies scale efficiently and effectively in an evolving data landscape.


