Are you a data engineer or developer looking to streamline project management and analytics? A Jira to Snowflake integration can be the solution you’ve been searching for.
Jira is a powerful agile project management tool, while Snowflake is a modern cloud data warehouse built for scale and advanced analytics. Connecting them allows you to centralize Jira data in Snowflake for real-time or scheduled syncs, enabling deeper reporting, faster decision-making, and more efficient collaboration.
In this comprehensive guide, we’ll walk you through the step-by-step process to integrate Jira with Snowflake quickly and seamlessly. By the end, you’ll be equipped to break down silos, automate reporting, and boost overall productivity.
Why Integrate Jira with Snowflake?
Bringing Jira and Snowflake together bridges the gap between project management and analytics. Instead of relying on manual exports or siloed reports, you can centralize Jira data in Snowflake for faster insights and collaboration.
Here are the key reasons organizations set up a Jira to Snowflake integration:
- Centralized reporting: Move issue tracking, sprints, and project updates from Jira into Snowflake, where they can be combined with data from other business systems for a single source of truth.
- Stronger analytics: Snowflake’s scalable compute power lets you run advanced queries on Jira data, uncovering trends like velocity, resource bottlenecks, and delivery timelines.
- Cross-team collaboration: Product managers, engineers, and executives can all access consistent Jira data in dashboards, eliminating version mismatches and manual reporting.
- Up-to-date visibility: With automated syncs, project status flows into Snowflake regularly, keeping dashboards and KPIs current without repeated CSV exports.
- Scalability and flexibility: Whether you’re tracking hundreds or millions of issues, Snowflake can handle the scale of Jira data without performance concerns.
Together, Jira and Snowflake enable data-driven project management. In the next section, we’ll walk through the step-by-step setup to connect these platforms efficiently.
Prerequisites
- Jira: Domain (e.g., yourco.atlassian.net), account email, and API token (create in Atlassian → Profile → Security → API tokens).
- Snowflake: Account URL/host, database, schema, warehouse, and a user/role with access. Plan to use key-pair (JWT) auth (recommended & required for Snowpipe Streaming).
- Estuary Flow: Create a free account.
Step-by-Step: Jira to Snowflake with Estuary Flow
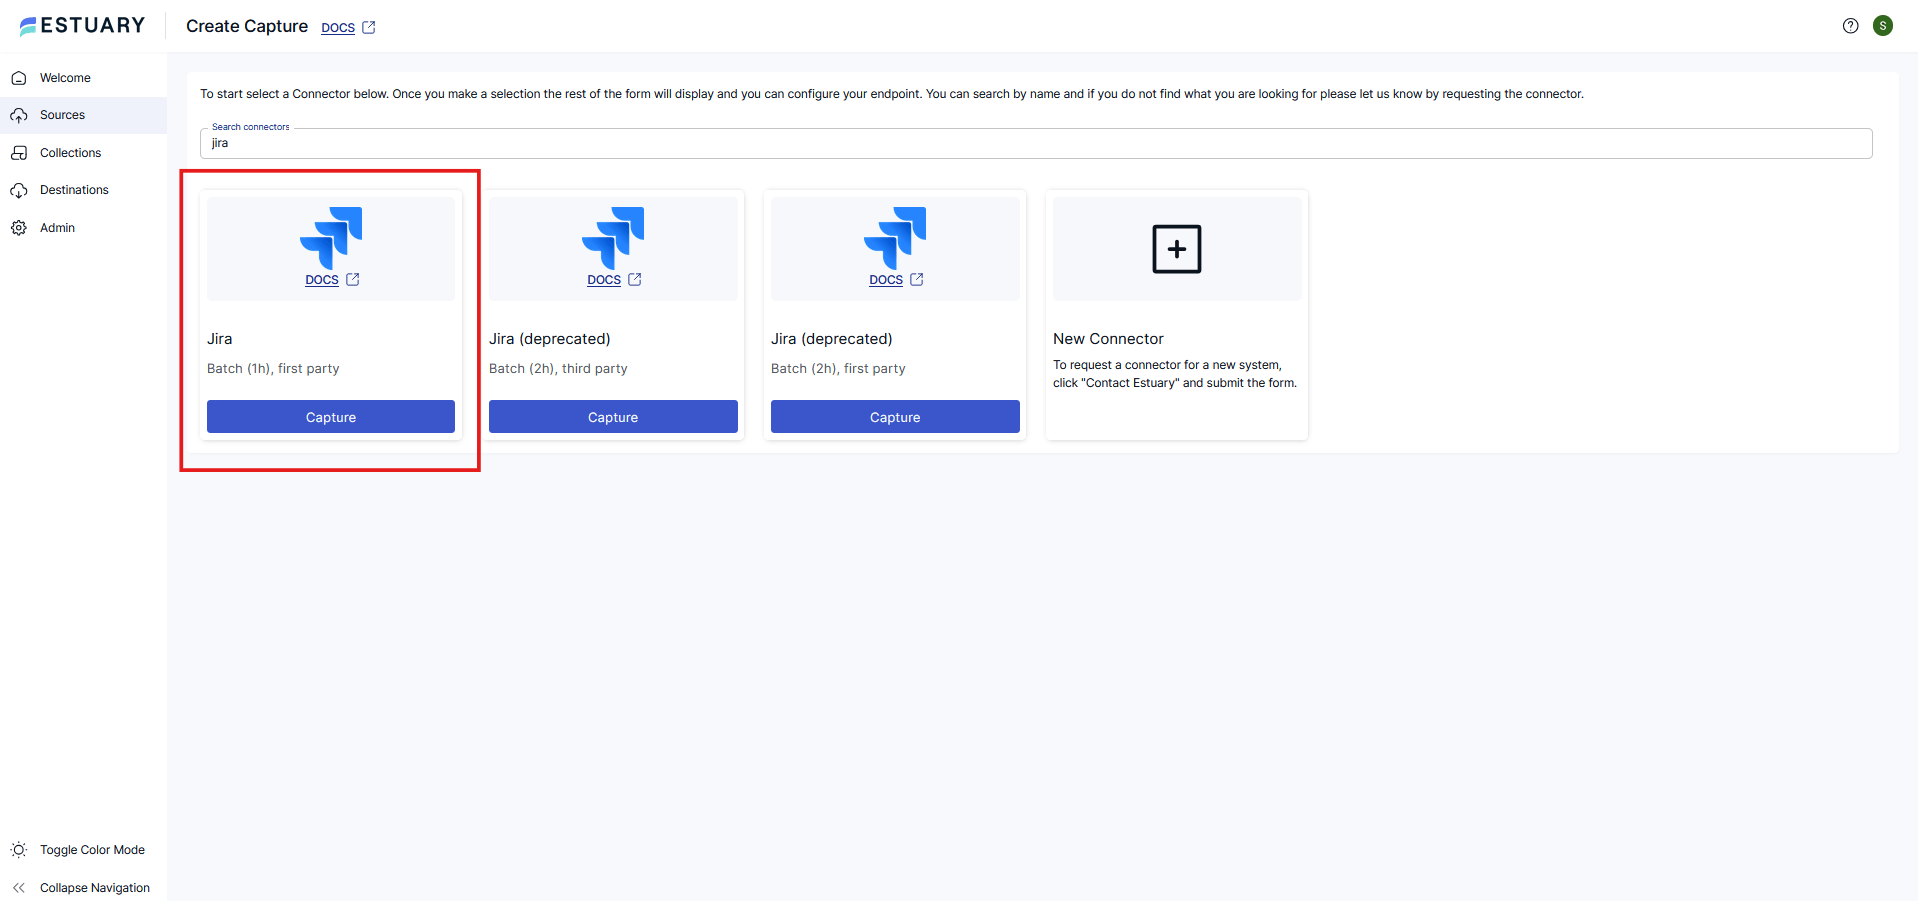
Step 1 — Capture Jira data (Sources)
- In Flow, go to Sources → + NEW CAPTURE.
- Choose the Jira tile (the first-party connector).
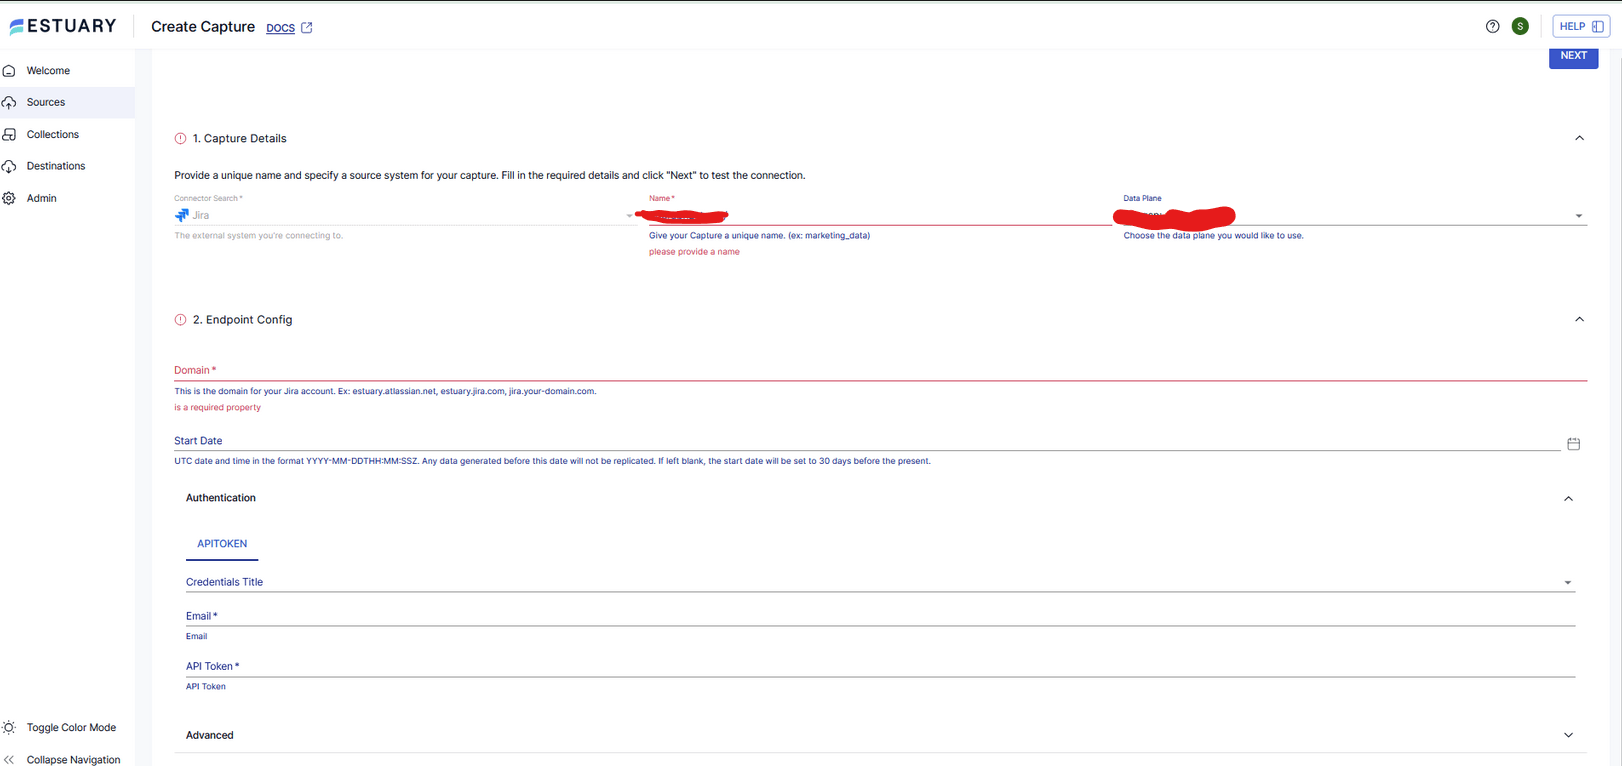
- Fill the Create Capture form (matches your screenshot):
- Name: any unique name (e.g., jira_prod_capture).
- Domain: your Jira site (e.g., yourco.atlassian.net).
- Start Date (optional): YYYY-MM-DDTHH:MM:SSZ.
- If left blank, Flow defaults to 30 days before now.
- Authentication → API TOKEN:
- Email: your Jira login email.
- API Token: the token you generated.
- Advanced → Projects (optional): comma-separated project IDs to limit sync; leave empty to capture all projects.
- Click Next → Save and publish.
What you get: Flow will create one collection per Jira resource (issues, issue comments/changelogs, projects, boards, sprints, users, etc.). The connector runs on a scheduled batch cadence (default hourly). You’ll control freshness on the materialization side next.
Step 2 — Materialize to Snowflake (Destinations)
- Go to Destinations → + NEW MATERIALIZATION.
- Select Snowflake
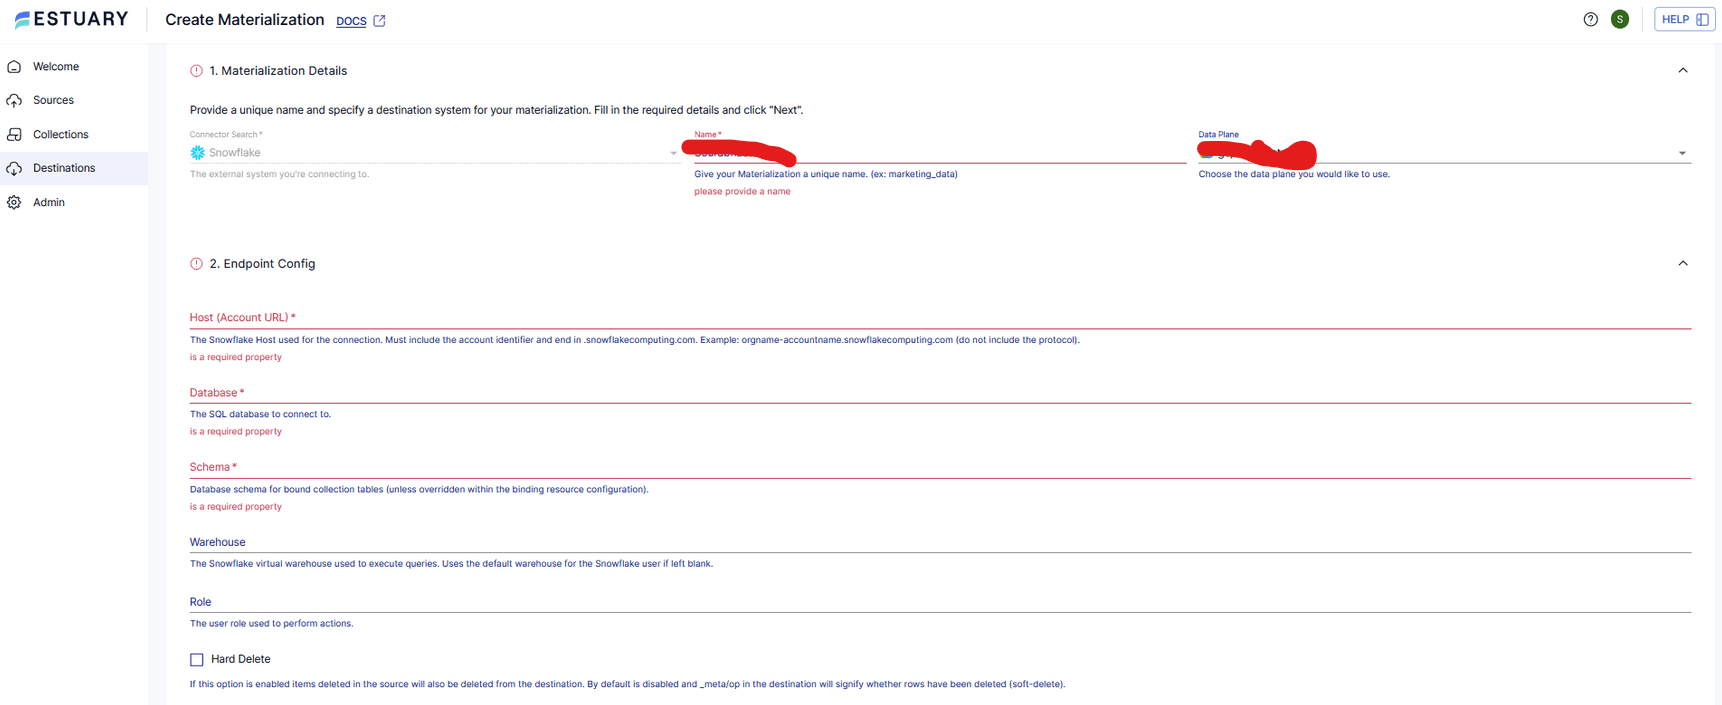
- Fill Materialization Details and Endpoint Config (as in your screenshots):
- Host (Account URL): e.g., orgname-accountname.snowflakecomputing.com (no https://).
- Database: target database.
- Schema: target schema for tables & metadata.
- Warehouse: virtual warehouse to run merges.
- Role (optional): role for the Snowflake user.
- Hard Delete (optional): enable only if you want source deletes to be physically deleted (default is soft delete via _meta/op).
Authentication (recommended): PRIVATE KEY (JWT)
- In the Authentication section, choose PRIVATE KEY (JWT) and provide:
- User: Snowflake username.
- Private Key: paste your PEM private key.
- If you haven’t set up key-pair auth yet:
- Generate keys:
plaintextopenssl genrsa 2048 | openssl pkcs8 -topk8 -inform PEM -out rsa_key.p8 -nocrypt
openssl rsa -in rsa_key.p8 -pubout -out rsa_key.pub- Assign the public key to your Snowflake user:
plaintextALTER USER ESTUARY_USER SET RSA_PUBLIC_KEY='MIIBIj...';- (Optional) Set timestamp mapping if you prefer TIMESTAMP_TZ:
plaintext-- ALTER USER ESTUARY_USER SET TIMESTAMP_TYPE_MAPPING = 'TIMESTAMP_TZ';- Ensure your warehouse auto-suspends to control cost:
plaintextALTER WAREHOUSE ESTUARY_WH SET AUTO_SUSPEND = 60;Link your Jira collections
- Scroll to 3. Source Collections → Link Capture → select the Jira capture you created.
- Target resource naming: leave Mirror Schemas unless you need custom names.
- Delta Updates (default for new bindings toggle):
- Enable only if you want append-style writes (great with Snowpipe Streaming for lowest latency & cost; table won’t be fully reduced/merged).
- Leave off for standard merge semantics (fully reduced tables).
Sync Schedule
- Optional in the materialization: set a schedule to control how often Flow applies changes to Snowflake (e.g., every 5–15 minutes for dashboards; hourly+ for cost savings).
Finally, click Next → Save and publish.
Step 3 — Verify & query in Snowflake
Run a quick check once the first sync lands:
plaintext-- Example: issues by status and priority
SELECT
  project_key,
  issue_type,
  status,
  priority,
  COUNT(*) AS issues
FROM jira_issues
GROUP BY 1,2,3,4
ORDER BY issues DESC;
From here you can:
- Join Jira with other sources (e.g., finance, CRM) for exec dashboards.
- Feed Looker/Power BI/Tableau with always-fresh project metrics.
Tips & gotchas (performance, cost, and freshness)
- Jira is batch: the source connector pulls on a schedule; choose your materialization sync to match freshness vs. cost.
- Snowpipe Streaming: enable by using JWT auth and turning on Delta Updates per binding for the lowest-latency loads.
- Warehouse costs: keep AUTO_SUSPEND = 60 and avoid overly frequent syncs unless needed.
- Schema evolution: Flow handles field additions; use the Disable Field Truncation advanced option if you expect very large string fields.
- Deletes: use Hard Delete only when you truly want rows removed instead of flagged via _meta/op.
Spin up Jira → Snowflake in minutes.
No scripts. No maintenance. Just pick Jira, pick Snowflake, and publish.
👉 Start free on Estuary Flow
With Estuary Flow, you’re not limited to Snowflake. The same no-code approach lets you move Jira data into Postgres, MySQL, and SQL Server for operational reporting, or into analytics platforms like Redshift, BigQuery, and Databricks for advanced insights. You can also stream Jira data to Elasticsearch for real-time search or even push updates into Slack to keep teams instantly informed. Wherever your data needs to go, Flow gives you the flexibility to keep Jira at the center of your workflows.
Best Practices for Jira to Snowflake Integration
Even after you’ve connected Jira and Snowflake, fine-tuning your pipeline can save costs, improve performance, and ensure reliable data for analytics.
1. Balance Freshness and Cost
- The Jira connector runs in batch mode (default hourly).
- For near real-time dashboards, reduce the materialization sync interval in Flow (e.g., every 5–15 minutes).
- For less frequent reporting, keep it hourly or daily to minimize Snowflake compute usage.
2. Use Snowpipe Streaming for Lower Latency
- If you need fresher Jira data, enable Delta Updates with JWT authentication.
- Snowpipe Streaming lets Flow write rows directly into Snowflake tables, reducing query lag and compute overhead.
3. Keep Warehouse Costs in Check
- Configure your warehouse with:
plaintextALTER WAREHOUSE ESTUARY_WH SET AUTO_SUSPEND = 60;- This ensures you only pay for 60 seconds of compute at a time.
- For heavier workloads, scale warehouse size up briefly, then auto-suspend.
4. Secure Your Pipeline
- Use API tokens for Jira authentication (never reuse passwords).
- In Snowflake, prefer key-pair (JWT) auth — it’s more secure and required for streaming updates.
- Apply role-based permissions in Snowflake so Estuary can only access what it needs.
5. Monitor & Validate Data
- Use Flow’s monitoring dashboard to track sync status, errors, and throughput.
- Run validation queries in Snowflake (e.g., compare Jira issue counts by project vs. Flow collections).
- Consider enabling alerts for failed syncs or schema drift.
Looking to connect Jira with other platform? Checkout these guide:
Conclusion
Integrating Jira with Snowflake is a powerful way to break down data silos and bring project management data into your analytics workflows. With Estuary Flow, the process is simple: capture Jira data, materialize it into Snowflake, and start analyzing—all without writing code or managing custom pipelines.
By following the steps in this guide, you now have a reliable data flow that keeps Jira issues, projects, and sprint updates continuously available in Snowflake. From there, you can build real-time dashboards, combine Jira with other business data sources, and empower your teams with faster, data-driven insights.
✅ Ready to set up Jira → Snowflake in minutes? Sign up free on Estuary Flow.
💬 Already using Estuary or want to share your experience? Join our Slack community to connect with data engineers and developers.
FAQs
What Jira data can I move into Snowflake?
How secure is the Jira to Snowflake integration?
How much does it cost to run Jira to Snowflake pipelines?

About the author
With over 15 years in data engineering, a seasoned expert in driving growth for early-stage data companies, focusing on strategies that attract customers and users. Extensive writing provides insights to help companies scale efficiently and effectively in an evolving data landscape.


