It’s common practice for organizations to use customizable project management solutions to build frameworks and workflows around their chosen projects. Jira is one of the best customizable project management solutions, with excellent issue management capabilities.
However, there are hurdles to using Jira — including workflow limitations, reporting restrictions, integration hurdles, and long query loading times. To overcome these challenges, migrating data from Jira to a reliable database like MySQL is an effective solution.
This guide will cover the two best data integration methods to transfer data from Jira to MySQL — right after a quick overview of both platforms!
Jira: An Overview
Jira is a comprehensive project management and issue-tracking solution for larger teams managing complex projects. It was initially designed to track bugs and issues. But today, it can facilitate extensive customization capabilities, making it the most optimal and agile project management tool. Jira also enables QA teams to test the software effectively. As an all-rounder, it can fit any project type and produce the best results in testing, deploying, and managing software projects.
Key Features of Jira
- Limits on Work in Progress: One of Jira's most essential features is implementing work-in-progress (WIP) limits on columns. WIP limits restrict the number of issues “In Progress” at a time. Once the WIP limit is reached, no additional work items should enter that state until one of the existing items is finished.
- Dashboards and Reports: Atlassian’s Jira provides a wide range of data-driven reports for every project stage. This functionality generates visually engaging reports spanning from planning to delivery stages and allows easy sharing with clients to enhance transparency in communication.
- Flagging an Issue: You can flag a blocked issue, and the card of a flagged issue is displayed in yellow on the dashboard. Visualizing and highlighting blocked work or issues is essential to the Agile process. Effectively managing issues helps improve service delivery without recurring obstacles.
MySQL: An Overview
Among various open-source databases available in the market today, MySQL is one of the popular databases. It is known for its high performance and reliable database structure. With MySQL, you can use Structured Query language to perform operations, such as Create, Read, Update, and Delete, enabling organized data in tables. The organized structure facilitates efficient maintenance and data manipulation while ensuring data integrity.
MySQL also seamlessly handles various tasks, such as creating custom datasets for specific queries, bulk editing, and managing massive data volumes. It uses an easy-to-understand client-server model to simplify the database management tasks, making it suitable for applications ranging from e-commerce to management systems.
Key Features of MySQL
- Scalable: MySQL exhibits high scalability for an RDBMS, offering a wide range of options that allow customization, tuning, and augmentation of the database.
- Partitioning: MySQL enables the partitioning of tables into smaller and more manageable segments to enhance the database performance. Various methods, such as List, Hash, Range, Columns, and Key, can be used for partitioning.
- High Availability: MySQL provides clustering, replication, and automated backup features to maintain uninterrupted availability and reduce downtime during failures or incidents.
Best Ways to Connect Jira to MySQL
Before we get into the actual steps and technical details, it’s important to understand that there are different ways to integrate these platforms in order to move your data. The easiest ways to connect Jira to MySQL are:
- The No-Code Way: Use Estuary Flow for Jira to MySQL integration
- The Manual Approach: Use JDBC connector to Connect Jira to MySQL
The No-Code Way: Use Estuary Flow for Jira to MySQL Integration
Estuary Flow is a versatile, real-time extract, transform, load (ETL) platform engineered to streamline data integration processes. It facilitates enhanced integration capabilities supported by impressive scalability. With its intuitive interface and readily available connectors, setting up a data integration pipeline will only take a few minutes and minimal effort. This makes Estuary Flow a suitable solution for a seamless connection between Jira and MySQL.
Key Features of Estuary Flow
- Reusability and Modularity: Estuary Flow promotes task reusability and modularity. You can encapsulate the ETL logic into reusable tasks, simplifying maintenance, updates, and sharing components across various workflows.
- Change Data Capture (CDC): Change Data Capture in Estuary Flow allows you to track and capture changes made to the data in source systems in real-time. This feature captures inserts, updates, and deletes performed on the source system and efficiently replicates the changes to the target system.
- Scheduling and Automation: Flow offers workflow scheduling options. Once configured, the platform executes your workflows at specified time intervals. Additionally, it provides automation capabilities to establish recurring ETL processes, ensuring regular data processing and updates.
Prerequisites
Before you get started with Estuary Flow to connect Jira to MySQL, there are a few prerequisites to fulfill:
Step 1: Connect to Jira Source
- Login to your Estuary account and access the dashboard.
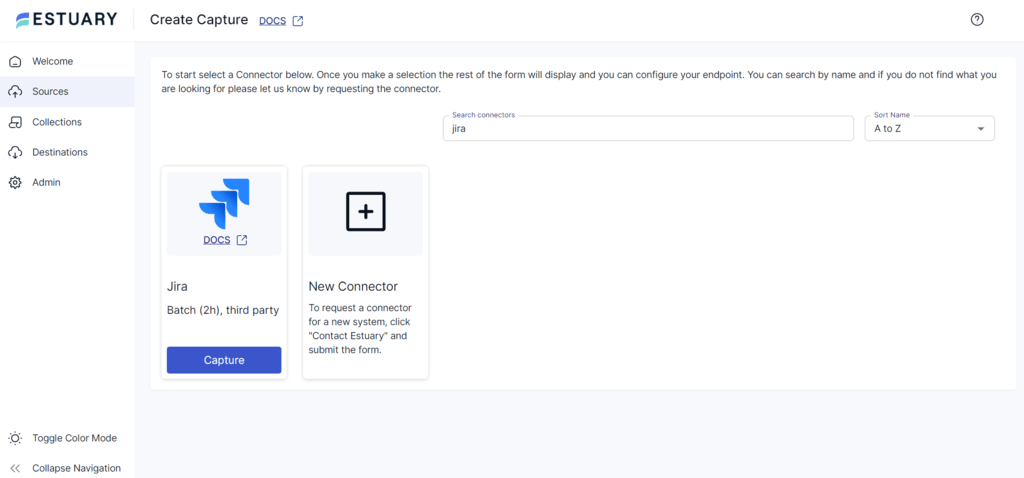
- To configure Jira as the source connector, click the Sources option on the left navigation pane. Then, click the + NEW CAPTURE button.
- Search for the Jira connector using the Search connectors field and click the Capture button of the Jira connector displayed in the search results.
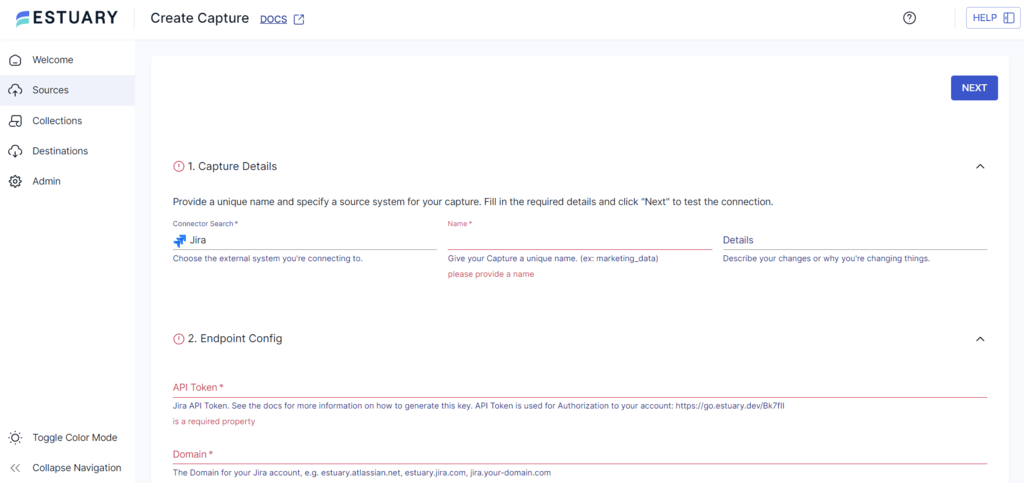
- On the Create Capture page, fill in details such as Name, API Token, Domain, and Email.
- To complete the source configuration, click the NEXT button at the top right corner, then click SAVE AND PUBLISH. The connector will capture Jira data into Flow collections.
Step 2: Connect to MySQL Destination
- To configure MySQL as the destination connector, click the Destinations option on the left navigation pane of the dashboard.
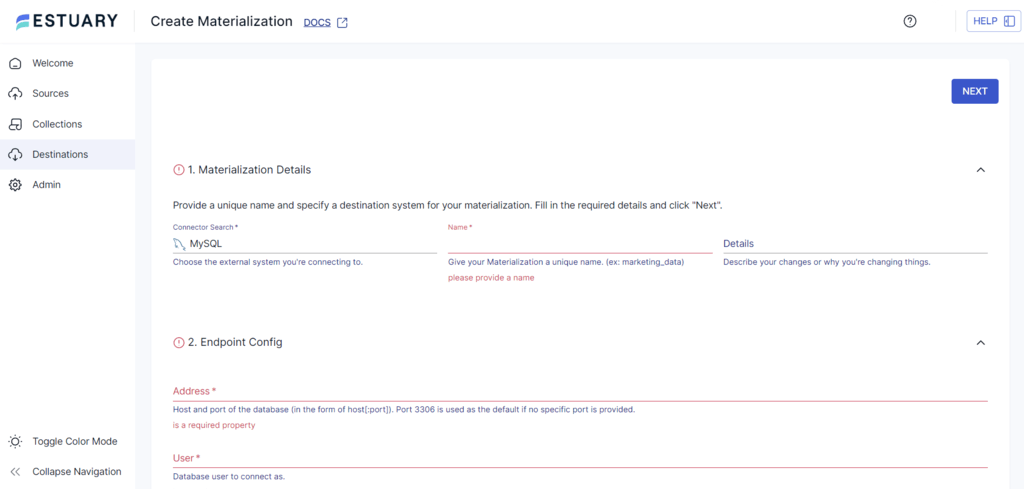
- Next, click the + NEW MATERIALIZATION button.
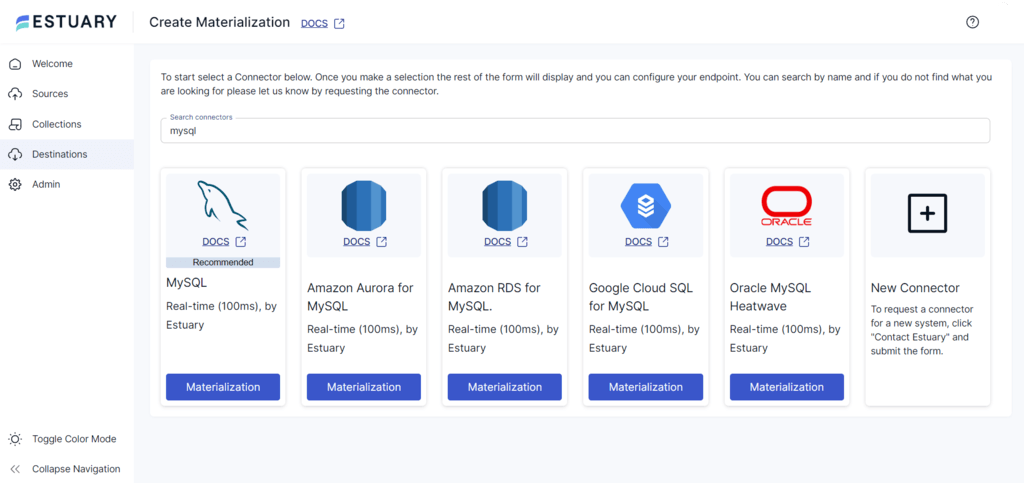
- Type MySQL in the Search connectors field and click the connector’s Materialization button when you see it in the search results.
- On the Create Materialization page, fill in the details like Name, Address, User, Password, and Database.
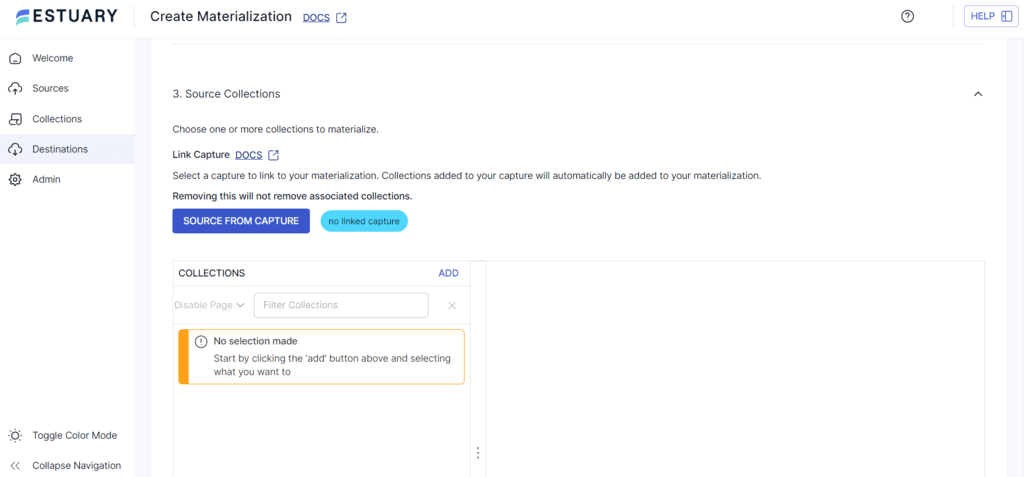
- To manually add a capture from a Flow collection to your materialization, click the SOURCE FROM CAPTURE button in the Source Collections box.
- To complete the MySQL destination configuration, click the NEXT > SAVE AND PUBLISH. The connector will materialize Flow collections of your Jira data into MySQL tables.
The Manual Approach: Use JDBC connector to Connect Jira to MySQL
JDBC connector, often called a JDBC driver, is a software component that implements the JDBC API and facilitates communication between Java applications and specific database management systems (DBMS). Each JDBC connector is designed to work with a particular DBMS, such as MySQL, Oracle, SQL Server, PostgreSQL, etc.
Follow the steps below to use the JDBC connector to transfer data from Jira to MySQL.
Step 1: Create and Configure MySQL Database
- Create a database user for the Jira connection, such as jirauser.
- Then, create a database where Jira can store issues, such as jiradbstore.
Ensure the database adopts a character set of UTF8. Use the following command within the MySQL command client to set it:
plaintextCREATE DATABASE jiradbstore CHARACTER SET utf8mb4 COLLATE utf8mb4_bin;Note the database name, username, and port number for connecting to Jira.
- Grant necessary permissions to the user for database access and table operations by using the following commands.
plaintextGRANT SELECT,INSERT,UPDATE,DELETE,CREATE,DROP,REFERENCES,ALTER,INDEX on <JiraDBSTORE>.* TO '<USERNAME>'@'<Jira_SERVER_HOSTNAME>' IDENTIFIED BY '<PASSWORD>';
flush privileges;- Subsequently, edit the my.cnf file in your MySQL Server to include specific parameters in the [mysqld] section.
- Parameters to be added or edited include:
- Setting a default storage engine to InnoDB:
plaintext
default-storage-engine=INNODB- Initializing the character set:
plaintext
character_set_server=utf8mb4- Setting default row format to DYNAMIC:
plaintextinnodb_default_row_format=DYNAMIC
- Enable large prefix:
innodb_large_prefix=ON - Set InnoDB file format to Barracuda:
innodb_file_format=Barracuda - Set the innodb_log_file size to at least 2G:
innodb_log_file_size=2G - Ensure the sql_mode parameter doesn’t specify NO_AUTO_VALUE_ON_ZERO:
plaintextsql_mode = NO_AUTO_VALUE_ON_ZERO- Reboot the MySQL server to ensure that changes take effect.
Step 2: Copy the MySQL JDBC Driver
- Download the appropriate MySQL driver JDBC Connector/J 5.1 here.
- Copy the downloaded driver into the following directory:
plaintext<Jira-installation-directory>/lib
- Reboot the Jira server.
- While installing Jira, access it through your browser to commence the setup wizard. Learn more about Setup Wizard here.
Step 3: Configure Jira to Connect to Your Database
You can configure your Jira server to connect to the MySQL database using the following two methods:
- Configuration Tool
Existing Jira instances can be configured using a configuration tool. The settings are saved in the dbconfig.xml file in the Jira home directory.
- To run the Jira Configuration tool:
- Windows: Execute config.bat in the bin sub-directory of the Jira installation directory via the command prompt.
- Linux/Unix: Run config.sh from a console in the bin subdirectory of the Jira installation directory.
- Navigate to the Database tab and specify the Database type as MySQL 5.7+.
- Fill out the fields according to the Database connection fields section.
- Verify the connection’s functionality and save the settings.
- Restart Jira to apply the changes.
- Setup Wizard
This approach is suitable if you have just installed Jira and set it up for the first time. The settings will be stored in the dbconfig.xml file in your Jira home directory.
The Jira setup wizard is visible when you first access Jira in your browser.
- On the initial screen titled Configure Language and Database, select Database Connection as My own database.
- Specify the Database Type as MySQL 5.7+.
- Fill out the fields based on the Database connection fields section.
- Test the connection to ensure its functionality, and then save the settings.
After following the above steps, you can configure your Jira account to the MySQL database.
Limitations of using JDBC Connector for Data Movement
- Manual setup and configuration of JDBC connectors can be time-consuming.
- Transferring data via a single JDBC connection is not scalable and tends to be slow when dealing with large volumes of data.
- Continuous monitoring is necessary to ensure that Jira and MySQL notifications are accurately synchronized.
Get Integrated
Connecting Jira to MySQL offers multiple benefits, including improved data management, reporting capabilities, customization options, performance, and security. There are two methods to help execute a Jira-MySQL connection.
One method involves the use of the JDBC connector to migrate your Jira data to MySQL. It currently works reliably, but it comes with certain limitations.
The other method uses Estuary Flow, which allows you to seamlessly transfer your data from Jira to MySQL (and other platforms!) thanks to its pre-built connectors and real-time integration capabilities. Setting up a data integration pipeline using Flow only takes a few minutes.
Estuary Flow provides 200+ connectors, robust functionalities, and an intuitive UI to easily connect with a wide range of data sources and destinations. Get started by signing up for a free account right away!
Frequently Asked Questions
Can I trust the security of my data with the SQL Connector?
Yes, your data is entirely secure with the SQL connector. It employs encrypted channels for all types of data, guaranteeing maximum security and preserving data integrity.
What benefits does integrating Jira with MySQl offer?
Integrating Jira with MySQL using the SQL connector gives you access to a comprehensive data hub, empowering you to make well-informed decisions based on detailed insights.
Can I Use MySQL workbench to manage the MySQL database used by Jira?
You can use MySQL workbench or any other MySQL management tool to manage Jira's MySQL database. This includes tasks such as creating and managing tables, running queries, and monitoring performance.

About the author
With over 15 years in data engineering, a seasoned expert in driving growth for early-stage data companies, focusing on strategies that attract customers and users. Extensive writing provides insights to help companies scale efficiently and effectively in an evolving data landscape.


