Integrating Jira with Slack is crucial for teams that rely on efficient project management and real-time communication. This integration keeps your team engaged, informed, and agile, boosting overall productivity. As a result, your organization benefits from more effective project management while streamlining collaboration and boosting team productivity.
Whether in software development, project management, or any field that values task management and seamless communication, the Jira to Slack integration helps teams streamline workflows. In this guide, we’ll cover two approaches: manual and automated integration.
What is Jira? An Introduction to the Popular Project Management Tool
Developed by Atlassian in 2002, the Jira platform allows teams to manage their projects and track issues. While Jira is primarily used by software development teams, its flexibility and scalability have made it a popular choice among many organizations for task planning, progress tracking, and team collaboration. These features promote effective communication among team members, expediting the software delivery process.
Jira also offers an array of reporting and dashboard features. These allow you to quickly monitor team performance and draw valuable insights from data, enabling you to make well-informed, data-driven decisions and execute projects effectively.
What is Slack? Understanding the Leading Team Collaboration Platform
Slack is a popular collaboration and communication platform designed for teams and organizations. It features real-time messaging and a user-friendly interface with channels for organized discussions, direct messaging, and file sharing, along with robust search functionality that enables you to quickly retrieve past messages and information. On top of this, Slack also provides video and voice call features, promoting seamless virtual meetings and keeping distributed teams together.
As a collaboration space, Slack is extensible by design; you can effortlessly connect various third-party apps and services with Slack — including Jira, Trello, and GitHub — to integrate tools within one workspace and streamline associated workflows.
How to Integrate Jira with Slack: 2 Effective Methods
Integrating Jira with Slack can significantly streamline your workflow, keeping your team updated and coordinated. Here are two approaches to achieve this:
- Method 1: Automate Jira to Slack Integration with Estuary Flow
- Method 2: Manual Integration of Jira and Slack
Method 1: Method 1: Automate Jira to Slack Integration with Estuary Flow
Looking to connect Jira and Slack quickly, without much manual intervention? You’re probably best off using a software-as-a-solution (SaaS) tool to facilitate the process.
SaaS services allow you to efficiently streamline your data pipeline with the support of an intuitive interface and built-in connectors. These connectors make the integration process a breeze, without any manual effort or the need for technical expertise. As a result, you can achieve seamless and real-time data flow between both systems, enhancing productivity, reducing errors, and allowing your team to focus on what’s most important.
For example, Estuary Flow is a popular SaaS solution that provides a reliable, no-code approach to integrating Jira and Slack with the help of built-in connectors and an intuitive interface. As a fully managed solution, Flow ensures that your data integration needs are met, with no extensive technical expertise required. This lets you focus on core tasks and enjoy hassle-free data synchronization across Jira and Slack.
Before proceeding Step-by-Step Guide to Integrating Jira and Slack with Estuary Flow, make sure you’ve met the following requirements.
Prerequisites
Step 1: Connect to Jira Source
- Sign up for a free Estuary account or log in to your existing account.
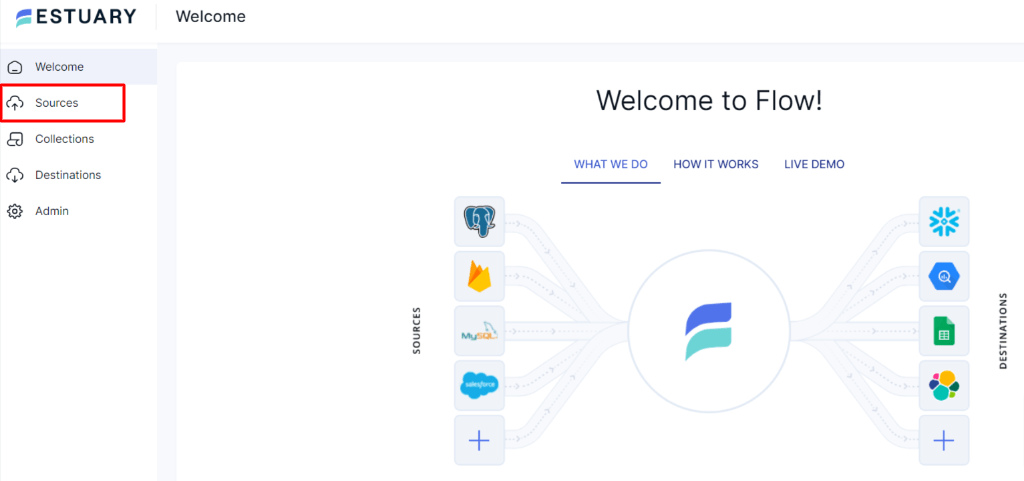
- On the Estuary dashboard, click Sources.
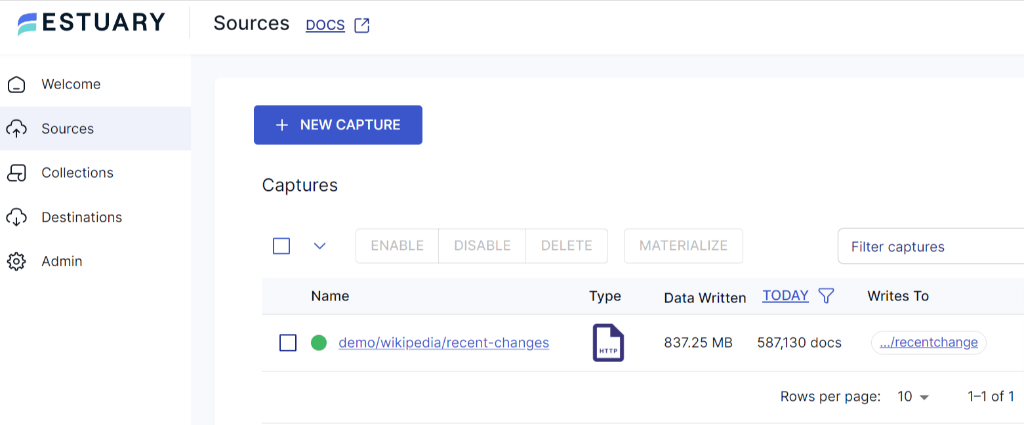
- On the Sources page, click the + NEW CAPTURE button.
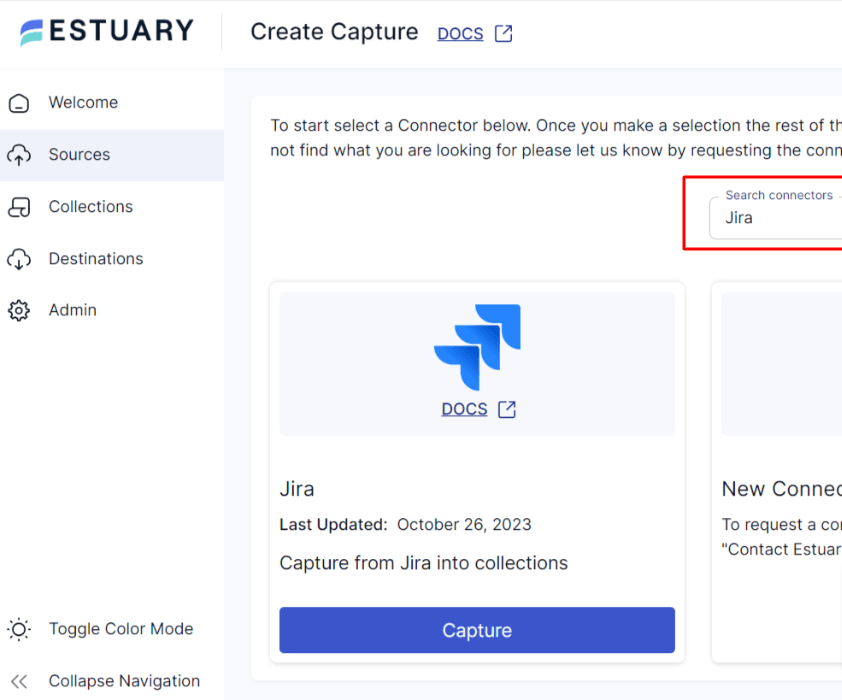
- Search for the Jira connector and click Capture.
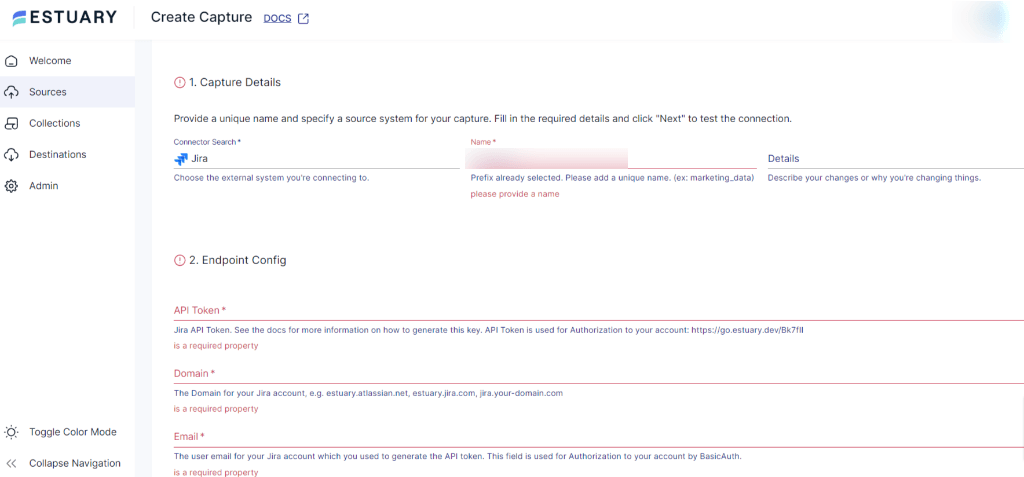
- You’ll be directed to the Jira Create Capture page. In the Capture Details section, fill in a unique Name and specify a source system for your capture. In the Endpoint Config section, add the Jira API Token, Domain for your Jira account, and Email address for your Jira account, which you used to generate the API token.
- Click NEXT, followed by SAVE AND PUBLISH.
Step 2: Connect to Slack Destination
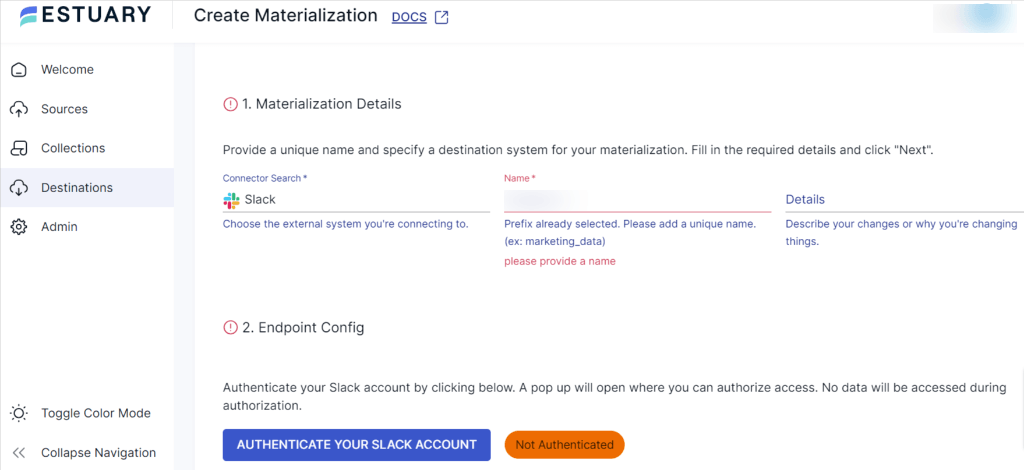
- On the Estuary dashboard, click "Destinations" > + "NEW MATERIALIZATION".
- Search for the Slack connector in the Search connectors box on the Create Materialization page (by typing Slack). Once you locate the connector, click the Materialization button.
- On the Slack Create Materialization page, provide a unique name and specify a destination system for your materialization in the Materialization Details section. In the Endpoint Config section, authenticate your Slack account by clicking the AUTHENTICATE YOUR SLACK ACCOUNT button.
- If the data from Jira hasn’t been filled in automatically, you can manually add it from the Source Collections section.
- Finally, click NEXT followed by SAVE AND PUBLISH.
That’s it! You created a Jira to Slack data pipeline using Estuary Flow in two simple steps. To learn more about the detailed process of how the flow and its connectors work, please refer to the links below:
Method 2: Method 2: Manual Jira-Slack Integration for Hands-On Control
Integrating Jira with Slack can help you streamline communication and collaboration tasks between development and project management teams. Connecting these two platforms will keep everyone on the same page about updates, issues, and other important information.
With that in mind, here’s a step-by-step guide on how to set up the Jira Slack integration manually. But first, make sure you’ve met the following prerequisites.
Prerequisites
- Administrator access to Jira and Slack accounts with necessary permissions.
Assuming you’re all set, follow these steps to integrate Jira and Slack.
Step 1: Configure the Jira Cloud Integration in Slack
- Log in to your Slack account and select the workspace.
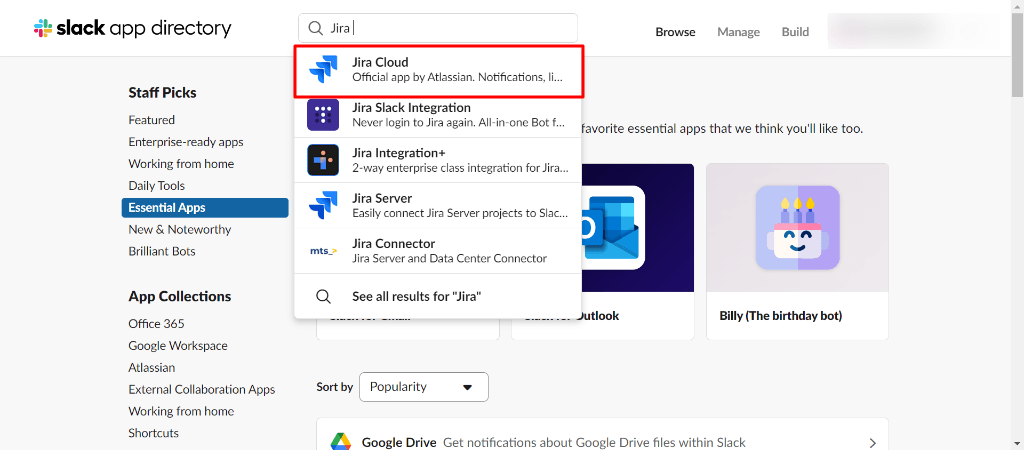
- Click Essential Apps in the left sidebar. Search for Jira and select the Jira Cloud app.
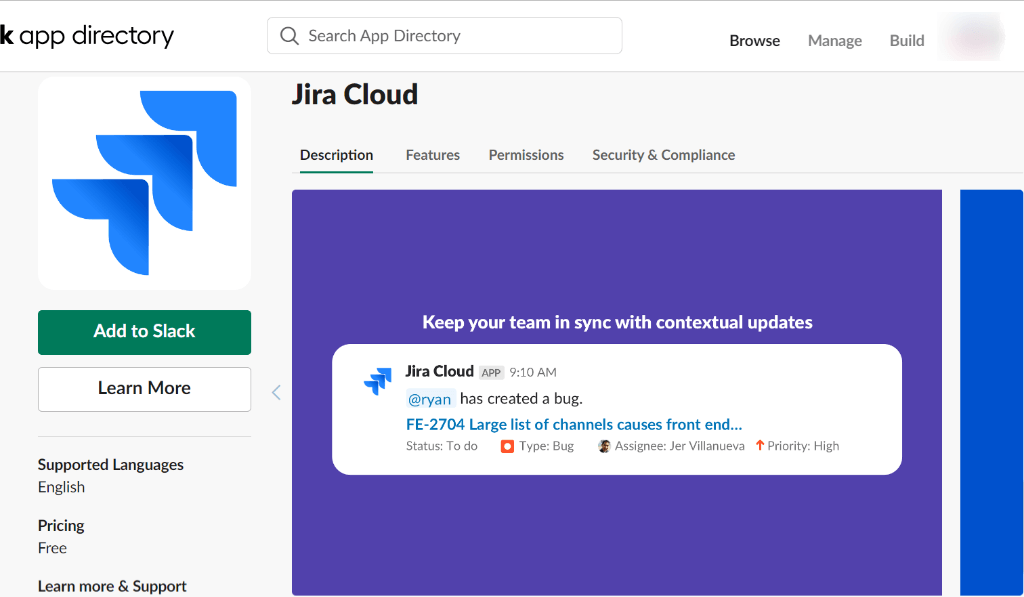
- Click Add to Slack.
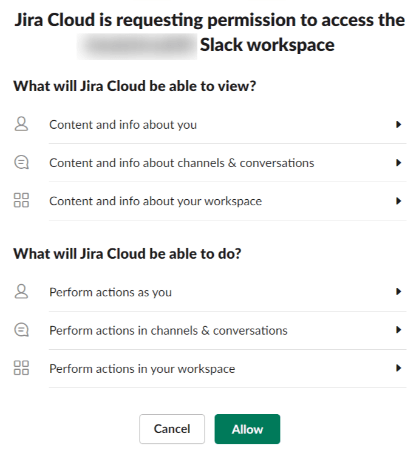
- Follow the prompts to connect your Jira account and grant the necessary permissions.
- Once connected, you’ll get this message: “Jira Cloud is now authenticated to your Slack.” Next, click the Go back to Slack button. You can configure settings like which Jira projects and issue types you’d like to receive updates for in Slack.
- Go to your Slack workspace and select Jira from the Apps section. Now, you can create an issue, connect to a project, and get and manage notifications about your work. The commands should be run in your Slack workspace or within a direct message in Slack where the Jira Cloud integration is set up.
Step 2: Connect to a Project
- If you want to connect your Jira Cloud account in Slack to a specific Jira project, you can use the /jira connect slash command. This will allow you to receive updates and notifications about your project.
- To do that, type /jira connect in the Slack channel. You’ll be prompted to select a Jira project to connect to. Follow the instructions to choose the project you want. Once connected, you’ll start receiving updates for your Jira project in Slack.
- Similarly, to create a Jira issue directly from Slack, you can use the /jira create slash command with a summary to define the issue.
Step 3: Manage Notifications
- You can manage your notifications and updates for Jira issues in Slack by configuring your settings. Go to a channel or create one where you want to receive Jira notifications. Click on the channel name to modify the channel settings.
- Choose Manage then customize your notification settings based on your preferences. You can opt to receive notifications for specific events, like issue creation, comments, or status updates. Then choose Save to save your notifications.
- Test the integration by invoking the slash command in your Slack workspace or create an issue in Jira to confirm whether you receive notifications in your Slack workspace.
That’s it! You’ve successfully integrated Jira with Slack, enabling seamless communication between the two platforms.
Despite its simplicity, the manual method outlined above does come with certain drawbacks:
Scalability challenges. As the number of Jira projects and Slack channels increases, manual management becomes less scalable and harder to maintain.
Human error. Relying on manual processes requires full focus and careful attention to detail, especially while setting account configurations and permissions between Jira and Slack. This can lead to inaccuracies and inconsistencies. In addition to this, you would continuously need to monitor the integration to ensure that notifications and issues are correctly routed between Jira and Slack.
Why Choose Estuary Flow for Jira-Slack Integration?
This section explains why Estuary Flow is ideal for seamless, real-time Jira to Slack integration, highlighting benefits like automation, scalability, and no-code simplicity.
- An intuitive interface. Estuary Flow provides a user-friendly interface that makes it easy for both technical and non-technical users to set up and manage the integration.
- Real-time updates. Flow enables change data capture (CDC), which refers to the process of identifying and capturing changes in data within Jira and then propagating those changes in Slack in real time. This feature keeps your data synchronized and up-to-date across both platforms.
- Automation. Flow automates the integration process, reducing the need for manual intervention. This ensures real-time updates and leaves minimal room for human error.
- Scalability. Flow is designed to handle increasing data volumes, supporting data flows of up to 7GB/s. This makes it a scalable solution as your Jira and Slack usage grows.
For teams seeking to leverage Jira data in their data warehouses, Estuary Flow also offers seamless connections to BigQuery, Snowflake, and Redshift:
Jira to Slack Integration: The Takeaway
Integrating Jira to Slack enhances collaboration and productivity by allowing you to interact with Jira without leaving your Slack workspace and vice versa.
Key Takeaways:
- Automated Integration Using SaaS Tools: Tools like Estuary Flow offer a no-code, reliable solution for quick and easy Jira to Slack integration.
- Manual Integration: Configure settings directly within Slack and Jira for a more hands-on approach.
With the approaches outlined in this article, you now know how to integrate Jira with Slack seamlessly. While the manual approach is straightforward, it may require ongoing management and intervention. On the other hand, SaaS alternatives like Estuary Flow automate the entire process, eliminating the need for manual work and ensuring a quick and seamless integration.
Estuary Flow offers a range of pricing plans to fit your team's needs, including a free tier to get you started. Explore pricing options and see how easily you can automate your Jira-Slack integration today.
Ready to experience hassle-free Jira-Slack integration — without the need for any manual intervention? Sign up for Estuary Flow now!

About the author
With over 15 years in data engineering, a seasoned expert in driving growth for early-stage data companies, focusing on strategies that attract customers and users. Extensive writing provides insights to help companies scale efficiently and effectively in an evolving data landscape.


