Migrating from Oracle to Snowflake is a strategic move toward a faster, more scalable, and cost-effective data architecture. It enables real-time analytics, simplifies infrastructure management, and supports cloud-native agility.
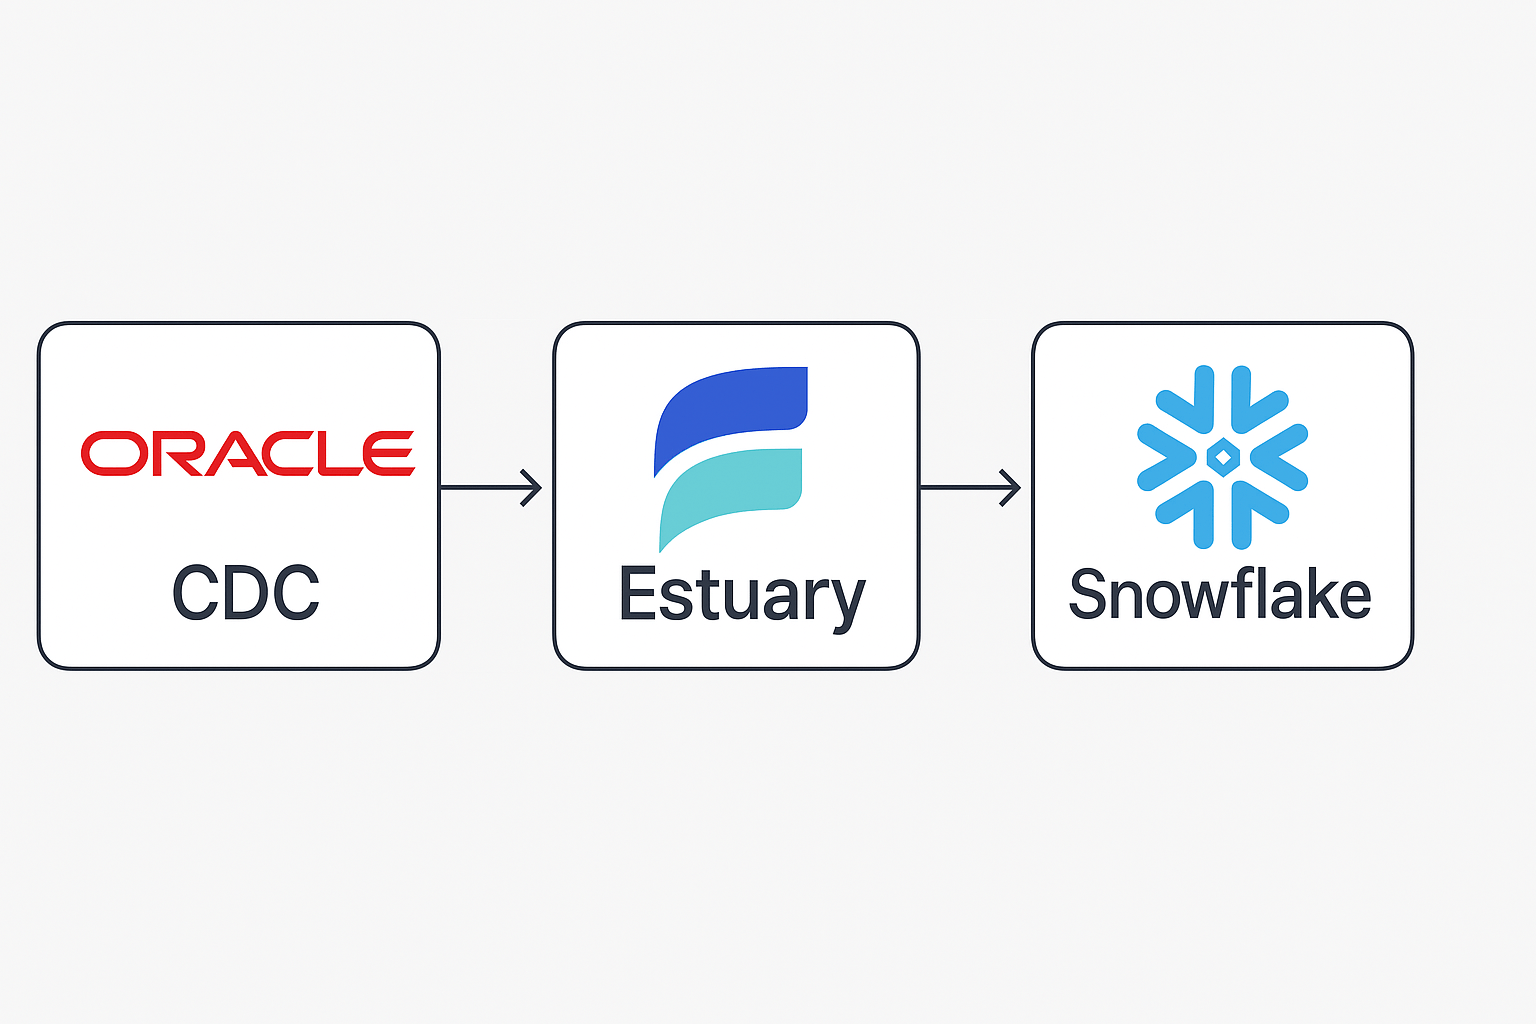
To migrate from Oracle to Snowflake, you can use a real-time CDC pipeline with Estuary or a manual export/import method using SQL tools. The automated method ensures low-latency synchronization, while the manual approach is best for one-time transfers.
In this guide, we’ll cover both options:
- A real-time pipeline using Estuary
- A traditional export/import process
Whether you’re modernizing analytics or offloading legacy systems, this tutorial will help you choose and implement the right approach.
Want to skip ahead and start syncing Oracle to Snowflake in real-time? Jump to the Estuary steps →
An Overview of Oracle
Oracle is the most popular RDBMS (relational database management system) for handling data from large-scale enterprise applications. Its modular, client-server architecture enables you to perform transactional workloads effortlessly.
Oracle uses Real Application Clusters (RAC) technology, which allows multiple servers to work together as a single database instance. If one server fails, another takes over, and the database can operate without interruptions. This provides you with enhanced performance, high availability, and fault tolerance.
Oracle's indexing capabilities facilitate quick data access and retrieval. It supports various index types, including B-tree, bitmap, and function-based indexes, leading to faster execution of complex queries.
Oracle’s unique features, like multi-tenancy, can further simplify database administration and improve security. This feature allows multiple pluggable databases (PDBs) to share common resources, such as storage and network connections while reducing administrative overhead. By isolating different databases within a single container, multi-tenancy also helps prevent unauthorized access and data breaches.
An Overview of Snowflake
Snowflake is a cloud-based data warehousing platform that allows you to perform advanced analytics and reporting on your customer data.
Snowflake utilizes massively parallel processing (MPP) compute clusters for improved data management and effective query execution. MPP helps distribute and process your data across multiple nodes. This architecture simplifies loading data into Snowflake, enabling faster data ingestion and retrieval for analysis, which leads to incorporating customer insights into fine-tuning your products and services.
Moreover, with Snowflake CDC, you can track and synchronize data changes in real-time, keeping your datasets continuously refreshed and ready for analysis at any moment.
Key Features of Snowflake
- Micro-Partitioning: With the micro-partitioning feature, Snowflake automatically divides large tables into small, contiguous storage units. These partitions are organized in a column, enabling you to perform granular pruning to improve performance.
- Advanced Security: Snowflake's enterprise-grade security features highly secure your data. Some features include end-to-end encryption for data at rest and in transit, role-based access control (RBAC), and two-factor authentication (TFA). These features help maintain the integrity and privacy of your data.
- Concurrency Handling: Snowflake’s multi-cluster architecture handles multiple concurrent workloads without performance degradation. It separates computing and storage resources and allows multiple users to access the same data without interference.
Why Should You Migrate from Oracle to Snowflake?
Many organizations handling increasing data volumes have turned to cloud computing solutions like Snowflake. It offers numerous benefits compared to conventional databases like Oracle and is a leading choice for cloud data migration, helping modernize your data infrastructure.
Snowflake’s completely managed, cloud-based architecture eliminates the operational burden of maintaining databases and enables you to focus on creating business value through analytics. Utilizing efficient data migration tools can simplify the transition to Snowflake, making it a seamless process. In addition to Oracle, many businesses are also transitioning from SQL Server to Snowflake to take advantage of Snowflake’s fully managed, cloud-based architecture.
Here are some reasons why you should migrate from Oracle to Snowflake:
- Cost-Efficiency: Oracle has high licensing fees. Using Oracle for analytical purposes can incur additional charges for OLAP tools and risk performance issues in your OLTP systems.
Conversely, Snowflake provides a pay-as-you-go pricing model that significantly lowers your total cost of ownership. - Simpler Management: Oracle is complex to set up and maintain regarding hardware and software. It requires considerable effort for network and storage management, configuration, OS patching, and updation.
In contrast, Snowflake offers a user-friendly interface and automated features that facilitate optimization and reduce administrative overhead. - Cloud Flexibility: You can deploy Snowflake on several cloud platforms, such as Azure, AWS, and GCP, and implement fail-safe data sharing. It provides unique features, including zero-copy cloning, automatic micro-partitioning, and time travel, enabling enhanced data processing.
Similarly, organizations looking for open-source solutions often consider migrating from Oracle to PostgreSQL.
How to Migrate Data from Oracle to Snowflake
There are two main ways to migrate data from Oracle to Snowflake:
- Method 1: Real-Time CDC Migration Using Estuary
- Method 2: Manual Export and Import with SQL Tools
The first approach uses Estuary to set up a real-time, low-latency pipeline from Oracle to Snowflake. It's ideal for continuous syncs, automation, and schema evolution.
The second method involves manually exporting Oracle data into CSV files and importing them into Snowflake using SnowSQL. It works for basic, one-time transfers but requires more effort and lacks real-time capabilities.
Method 1: Oracle to Snowflake Migration Using Estuary
There are many Oracle to Snowflake migration tools available in the market. While some focus on bulk data loading, others can achieve real-time synchronization. Estuary stands out in this category with its library of 200+ pre-built connectors, including a native Oracle CDC connector for continuous data capture.
Estuary is a real-time data integration platform built on Change Data Capture (CDC) and a streaming-first architecture. It enables both low-latency replication and flexible transformations to support a variety of migration and analytics use cases.
Here is an overview of the key features of this efficient ETL tool:
- Reliable CDC: The Oracle connector uses Oracle LogMiner to capture inserts, updates, and deletes in near real time. Supplemental logging and a dedicated read-only user ensure accuracy and minimal impact on your source database.
- Automated Schema Evolution: Schema changes upstream are detected and automatically propagated downstream, reducing the risk of pipeline breakage.
- Flexible Transformations: You can implement ETL using streaming SQL or TypeScript, or follow an ELT approach with built-in dbt Cloud integration.
- UI and CLI Options: Estuary provides a no-code, web-based interface for fast setup, as well as YAML and CLI tooling for developers who prefer infrastructure-as-code workflows.
To create an Oracle to Snowflake data pipeline using Estuary, follow the steps below.
Pre-requisites
- OracleDB Database 11g or above with supplemental logging enabled.
- A dedicated read-only Oracle user with permissions for LogMiner and a watermarks table.
- A Snowflake account with a target database, schema, virtual warehouse, and a user role with appropriate access.
- An Estuary account.
Note: Estuary’s Oracle connector uses LogMiner and requires supplemental logging, a dedicated FLOW_WATERMARKS table, and appropriate privileges for the capture user (including LogMiner and catalog read access). On container databases, you must create a common user and have access to the root container. RDS Oracle configured as a multi-tenant CDB is not supported with this connector.
Step 1: Set Up Oracle Database as a Source
- Log in to your Estuary account to access the dashboard.
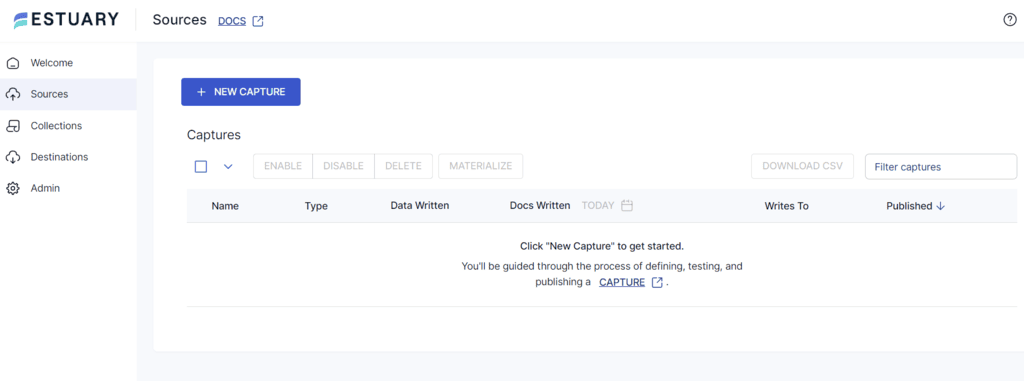
- Click on the Sources tab on the left panel. You will be redirected to the Sources page.
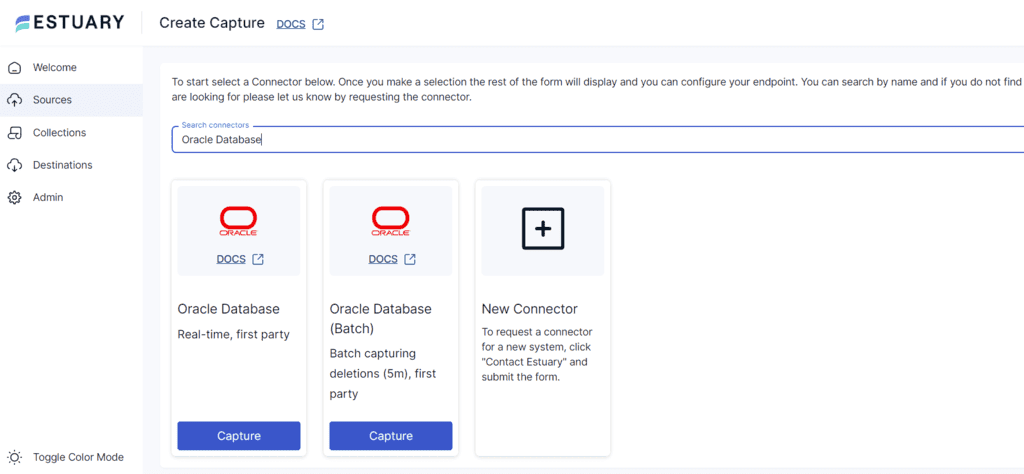
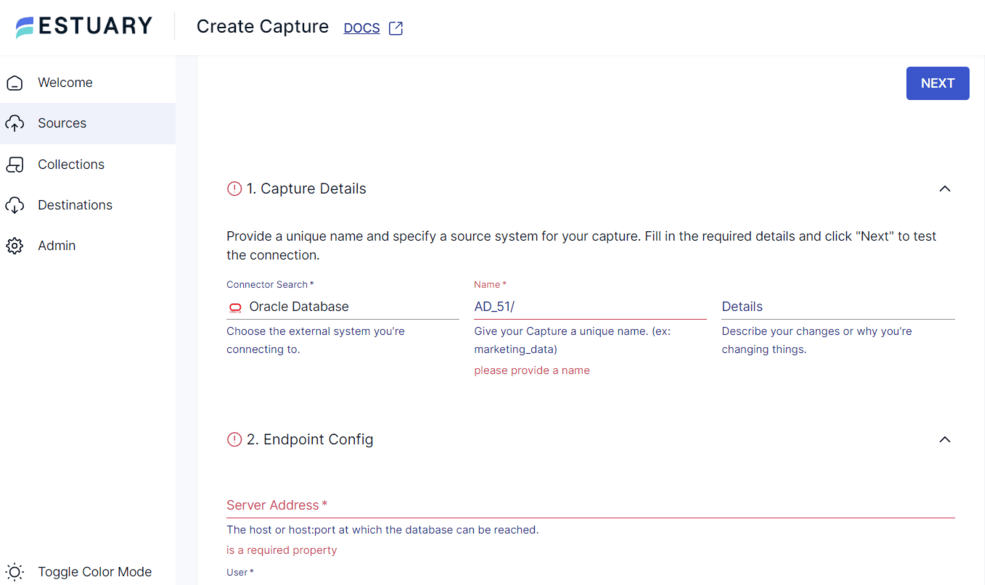
- Click the + NEW CAPTURE button and type Oracle Database in the Search connectors field.
- You will see two options for Oracle Database: Real-time and batch. Select the one that suits your requirements and click the connector’s Capture button.
Let’s choose the Oracle real-time connector for this tutorial.
- You will land on the configuration page. Enter all the mandatory fields, including:
- Name: Provide a unique name for your capture.
- Server Address: This is the host:port at which your database can be connected.
- User: Type your Oracle database user name for authentication.
- Password: Enter the password for the specified user name.
- After filling in all the details, click NEXT and SAVE AND PUBLISH.
This completes your source connector configuration. You can now capture streaming (or batch) data changes from your Oracle Database into a Flow collection.
Step 2: Set Up Snowflake as a Destination
- To set up the destination of your data pipeline, click on the Destinations tab on the left pane of the dashboard. This will direct you to the Destinations page.
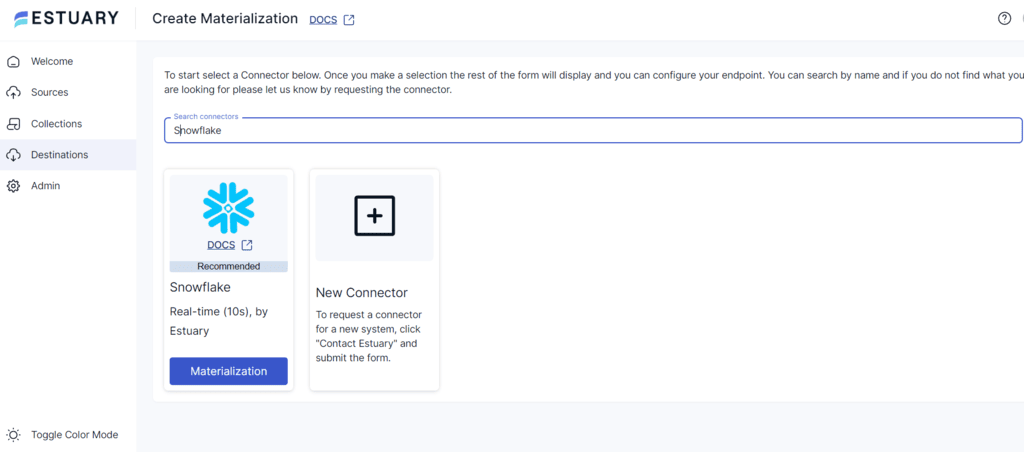
- Click the + NEW MATERIALIZATION button and enter Snowflake in the Search connectors field.
- The search result will display the Snowflake connector with a Materialization button. Click on the button to continue your configuration.
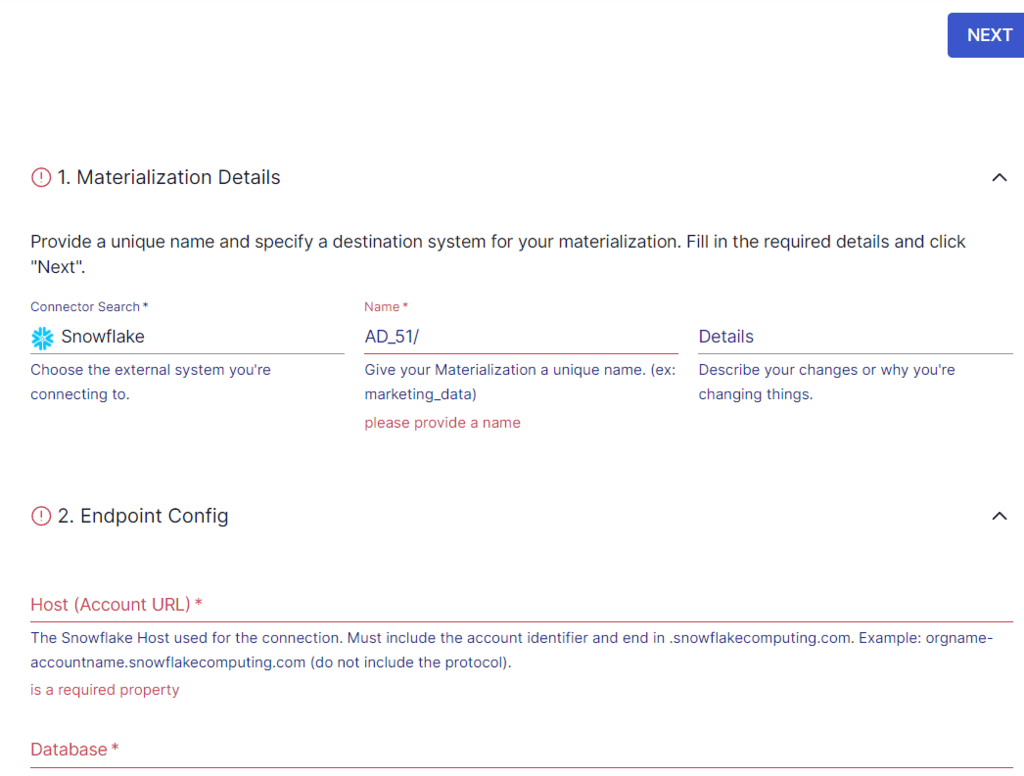
- Fill in all the required fields on the Create Materialization page. This includes:
- Name: Enter a unique name for your materialization.
- Host (Account URL): This is the Snowflake host for the connection.
- Database: Specify the Snowflake SQL database to which you will connect.
- Schema: The schema where tables will be created.
- Warehouse: The warehouse used for compute.
- Authentication: Configure JWT key pair authentication. Snowflake has deprecated username and password for programmatic access, and JWT is required for features like Snowpipe Streaming.
- In the Bindings section, map your Flow collections (from Oracle) to Snowflake tables.
- Click NEXT, then SAVE AND PUBLISH.
Estuary will now continuously materialize Oracle data into Snowflake tables.
This connector will materialize the Flow collections of your Oracle data into Snowflake tables through a Snowflake table stage.
How It Works Behind the Scenes
- The Oracle connector uses LogMiner to capture inserts, updates, and deletes in near real time. Supplemental logging ensures changes are tracked correctly.
- The Snowflake connector supports both merge-based and delta updates. For delta updates, Estuary uses Snowpipe Streaming by default, which ingests rows directly into Snowflake without keeping your warehouse running for ingestion.
- Schema changes in Oracle are automatically detected and propagated downstream.
For more detailed technical insights and references, you can explore the following resources:
- Estuary OracleDB Capture Connector Documentation
- Oracle Database Documentation
- Estuary Snowflake Materialization Connector Documentation
Method 2: Manual Export/Import Process for Oracle to Snowflake Migration
SQLPlus is a command-line batch query tool included in every Oracle database. You can use it to export your Oracle data into a CSV file. Then, you can import the CSV file into Snowflake using SnowSQL. Here are the steps to help begin your data transfer:
Step 1: Export Data from Oracle Using SQL Plus
- Type sqlplus in your command prompt and hit enter to get started.
plaintext$ sqlplus- Input your credentials and connect your Oracle database to SQL Plus.
- Now, configure the SQL Plus system using the set statement.
plaintextset colsep ,
set headsep off
set pagesize 0
set trimspool on- Here is a brief explanation of the above commands:
- colsep sets the character used to separate columns in the output. For a CSV file, the separator is a comma.
- headsep is used to decide whether you want to keep or remove the header separator.
- pagesize allows you to enable or disable pagination. With the parament set to ‘0’, your query results will be continuously printed on a single page.
- trimspool will help you remove the trailing whitespaces.
- Alter the query for the following commands depending on your requirements.
plaintextset linesize #
set numwidth #- For linesize, replace the ‘#’ with the number of columns you want in your output.
- For numwidth, replace the ‘#’ with a number that decides the width of your numeric fields. For example, if you enter ‘5’ and your numeric output is less than five characters, then the rest will be padded with spaces on the left. If the output is more than five characters, it will be truncated.
- Then, type in the spool command. While the spool command is active, SQL Plus will store the query results in the specified file.
plaintextspool file_path- Insert a query to select the columns you want to retrieve from the database:
plaintextSELECT column_name1, column_name2
FROM table_name; - Finally, turn off the spool command to stop the printing of outputs into your CSV file.
plaintextspool offWith this, you have exported your Oracle data to a CSV file. Now, let’s take a look at the data-importing method in Snowflake.
Step 2: Importing CSV File to Snowflake Using SnowSQL
To get started with this import, you need a Snowflake account with appropriate permissions and SnowSQL installed.
1. Create a Target Table to Store Your CSV Data
plaintextCREATE OR REPLACE TABLE table_name (
    column1 data_type,
column2 data_type);- Parameters:
- table_name: Name of the table provided by the user.
- column1: Name of the column provided by the user.
- data_type: Represents the corresponding data type (integer, boolean, etc.)
2. Create a File Format Object
plaintextCREATE OR REPLACE FILE FORMAT file_format_name
    TYPE = 'CSV'
    FIELD_DELIMITER = ','
SKIP_HEADER = 1;- Parameters:
- file_format_name: Name for the file format provided by the user.
- TYPE = 'CSV': Specifies the type of file.
- FIELD_DELIMITER = ',': Sets the delimiter for the CSV file as a comma.
- SKIP_HEADER = 1: This informs Snowflake to skip the header row.
3. Create a Stage Object for Your CSV File
plaintextCREATE OR REPLACE STAGE stage_object_name
FILE_FORMAT = file_format_name;- Parameters:
- stage_object_name: User-defined name for the stage.
- FILE_FORMAT = file_format_name: Associates the previously created file format to this stage.
4. Load Your CSV Data into the Staged File Using the PUT Command
For Windows:
plaintextPUT file://<file_path>\<file_name>*.csv @stage_object_name
AUTO_COMPRESS=TRUE;
For Linux or macOS:
plaintextPUT file:///<file_path>/<file_name>*.csv @stage_object_name
AUTO_COMPRESS=TRUE;- Parameters:
- file:///<file_path>/<file_name>* or file://<file_path>\<file_name>*.csv: Represents the path to your local CSV files. The asterisk (*) allows you to select all files with the matching pattern.
- @stage_object_name: Your CSV files will be loaded here.
- AUTO_COMPRESS=TRUE: This automatically compresses your data during upload, improving load performance.
5. Copy the CSV Data into the Target Tables
plaintextCOPY INTO table_name
    FROM @stage_object_name/<file_name>*.csv.gz
    FILE_FORMAT = (FORMAT_NAME = file_format_name)
ON_ERROR = 'skip_file';- Parameters
- Table_name: The Snowflake table in which your CSV data will be loaded.
- @stage_object_name/<file_name>*.csv.gz: Indicates the loading of the staged and compressed CSV files.
- FILE_FORMAT = (FORMAT_NAME = file_format_name): References the previously defined file format.
- ON_ERROR = 'skip_file': This informs Snowflake to skip any files that throw an error.
You have successfully imported the CSV data into your Snowflake database.
Limitations of Using the Manual Import/Export Method
- Time-consuming and Error-prone: Using the manual import/export method when working with high-volume data can be time-intensive. Any errors can lead to data inconsistencies or loss, which can affect the quality of your analysis and decision-making.
- Lack of Real-Time Data Synchronization: This method cannot transfer real-time data changes, as it involves one-time export and import processes. Migrating data manually also requires regular interventions and can be computationally expensive. The manual method can be inconvenient for businesses that need to analyze data in real-time and respond to anomalies instantly to avoid damage.
- No Schema Management: Using this method, you will have to manually ensure that all changes in the source schema are properly reflected in Snowflake. This can take a lot of time and can also cause operational systems to experience downtime.
Oracle to Snowflake Migration Best Practices
Here are some best practices that you should consider when migrating data from Oracle to Snowflake:
- Create a comprehensive Oracle to Snowflake migration strategy. This includes identifying the data you want to migrate, dependencies, and the necessary resources.
- To avoid complications related to the schema, you should map Oracle data structures to equivalent Snowflake data structures.
- Outlining the potential risks involved in the process enables you to develop mitigation strategies.
- To avoid propagating inconsistencies, ensure you clean and standardize your data to a format compatible with Snowflake.
- You should address differences between Oracle and Snowflake SQL dialects and functions early in the migration process.
- Implement monitoring tools to track performance and usage metrics during and after migration.
- Once you have migrated your data, you need to test it. This involves running queries against your new Snowflake warehouse and comparing results with your old Oracle database.
- Based on the post-migration analysis, continuously optimize Snowflake configurations to ensure maximum efficiency.
Final Thoughts
Knowing your data helps you better understand your customers' needs or concerns. By performing Oracle to Snowflake migration, you allow your organization to explore your data with enhanced performance and usability.
However, migration can be complex when you choose to do it manually. The process is resource-intensive, error-prone, and time-consuming. With these limitations, you also risk losing data in transit, leading to faulty analysis and decision-making. This can negatively impact your organization.
Conversely, using an automated, real-time ETL tool like Estuary can be beneficial. Its automated connectors save time and effort and help you focus on other downstream tasks. You can also leverage Estuary’s real-time CDC capabilities and propagate changes with minimal latency. This platform empowers your organization to anticipate customer needs and leverage data to capitalize on upcoming market trends.
Connect with the experts at Estuary to learn more about integrating this tool into your workflows.
Related Guides: Sync with Oracle
FAQs
What are the challenges of Oracle to Snowflake migration?
Can I sync Oracle to Snowflake continuously?

About the author
With over 15 years in data engineering, a seasoned expert in driving growth for early-stage data companies, focusing on strategies that attract customers and users. Extensive writing provides insights to help companies scale efficiently and effectively in an evolving data landscape.


