If data is king, databases are the kingmakers. They are used to store and analyze quintillions of structured and unstructured data. SQL Server and Snowflake are prominent databases with unique capabilities like data lakehousing, structuring, visualization, and transfer. But they serve different purposes, so sometimes you’ll need to move data from SQL Server to Snowflake.
There are many methods to connect these two systems—you can leverage data pipelines and implement advanced SQL scripting techniques or use ETL tools. This one-stop article will explore four of the most effective methods to transfer data from Microsoft SQL Server to Snowflake.
Want the fastest, no-code way to stream data from SQL Server to Snowflake?
Start your free trial with Estuary Flow →
Real-time sync. No code. Set up in under 5 minutes.
What is SQL Server?
Created by Microsoft in 1989, SQL Server implements the Relational Database Management System (RDBMS) and the Structured Query Language (SQL). It supports advanced analytics and machine learning, and provides fine-grained security and access controls. It is widely used due to its high availability, easy configuration, and scalability.
What is Snowflake?
Snowflake is a modern, secure cloud data warehouse. It is delivered as a Data Warehouse-as-a-Service (DWaaS). Snowflake is famously used because of its user-friendly UI and unlimited space capacity, enabling unlimited scalability and concurrency without resource contention.
Snowflake can query structured relational data like NUMBER, BOOLEAN, VARCHAR, TIMESTAMPS, etc. It uses Massively Parallel Processing (MPP) to achieve lightning-fast query executions and does not require hardware provisioning.
Methods to Transfer Data from SQL Server to Snowflake
In this section, we provide comprehensive step-by-step methods for transferring data from SQL Server to Snowflake using various open-source platforms and a third-party ETL Tool.
Method 1: Load Data from SQL Server to Snowflake Using Estuary Flow (Recommended)
Method 2: SQL Server to Snowflake Using Snowpipe
Method 3: Using SnowSQL
Method 4: Using SQLpipe
Method 1: Load Data from SQL Server to Snowflake Using Estuary Flow (Recommended)
Estuary Flow is a no-code, real-time ELT platform that makes it easy to move data between systems, with zero scripting and production-grade reliability. What sets Estuary apart is its ability to support both historical data backfills and real-time change data capture (CDC) from SQL Server. This means you don’t need to worry about missing any changes — Flow automatically captures existing rows and stays in sync with ongoing updates.
Once connected, Estuary Flow continuously streams change events from SQL Server and materializes them into Snowflake within seconds — no batch schedules or polling required.
Perfect for developers, data teams, or operations leads who need accurate, up-to-date data in Snowflake without the headache of managing pipelines.
Here’s how to set it up:
Step 1. Create an Estuary Flow Account
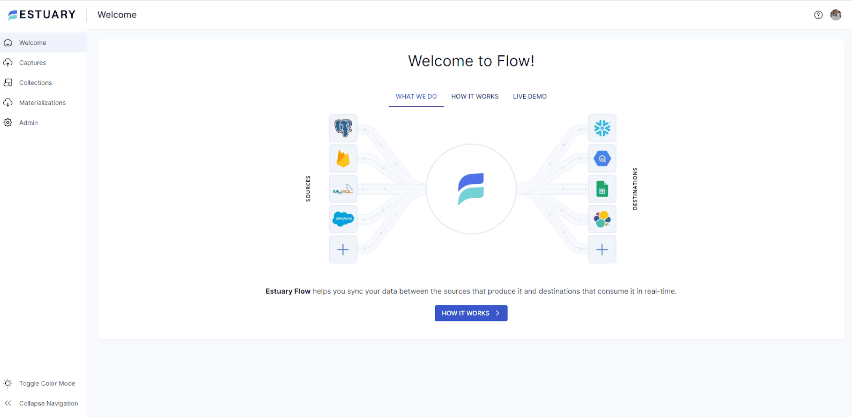
- Start by signing up for a free Estuary Flow account. You can register using Google or GitHub credentials. Once inside, you’ll be greeted by a dashboard with options to capture data and materialize it to your desired destination.
Step 2. Set Up Your SQL Server to Snowflake Environments
Before building the pipeline, make sure:
- SQL Server is network-accessible and allows CDC on the tables you want to sync
- You have login credentials with REPLICATION or equivalent privileges
- Your Snowflake account is ready to receive data (you’ll need host, username, and password/API key)
[See full prerequisites for SQL Server and Snowflake →]
Step 3. Capture Data from SQL Server
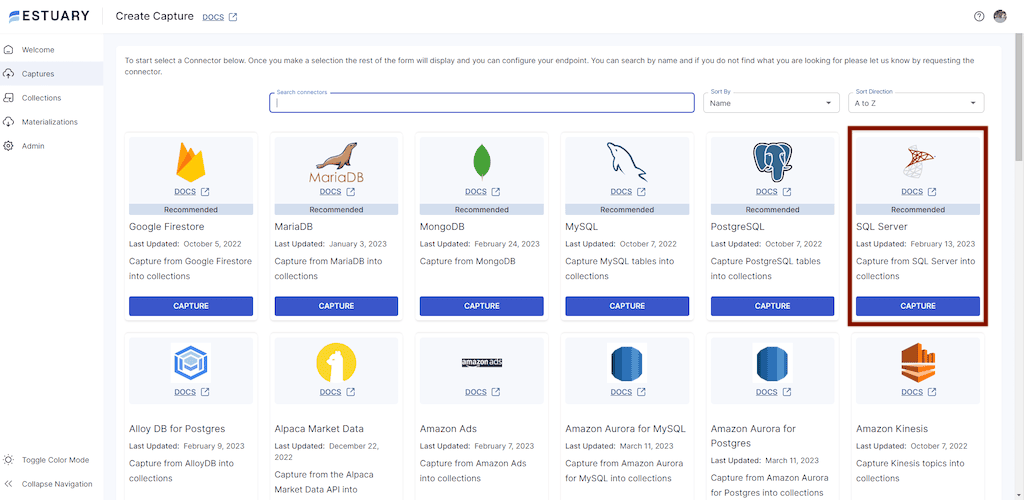
- Click Captures and select New capture. This will connect you to your data source— the SQL Server.
- Navigate to and select SQL Server as your data source connector.
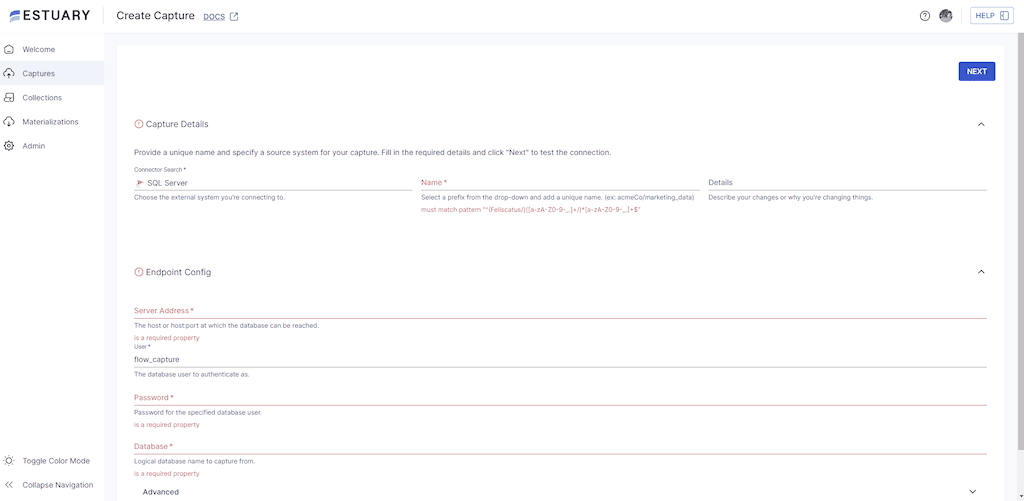
- Fill in the capture details with your SQL server address, database username, and password. Click Next.
- Flow will connect to your database and auto-detect all tables that support CDC
- Choose which tables you want to capture (all are selected by default)
- Click Save and Publish
Estuary will now backfill historical rows and begin listening for real-time changes via SQL Server CDC. Each selected table becomes a versioned collection within Flow.
Step 4: Materialize Data to Snowflake with Snowpipe Streaming
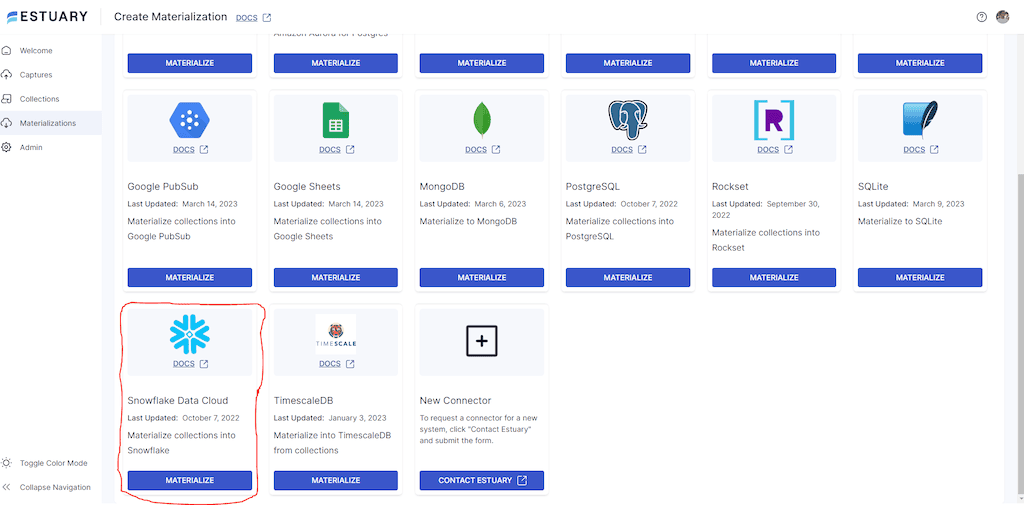
- Click the Materialize collections button to transfer your captured data.
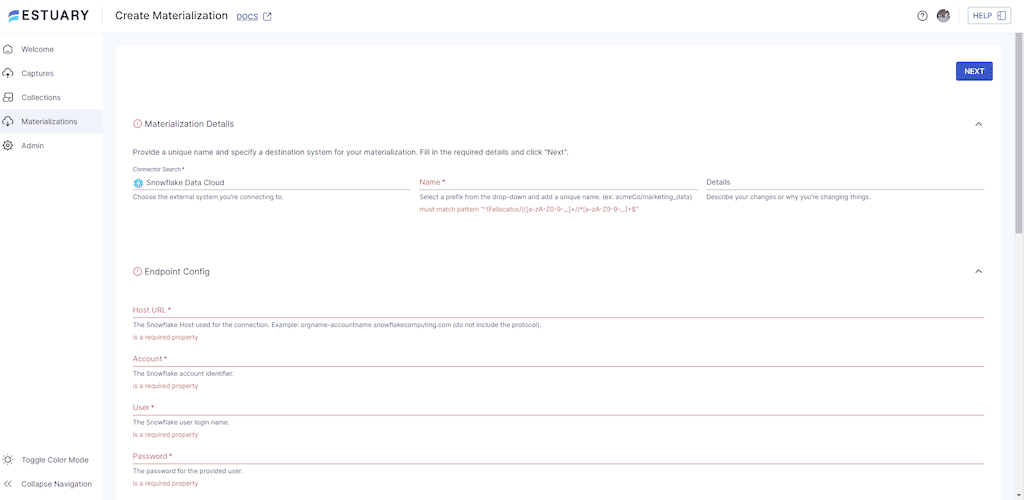
- From the connector tile, select Snowflake Data Cloud as your destination.
- Fill out the required properties in the Endpoint Configuration by choosing a unique name for your materialization. Then provide the Host URL, Account identifier, Username, and Password. Then click Next.
Flow maps each collection (from SQL Server) to a new or existing table in Snowflake. You can optionally:
- Rename the target tables
- Filter fields
- Apply in-flight transformations
No need to configure external stages like S3 or GCS — Estuary Flow uses Snowpipe Streaming under the hood to write data directly into Snowflake with sub-second latency.
- Click Save and Publish to go live.
Final Result
- Historical rows from SQL Server are fully loaded into Snowflake
- New inserts, updates, and deletes are captured in real time via CDC
- Snowpipe Streaming delivers ultra-low latency ingestion — no staging or batching
All done in a few clicks, with a no-code, production-grade pipeline
Benefits of Using Estuary Flow
- No-code, UI-based setup: Build end-to-end pipelines between SQL Server and Snowflake in minutes — no scripts or maintenance overhead.
- Real-time CDC from SQL Server: Flow captures inserts, updates, and deletes using SQL Server’s change data capture (CDC) logs.
- Snowpipe Streaming for Snowflake: Estuary Flow writes directly to Snowflake using Snowpipe Streaming, bypassing file staging and reducing end-to-end latency to sub-second levels.
- Historical + incremental sync: Automatically loads existing data, then keeps your tables in sync with future changes.
- Delta update support: Optional table update mode minimizes database write load and avoids full overwrites.
- In-flight transformations: Optionally reshape, join, or enrich your data between capture and materialization.
- Built-in monitoring & fault tolerance: Full observability, retry logic, and schema evolution alerts help you run pipelines in production with confidence.
- Transparent, usage-based pricing: $0.50/GB of change data + $0.14/hour per connector.
Whether you're migrating tables or powering real-time analytics, Estuary Flow gives you a future-proof pipeline from SQL Server to Snowflake — streaming-first and enterprise-ready.
Method 2: SQL Server to Snowflake Using Snowpipe
Step 1. Set up your Snowflake account. Create a database and schema, ensuring you have the required privileges.
Step 2. Create an external stage using this SQL statement:
plaintextCREATE STAGE <stage_name>
  URL = 's3://<your_s3_bucket>'
  CREDENTIALS = (AWS_KEY_ID='<your_aws_access_key>', AWS_SECRET_KEY='<your_aws_secret_key>');
Replace <stage_name> with the name of your stage, <your_s3_bucket>, <your_aws_access_key>, and <your_aws_secret_key> with your S3 bucket name and AWS credentials.
Step 3. Create a pipe using this SQL statement:
plaintextCREATE PIPE <pipe_name>
  AUTO_INGEST = TRUE
  AS COPY INTO <your_table_name>
  FROM '@<stage_name>/<your_file_prefix>'
  FILE_FORMAT = (TYPE=CSV FIELD_DELIMITER=',' SKIP_HEADER=1);
Replace <pipe_name> with the name of your pipe, <your_table_name> with the name of the table in your snowflake database and schema where you want to load the data, <stage_name> with the name of your external stage, and <your_file_prefix> with the prefix for your files in the external stage.
Step 4. Run this command to enable Snowpipe in your Snowflake database:
plaintextALTER ACCOUNT SET PIPE_EXECUTION_PAUSED = FALSE;This allows Snowpipe to ingest data when it arrives in the external stage automatically.
Step 5. Set up SQL Server by installing the Snowpipe JDBC driver.
Create a batch file to host an SQL statement that can export data from SQL Server to a CSV file, then upload it to the external stage in Snowflake.
To create a batch file, open a text file, and run this command:
plaintext@echo off
title [title of your batch script]
echo [first line]
pause
Save the text file with the extension .bat, double-click to run the batch file, right-click and select edit so you can paste the SQL statement in the file.
Step 6. Use a scheduling tool like Windows Task Scheduler or Cron to schedule the batch file to run regularly. If you implement the preceding steps correctly, your SQL data should be automatically loaded into Snowflake through Snowpipe.
Want more automation without file juggling? Try Estuary Flow instead.
Method 3: SQL Server to Snowflake Using SnowSQL
Step 1. Download SnowSQL from the Snowflake website and install it on your local machine.
Step 2. Create a Snowflake account to create a new database and table in Snowflake.
Step 3. Run this command to connect to Snowflake using SnowSQL:
plaintextsnowsql -a <account_name> -u <username> -d <database_name> -s <schema_name> -w <warehouse_name>Replace <account_name>, <username>, <database_name>, <schema_name>, and <warehouse_name> with your Snowflake account details.
Step 4. Run this SQL command to create a Snowflake table to host the data in transit:
plaintextCREATE TABLE <table_name> (
    <column1_name> <column1_data_type>,
    <column2_name> <column2_data_type>,
    ...
)
Replace <table_name>, <column1_name>, <column1_data_type>, <column2_name>, <column2_data_type>, and other blank values with your table and column names and data types.
Step 5. Run this command to export data from the SQL Server table using the BCP utility.
plaintextbcp <table_name> out <file_name> -c -t',' -S <server_name> -U <username> -P <password>Replace <table_name> with the name of the table you want to export, <file_name> with the name of the file you want to export to, <server_name> with the name of the SQL Server instance, <username> with your SQL Server username, and <password> with your SQL Server password
Step 6. Run this command to upload the data to Snowflake:
plaintextPUT file://<file_path> @<stage_name>/<file_name>Replace <file_path> with the path to the file you exported from SQL Server, <stage_name> with the name of the Snowflake stage you want to upload the file to, and <file_name> with the name of the file you want to upload.
Step 7. Execute this command to load the data from the file to the Snowflake table you created earlier:
plaintextCOPY INTO <table_name>
FROM @<stage_name>/<file_name>
FILE_FORMAT = (TYPE = CSV, FIELD_DELIMITER = ',', SKIP_HEADER = 1);
Replace <table_name> with the name of the Snowflake table you created earlier, <stage_name> with the name of the Snowflake stage you uploaded the file to, and <file_name> with the name of the file you uploaded.
This completes the one-time process of transferring data from the SQL Server to Snowflake using SnowSQL. To automate the transfer of bulk data, you can either run a task for each of your SQL statements and build dependencies between them or wrap the entire SnowSQL script into a stored procedure triggered with your tasks.
Method 4: Using SQLpipe
Step 1. Download and install SQLpipe.
Step 2. Connect to your SQL Server instance using your computer’s ODBC Data Source Administrator. Search for “ODBC” in the Windows Start menu and supply the database name, username, password, schema name, hostname, and port.
Step 3. Connect to Snowflake using the ODBC Data Source Administrator using the same format.
Step 4. Write a SQL query to extract your data from SQL Server for onward transfer to Snowflake. You can use any SQL client, such as SQL Server Management Studio or Visual Studio Code.
Step 5. Save the SQL query as a file on your computer, and note the file path.
Step 6. Use SQLpipe to transfer the data.
Open your command prompt, navigate to the folder hosting SQLpipe, and run this command:
plaintextsqlpipe -s [source_odbc_data_source_name] -d [destination_odbc_data_source_name] -f [path_to_sql_query_file] -t [target_table_name]Replace [source_odbc_data_source_name] with the name of the ODBC data source that you set up for SQL Server, [destination_odbc_data_source_name] with the name of the ODBC data source that you set up for Snowflake, [path_to_sql_query_file] with the file path of the SQL query that you wrote in Step 4, and [target_table_name] with the name of the table in Snowflake where you want to store the data.
Assuming you want to transfer a table called “users” in the schema “dbo” from SQL Server to Snowflake, here is an example command:
plaintextsqlpipe transfer \
--source-ds-type "mssql" \
--source-hostname "your-mssql-hostname" \
--source-port 1433 \
--source-db-name "your-mssql-db-name" \
--source-username "your-mssql-username" \
--source-password "your-mssql-password" \
--target-ds-type "snowflake" \
--target-account-id "your-snowflake-account-id" \
--target-db-name "your-snowflake-db-name" \
--target-schema "your-snowflake-schema-name" \
--target-username "your-snowflake-username" \
--target-password "your-snowflake-password" \
--target-table "name-of-table-to-insert-into" \
--overwrite \
--query "select * from dbo.users"
The command -c or --csv enables you to output the data in CSV instead of the default tab-separated format. This can be useful if you need to import the data into a tool that requires CSV format.
Step 7. After the data transfer is complete, verify that the data has been successfully transferred by querying the target table using an SQL client.
C’est fini!
Comparison: Estuary Flow vs Other Methods
Feature | Estuary Flow | Snowpipe | SnowSQL | SQLpipe |
| Real-time sync | Yes (CDC + Streaming) | No (batch-based) | No | No |
| No-code setup | Yes | No | No | No |
| Handles schema changes | Yes | No | No | No |
| Setup time | Minutes | Moderate | High | Moderate |
| Best for | Continuous, low-latency pipelines | Batch file loads | Manual data transfers | Command-line users |
Explore our guide for loading data from SQL Server to various other databases:
Conclusion
Seamless data transfer across databases can be challenging, especially when dealing with batch jobs, staging files, and schema mismatches. This guide explored four effective ways to move data from SQL Server to Snowflake, each with its own strengths.
If you're looking for a fast, no-code, and production-ready solution, Estuary Flow is your best choice. It enables:
- Real-time change data capture (CDC) from SQL Server
- Direct, low-latency ingestion into Snowflake via Snowpipe Streaming
- Automatic handling of schema changes, error recovery, and observability
- Setup in under 5 minutes — without writing a single line of code
Estuary Flow combines the simplicity of an ELT tool with the power of modern streaming infrastructure, making it ideal for anyone building real-time SQL Server to Snowflake pipelines.
Start your free trial today → and get your SQL Server data flowing into Snowflake in real time.
FAQS
- What is the best method to transfer data from SQL Server to Snowflake?
The best method depends on your specific use case. For real-time data transfer and ease of use, Estuary Flow is an excellent choice as it provides a no-code solution with minimal setup. For more traditional methods, Snowpipe and SnowSQL are also effective, depending on whether you prefer automated or manual data ingestion.
- Can you automate data transfer from SQL Server to Snowflake?
Yes, you can automate data transfer from SQL Server to Snowflake using tools like Snowpipe and Estuary Flow. Snowpipe allows automatic ingestion of data into Snowflake as soon as it arrives in an external stage, while Estuary Flow can capture and load data in real-time with minimal setup.
- What are some popular third-party tools for transferring data from SQL Server to Snowflake?
Estuary Flow is a top choice for its real-time, no-code setup. Fivetran and SQLpipe are also popular, with Fivetran offering automated integration and SQLpipe providing a simple command-line solution. These tools ensure efficient and reliable data migration.

About the author
With over 15 years in data engineering, a seasoned expert in driving growth for early-stage data companies, focusing on strategies that attract customers and users. Extensive writing provides insights to help companies scale efficiently and effectively in an evolving data landscape.


