A flexible and scalable database solution is essential for aligning your organization with changing demands. Oracle, used by more than 10% of developers, is widespread for many reasons. It is mainly a relational database management system (RDBMS) with analytical and operational capabilities.
You may need to manage more unstructured and semi-structured data as your business expands. MongoDB, a NoSQL database with a user base larger than 20% of developers, is better suited for this. It can provide more scalability when working with diverse and dynamic data types.
With an Oracle to MongoDB migration, you can enhance application performance for backends that leverage often-changing data schemas.
If you’re currently using Oracle and are considering transitioning to MongoDB, this article provides three different migration methods. Before getting into the specifics of the processes, let’s take a quick look at the key capabilities of both platforms. However, if you are familiar with Oracle and MongoDB, you can jump straight to the migration methods.
Looking for the fastest way to migrate Oracle data to MongoDB? Sign up free and start building pipelines with Estuary today.
Oracle: A Brief Overview
Oracle is among the most widely used RDBMS solutions for storing and processing data. It offers top-tier on-premises and cloud-based solutions suitable for the data management needs of businesses of all sizes. As of the writing of this article, Oracle’s latest version, Oracle Database 23ai, is a next-generation platform that helps you develop relational, graph, document, and microservice applications.
You can configure the Oracle database as a Single Instance (SI) or Real Application Clusters (RAC).
The SI configuration comprises a single instance of an Oracle database. This provides simplicity and reduced costs but limited scalability and redundancy.
In contrast, RAC enables multiple instances across different servers to access a single database. This ensures that even if one instance fails, others can continue operations with minimal downtime. With RAC, you can achieve high availability and scalability.
Key Features of Oracle
- Multitenant Architecture: Multitenant architecture allows an Oracle database to operate as a container database (CDB). A CDB can contain zero, one, or multiple user-defined pluggable databases (PDBs). These are portable collections of schemas, schema objects, and non-schema objects. The setup lets you consolidate the database on a single server, reducing hardware costs and administrative overhead.
- Improved Query Performance: Oracle utilizes partitioning strategies, such as list, hash, and range partitioning, to split tables and indexes into partitions. This increases the query performance by minimizing the amount of data processed during query execution. Advanced partitioning options like interval, auto list, and reference partitioning help extend the capabilities.
- JSON Relational Duality Views: Oracle’s new JSON Relational Duality View feature combines the benefits of the relational and document-oriented data models. With Duality views, your applications can retrieve the data stored in relational tables as JSON documents.
MongoDB: A Brief Overview
MongoDB is a NoSQL database built to handle large volumes of heterogeneous data. Unlike traditional databases, it helps store data in flexible, JSON-like documents in Binary JSON (BSON) format.
Since MongoDB supports dynamic data structures, it does not require a fixed database schema. This lets you easily modify the data model, making it suitable for applications with evolving data requirements.
MongoDB allows you to meet the demands of modern systems using its developer data platform, MongoDB Atlas. It is a cloud-based service offering a robust query interface to help you quickly build transactional and analytical apps. The platform also allows you to run the applications across different environments without coding.
Key Features of MongoDB
- Enhanced Scalability: MongoDB supports horizontal and vertical scaling, allowing you to manage rapidly evolving data. Horizontal scaling, or sharding, involves distributing the increasing workload across multiple servers. Conversely, vertical scaling enables you to increase the capacity of individual servers by upgrading hardware like memory or processing speed.
- Replication: Replication in MongoDB with replica sets ensures high availability and fault tolerance. The replica sets involve multiple copies of data across different database servers. The primary server handles all write operations in a replica set and replicates data to secondary servers. If the primary server fails, one of the secondary servers is automatically selected as the new primary. When the failed server recovers, it rejoins as a secondary server.
- Handling Ad-Hoc Queries: MongoDB supports different ad-hoc queries, allowing you to perform field queries, range queries, and regular expression searches. It indexes BSON documents and uses its powerful MongoDB Query Language (MQL) to make this process faster and more efficient.
Why Migrate Data from Oracle to MongoDB?
The flexibility in the MongoDB database schema is invaluable for managing large volumes of diverse data types, which can be a significant challenge in Oracle. Consequently, migrating data from Oracle to MongoDB enables you to change the database schema easily with minimal modifications — especially compared to other Oracle migration tools that may require heavier restructuring.
Here are a few other reasons why you should move data from Oracle to MongoDB:
- Faster Application Development: MongoDB’s flexible data model and efficient indexing enable you to build and modify applications quickly. Its native language drivers work smoothly with different programming languages, and cloud-based tools like MongoDB Atlas help you scale efficiently.
This results in quicker application development than Oracle’s rigid database schema. - High-Performance Storage Engine: MongoDB uses the open-source, high-performance storage engine called WiredTiger. It offers document-level concurrency, data compression, and in-memory and disk storage.
On the contrary, Oracle does not utilize the concept of a storage engine like MongoDB. Instead, it helps you organize the data logically into tablespaces and physically store it in datafiles that correspond to these tablespaces. This structure enables Oracle to manage storage and allocate resources effectively. However, MongoDB is the better choice for high performance in document store operations. - Cost-Efficiency: MongoDB’s total cost of ownership can be lower, particularly with its open-source Community Edition. It helps startups and small to medium-sized businesses minimize initial investment. Even its database-as-a-service, MongoDB Atlas, has a usage-based pricing model where you pay only for what you use.
In contrast, Oracle’s licensing fees are usually higher and focus mainly on large enterprises. - JSON by default: JSON is the lingua franca for data representation on the web. Because MongoDB represents data internally similarly, developers don’t have to learn new data representations and can quickly get started.
Top 3 Methods to Migrate Data from Oracle to MongoDB
This section will look into the top three methods to effectively migrate data from Oracle to MongoDB. You can choose the one that best suits your needs.
- Automated Method: Oracle to MongoDB Migration Using Estuary
- Manual Method: Oracle to MongoDB Integration Using Apache Kafka
- MongoDB’s Official Product: Oracle to MongoDB Migration With Relational Migrator
Method 1: Move Data from Oracle to MongoDB Using Estuary
Estuary is a unified data integration solution that utilizes Change Data Capture (CDC) to facilitate dynamic data integration across various sources and destinations. You don’t have to write a single line of code to extract data from a source and move it to a destination; Estuary helps simplify the migration process with just a few clicks.
Here are some of the impressive features of Estuary that make it a great Oracle to MongoDB migration tool:
- Extensive Catalog of Connectors: Estuary offers 200+ built-in connectors, including batch and streaming options. It helps you build automated data pipelines that streamline data extraction, transformation, and loading workflows between various sources and destinations.
- Change Data Capture: Estuary uses robust real-time CDC technology to enable you to capture changes in the source system and replicate them to the destination. This entire process occurs with a total latency of less than 100 milliseconds.
- Transformations: Estuary allows you to perform numerous transformations, from a simple remapping to complex self-referential and stateful transaction processing with Flow derivations. You can write derivations for your batch and streaming pipelines using SQLite or TypeScript. Using TypeScript helps prevent several common pipeline failures.
Let’s look at the steps to create an Oracle to MongoDB ETL data pipeline using Estuary. Before you begin, ensure the following prerequisites are in place:
- Oracle 11g or above with appropriate access privileges.
- A MongoDB account that includes a target database and enables read and write access to your MongoDB database.
- An Estuary account.
- Allowlist IP addresses on Oracle and MongoDB to interact with Estuary.
Step 1: Configure Oracle as the Source
- Sign in to your Estuary account to access the dashboard.
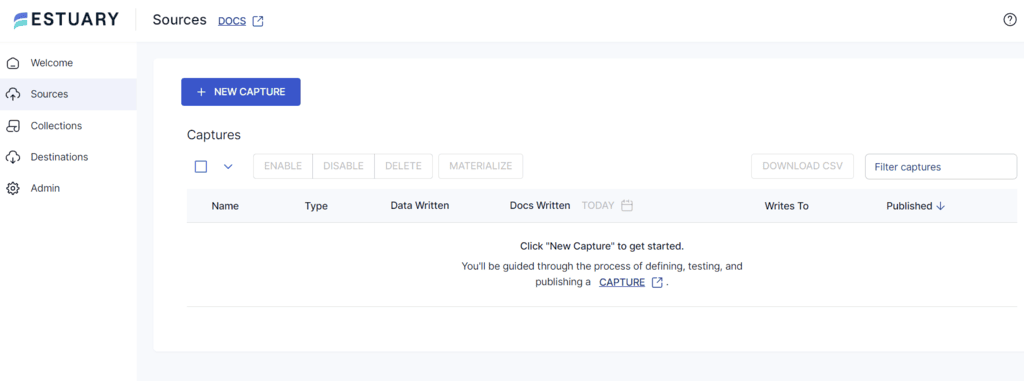
- Choose the Sources option from the left navigation pane, and you will be redirected to the Sources page.
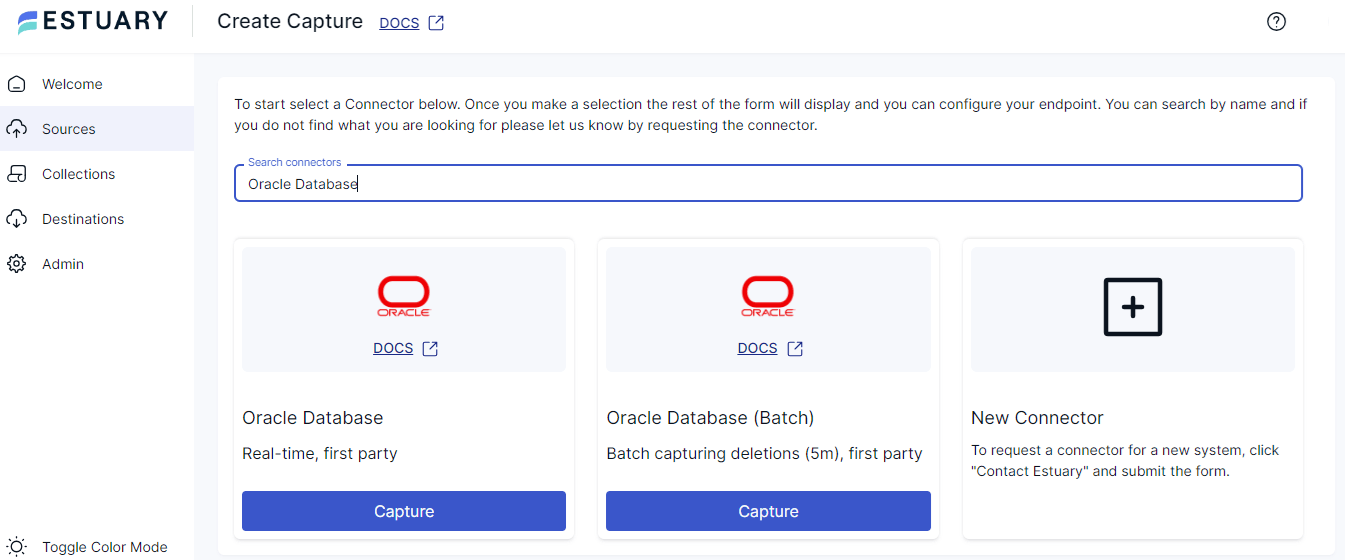
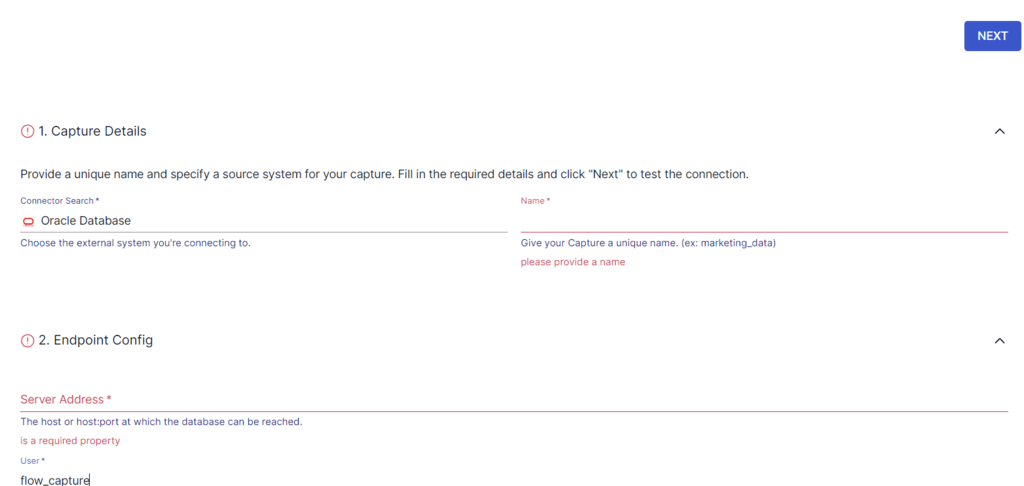
- Click the + NEW CAPTURE button and browse for Oracle Database using the Search connectors field.
- You will find two Oracle Database options: Real-time and Batch. Choose the one that best suits your needs and click the connector’s Capture button.
For this tutorial, let’s select the Oracle Real-time connector.
- On the connector configuration page, fill in all the mandatory fields as follows:
- Name: Enter a unique name for your capture.
- Server Address: Type the host address where your database is accessible
- User: Provide the username for your Oracle database to enable authentication.
- Password: Specify the password associated with the given username.
- After specifying all the required information, click the NEXT > SAVE AND PUBLISH buttons.
This completes the configuration of your source connector to capture data from your Oracle database in a Flow collection.
Step 2: Configure MongoDB as the Destination
After a successful Oracle database capture, a pop-up window with the capture details will appear. You can click the MATERIALIZE COLLECTIONS option from this window to configure the destination end of the pipeline.
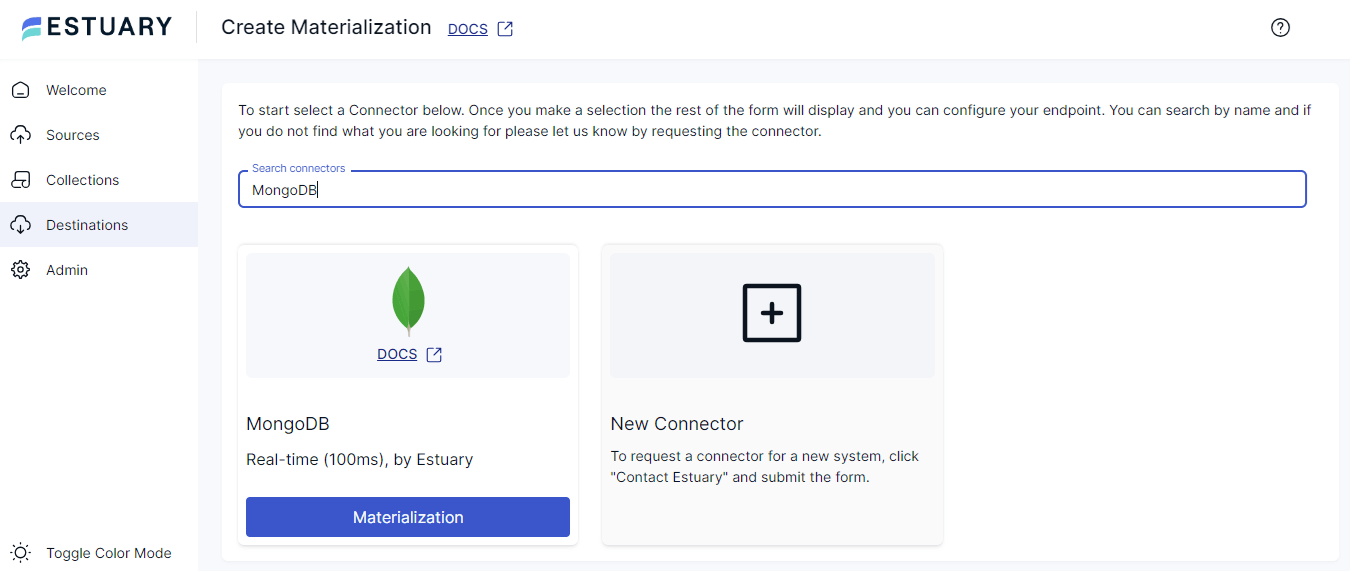
Alternatively, navigate to the dashboard and click the Destinations > + NEW MATERIALIZATION. On the Create Materialization page, follow the steps below:
- Type MongoDB in the Search connectors field.
- In the search results, click the Materialization button of the MongoDB connector to proceed with your destination setup.
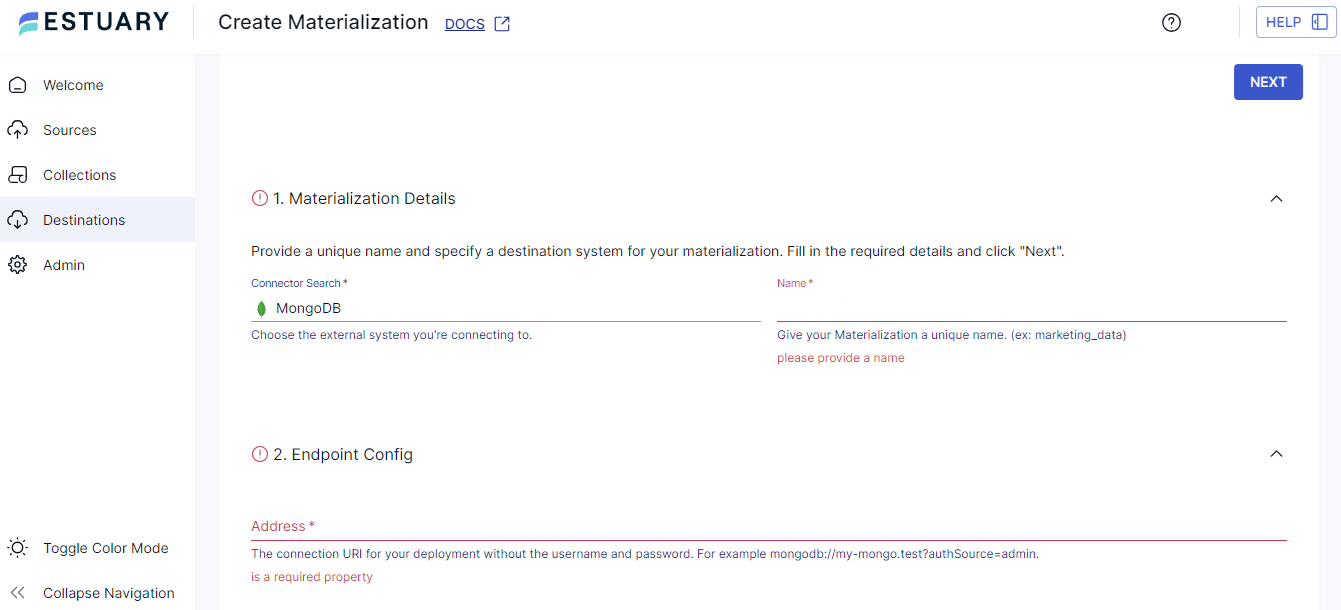
- Provide all the necessary information on the Create Materialization page, including:
- Name: Enter a unique name for your materialization.
- Address: Specify the MongoDB connection URI.
- User: Enter the database username to connect with.
- Password: Type the password of the associated username.
- Database: Provide the target database name.
- For an alternative way of directly connecting to your MongoDB instance, use SSH Forwarding under Network Tunnel for secure connections.
- Check if your captured data from the Oracle database is automatically added to your materialization. If not, you can manually link the capture by clicking the SOURCE FROM CAPTURE button under the Source Collections section.
- Click on NEXT > SAVE AND PUBLISH to finish your destination configuration.
The connector will materialize data from your Oracle data in the Estuary collections and convert it into your MongoDB collections. This completes your Oracle to MongoDB replication.
Similarly, using Estuary connectors, you can move data from MongoDB to Oracle MySQL Heatwave.
✨ With just a few clicks, you can move from Oracle to MongoDB in real time. Try Estuary free or book a demo with our team to see it in action.
Method 2: Oracle to MongoDB Migration Using Apache Kafka
In real-time, you can quickly move data from Oracle to MongoDB with Apache Kafka and Confluent KSQL within a Docker Compose setup. Docker Compose enables you to run multi-container Docker applications.
Instead of manually starting each Docker container and managing their interactions, Docker Compose helps you configure your entire application in a single YAML file. This file describes all the services (containers), networks, and volumes required for your application.
Using Docker Compose, you can stream changes from Oracle using the Confluent Oracle CDC connector. Then, you can apply transformations to the data with KSQL and write the results into MongoDB using the MongoDB connector for Apache Kafka.
Here are the steps to build a manual Oracle to MongoDB pipeline using Docker Compose:
Prerequisites:
- Install Docker on your PC to use Docker Compose.
- Install Git on your system.
Step 1: Prepare the Oracle Docker Image
If you do not have an Oracle environment, you can easily pull the Oracle Database Enterprise Edition from Docker Hub by following the given instructions:
- Accept the Oracle Terms and Conditions.
- Log into your Docker account by executing the following command in your terminal:
plaintextdocker login- Provide your Docker Hub credentials for successful login.
- Once logged in, run the following command to download the image locally:
plaintextdocker pull store/oracle/database-enterprise:12.2.0.1-slimStep 2: Launch the Docker Environment
- Go to the repository on GitHub and copy the HTTPS link under the Code menu.
- In the terminal, go to the directory where you need to clone the git repository and execute the following:
plaintextgit clone <repository-url>Replace <repository-url> with the actual GitHub repository URL.
- Build the Docker compose file to start the services within it:
plaintextdocker-compose up -d --buildOnce you complete the compose file step, you must configure your Oracle environment for use with the Confluent CDC connector.
Step 3: Configure Your Oracle Environment for Confluent CDC Connector
- Connect to your Oracle database instance using docker exec:
plaintextdocker exec -it oracle bash -c "source /home/oracle/.bashrc; sqlplus /nolog "
connect / as sysdba- Verify if the Oracle database is in archive log mode:
plaintextselect log_mode from v$database;If not in archive mode, then execute the following:
plaintextSHUTDOWN IMMEDIATE;
STARTUP MOUNT;
ALTER DATABASE ARCHIVELOG;
ALTER DATABASE OPEN;- Run the following to set up a user and grant necessary privileges in an Oracle database environment to utilize the CDC approach:
plaintextCREATE ROLE C##CDC_CAPTURE_ROLE;
GRANT CREATE SESSION,
EXECUTE_CATALOG_ROLE,
SELECT ANY TRANSACTION,
SELECT ANY DICTIONARY TO C##CDC_CAPTURE_ROLE;
GRANT SELECT ON SYSTEM.LOGMNR_COL$ TO C##CDC_CAPTURE_ROLE;
GRANT SELECT ON SYSTEM.LOGMNR_OBJ$ TO C##CDC_CAPTURE_ROLE;
GRANT SELECT ON SYSTEM.LOGMNR_USER$ TO C##CDC_CAPTURE_ROLE;
GRANT SELECT ON SYSTEM.LOGMNR_UID$ TO C##CDC_CAPTURE_ROLE;

CREATE USER sampleuser IDENTIFIED BY password CONTAINER=ALL;
GRANT CDC_CAPTURE_ROLE TO sampleuser CONTAINER=ALL;
ALTER USER sampleuser QUOTA UNLIMITED ON sysaux;
ALTER USER sampleuser SET CONTAINER_DATA = (CDB$ROOT, ORCLPDB1) CONTAINER=CURRENT;

ALTER SESSION SET CONTAINER=CDB$ROOT;
GRANT CREATE SESSION, ALTER SESSION, SET CONTAINER, LOGMINING, EXECUTE_CATALOG_ROLE TO sampleuser CONTAINER=ALL;
GRANT SELECT ON GV_$DATABASE TO sampleuser CONTAINER=ALL;
GRANT SELECT ON V_$LOGMNR_CONTENTS TO sampleuser CONTAINER=ALL;
GRANT SELECT ON GV_$ARCHIVED_LOG TO sampleuser CONTAINER=ALL;
GRANT CONNECT TO sampleuser CONTAINER=ALL;
GRANT CREATE TABLE TO sampleuser CONTAINER=ALL;
GRANT CREATE SEQUENCE TO sampleuser CONTAINER=ALL;
GRANT CREATE TRIGGER TO sampleuser CONTAINER=ALL;

ALTER SESSION SET CONTAINER=cdb$root;
ALTER DATABASE ADD SUPPLEMENTAL LOG DATA (ALL) COLUMNS;

GRANT FLASHBACK ANY TABLE TO sampleuser;
GRANT FLASHBACK ANY TABLE TO sampleuser container=all;- You can create a sample database object like an employee and add some data:
plaintextCREATE TABLE sampleuser.employee
(
   identityNo INTEGER GENERATED BY DEFAULT AS IDENTITY,
   firstname VARCHAR2(100),
   lastname VARCHAR2(100),
   PRIMARY KEY (identityNo)
) tablespace sysaux;

insert into sampleuser.employee (firstname, lastname) values ('Sam', 'Perez');
insert into sampleuser.employee (firstname, lastname) values ('Manuel','Revan');
insert into sampleuser.employee (firstname, lastname) values ('Michel’,'Kristen');
insert into sampleuser.employee (firstname, lastname) values ('John’,'Cambo');
commit;
Step 4: Create a Kafka Topic
- Open a new terminal and connect to your Kafka server:
plaintextdocker exec -it broker /bin/bash- Create a Kafka topic using the given command:
plaintextkafka-topics --create --topic SimpleOracleCDC-ORCLCDB-redo-log \
--bootstrap-server broker:9092 --replication-factor 1 \
--partitions 1 --config cleanup.policy=delete \
--config retention.ms=120960000
Step 5: Set Up Confluent Oracle CDC Connector
Locate the oracle-cdc-source.json file from the repository, which contains all the necessary settings for the Oracle CDC connector. You can execute the configuration by using the following command:
plaintextcurl -X POST -H "Content-Type: application/json" --d @oracle-cdc-source.json http://localhost:8083/connectorsStep 6: Configure KSQL Data Flows in Kafka
Run the command to execute the KSQL server:
plaintextdocker exec -it ksql-server bin/bashplaintextksql http://127.0.0.1:8088Then, create streams as follows:
plaintextCREATE STREAM CDCFORORACLE (IdentityNo DECIMAL(20,0), FIRSTNAME varchar, LASTNAME varchar, op_type VARCHAR) WITH ( kafka_topic='ORCLCDB-EMP', PARTITIONS=1, REPLICAS=1, value_format='AVRO');plaintextCREATE STREAM WRITETOPIC AS
SELECT CAST(IdentityNo AS BIGINT) as "_id", FIRSTNAME , LASTNAME , OP_TYPE from CDCFORORACLE WHERE OP_TYPE!='D' EMIT CHANGES;As Oracle CRUD operations are captured and published to the Kafka topic WRITETOPIC, KSQL helps you process these events and stream them into a new topic. The MongoDB connector will then consume this new topic for Apache Kafka to facilitate an efficient data transfer from Oracle to MongoDB.
Step 7: Configure MongoDB Connector for Apache Kafka
To apply the configuration, execute the MongoDB connector for the Apache Kafka (MongoDB Sink) file in the repository.
plaintextcurl -X POST -H "Content-Type: application/json" -d @mongodb-sink.json http://localhost:8083/connectorsAfter applying this configuration, the sink process in the configuration script allows you to consume records from the Kafka topic and load data to MongoDB.
Step 8: Data Sync Between Oracle and MongoDB
To check if new entries or updates in the Oracle database stream to MongoDB, go back to the Oracle database and add more data. Then, run the below command in the MongoDB shell to verify that the Oracle database updates are reflected in MongoDB.
plaintextdocker exec -it mongo1 /bin/mongoYou have successfully migrated your Oracle data to a MongoDB instance using these steps.
Limitations of the Method Using Apache Kafka
- Complexity of Configuration: Setting up Docker Compose requires a clear understanding of YAML syntax and service configuration. This can be difficult if you aren’t familiar with Docker and might lead to errors when moving your data from Oracle to MongoDB.
- Network Latency: Depending on the networking setup between containers, latency issues may affect data transfer speeds between Oracle and MongoDB.
- Limited Scalability: While Docker Compose is great for local development and testing, it may need to scale more efficiently for large-scale data migrations.
⚡ Why spend hours setting up Kafka when you can achieve the same Oracle-to-MongoDB sync in minutes? Start with Estuary and avoid the complexity.
Method 3: Oracle to MongoDB Integration with Relational Migrator
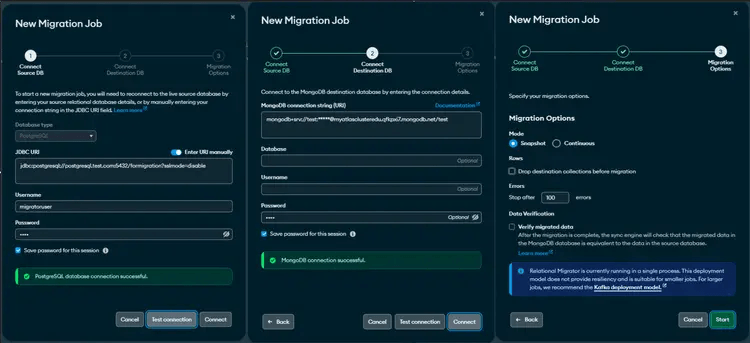
MongoDB Relational Migrator is another tool that allows you to move relational data from Oracle database to MongoDB.
With Relational Migrator, you can design an effective MongoDB database schema with respect to the Oracle relational schema. After defining the data model, you can define a new migration job by configuring the source, destination, and migration options.
Once you finish the configurations, begin your synchronization job by clicking the Start button. This will also enable you to migrate all your Oracle data into MongoDB.
Limitations of Relational Migrator
- Long-Running CDC: When migrating multiple legacy applications from Oracle to MongoDB without downtime, relying on long-running CDC processes can get challenging. While CDC helps synchronize every Oracle data change in MongoDB, the relational migrator may not be the most suitable for this scenario. Managing long-running CDC processes can complicate the migration, leading to issues with data consistency.
- Impact of Third-Party Tools: Relational Migrator depends on an open-source Debezium connector to efficiently track row-level changes from the Oracle database in real-time. However, backfilling historical data for future analytical needs and partitioning tables for enhanced scalability is a manual process.
Summing It Up
With a detailed understanding of your data, you can align your services to meet customer needs efficiently. Migrating from Oracle to MongoDB helps your business to fully utilize the destination platform’s scalability and real-time analytics capabilities.
However, manual integration processes can be complex and resource-intensive, leading to higher costs. Other drawbacks include being time-consuming and prone to human error, which can result in data loss during transit. Such issues can negatively impact the decision-making processes and customer satisfaction.
On the other hand, selecting an automated ETL tool like Estuary can transform your migration experiences. Its wide range of connectors and real-time CDC support provide an almost effortless and efficient solution.
Ready to migrate Oracle to MongoDB without the headaches? Start your free Estuary account, see how others succeeded, or contact our team to discuss your use case.
Related Sync with Oracle
FAQs
Can I migrate my applications and data from Oracle to MongoDB?
What is the best tool for Oracle to MongoDB migration?

About the author
Dani is a data professional with a rich background in data engineering and real-time data platforms. At Estuary, Daniel focuses on promoting cutting-edge streaming solutions, helping to bridge the gap between technical innovation and developer adoption. With deep expertise in cloud-native and streaming technologies, Dani has successfully supported startups and enterprises in building robust data solutions.


