In a data-driven world, moving data effortlessly from SFTP/FTP to Google BigQuery offers a powerful way to gain valuable insights. File Transfer Protocol (FTP), a widely used method for data exchange, can be seamlessly integrated with BigQuery’s cloud-based data warehouse. By replicating data from FTP to BigQuery, you can gain a deeper understanding of your data. This empowers you to unveil hidden patterns and enhance user experiences.
In this post, we’ll quickly introduce these platforms and outline automated and manual methods for transferring data from FTP to BigQuery. So, let’s get started.
Overview of FTP (as a Source)
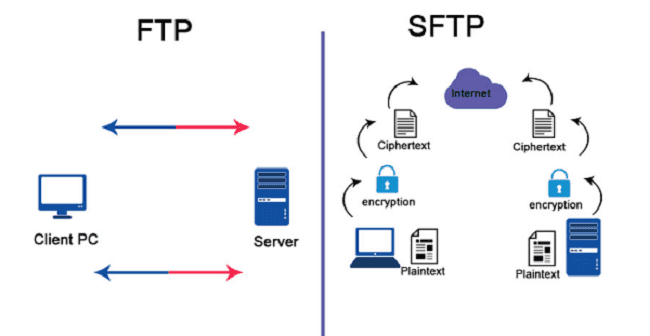
FTP is a standard network protocol used for transferring files between computers connected through TCP/IP connections. In an FTP transaction, the initiating computer is the local host, while the other, a file repository, is the remote host or server.
Often used for cloud access and web hosting services, FTP supports remote data transfer. It allows you to upload files from the local to the remote host and download them from the remote to the local host. This plays a crucial role in data backup, ensuring redundancy by moving important files to remote servers and preventing data loss.
In addition, FTP's security can be enhanced through secure alternatives like FTPS (File Transfer Protocol Secure) and SFTP (Secure File Transfer Protocol), ensuring the protection of sensitive information during transfers.
Overview of BigQuery (as a Destination)
Google BigQuery is a fully managed and serverless cloud data warehouse and analytics platform provided by Google Cloud Platform (GCP). It is designed to process and analyze massive datasets, making it a powerful tool for data analytics. With its columnar storage and SQL compatibility, you can execute complex queries and aggregations without the delays you usually witness in traditional databases.
Combining real-time and batch-processing capabilities, BigQuery supports geospatial analysis and machine learning integration. It even includes features like window function and BigQuery ML for comprehensive analytics. BigQuery’s seamless integration with Google Cloud services facilitates end-to-end data pipelines. Overall, it is an efficient solution for large-scale data analysis and insights.
2 Reliable Ways to Move Data From FTP to BigQuery
This section will cover two approaches for transferring data from FTP to BigQuery:
- The Easy Way: Load Data from SFTP to BigQuery using no-code tools like Estuary
- The Manual Approach: Integrate FTP to BigQuery using manual tools and commands
Method #1: SFTP to BigQuery Integration Using No-Code Tools Like Estuary
Real-time, no-code data integration platforms like Estuary Flow offer better scalability, reliability, and integration capabilities. Its intuitive UI and pre-built connectors simplify setup, making data transfers seamless and reducing the risk of errors. With its automation capabilities, Flow can orchestrate complex workflows, ensuring timely and accurate data synchronization between SFTP and BigQuery.
Before you begin the SFTP to BigQuery ETL using Estuary Flow, it’s important to ensure that you meet the following requirements:
- SFTP Source Connector: You'll need an SFTP server that can accept connections from the Estuary Flow IP address 34.121.207.128 using password authentication.
- BigQuery Destination Connector: You'll need a new Google Cloud Storage (GCS) bucket located within the same region as the BigQuery destination dataset. And a Google Cloud service account with a key file generated.
Step 1: Register/Login to Estuary Account
If you are a new user, register for a free Estuary account. Or, log in with your credentials if you already have an account.
Step 2: Set SFTP as a Data Source
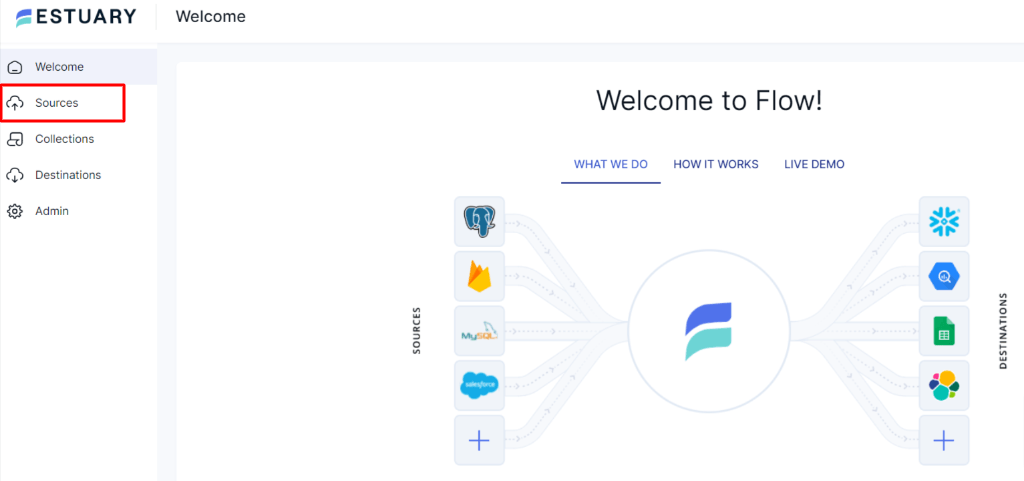
- After logging in, set up the SFTP as the source of the data pipeline. Click on Sources located on the left side of the Estuary’s dashboard.
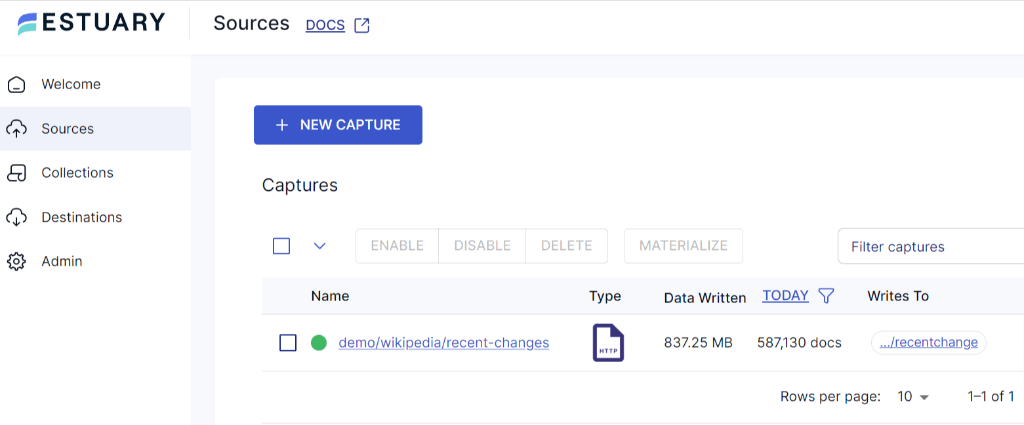
- You’ll be directed to the Sources page. Click the + New Capture button.
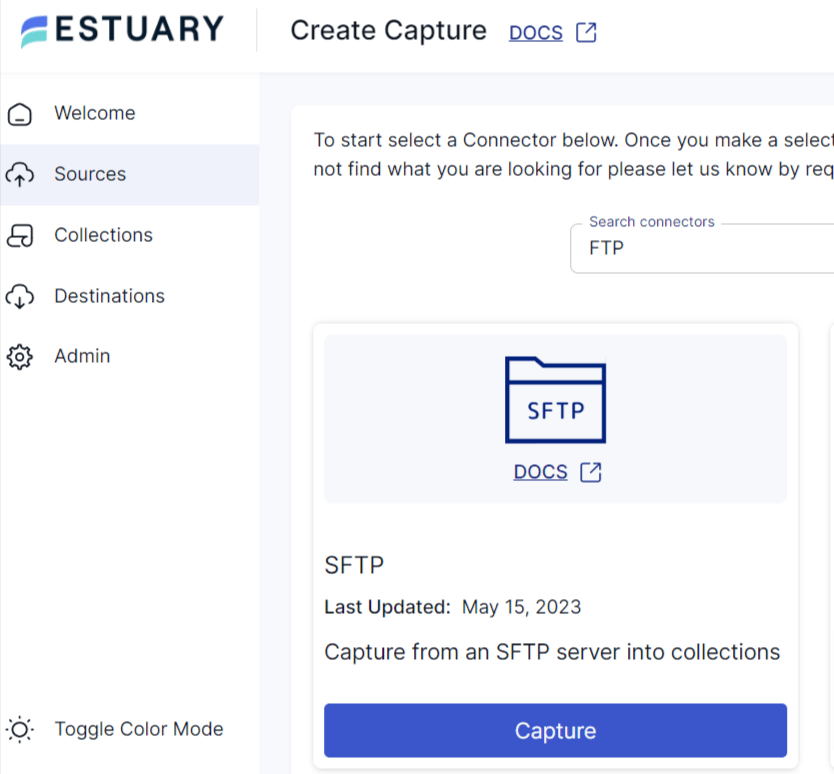
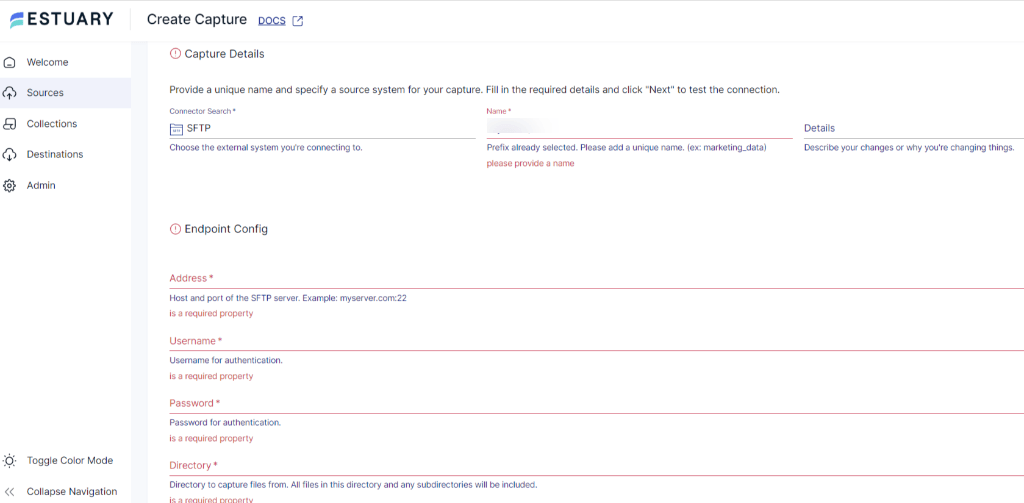
- Locate the SFTP connector by using the Search Connectors box, then proceed to click the Capture button. This action will lead you to the SFTP connector page.
- Enter a unique name for your connector in the Capture details. Fill in the Endpoint Config details such as Address, Username, Password, and Directory.
- Click on Next, followed by Save and Publish.
Step 3: Connect and Configure BigQuery as Destination
- To set up BigQuery as a destination, go to the Estuary dashboard, click on Destinations, then click on + New Materialization.
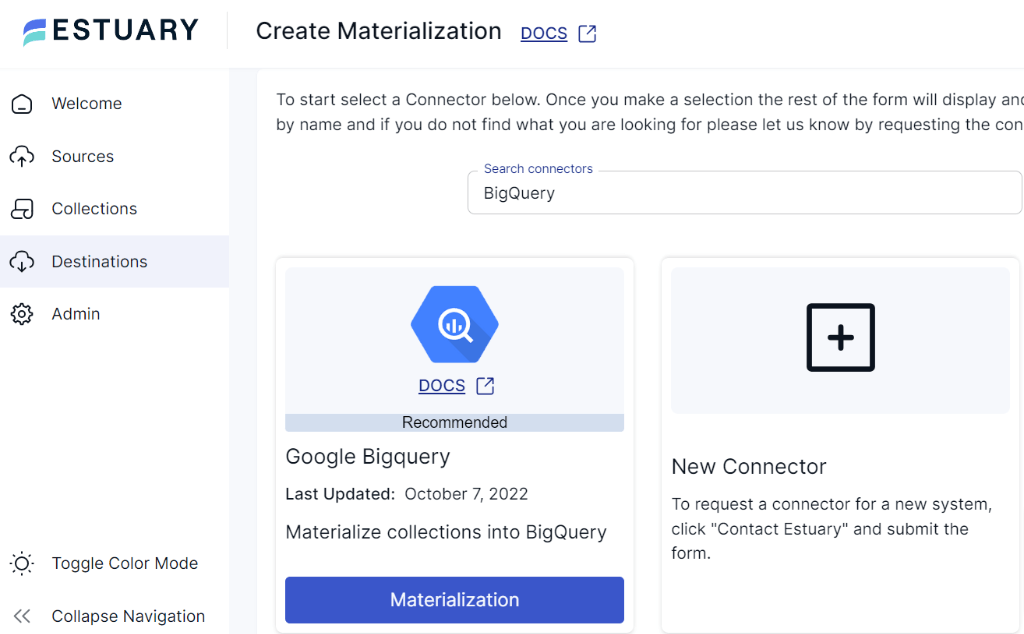
- Use the Search Connector box to find Google BigQuery, and then click on the Materialization button. This will direct you to the dedicated page for Google BigQuery materialization.
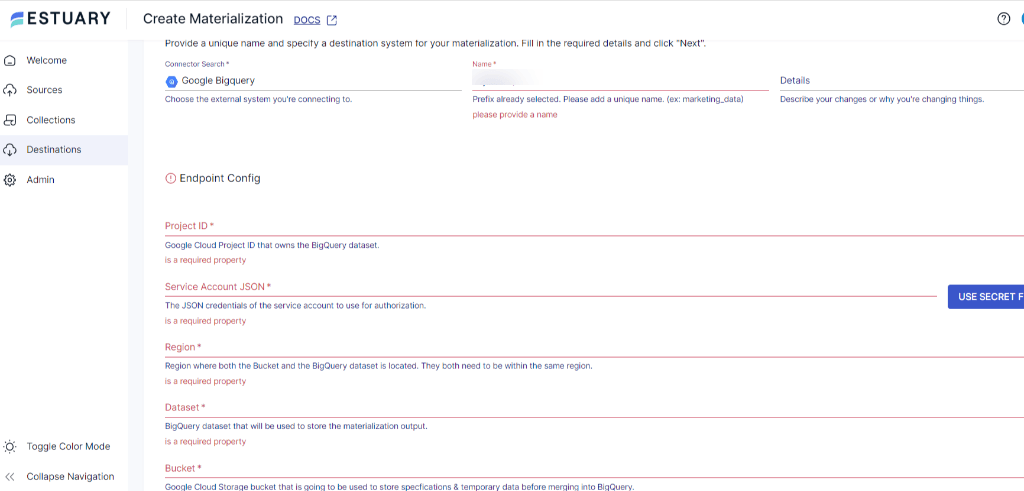
- Within the BigQuery Create Materialization page, enter a unique name for the connector. Provide the Endpoint Config details such as Project ID, Region, Dataset, and Bucket details. While Flow collections are usually picked automatically, you also have the option to choose specific ones using the Source Collections feature.
- Once you have filled all the mandatory fields, click on Next.
- Next, click on Save and Publish. Estuary Flow will initiate the real-time movement of your data from SFTP to BigQuery.
For detailed instructions on setting up a complete Data Flow, refer to the Estuary Flow documentation:
Method #2: Manually Integrate FTP to BigQuery
Manually integrating FTP data with BigQuery involves fetching data from an FTP server and loading it into BigQuery. But before diving into those steps, let's look at the essential prerequisites.
- FTP server access where the data is located with necessary credentials.
- Google Cloud account to use Google BigQuery.
- Google Cloud project, where you'll set up your BigQuery dataset and tables. BigQuery API must be enabled in your project.
- Install the CURL utility on your local machine.
Here's a step-by-step guide on how to achieve this:
Step 1: Download Files using CURL
Open a terminal on your local machine. Use the CURL utility command to fetch files from the FTP server and save them locally.
plaintextcurl -u username:password ftp://ftp_server/remote_file_path/data.csv -o local_file_path/data.csv-o flag tells curl where to save the downloaded file on your local machine. Replace username, password, ftp_server, remote_file_path/data.csv, and local_file_path/data.csv with your actual FTP credentials, server details, remote file path, and local file path, respectively.
After the file is downloaded to your local machine, perform any necessary data transformations to align with the BigQuery schema.
Step 2: Upload Data to Google Cloud Storage
Loading data into Google Cloud Storage (GCS) acts as an intermediate storage layer to store the data temporarily before loading it into BigQuery. This approach has advantages like data decoupling, integrity check, and optimization while also serving as a robust backup during the loading process.
Now, create a GCS bucket to store the CSV file temporarily before loading it into BigQuery.
- Go to the Google Cloud Console.
- Navigate to the Storage section and click on Buckets.
- Select your project and click on Create Bucket.
- Follow the prompts to name your bucket and configure any additional settings.
- Use the Google Cloud Console options to upload the CSV file to the GCS bucket you created.
Step 3: Replicate Data into BigQuery
Replicating data into BigQuery can be performed either by using the BigQuery Console or the bq load command.
Using BigQuery Web Console
- Open the BigQuery web console.
- In the navigation pane on the left, select your desired project and dataset.
- Select the existing table or create one by clicking on the Create Table button.
- Choose Create Table from Source and then Google Cloud Storage as the source data.
- Browse your GCS bucket and select the file you uploaded.
- Configure the schema by manually specifying column names and types or selecting Auto detect to have BigQuery infer the schema.
- Adjust any additional settings as needed.
- Click the Create Table button to initiate the data load.
- After the data is loaded into BigQuery, you can navigate to your dataset and the newly created table to review the schema and FTP data.
Using BQ Load Utility
The BQ Load Utility is designed to simplify the process of data loading from various sources into BigQuery, enabling efficient data transfer. It facilitates data ingestion by offering features like schema management and error handling. Use the command below to load data into BigQuery:
plaintextbq load --source_format=CSV <project_id>:<dataset_id>.<table_id> <local_file_path/data.csv> <schema_definition>Replace <project_id>, <dataset_id>, <table_id>, <local_file_path/data.csv>, and <schema_definition> with the actual project ID, dataset ID, table ID, local file path, and schema definition, respectively.
By following these steps, you can manually connect FTP to BigQuery.
Limitations of the Manual Approach
The manual method of transferring data from FTP to BigQuery can be a straightforward option for small datasets, occasional transfers, or backing up data. However, it comes with certain limitations that can make it inefficient in various scenarios. Some of these limitations include:
- Scalability and Efficiency: The manual approach can become inefficient and time-consuming when dealing with large datasets. Downloading from FTP, uploading into the GCS bucket, and loading into BigQuery for extensive or frequent transfers can lead to slower data processing.
- Error-Prone: Manual process is prone to human errors, such as data format mismatches, incorrect schema definitions, or accidental data loss. These errors can affect the data integrity and quality in the BigQuery table.
- Limited Automation: Manual transfers lack automation, making it challenging to implement scheduled or real-time data updates.
Get Integrated
Integrating FTP into BigQuery offers several advantages, such as enhanced scalability and efficient analysis. The manual method may serve well for smaller datasets or one-off transfers. But, its limitations in terms of automation, scalability, and real-time analysis become apparent as data needs grow.
Data pipeline tools like Estuary Flow provide you with a user-friendly interface and automation capabilities. Flow transforms the data integration process into an optimized and streamlined workflow. By completing two steps to connect FTP to BigQuery, Estuary Flow ensures data integrity, enables near real-time synchronization, and enhances performance.
Move data from FTP to BigQuery seamlessly; sign up for free today to build your pipeline!
Ready to explore more ways to optimize your data workflows? Check out our related articles:
- SFTP & FTP to Redshift: Learn how to seamlessly integrate secure file transfer protocols with Amazon Redshift for efficient data ingestion.
- FTP to Snowflake: Discover the steps to effortlessly transfer data from FTP servers to Snowflake's cloud data platform, unlocking powerful analytics capabilities.

About the author
With over 15 years in data engineering, a seasoned expert in driving growth for early-stage data companies, focusing on strategies that attract customers and users. Extensive writing provides insights to help companies scale efficiently and effectively in an evolving data landscape.


