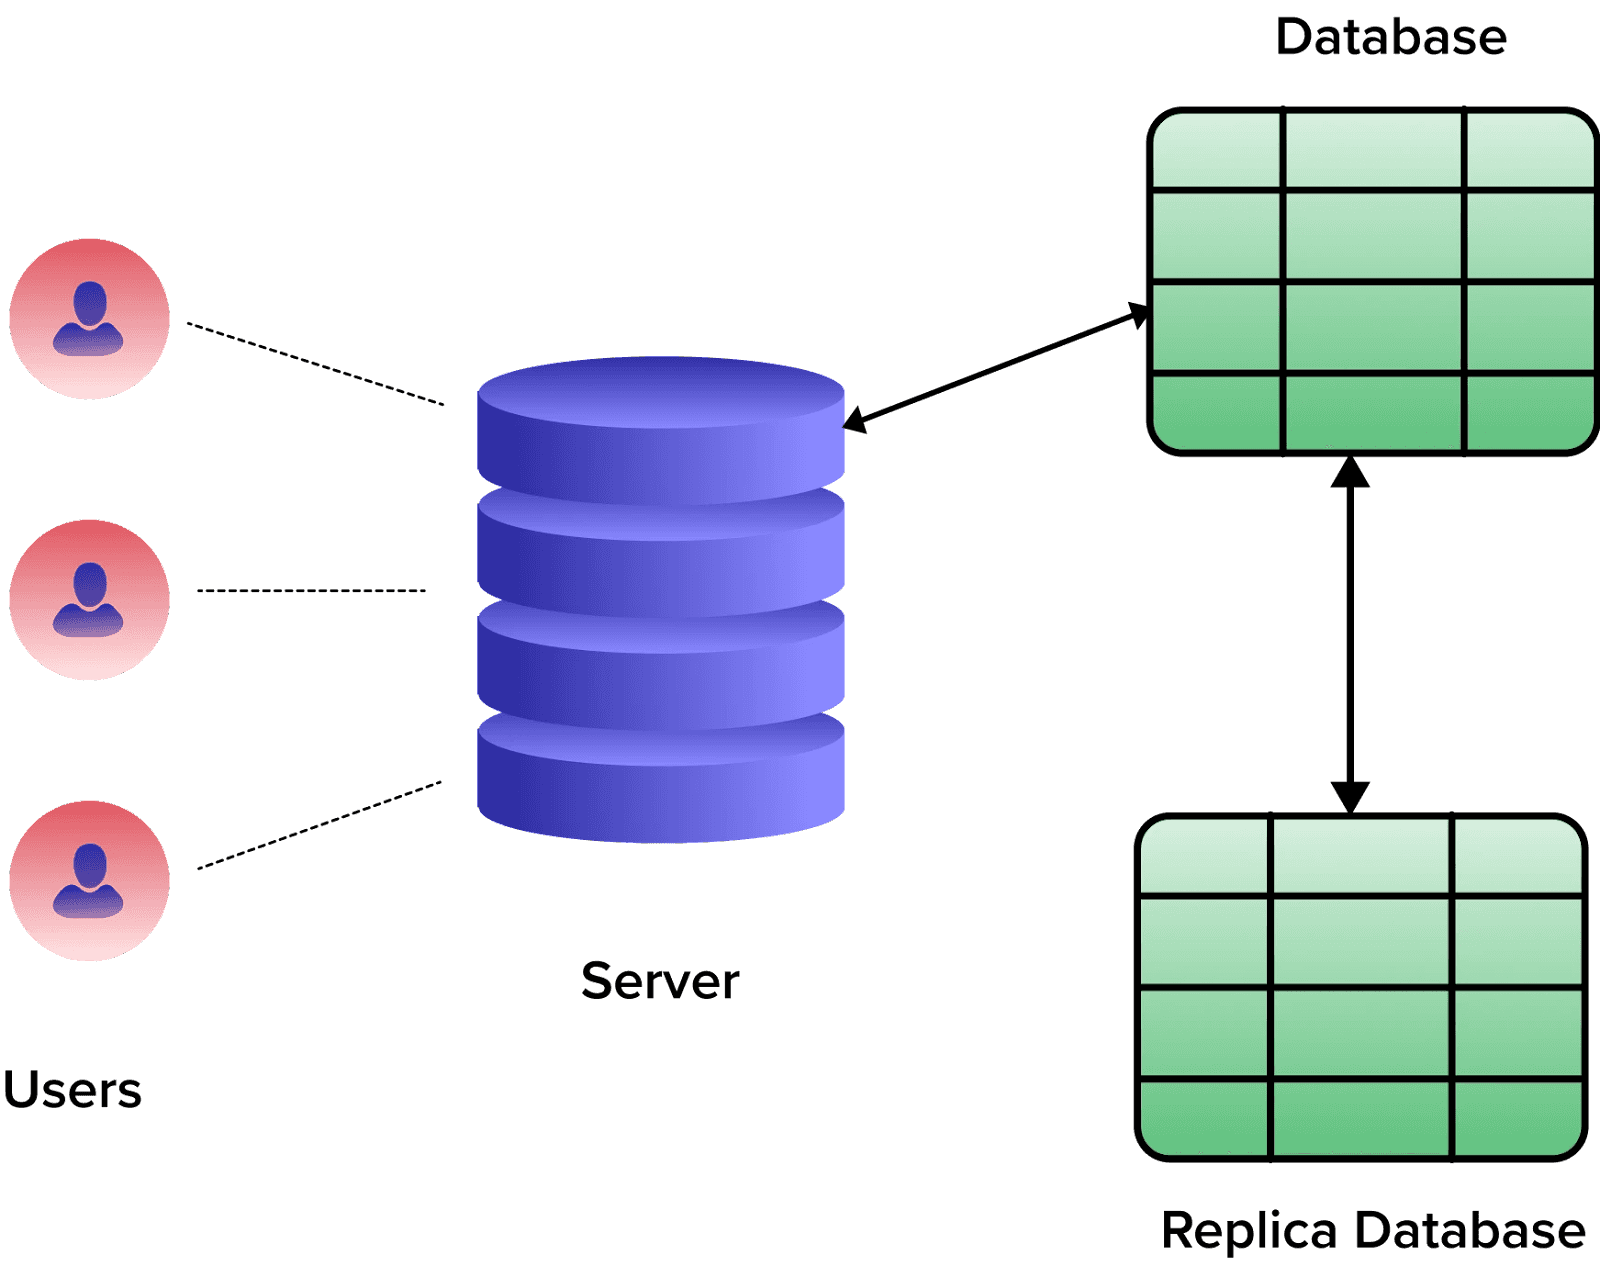
Database replication is the process of making multiple copies of the same database and keeping them up to date. Why is database replication important, you ask? Well, around 82% of organizations experience at least one unplanned outage per year. The redundant copies created by database replication act as a fail-safe in case of such scenarios.
Consider this: imagine you're a data expert in a bustling startup, entrusted with the responsibility of safeguarding the company's most valuable asset: its data. One fateful day, a server hiccup triggers a chain reaction, leaving your database inaccessible.
Hours pass, and the downtime not only causes frustration but also causes substantial financial losses and a dent in your reputation. At that very moment. You realize that relying on a single point of failure is a risky gamble.
Enter database replication – a lifeline that can transform your data infrastructure and fortify it against unforeseen disasters.
In this guide, we explain how database replication works, the main replication types, and how to set up replication for MySQL, SQL Server, and PostgreSQL. We also show how Estuary enables real-time replication without operational complexity.
What Is Database Replication? Understanding The Basics
Database replication involves duplicating data from a source database to one or more target databases. This operation ensures that data remains consistent and readily available across networks. This procedure maintains the comprehensive structure and relationships within your database across multiple locations.
The process differs from data replication, which involves copying specific data items from one location to another. Data replication doesn’t necessarily maintain the complete structure or relationships within a database. On the other hand, database replication focuses on the whole database and how it changes over time. This keeps your data consistent and accurate.
7 Main Types Of Database Replication
Different experts categorize the types of database replication in different ways. Some focus on broad methods like a snapshot, transactional, and merge replication. Others look at the finer details, like full-table, key-based incremental, or log-based incremental replication.
However, all these are valid methods of replication, and they can even overlap in certain scenarios. For instance, transactional replication might use elements from log-based incremental replication to mirror transactions in real time. For the purposes of providing a more complete picture, we’ll combine these viewpoints and look at how they work.
Full-Table Replication
This method transfers all rows of data, including new, updated, or existing ones, from the source database to the target. While it creates a perfect replica, it can be slow, costly to maintain, and resource-demanding for large data sets.
Key-Based Incremental Replication
This type of replication targets only the updated or newly added data. It operates like a filter, looking for changes based on a unique key, like a timestamp or an integer key. This selective replication saves resources, but one drawback is that it doesn't capture deleted data, as it doesn't recognize deletions in the source.
Log-Based Incremental Replication
This method examines the database binary log file to detect what has changed. It identifies all the changes (inserts, updates, and deletes) and replicates them to the destination. Though precise and resource-friendly, it can be somewhat complex to set up.
Trigger-Based Replication
Instead of relying on specific keys or timestamps, trigger-based replication uses database triggers to detect and capture changes in the source database. When a change occurs, such as an insert or delete operation, a trigger is activated, and the modified data is replicated to the target database. This method ensures that all changes are accurately captured and propagated in near real-time, but this comes with the drawback of being resource intensive.
Snapshot Replication
The snapshot replication takes an image of your database at a specific point in time and then replicates it to the destination. It’s quick and easy, but it doesn’t record changes that happen after the snapshot is taken. This method of replicating databases is more suitable for cases when you need to quickly replicate your database, and alterations to the data are rare.
Transactional Replication
Transactional replication takes a snapshot of all the existing data in the source database. Then, with each new change or development, the same transaction is mirrored in the replica database in near real-time.
Merge Replication
This allows multiple databases to be updated independently while maintaining synchronization with each other. Changes made at any location are tracked and applied to all others, ensuring a unified and updated system.
How To Setup Database Replication For MySQL, SQL Server, And PostgreSQL: The Classical Approach
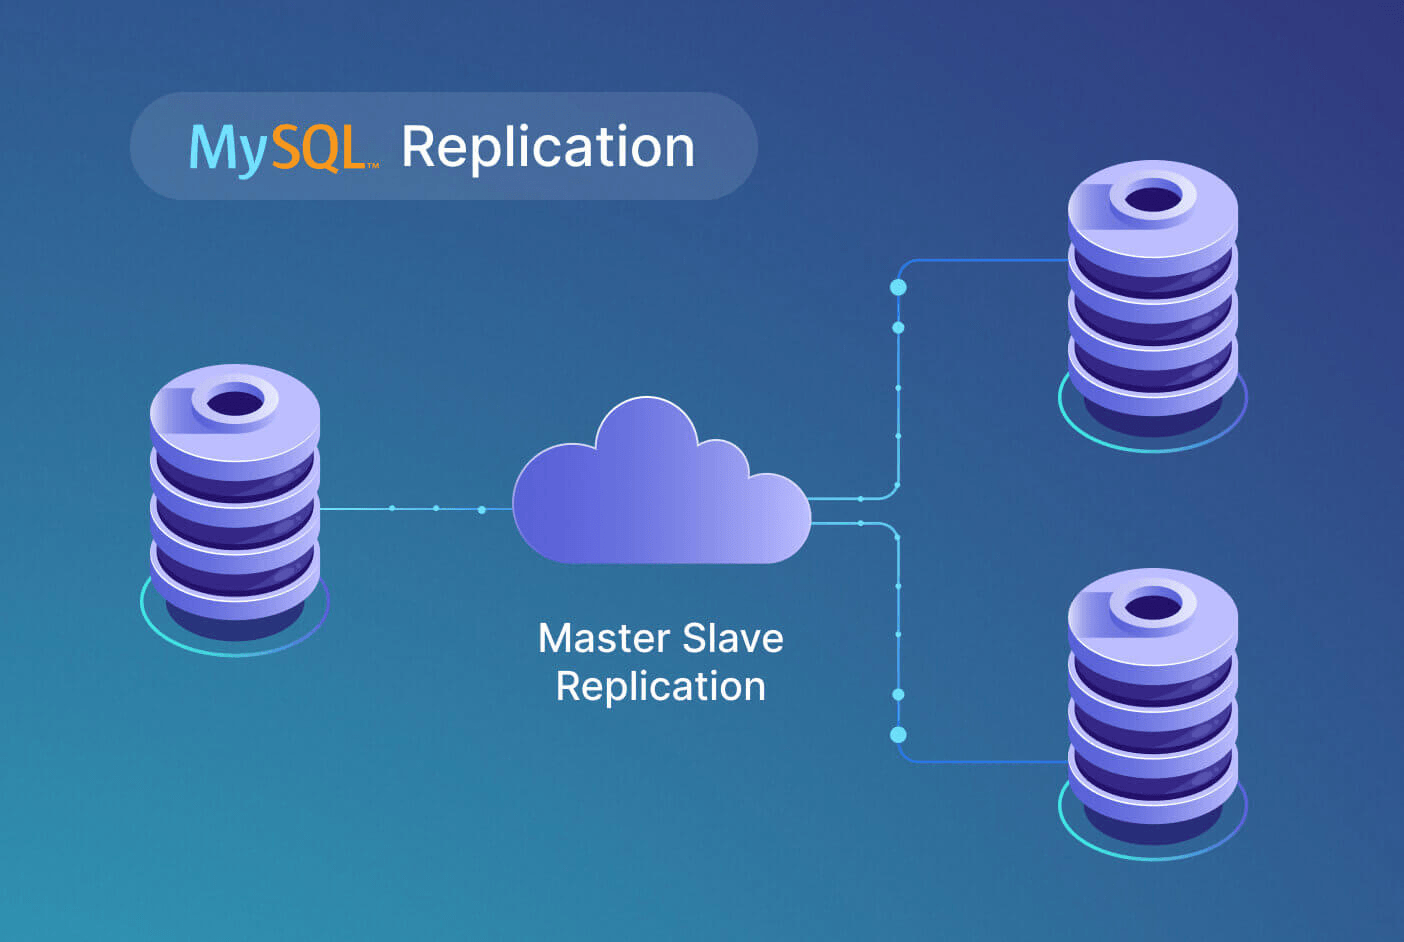
MySQL, SQL Server, and PostgreSQL are all well-known SQL databases that use replication techniques. Each system has its replication process, but they all have the same goal: to keep the data on all servers accurate.
Let’s discuss how you can set up database replication for MySQL, SQL Server, and PostgreSQL.
Step-By-Step Guide To MySQL Database Replication
Here is a detailed guide on how to setup MySQL Database Replication:
Step 1: Setting Up The Master
First, you need to install MySQL on your master server if it’s not installed already. After that, set up the MySQL configuration file, located usually at ‘/etc/mysql/mysql.conf.d/mysqld.cnf’. Update the server-id and bind-address parameters with your server’s ID and IP address, respectively.
Step 2: Create A New User For The Slave
Next, create a new user on your master server. This user allows the slave server to connect to the master. Assign the user replication privileges and then flush privileges to enact the changes.
Step 3: Backup Data On The Master
Now, create a backup of your databases on the master server using mysqldump tool. This backup will be later used to sync data with the slave server.
Step 4: Transfer Data To The Slave
Transfer the backup file to the slave server using “secure copy (scp)” or another file transfer protocol.
Step 5: Setting Up The Slave
Install MySQL on the slave server and edit the MySQL configuration file in the same manner as you did for the master but with a different server-id.
Step 6: Import Data To The Slave
Import the data dump from the master into your slave server using the mysql command.
Step 7: Setup Replication
Finally, set up the slave to commence replication from the master. Instruct the slave server where to locate the master server and from which position it should start replicating.
Step 8: Test The Replication
To ensure everything is set up correctly, make changes on your master server and see if the changes are replicated to the slave server.
Step-By-Step Guide To SQL Server Database Replication
To replicate your Microsoft SQL Server databases, the most straightforward approach is to use the SQL Server Management Studio (SSMS). Let’s discuss the replication steps using SSMS, covering the SQL Server replication step by step.
Step 1: Prerequisites
Ensure that you have SQL Server, SQL Server Management Studio, and the primary database installed on your system. The SQL Server version must be any edition other than SQL Server Express or SQL Server Compact, as they cannot be replication publishers.
Step 2: Setting Up Replication Agents
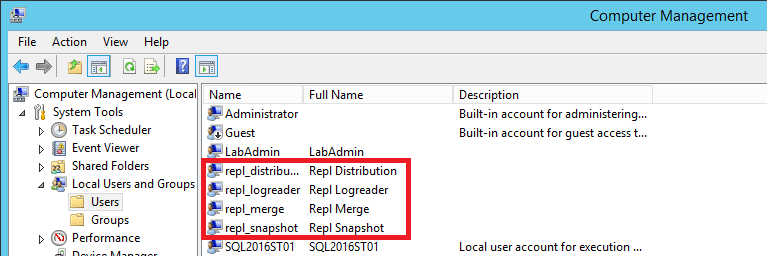
Create separate Windows accounts on your local server for the Snapshot Agent, Log Reader Agent, Distribution Agent, and Merge Agent.
Step 3: Prepare The Snapshot Folder
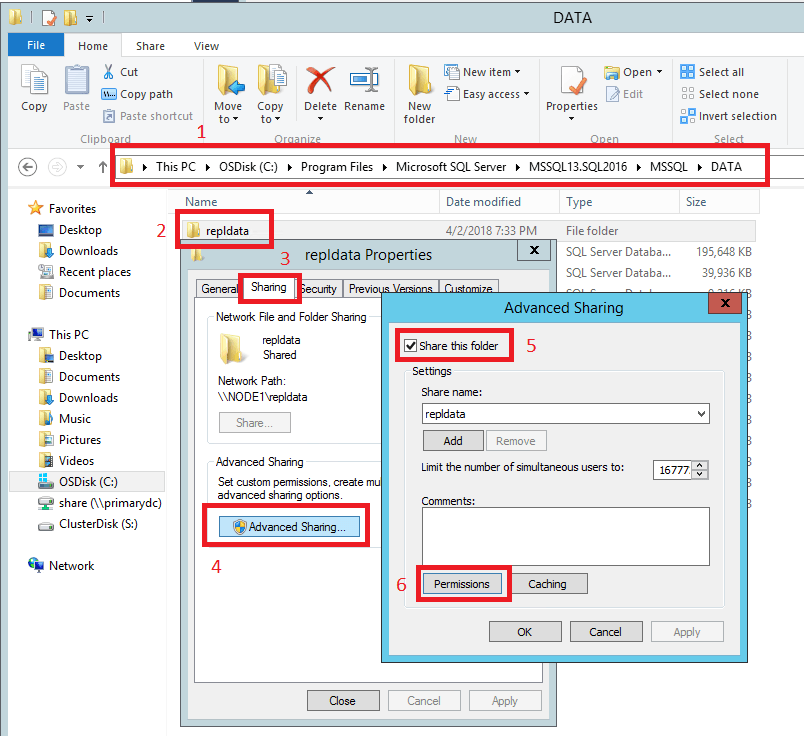
Create a new folder named ‘repldata’. This is the snapshot folder where the publication snapshot will be stored. Grant the appropriate permissions for each of the replication agents in this folder.
Step 4: Configure Distribution
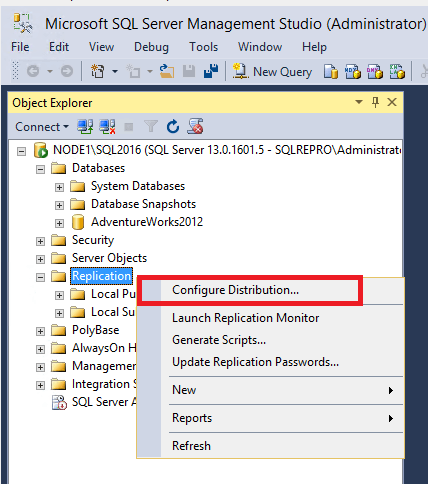
Connect to the publisher in SQL Server Management Studio and right-click the ‘Replication’ folder and select ‘Configure Distribution’. Follow the wizard to complete the configuration. During this process, make sure the SQL Server Agent is configured to start automatically.
Step 5: Set Database Permissions
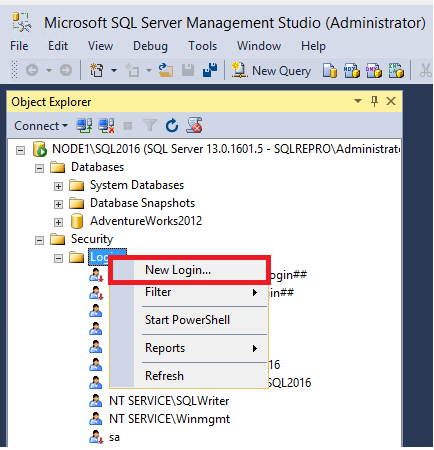
In SQL Server Management Studio, expand Security, right-click on ‘Logins’, and then select ‘New Login’. Create logins for all the local accounts you created earlier (repl_snapshot, repl_logreader, repl_distribution, and repl_merge). These logins need to be mapped to users who are members of the db_owner fixed database role in the distribution and test databases.
Step 6: Create Publication
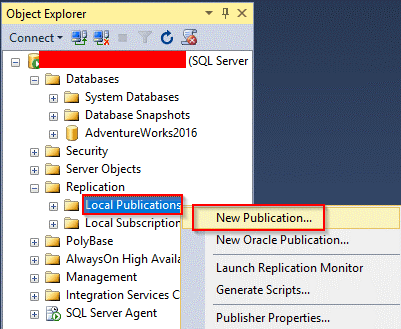
In SQL Server Management Studio, right-click the Replication folder and select ‘New Publication’. Follow the wizard to select the type of publication, the articles to publish, and the snapshot agent schedule.
Step 7: Create Subscription
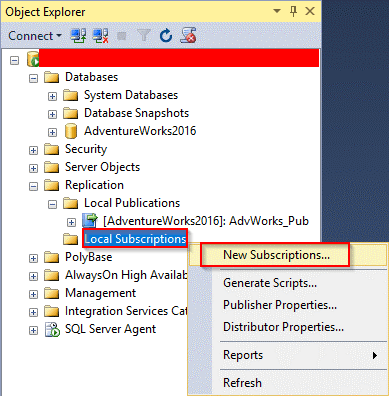
In the Replication folder, right-click on the publication you created and select ‘New Subscriptions’. Follow the wizard to choose:
- Distribution agent location
- Subscribers
- Subscription database
- Distribution agent security
- Synchronization schedule
- Initialization method
Step 8: Monitor Replication
Monitor the replication by opening the ‘Replication Monitor’ in SQL Server Management Studio. You can view details such as status, performance, and synchronization details of the publishers, publications, and subscriptions.
Step-By-Step Guide To PostgreSQL Database Replication
PostgreSQL supports different methods of replication, one of them being Streaming Replication. This technique is used to create and maintain a replica of your database. Here is an overview of how you can set up Streaming Replication in PostgreSQL:
Step 1: Initial Database Setup
Begin by initializing the database and configuring the PostgreSQL master server, the primary database server where all transactions occur. Alter specific configurations in the PostgreSQL configuration file, such as ‘wal_level’, ‘max_wal_senders’, etc.
Step 2: Create Replication User
Create a user with replication privileges on the master server. This user handles replication between the master and standby server.
Step 3: Configure The Master Node
On the master server, enable configuration settings for replication. This involves modifying parameters in the ‘postgresql.conf’ file and authorizing the replication user to connect to the server in the ‘pg_hba.conf’ file.
Step 4: Backup The Master Server
Create a backup of the master server, which will be the starting point for the standby server. PostgreSQL provides the ‘pg_basebackup’ utility for this purpose, which creates a base backup of the PostgreSQL database cluster, including all necessary transaction log files (WAL files).
Step 5: Prepare The Standby Server
Now switch to the standby server. Use the backup from the previous step to set up the standby server, which will replicate the master server. This process also involves adjustments in the ‘postgresql.conf’ file and creating the replication configuration file — ‘recovery.conf’.
Step 6: Start The Standby Server
Once the ‘recovery.conf’ file is correctly created and configured, which can be done by using the -R command in the ‘pg_basebackup’ utility, start the standby server. This server will connect to the master server and begin replicating changes.
Step 7: Monitor The Replication Process
Monitor the replication process regularly to ensure that it’s working as expected. PostgreSQL provides various system views and functions to check the status of the replicated databases and the progress of replication.
Requirements Of Modern Database Replication & The Need For Real-Time Replication
Unlike traditional single-database systems, today’s data is scattered across multiple platforms, requiring a need for a system that can capture, track, and mirror changes accurately and ensure the same data is available everywhere. This is where real-time database replication steps in.
Real-time replication is not just about making a mirror image of your data – it’s about improving the data availability and reliability while providing a seamless experience to users. It reduces latency, improves performance, and facilitates swift disaster recovery.
Let’s look at some key requirements of modern database replication and see why there’s a growing need for real-time replication.
Change Data Capture (CDC)
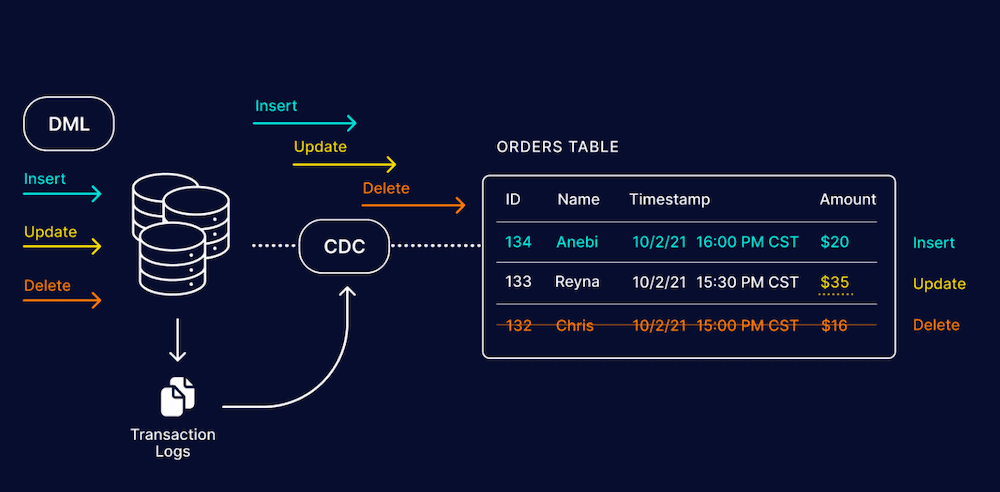
CDC is a big one. You need your replication platform to catch every change happening in your database, from the smallest updates to large-scale transactions. This real-time tracking helps maintain an accurate and current copy of your data.
Observable Data
Keeping track of what’s happening at every step is crucial. You want to know when the data is captured, when it’s transferred, and when it arrives at its destination. It’s all about transparency and control over your data.
SQL-Based Transformation
We’re talking about real-time access and transformation of your data. Modern replication platforms should let you use your go-to SQL commands to manipulate data as you see fit.
Scalability
A modern replication platform should scale out across multiple nodes or cloud instances to handle growing data volumes. It’s like adding more lanes to a highway to handle more traffic.
Low Latency
If you want real-time data replication, then low latency is extremely important. Your replication platform should keep delays to a minimum so data can be delivered and used right when it’s needed.
Data Validation
Make sure that the data you’ve replicated is accurate. A modern replication platform should provide you with statistics to verify this.
Traditional Database Replication vs Real-Time CDC Replication
Traditional database replication was designed primarily for high availability and disaster recovery. While it works well for basic redundancy, it often falls short for modern use cases like real-time analytics, event-driven systems, and operational data sharing.
Real-time Change Data Capture (CDC) replication focuses on streaming every change as it happens, making it better suited for today’s distributed data architectures.
Here’s a practical comparison:
| Aspect | Traditional Database Replication | Real-Time CDC Replication |
|---|---|---|
| Primary purpose | High availability and failover | Real-time data movement and analytics |
| Data latency | Seconds to minutes | Sub-second to near real-time |
| Change tracking | Table snapshots or internal replication mechanisms | Log-based CDC (inserts, updates, deletes) |
| Impact on source database | Can be resource-intensive | Low impact (reads transaction logs) |
| Schema evolution handling | Limited and manual | Built-in schema tracking and evolution |
| Observability | Minimal visibility | End-to-end visibility into data movement |
| Downstream flexibility | Usually same database engine | Works across warehouses, lakes, and services |
Traditional replication is effective when you simply need a hot standby. CDC-based replication becomes essential when data needs to be consumed, transformed, or analyzed in real time across multiple systems.
When You Need Real-Time Database Replication (Not Just Backups)
Backups and traditional replication protect data after something goes wrong. Real-time database replication is about preventing disruption and enabling faster decisions before issues escalate.
You typically need real-time replication when:
- You power analytics or dashboards from live operational data: Batch replication introduces delays that make dashboards stale. Real-time replication ensures reports reflect what is happening right now.
- You synchronize data across multiple systems: Modern architectures rely on multiple databases, warehouses, and services. Real-time replication keeps all systems consistent without manual sync jobs.
- You support customer-facing applications with strict latency requirements: Applications like fraud detection, personalization, and order tracking depend on immediate data availability.
- You need reliable disaster recovery with minimal data loss: Streaming changes continuously reduces recovery point objectives (RPO) from minutes to seconds.
- You want to avoid a heavy load on production databases: CDC-based replication reads from database logs instead of querying tables, reducing performance impact on primary systems.
In short, if your data must be current, reliable, and continuously available, real-time database replication is no longer optional—it’s foundational.
Real-Time Database Replication With Estuary
Estuary is the right-time data platform that lets teams replicate data exactly when they choose — sub-second, near real-time, or batch — without managing fragile replication pipelines or custom CDC tooling.
Unlike traditional database replication methods that focus only on failover, Estuary is built for continuous, real-time data movement across systems. It captures every change from operational databases and reliably delivers it to warehouses, lakes, and downstream services with low latency and strong consistency guarantees.
Why Teams Use Estuary for Database Replication
- Unified data movement: Estuary replaces disconnected replication, streaming, and batch tools with a single platform for CDC and real-time data delivery.
- Right-time performance: Choose how fast data moves based on the use case — from real-time analytics to scheduled batch replication — without rebuilding pipelines.
- Enterprise-grade reliability: Estuary uses exactly-once processing semantics and a fault-tolerant architecture to ensure data is delivered accurately and in order, even during failures.
- Low operational overhead: Log-based CDC minimizes load on production databases while eliminating custom scripts, cron jobs, and brittle orchestration.
- Built-in observability and control: Track captured changes, delivery status, and data freshness end to end, with clear visibility into every stage of replication.
3-Step Guide To Database Replication Using Estuary
With Estuary Flow, you can set up real-time database replication with ease. Let’s look at the simple steps you need to follow:
Step 1: Creating A New Capture
First, we’ll start by capturing changes from your database.
- Navigate to the ‘Captures’ tab on the Flow web app and click on ‘New capture’.
- Select the database Connector from the list of available connectors.
- Fill in the required properties which typically include your database connection details and any specific configurations you need.
- Name your capture and click ‘Next’.
- In the Collection Selector, choose the collections (tables) you want to capture from your SQL database.
- Once you’re happy with your configuration, click ‘Save and publish’.
Step 2: Transforming Captured Data (Optional)
With Estuary, you can perform transformations on the fly if your replicated data needs to be modified before it is sent to its destination. This could involve filtering, aggregation, or even applying business rules.
Here’s how you create a transformation:
- Navigate to the ‘Collections’ tab and click on ‘New transformation’.
- Choose the collection you want to transform.
- Name your new derived collection.
- Define your transformation logic. With Flow, you can write transformations using either SQL or TypeScript.
Step 3: Creating A New Materialization
Now that you have captured and possibly transformed your data, send it to its destination database using the following steps:
- Head over to the ‘Materializations’ tab and click on ‘New materialization’.
- From the available connectors, choose the appropriate connector.
- Name your materialization and enter the Endpoint Config details.
- The Source Collections section will display the collections you captured from your database.
- Select the relevant collections and click ‘Next’.
- Once you’re content with your setup, click ‘Save and publish’. You’ll be notified when the new materialization publishes successfully.
Common Database Replication Use Cases
Database replication supports a wide range of operational and analytical use cases, depending on how quickly data needs to move.
Real-time analytics and dashboards
Replicate operational data into warehouses or analytics platforms with low latency to ensure metrics reflect current system state.
Disaster recovery and high availability
Maintain continuously updated replicas to reduce downtime and minimize data loss during outages.
Microservices and system synchronization
Keep multiple services in sync without direct database coupling or point-to-point integrations.
Data migration and modernization
Stream data from legacy databases into modern platforms without downtime or risky cutover windows.
Choosing the right replication approach depends on latency requirements, system complexity, and downstream usage.
Conclusion
Database replication is no longer just about keeping a standby copy of your data. Modern systems demand real-time database replication that keeps operational, analytical, and customer-facing systems continuously in sync.
Traditional replication methods still play a role in basic failover scenarios, but they struggle to meet today’s requirements for low latency, observability, and scalable data sharing. Real-time CDC-based replication closes that gap by streaming every change as it happens, without adding load or operational complexity.
This is where Estuary, the right-time data platform, provides a more dependable approach. By unifying CDC, streaming, and batch replication in a single system, Estuary lets teams move data exactly when they need it — whether that’s sub-second for live analytics, near real-time for operational reporting, or batch for cost-efficient processing.
If you need real-time database replication to power analytics, synchronize systems, or reduce recovery time objectives without managing fragile replication pipelines, Estuary gives you a simpler and more reliable foundation.
Learn how Estuary supports real-time database replication across MySQL, PostgreSQL, and SQL Server.
FAQs
Does database replication impact performance?
Can database replication work across different systems?
Is real-time database replication expensive?

About the author
With over 15 years in data engineering, a seasoned expert in driving growth for early-stage data companies, focusing on strategies that attract customers and users. Extensive writing provides insights to help companies scale efficiently and effectively in an evolving data landscape.


