Many businesses today rely on Braintree for secure and efficient payment processing. However, businesses struggle to obtain insights from their transactional data as the platform lacks analytics capabilities. In such cases, it becomes imperative to transfer this data into specialized data warehouses like Amazon Redshift, which are specifically built for analytics.
By migrating data from Braintree to Redshift, you can access Redhsift’s comprehensive analytics capabilities, such as trends analysis, customer behavior pattern analysis, price optimization models, etc. The platform provides a more holistic overview of your data by combining transactional data with other data sources, enabling you to make informed decisions.
This guide explores two methods of migrating data from Braintree to Redshift. Let’s start with a quick overview of each platform.
What Is Braintree?
Braintree is a payment gateway platform that allows merchants to process transactions online. The company was founded in 2007 and acquired by PayPal in 2013, making it a subsidiary of the popular online payment system. With Braintree, merchants can accept payments through various sources, such as debit and credit cards and digital wallets.
Braintree is known for its easy-to-use interface and robust security features, including fraud detection tools and Level 1 PCI DSS compliance, which is the highest level of certification in the industry. The platform is also known for its developer-friendly approach with well-documented SDKs and support for popular programming languages such as Java, PHP, Python, Node.js, Ruby, etc.
Here are the key features of Braintree.
- Customizable User Interface: Braintree offers quick integration with its Drop-in UI for a seamless checkout experience. The Hosted Fields ensure PCI compliance, enabling you to customize the UI.
- Multi-Currency Support: Braintree enables merchants to accept payments in multiple currencies, allowing them to cater to customers from around the world. This feature eliminates the need for customers to convert currencies themselves, providing a seamless checkout experience.
- Recurring Billing: For businesses with subscription models, Braintree offers a recurring billing feature that allows for the automatic scheduling of payments. This is particularly useful for companies that rely on consistent revenue streams from subscriptions or memberships.
What Is Redshift?
Redshift is a powerful data warehousing service offered by Amazon Web Services (AWS).
It seamlessly integrates with other AWS services, such as Amazon S3, DynamoDB, AWS Glue, and popular relational databases, including PostgreSQL and MySQL. This integration makes it easy to load and analyze data from different sources, enabling more comprehensive analysis, which can lead to better insights. Redshift’s powerful processing ability, near-limitless scalability, and integration options make it an excellent choice for organizations looking to leverage their data to make informed decisions.
Here are some of the key features of Redshift.
- Granular Access Controls: Amazon Redshift provides granular row and column-level security controls, ensuring users access only the authorized data. It integrates with AWS Lake Formation (LF) for column-level access controls on queries and supports centralized access control to simplify governance.
- Zero-ETL Integrations: Redshift enables no-code integration with Amazon Aurora, Amazon RDS, and DynamoDB for near real-time analytics. The platform makes new data available for querying within seconds of uploading to the connected databases without complex Extract, Transform, Load (ETL) pipelines.
- Concurrency Scaling: This feature allows Redshift to automatically add computing resources to handle spikes in query traffic. It dynamically scales the cluster to handle concurrent queries while ensuring optimal performance.
Migrating Data From Braintree to Redshift
If you’re looking to migrate your data from Braintree to Redshift, here are the two methods you can pick:
- The Automated Method: Using Estuary Flow to Migrate Data from Braintree to Redshift
- The Manual Approach: Using Custom Scripts to Migrate Data from Braintree To Redshift
The Automated Method: Using Estuary Flow to Migrate Data From Braintree to Redshift
A simpler approach to migrating data from Braintree to Redshift is using a no-code SaaS tool like Estuary Flow to build a data pipeline that automates the entire data migration process. Here is a step-by-step tutorial on how to achieve Braintree to Amazon Redshift integration:
Prerequisites
Step 1: Configure Braintree as the Source
- Log in to your Estuary Flow account.
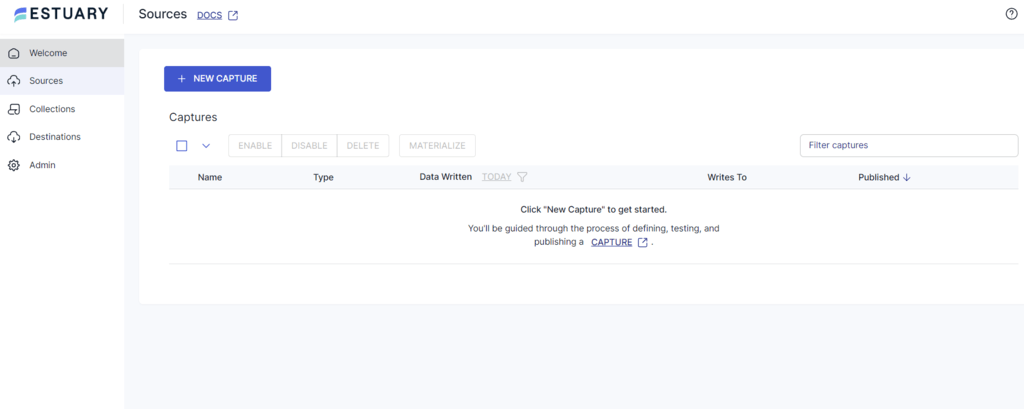
- Select the Sources tab on the left navigation pane. Click on the + NEW CAPTURE button.
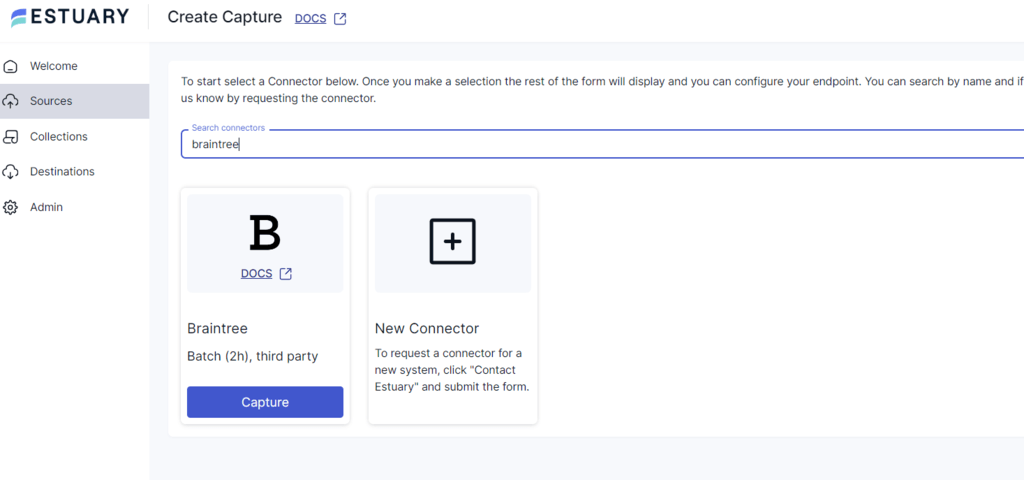
- Search for Braintree in the Search connectors field and click its Capture button to start configuring it as the data source.
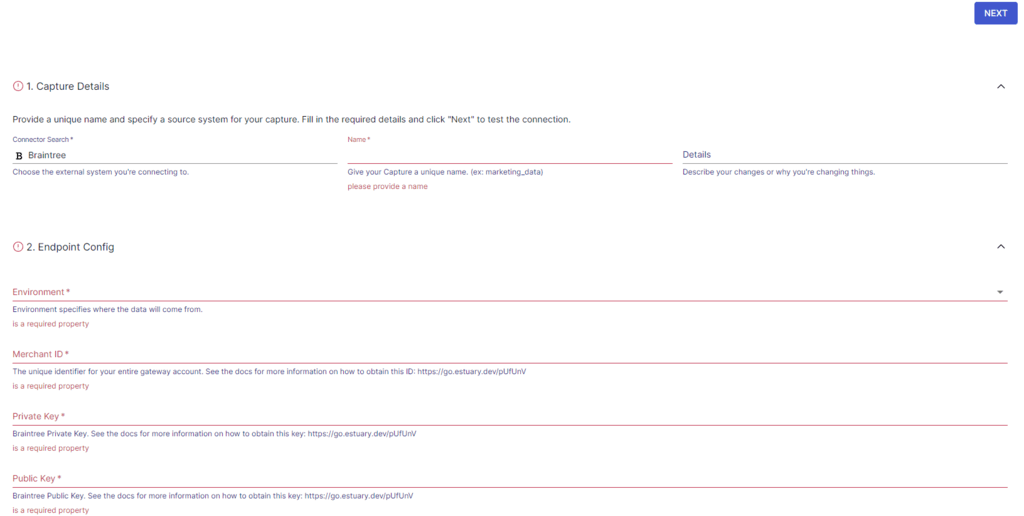
- In the Create Capture page, enter the mandatory details, such as Name, Environment, Merchant ID, Private Key, Public Key, and Start Date. Then, click on NEXT > SAVE AND PUBLISH to start the data capture from Braintree to Flow collections.
Step 2: Configure Redshift as the Destination
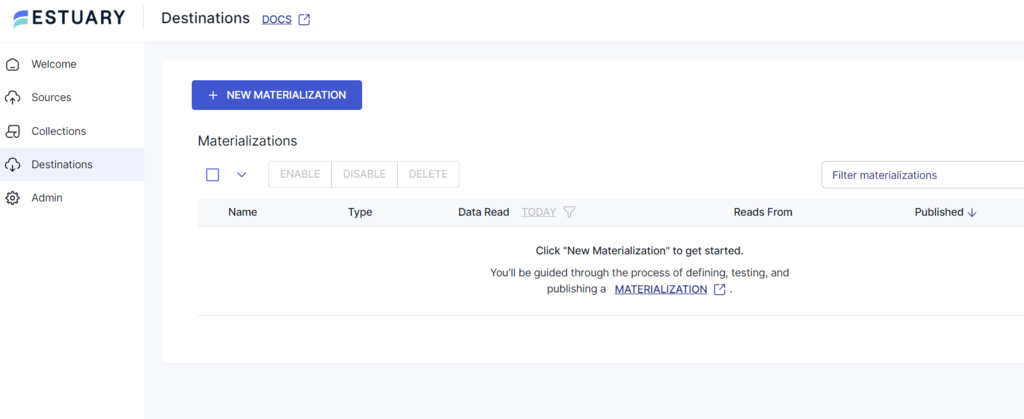
- After setting up the source, you need to configure the destination end of the data pipeline. You can do this by clicking MATERIALIZE COLLECTIONS in the pop-up window that appears after a successful capture, or you can click Destinations on the dashboard.
- Select the + NEW MATERIALIZATION button on the Destinations page.
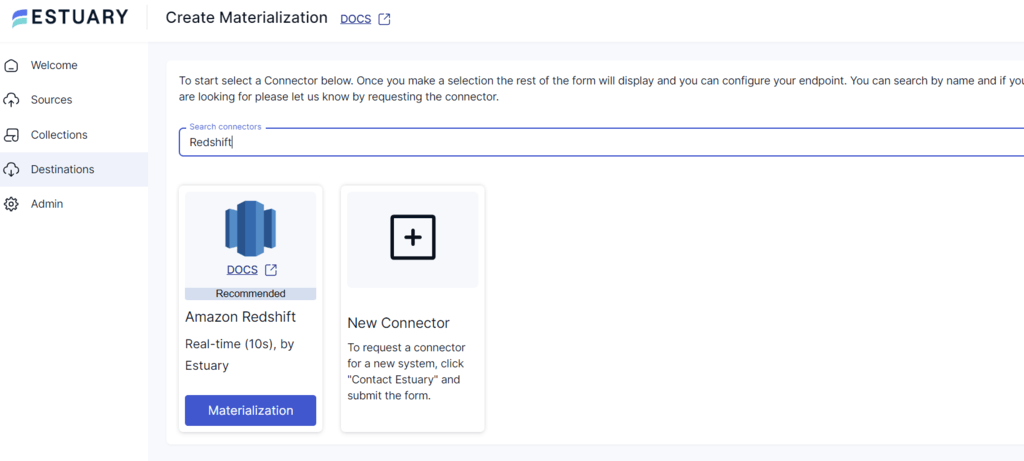
- Search for the Redshift connector using the Search connectors field and click the Materialization button to start configuring it as the destination.
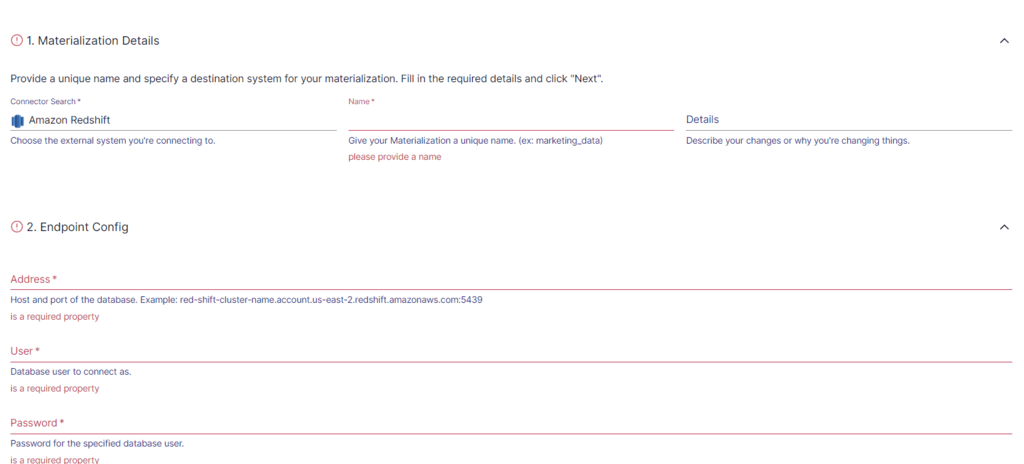
- In the Create Materialization page, enter the mandatory fields such as Name, Address, User, and Password, among others.
- If your Flow collection of Braintree data isn’t automatically added to your materialization, you can use the Source Collections section to do this manually.
- Finally, click on NEXT > SAVE AND PUBLISH. The connector will materialize Flow collections into tables in your Redshift database by way of files in an S3 bucket.
Benefits of Estuary Flow
The advantages of using Flow include:
- Real-Time Data Synchronization: Estuary Flow supports real-time data synchronization with millisecond latency, ensuring any changes to source systems are promptly reflected in destination systems. This provides accurate and up-to-date data across different platforms, enhancing operational efficiency.
- No-code Configuration: The platform provides over 300 pre-built connectors, making data migration a breeze and minimizing the chances of errors during the process. Configuring the source and destination with these connectors doesn’t involve any coding.
- Scalability: Estuary can expand horizontally, enabling it to handle substantial amounts of data and effectively meet high-throughput requirements.
The Manual Approach: Using Custom Scripts to Migrate Data From Braintree to Redshift
The manual method takes a different approach to integrating the two platforms. Let’s jump right into what’s needed to load data from Braintree to Redshift using custom scripts:
Step 1: Extracting Data From Braintree
The first step is to extract data from Braintree. You can use Braintree’s API, which provides access to stored data entities such as transactions, customers, and payments. This will include using custom scripts to make API requests to Braintree and specifying the data you wish to extract. The extracted data is in JSON format.
Step 2: Preparing the Data
After extracting the data, the next step is to prepare it for loading into Redshift. This involves transforming the JSON format into a Redshift-compatible structure. While Redshift does support JSON format, it is ideal to transform the data into a structured format for better analysis. In addition, designing a schema that aligns with Redshift’s best practices is essential for optimal performance.
Once the data is extracted and transformed into a Redshift-compatible format, the next step is to load the data into Redshift. This involves migrating it into a source from which Redshift can pull the data. Redshift currently supports three main data sources: Amazon S3, Amazon DynamoDB, and Amazon Kinesis Firehose. You can choose any of the three data sources for Redshift to be able to accept it as input.
Step 3: Loading the Data into Amazon Redshift
With the data transformed into a Redshift-compatible format, you can now load it into your Redshift cluster. There are two methods to accomplish this task. The first method involves using the INSERT command. This requires you to connect your client to your Amazon Redshift instance through a JDBC or ODBC connection; you can execute the INSERT command to load your data.
Here is an example of the INSERT command to load data into the category_stage table:
| insert into category_stage values (12, 'Concerts', 'Comedy', 'All stand-up comedy performances'); |
However, it's important to note that using the INSERT command is not the most efficient method for loading data into Redshift.
For the best performance and use of resources, the COPY command is the way to go as it supports bulk uploads. The COPY command allows you to copy data from files stored in the supported data sources. Redshift can read multiple files simultaneously and distribute the workload across the cluster nodes for parallel processing when using the COPY command.
To perform a COPY operation from Amazon S3 for connecting Braintree to Redshift, you can use the following command:
| copy listing from 's3://mybucket/data/listing/' credentials 'aws_access_key_id=;aws_secret_access_key='; |
By following the above steps, you can manually migrate data from Braintree to Redshift.
However, the process has several limitations, including:
- Technical Expertise: This method requires deep, technical knowledge, which introduces a layer of complexity for people who are not familiar with the technical concepts.
- Time-consuming: The method requires you to manually search and provide the details of the data to be fetched. This becomes inefficient when you have to do this for each section (Vault, Verifications, Subscriptions, etc.).
- Prone to Errors: This method is prone to errors due to the multitude of steps involved. During the extraction, transformation, and loading, errors may arise due to incompatible data types, syntax differences, encoding variations, and inaccurate mapping.
Get Integrated
Migrating your data from Braintree to Redshift lets you position your business to make data-driven decisions that improve efficiency, customer satisfaction, and profitability. If you have the in-house technical resources, custom methods might be a suitable option, as they offer fine-grained control.
However, it’s a particularly complex undertaking as it requires technical know-how and going through multiple steps to migrate your data — and, even then, there’s a chance you could run into issues concerning data accuracy, mapping, compatibility, coding errors, etc.
For those seeking a faster and more streamlined integration solution, Estuary Flow provides pre-built connectors that automate the data migration process and provide near real-time data synchronization.
Ultimately, you have to choose the method that best serves your needs, considering all the factors and specifications. Happy integrating!
Estuary Flow provides an extensive and growing list of connectors, robust functionalities, and a user-friendly interface. Sign up today to simplify and automate data migration from Braintree to Redshift.
FAQs
- What is Braintree to Redshift data integration?
Braintree to Redshift integration involves the process of extracting transaction data from the Braintree payment platform and loading it into an Amazon Redshift data warehouse. This enables businesses to analyze their payment data alongside other business information for deeper insights.
- What data can be transferred from Braintree to Redshift?
The data transferred from Braintree to Redshift includes transactional data (amounts, dates, payment methods, customer information), subscription data, settlement information, and associated metadata.
- How is Braintree data loaded into Redshift?
There are several methods for loading data from Braintree to Redshift. You can use low-code ETL tools like Estuary Flow or dedicated integration solutions.

About the author
With over 15 years in data engineering, a seasoned expert in driving growth for early-stage data companies, focusing on strategies that attract customers and users. Extensive writing provides insights to help companies scale efficiently and effectively in an evolving data landscape.


