Application developers constantly strive to build highly efficient applications with minimal downtime. Supabase, with its robust backend management capabilities, has become a go-to solution for many developers. However, when dealing with large datasets or advanced analytics, Supabase’s performance can fall short.
Integrating Supabase with Snowflake—a powerful and scalable data warehousing solution—addresses these limitations. By leveraging Snowflake’s extensive data storage, processing, and analysis capabilities, developers can streamline data management.
Snowflake’s architecture supports complex queries across various data types and scales seamlessly to meet demand. This not only ensures high-performance data processing but also enables efficient resource utilization, optimizing costs for your data operations.
In this article, we’ll start with a quick overview of both platforms before exploring the different methods to integrate Supabase with Snowflake.
An Overview of Supabase
Supabase is a PostgreSQL-based Backend-as-a-Service (BaaS) platform that streamlines the management of essential backend functions for web and mobile applications. These functions encompass data storage, user authentication services, and the provision of APIs for seamless data integration.
One of Supabase's standout features is its support for edge functions, which enable developers to create applications with reduced latency. This capability makes Supabase particularly well-suited for building real-time applications such as messaging platforms, live dashboards, and collaboration workspaces.
In addition, Supabase excels in managing the backend infrastructure of e-commerce platforms and content management systems (CMS), where reliable performance and scalability are critical.
An Overview of Snowflake
Snowflake is a fully managed, cloud-based data warehouse engineered for high-performance data storage, processing, and analytics. Its architecture is uniquely designed to optimize both resource utilization and scalability, making it a robust solution for handling large-scale data operations.
A key feature of Snowflake’s architecture is the separation of compute and storage, which allows these resources to scale independently. This flexibility supports both horizontal and vertical scaling for compute. Horizontal scaling involves adding more compute clusters to manage increasing workloads, while vertical scaling enhances the computing power of existing virtual warehouses to handle more intensive processing tasks.
Why Connect Supabase to Snowflake?
- Data Centralization: By connecting Supabase to Snowflake, you can centralize your application's backend data and enrich it with data from other sources within Snowflake. This integration allows you to merge your application’s operational data with additional datasets, such as third-party APIs, external databases, or other internal systems. As a result, you can perform more comprehensive and enriched analyses, gaining deeper insights and making more informed decisions based on a fuller picture of your data landscape.
- Optimized Performance: Snowflake outperforms Supabase in terms of query execution and data processing capabilities. It is built to handle large-scale data aggregation and transformation, making it ideal for complex data analysis tasks. Additionally, Snowflake’s integration with Snowflake ML and Snowflake Cortex AI enables you to harness machine learning and artificial intelligence for advanced analytics, further enhancing your data capabilities.
- Enhanced Scalability: While Supabase excels in providing backend services for applications, its scalability for advanced analytics is limited. By connecting your Supabase data to Snowflake, you can tap into Snowflake’s powerful scalability, allowing you to seamlessly manage fluctuating volumes of data and user load. This integration ensures that your application can scale efficiently, regardless of demand.
Methods to Integrate Supabase to Snowflake
- The Automated Way: Using Estuary to Load Data from Supabase to Snowflake
- The Manual Way: Using CSV Export/Import to Move Data from Supabase to Snowflake
Method 1: Using Estuary to Load Data from Supabase to Snowflake
Estuary is a real-time ETL (Extract, Transform, Load) platform that allows you to consolidate data from various sources into a centralized location.
With an extensive library of 200+ connectors, Estuary offers easy to manage real-time ingestions between databases, data warehouses, data lakes, and SaaS applications. These connectors can be easily configured to fetch data from Supabase and other sources, and load it directly into Snowflake.
Estuary has some other impressive features, including:
- Many-to-many Connections: Estuary allows you to extract data from many sources and load it into many destinations with the same data pipeline.
- Change Data Capture (CDC): Estuary supports Change Data Capture, allowing you to track and synchronize data changes in the source system, with those changes being reflected in real-time within the target system. This ensures that your datasets are consistently up-to-date, enabling you to derive timely insights and make more informed decisions based on the latest data.
- ETL and ELT Capabilities: Estuary provides robust transformation capabilities for both streaming and batch pipelines. For ETL processes, you can utilize SQL and TypeScript to transform data before loading it into the destination. For ELT, you can leverage dbt (Data Build Tool) that runs directly within the destination, allowing you to perform transformations after the data has been loaded.
Now that you’ve looked into what Estuary has to offer, let’s get started with the steps to move data from Supabase to Snowflake:
Prerequisites
- A Supabase PostgreSQL database setup
- A Snowflake account with proper credentials and permissions
- An Estuary account
Note: Supabase CDC captures require a direct database connection (not the pooler), a dedicated IPv4 address, logical replication enabled, and a user with the REPLICATION attribute.
Step 1: Configure Supabase as Your Source
- Log in to your Estuary account.
- Select Sources on the left-side pane of the dashboard. This will redirect you to the Sources page.
- Click the + NEW CAPTURE button on the Sources page.
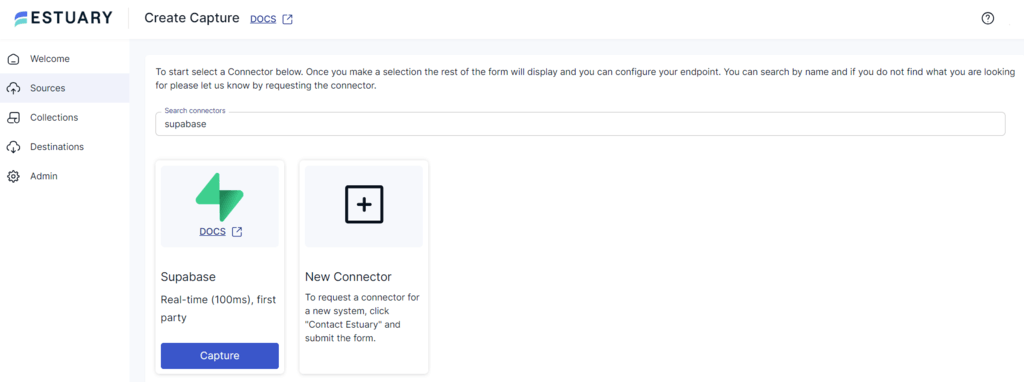
- Type Supabase in the Search connectors box.
- When you see the Supabase connector in the search results, click on its Capture button.
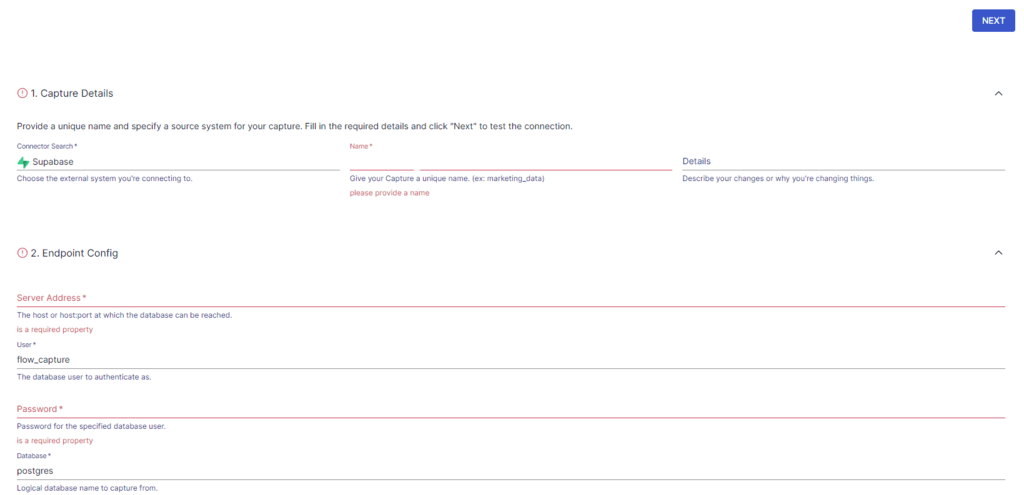
- On the Create Capture page, enter the mandatory details such as:
- Name: Give your capture a unique name.
- Server Address: Specify the host or host:port of the database.
- User: This is the database user to authenticate as.
- Password: Provide the password for the specified database user.
- Then, click NEXT > SAVE AND PUBLISH.
This CDC connector continuously captures updates from your Supabase PostgreSQL instance into Flow collections using PostgreSQL logical replication. Supabase requires a direct database connection (not the connection pooler), a dedicated IPv4 address, logical replication enabled, and a user with the REPLICATION attribute.
Step 2: Configure Snowflake as Your Destination
- After a successful capture, you will see a pop-up window with the capture details. To proceed with setting up the destination end of your pipeline, click MATERIALIZE COLLECTIONS in this pop-up.
Alternatively, click Destinations from the dashboard left-side menu, followed by the + NEW MATERIALIZATION button on the Destinations page.
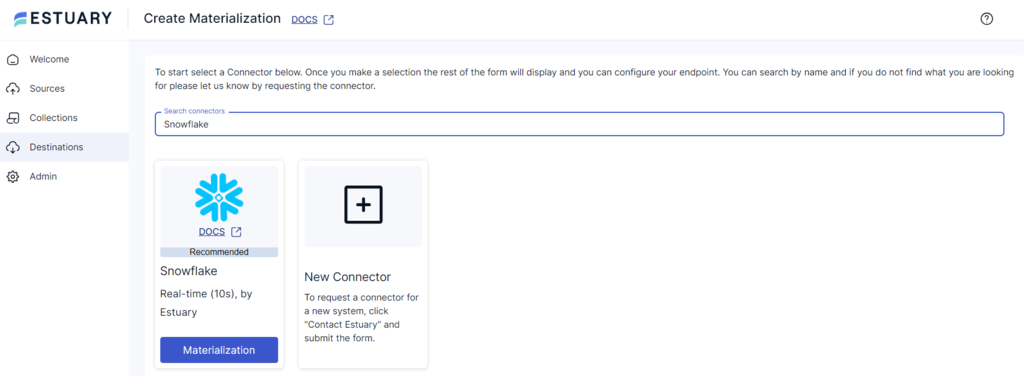
- Use the Search Connectors box on the Create Materialization page to search for the Snowflake connector.
- Click the Materialization button of the Snowflake connector in the search results.
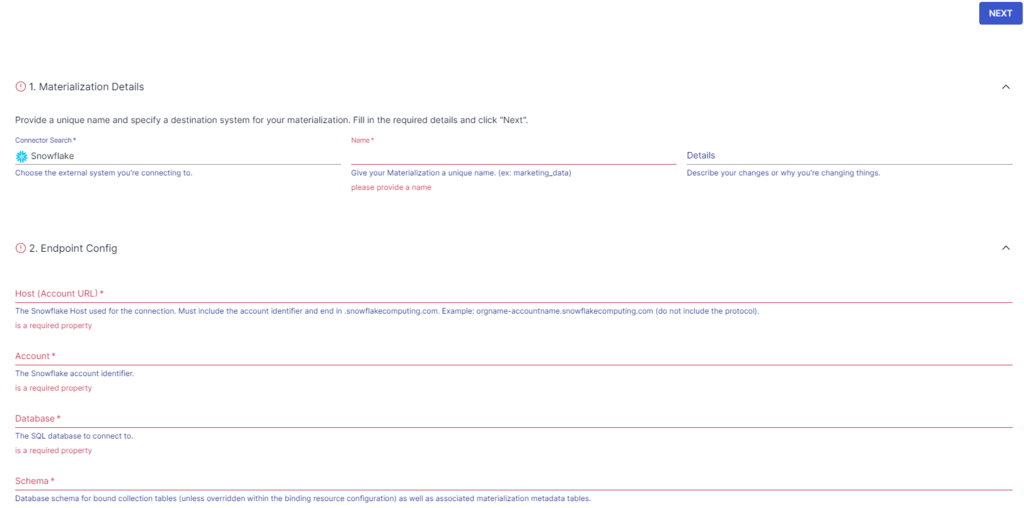
- On the Create Materialization page, enter all the necessary details, including:
- Name: Provide a unique name for your materialization.
- Host (Account URL): This is the Snowflake host you’re using for the connection.
- Database: Specify the Snowflake SQL database to connect to.
- Schema: Mention the database schema.
- Snowflake now requires key-pair (JWT) authentication. Username and password authentication is deprecated and should not be used.
- Check if the capture of your Supabase data has been automatically added to your materialization. If not, click the SOURCE FROM CAPTURE button in the Source Collections section to manually link it.
- Finally, click NEXT > SAVE AND PUBLISH.
The connector will materialize Flow collections of your Supabase data into Snowflake tables via a Snowflake table stage.
Estuary also supports Snowpipe Streaming for delta-update bindings, enabling low-latency ingestion directly into Snowflake tables. Snowpipe Streaming is automatically used when delta updates are enabled.
Ready to streamline your data integration? Try Estuary for seamless Supabase to Snowflake integration with real-time synchronization. Start your free trial now!
Method 2: Using CSV Export/Import to Move Data from Supabase to Snowflake
You can manually extract data from Supabase as a CSV and then transfer the CSV file to Snowflake.
While this process takes up more time and effort compared to automated solutions like Estuary, it provides you with a flexible way to manage your data transfer process.
Step 1: Export Data from Supabase as CSV
There are two ways to export your Supabase data in CSV format:
- Direct Download from Supabase Interface
To download data in CSV format from the Supabase dashboard:
- Log in to the Supabase account.
- Open the SQL editor within the dashboard and run the following SQL query:
plaintext`SELECT * FROM `your_table_name`;Replace `your_table_name` with the name of your table.
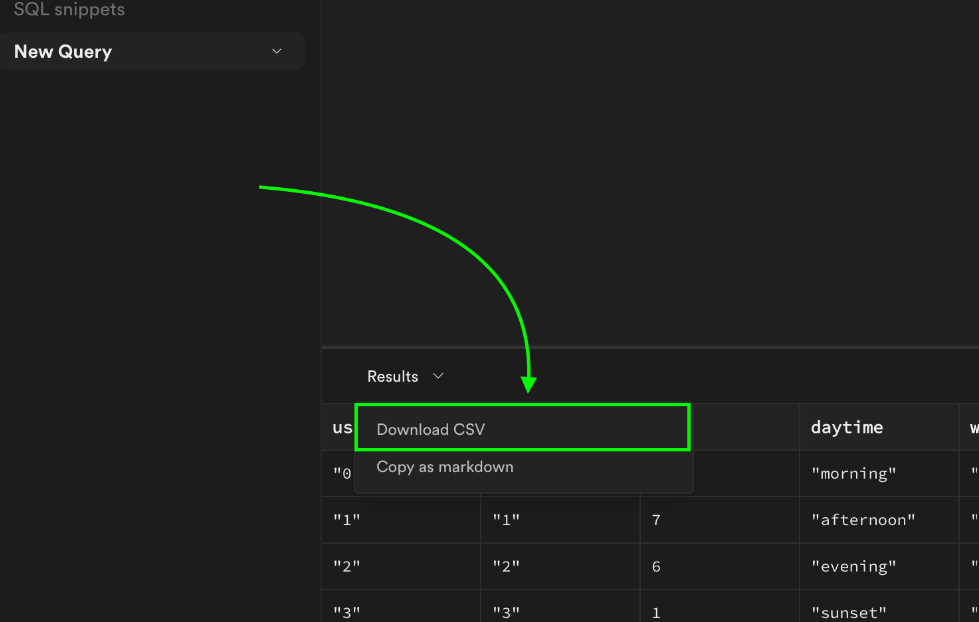
- After running the query, click Results > Download CSV to download the data
- Using JavaScript Library
- You can also extract Supabase data using the JavaScript library.
javascriptimport { createClient } from '@supabase/supabase-js';- Initialize the client with your Supabase project URL and API key, then query the table data:
plaintextconst supabase = createClient('https://your-project-url.supabase.co', 'your-api-key');
const tableName = 'your_table_name';
async function fetchData() {
  const { data, error } = await supabase.from(tableName).select('*');
  if (error) console.error('Error:', error);
}
fetchData();- The fetched data is in JSON format. To convert it into CSV format, you can use the json-2-csv library. This will save your CSV data in your local machine.
Step 2: Importing CSV into Snowflake
There are two ways to load your Supabase CSV file into Snowflake:
- Using Snowsight
Snowsight is a web interface that allows you to load, transform, and manage your data in Snowflake.
Here are the steps involved in loading CSV data from your native system into Snowflake using Snowsight:
- Sign in to Snowsight and access your Snowflake account.
- Click Data > Add Data from the navigation menu.
- On the Add Data page, select Load Data into a Table. A dialog box will appear.
- Select a warehouse if you haven’t already set a default warehouse.
- Click Browse to select and upload the CSV file.
- Choose the database and schema as per your requirements. Then, select the table where you want to upload your CSV data.
- Specify the file format as CSV and make other settings according to your data file.
- Click on Load. Snowsight will load the data into your specified table and display the number of rows imported.
- Using SnowSQL
You can use SnowSQL, a command line client (CLI), to load and query data into Snowflake.
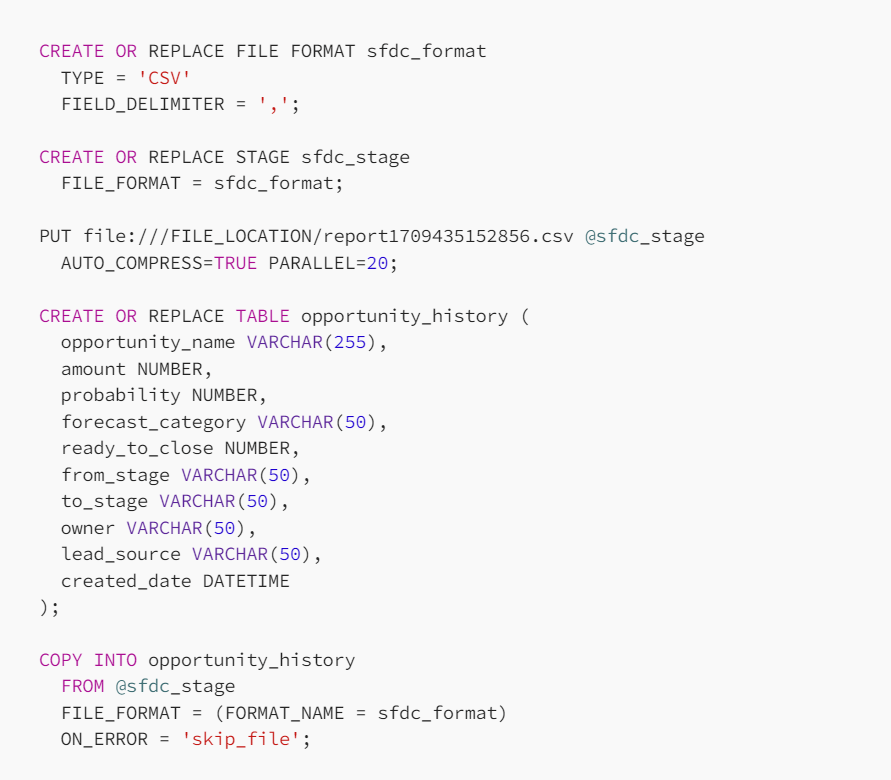
First, you can transfer the CSV file of your Supabase data from the local system to Snowflake's internal or external stage. Then, use the COPY INTO command to copy data from the staged file to the Snowflake table.
Challenges of Using CSV Export/Import to Move Data from Supabase to Snowflake
- Time-Consuming: Manually extracting data from Supabase and loading it into Snowflake is both time-consuming and labor-intensive. This process can introduce significant delays, particularly when dealing with large datasets or frequent updates.
- Latency Issues: The manual nature of this method leads to latency issues, as it lacks real-time data synchronization capabilities. This means you won’t have access to the most current Supabase data in Snowflake, hindering the ability to perform real-time analytics.
- Error-Prone: The delays inherent in this process increase the likelihood of errors. These can range from duplicate or missed data to data loss and formatting errors, all of which compromise data integrity and lead to inaccurate results.
Conclusion
Connecting Supabase to Snowflake facilitates advanced analytics, improved scalability, and cost optimization.
To move your Supabase data into Snowflake, you can opt for a manual CSV export/import method or an automated ETL tool like Estuary.
Although the CSV export/import method is efficient, it lacks real-time synchronization capabilities, is error-prone, and is effort-intensive.
Estuary, a real-time ETL tool, can help you overcome these limitations. With a vast library of no-code connectors, robust data transformation, and CDC capabilities, you can integrate data from Supabase to Snowflake almost effortlessly.
Sign up for an Estuary account today to benefit from its powerful features for seamless data migration!
FAQs
How can you access the Snowflake cloud data warehouse?
You can access the Snowflake cloud data warehouse through its web-based user interface, SnowSQL CLI, or via ODBC and JDBC drivers. The Snowflake warehouse can also be accessed using Python libraries, enabling the development of Python applications to interact with the warehouse.
What is the difference between Firebase and Supabase?
Firebase and Supabase are both backend cloud computing services but differ from each other in the following ways:
- Firebase is based on Cloud Firestore, Google’s NoSQL database. On the other hand, Supabase is based on Postgres, a relational database system.
- Firebase, hosted by Google, has a more extensive community and wider adoption than Supabase.

About the author
Rob has worked extensively in marketing and product marketing on database, data integration, API management, and application integration technologies at WS02, Firebolt, Imply, GridGain, Axway, Informatica, and TIBCO.


