In this article, we’ll explore how to create a real-time Retrieval Augmented Generation (RAG) system using Estuary Flow and Pinecone.
Estuary Flow seamlessly integrates with multiple third-party tools in a no-code fashion. This gives us infinite possibilities to build out multiple applications, including complex ones, with almost zero code. In this article, we'll specifically focus on constructing a RAG system that leverages MongoDB and Pinecone, utilizing a dataset of e-commerce product reviews. This will allow us to query and obtain insights about the best and worst products based on these reviews.
Understanding Retrieval Augmented Generation (RAG)
Retrieval Augmented Generation (RAG) is a widely-used technique for enhancing the capabilities of large language models (LLMs). Due to inherent limitations in the amount of data that can be included in a single prompt, sending excessive information can lead to increased costs or even rejection of the prompt by the LLM. Therefore, it's crucial to provide just the right amount of relevant information.
This is where a vector database comes into play. You can vectorize all your data and store it in a vector database, enabling efficient searches based on similarity. When a query is made, it too can be vectorized, allowing you to retrieve relevant information related to the query from the vector database. The query and the retrieved relevant information in the vector database can then be provided to the LLM to generate the desired output. This process is called Retrieval Augmented Generation, commonly abbreviated as RAG.
An Introduction to Estuary Flow
Estuary Flow is a real-time change data capture (CDC) platform built from the ground up for CDC and streaming. It excels at capturing data from various sources and delivering it to many destinations used for analytics, operations, and AI. With its event-driven architecture, Estuary Flow ensures data is processed and delivered exactly once, with low latency, making it an ideal solution to use with Materialize.
These capabilities are particularly beneficial for applications requiring continuous data updates, such as RAG implementations.
Some key features of Estuary Flow are:
- Fully Integrated Pipelines: Flow simplifies data integration by enabling you to create, test, and adapt pipelines that gather, modify, and consolidate data from multiple sources.
- Change Data Capture (CDC): Always-on CDC that replicates in real-time with exactly-once semantics, backed by cloud storage.
- No-code Connectors: With pre-built connectors for popular data sources and sinks, such as databases and message queues, Flow reduces the need for custom connectors. This speeds up data pipeline deployment and ensures consistency across systems.
- AI pipeline-ready: Native support for vector databases like Pinecone, including the ability to vectorize data as part of the loading process.
- In-flight transformations: Support for real-time SQL, TypeScript, including the ability to call APIs to use generative AI services like ChatGPT.
Introducing Pinecone
For this blog, we will utilize Pinecone as our vector database. Pinecone is a fully managed, cloud-native solution optimized for machine learning and AI applications. It enables efficient similarity searches and retrieval of high-dimensional data, such as embeddings produced by deep learning models. This makes Pinecone a vital tool for applications like recommendation systems, semantic search, and natural language processing.
Pinecone also offers a free tier suitable for development purposes, which we will use in this blog.
Also Read: What is Pinecone AI?
Ecommerce Product Review Dataset
We’ll use a dataset from Kaggle featuring Amazon product reviews across various categories: books, e-books, jewelry, groceries, and personal computers. The dataset includes multiple columns, such as review_body, which contains customer feedback, and star_rating, which reflects the product's rating. These columns will be instrumental in understanding customer perceptions.
We have already downloaded the necessary files and placed them in our estuary/examples repository.
Designing RAG application
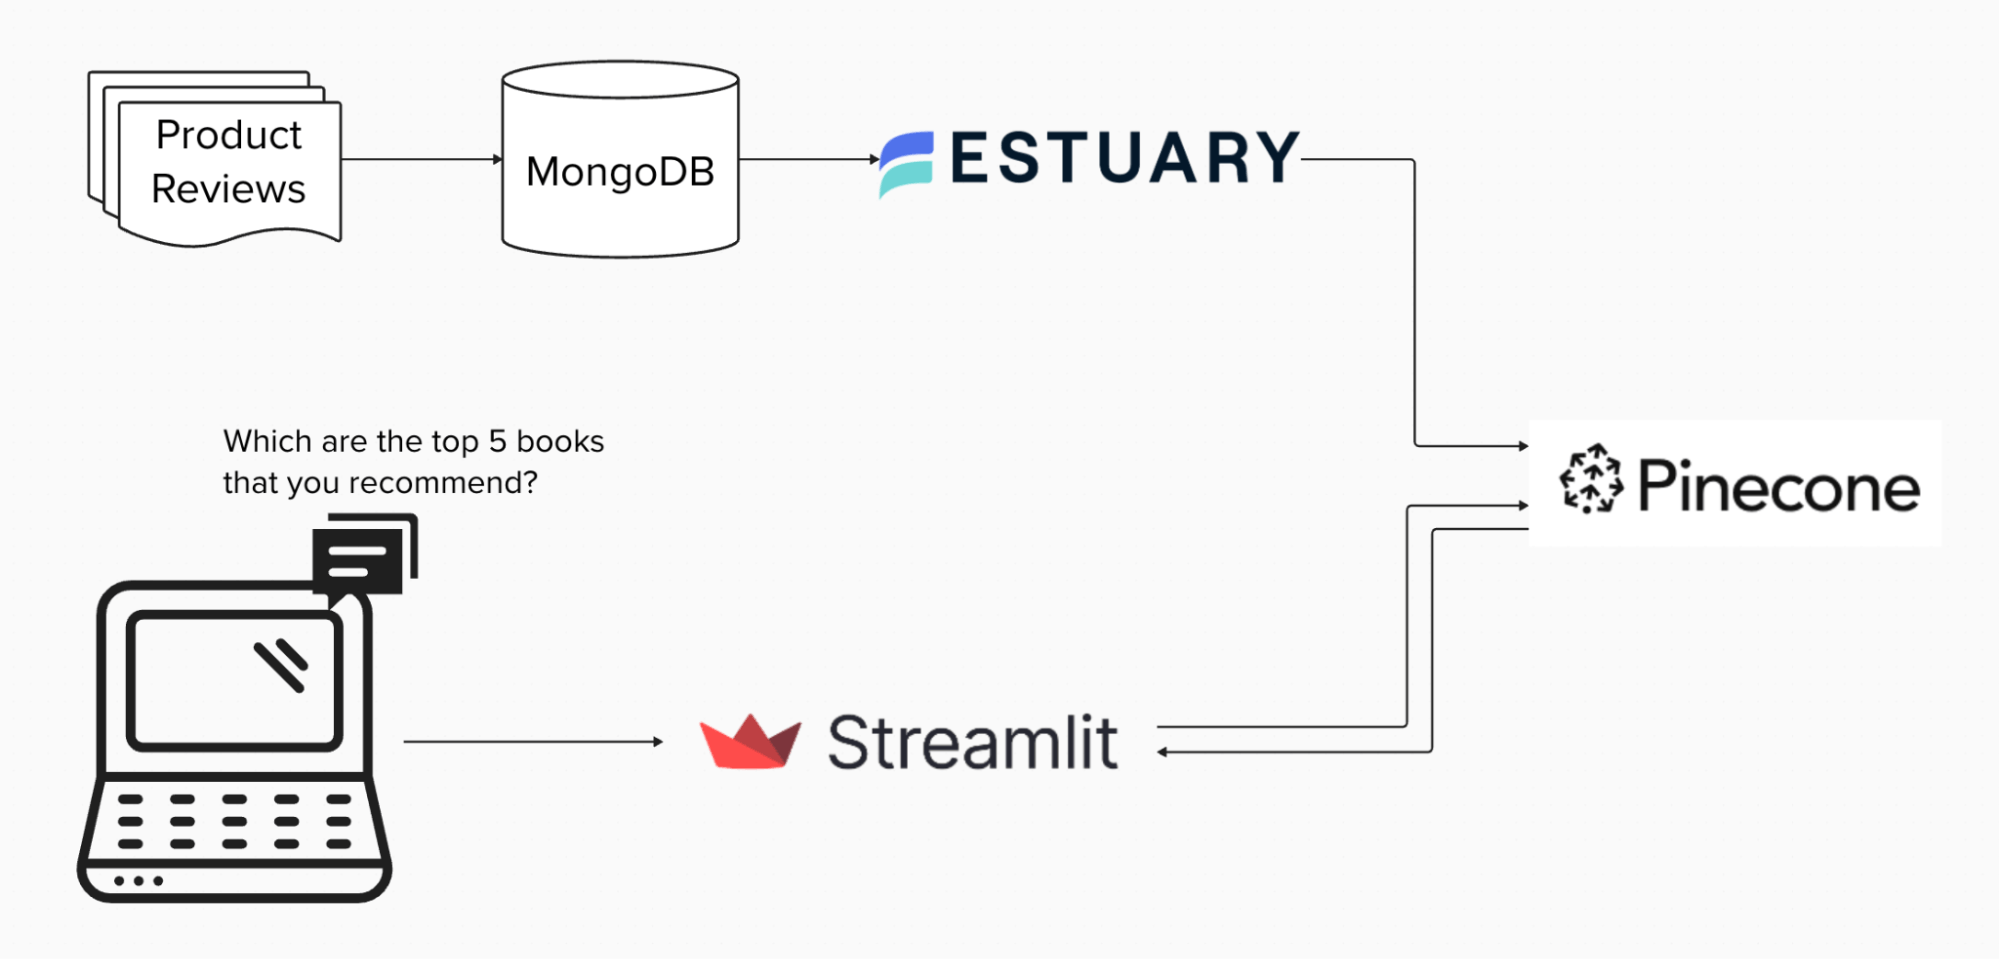
Firstly, we will push the data from the csv file into MongoDB to mimic the real-world scenario where the data is generally present in some data store. We will then use Estuary to route the data from MongoDB into the Pinecone vector database. Estuary will also ensure that any changes to the review data set like insertion of new rows, deletion of existing row(s), and updates on the rows are captured and pushed into the Pinecone database.
Next, we’ll set up a Streamlit application, providing a chat interface that allows users to query the review dataset and receive relevant information.
Building the pipeline
Let us delve into the step-by-step instructions on how to build a real-time RAG application. You’ll learn how to:
- Spin up a local MongoDB instance, stream fake data into it, and prepare it for CDC capture.
- Configure a capture in the Estuary Flow dashboard to ingest change events.
- Set up Estuary Flow which will stream data from MongoDB onto Pinecone database.
- Initialize a Streamlit application and see RAG application in action.
Prerequisites
- Estuary Flow account: if you haven’t registered yet, you can do so here for free!
- Pinecone account: Pinecone is the target vector database in this project.
- OpenAI account: The project uses OpenAI’s API to calculate the embeddings and to wrap the chat responses using an LLM.
- Docker: for convenience, we provide a Dockerized development environment so you can get started in just seconds!
- Github repository: Clone this repository as we would be using it in this project.
Step 1: Generating data into MongoDB
Firstly, we will need a MongoDB server. You can use an already existing server if you have one, or create one using Docker with the following command:
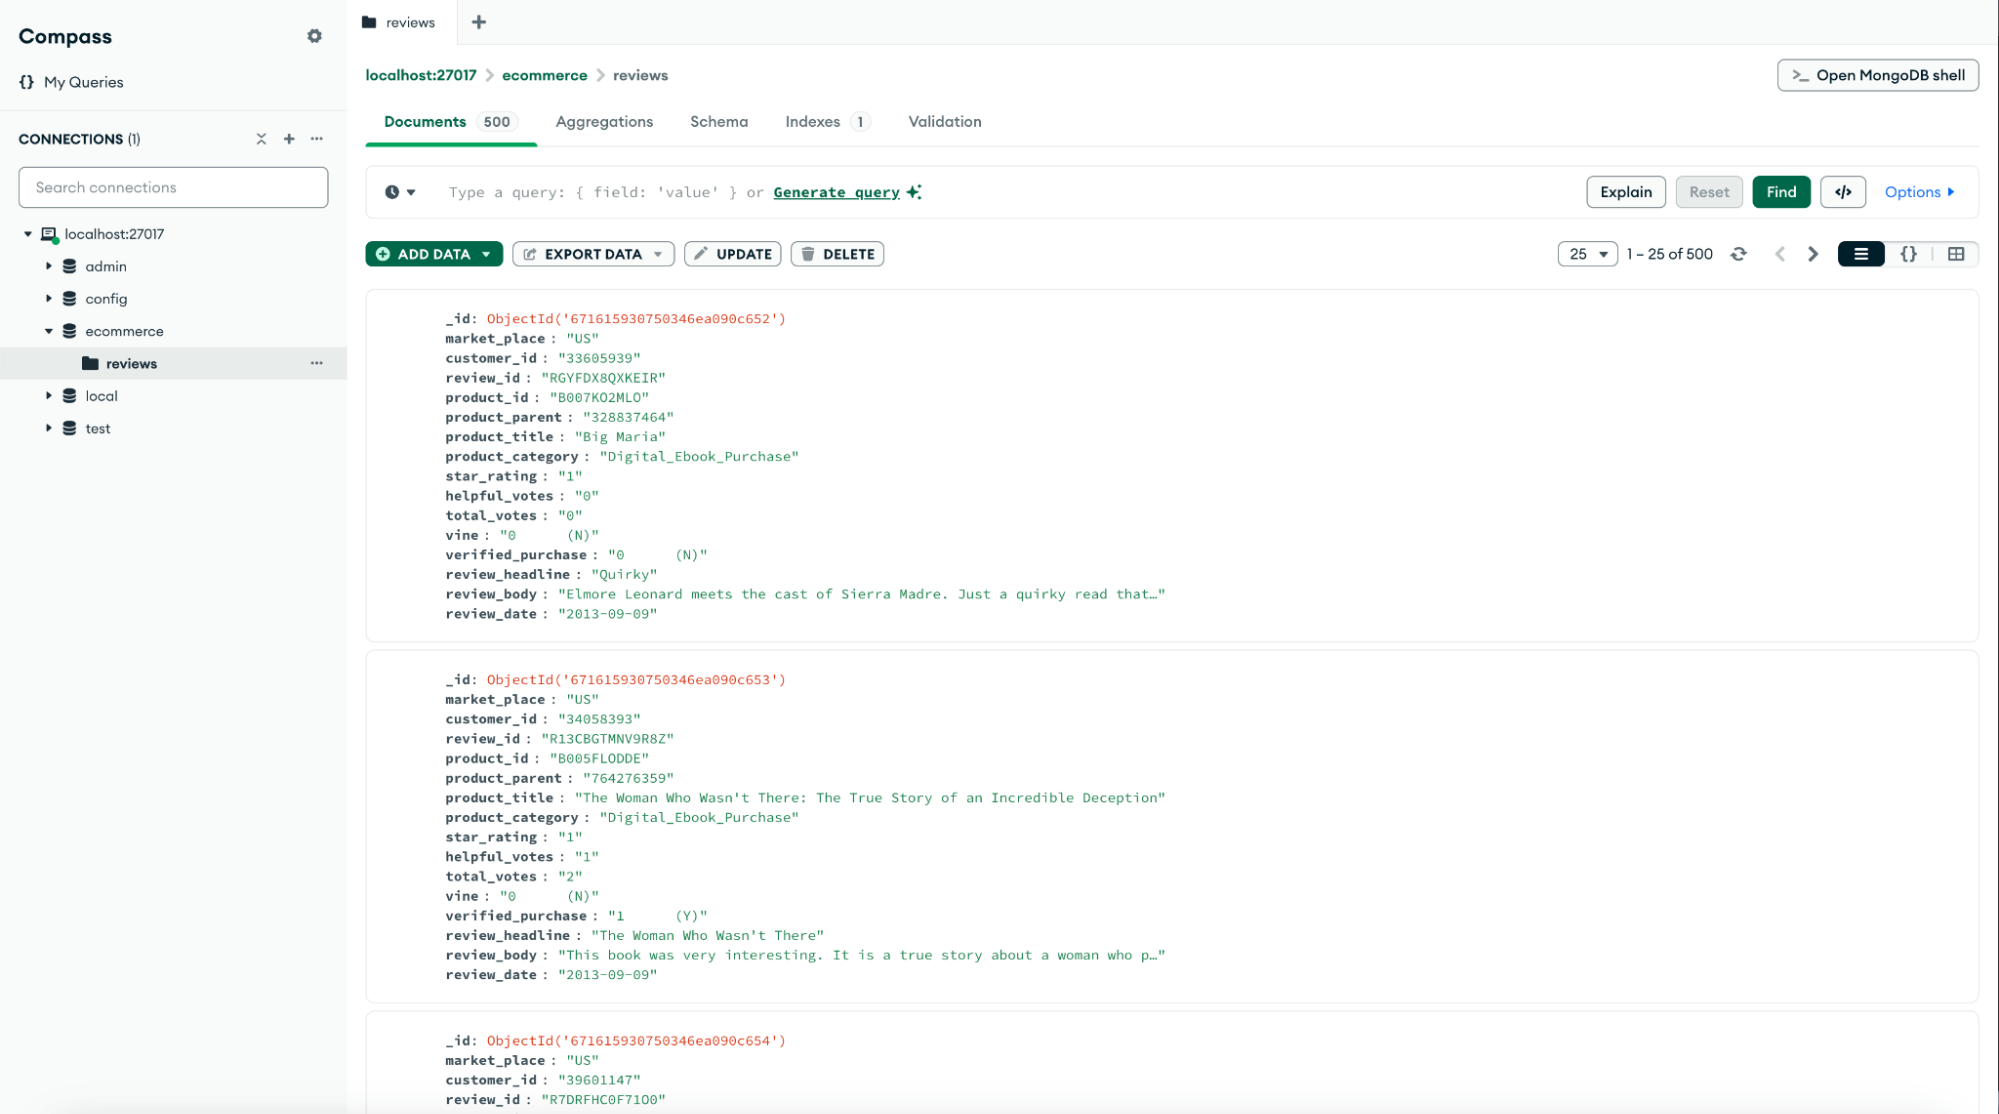
plaintext% docker run -d --name my-mongo -e MONGO_INITDB_ROOT_USERNAME=mongo -e MONGO_INITDB_ROOT_PASSWORD=mongo -p 27017:27017 mongoIn order to connect to MongoDB, you can use any MongoDB client like MongoDB Compass. Connect to MongoDB, and create an ecommerce database, and within this database, create a reviews collection.
Navigate to the mongodb-pinecone-rag folder of the estuary/examples repository. Open the docker-compose.yml file, and provide appropriate values are provided for MongoDB connection in the datagen service. Save the file. We will now generate the data into MongoDB using the following command that you can run from your terminal:
plaintext% docker compose up datagenThis will ingest all the review records, 500 in total, into MongoDB.
Step 2: Creating Estuary Flow - Capture
Next, we will create the no-code CDC pipeline from MongoDB to Pinecone using Estuary Flows. This will not only push in the existing records from MongoDB collection into Pinecone database, but will also capture all the changes as and when they happen on MongoDB like inserts, updates and deletes on the collection, and push the same into Pinecone database. This will ensure that the Pinecone database is up-to-date with MongoDB collection.
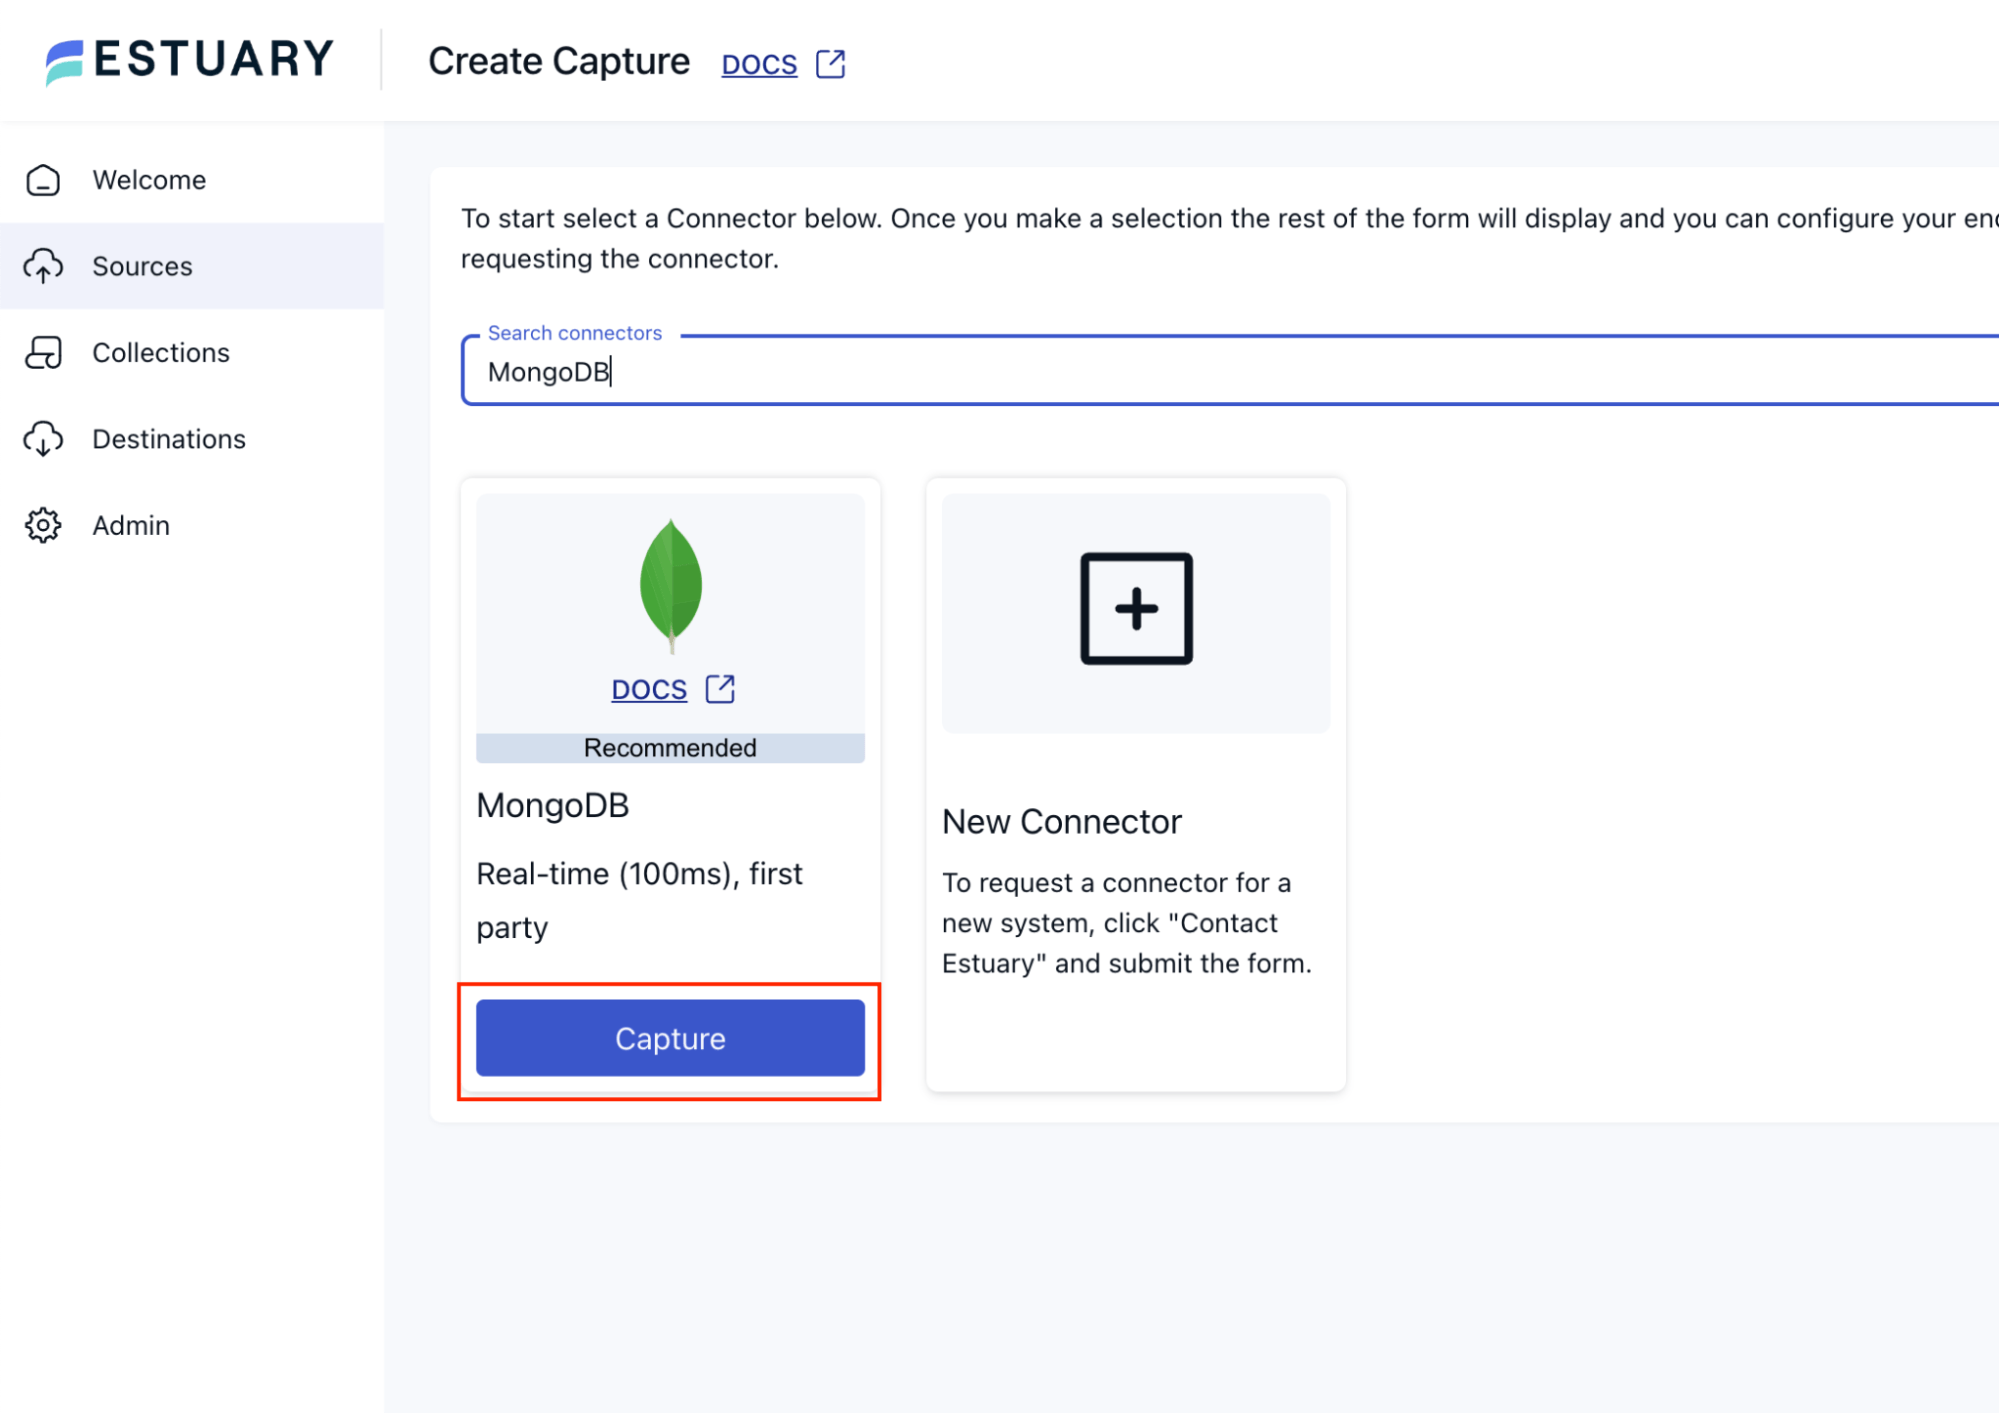
Navigate to Estuary Cloud, and click on Sources from the left navigation menu. Click on New Capture button at the top. Search for “MongoDB”, and click on the Capture button on the MongoDB tile.
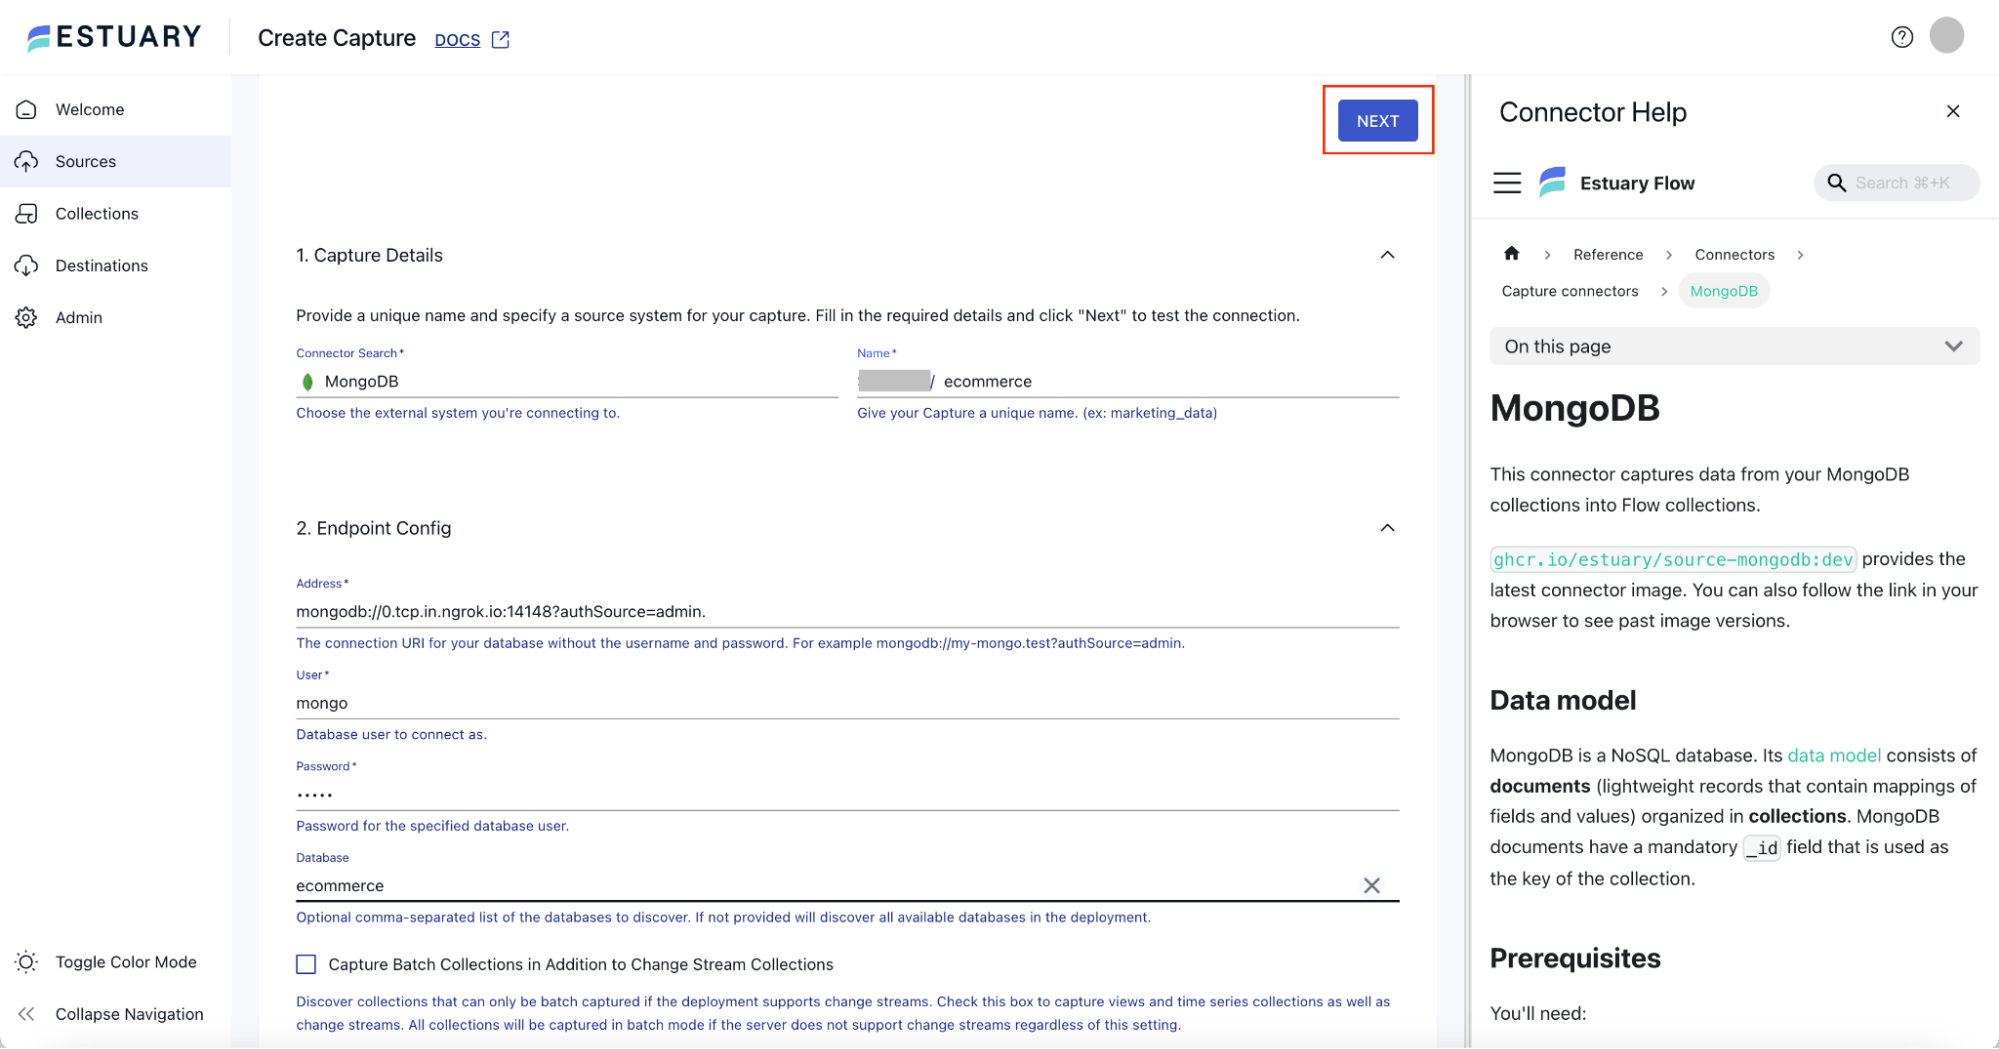
On the Create Capture page, put an appropriate name in the Name field, say ecommerce. In the Address field, put an appropriate address where the MongoDB server is hosted. Use the mongodb:// url notation for the Address as mentioned in the field’s description.
Note: In case you have hosted the server locally, you should ensure that the firewall of your local machine allows incoming TCP network connections at MongoDB server port 27017, or put out an open connection for this port using tools like ngrok.
Provide appropriate values for User, Password and Database fields. And then, click on the Next button at the top of the page.
You should now see a page where the collections in the MongoDB database are listed.
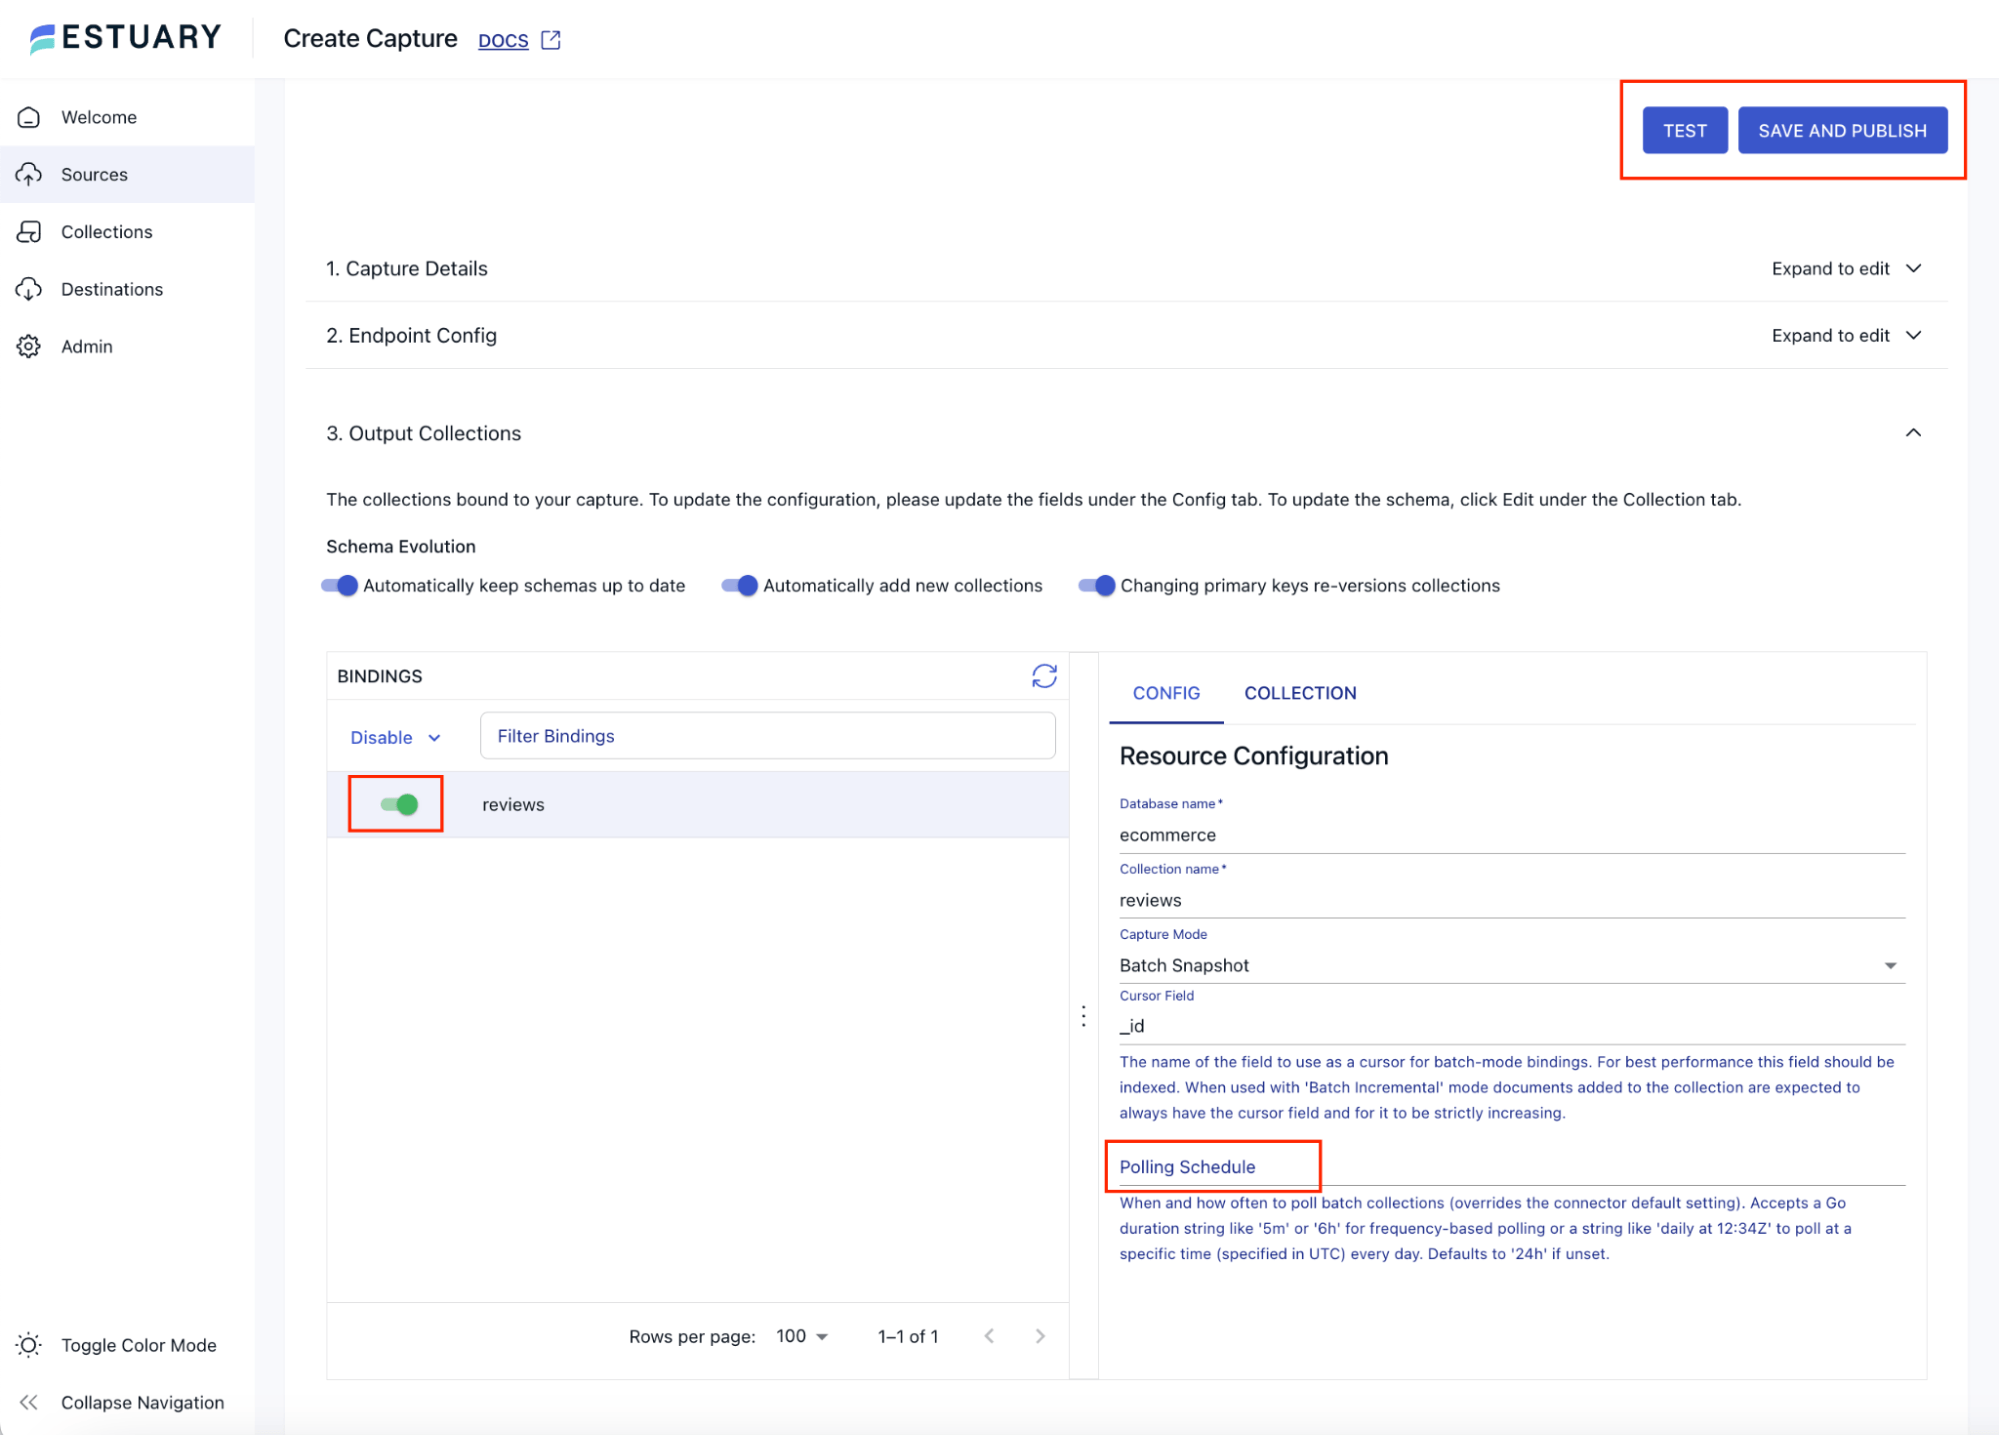
Ensure the reviews collection is in enabled state. You can choose to reduce the Polling Schedule, say 5m. You can click on Test button at the top and ensure that it is successful. Next, click on Save and Publish at the top of the page.
Once the publish is successful, you should be able to see the newly created source on the Sources page. Soon, all the documents from MongoDB will be captured by the flow, and the Docs written will be 500.
You can also navigate to Collections from the left navigation menu, and notice that Docs written shows 500 for the reviews collection.
Step 3: Creating Index in Pinecone
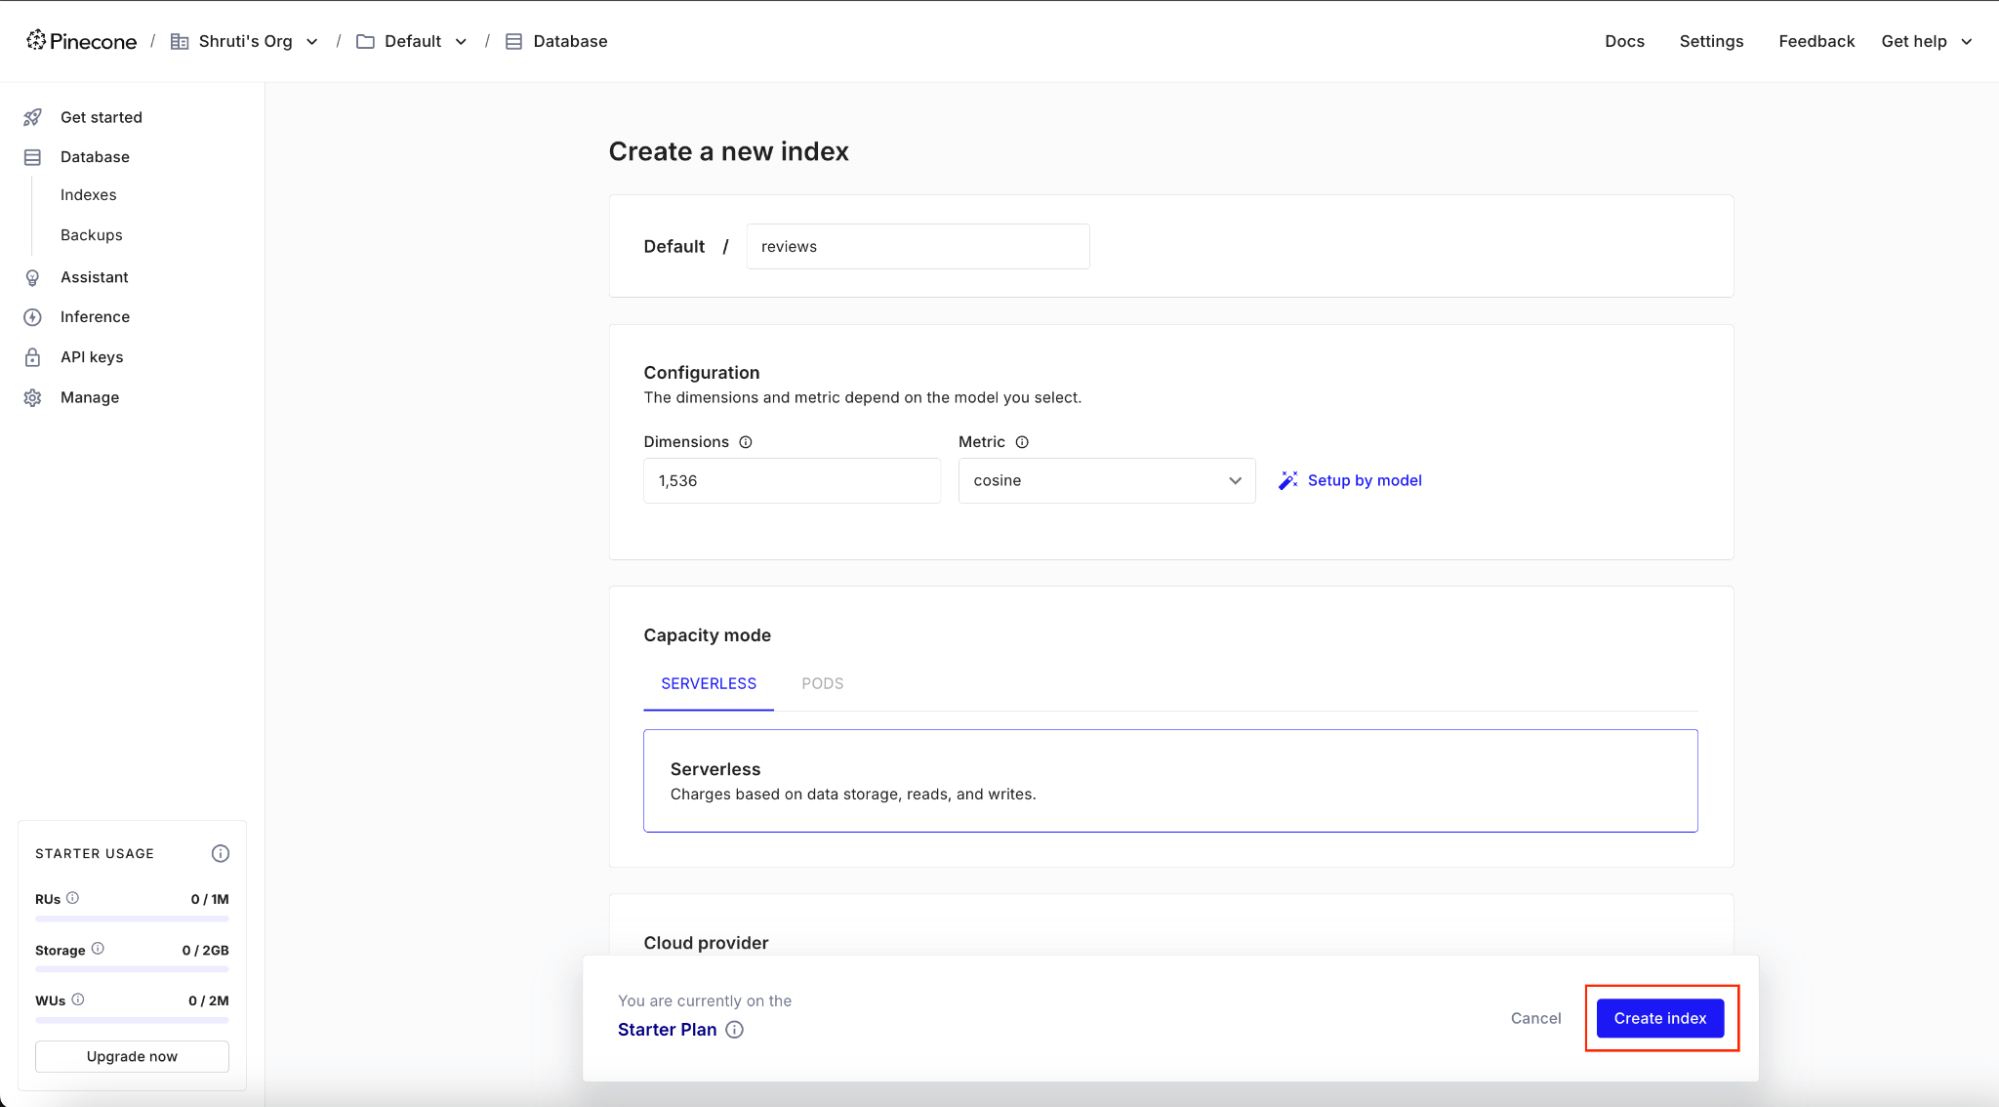
Before creating the Estuary Flow materialization, it is necessary that you create an index in the Pinecone. Hence, we will login to the Pinecone Cloud, and navigate to Indexes from the left navigation menu. Click on the Create Index button. On the Create a new index page, provide the name of the index, say reviews. In the Configuration section, click on Setup by model, and choose an appropriate model, say text-embedding-ada-002. This will auto-fill the Dimension and Metric. In the Capacity Mode section, let the default selection of Serverless be as is. The selection under Cloud Provider and Region can be left as default. Click on the Create Index button at the bottom of the page.
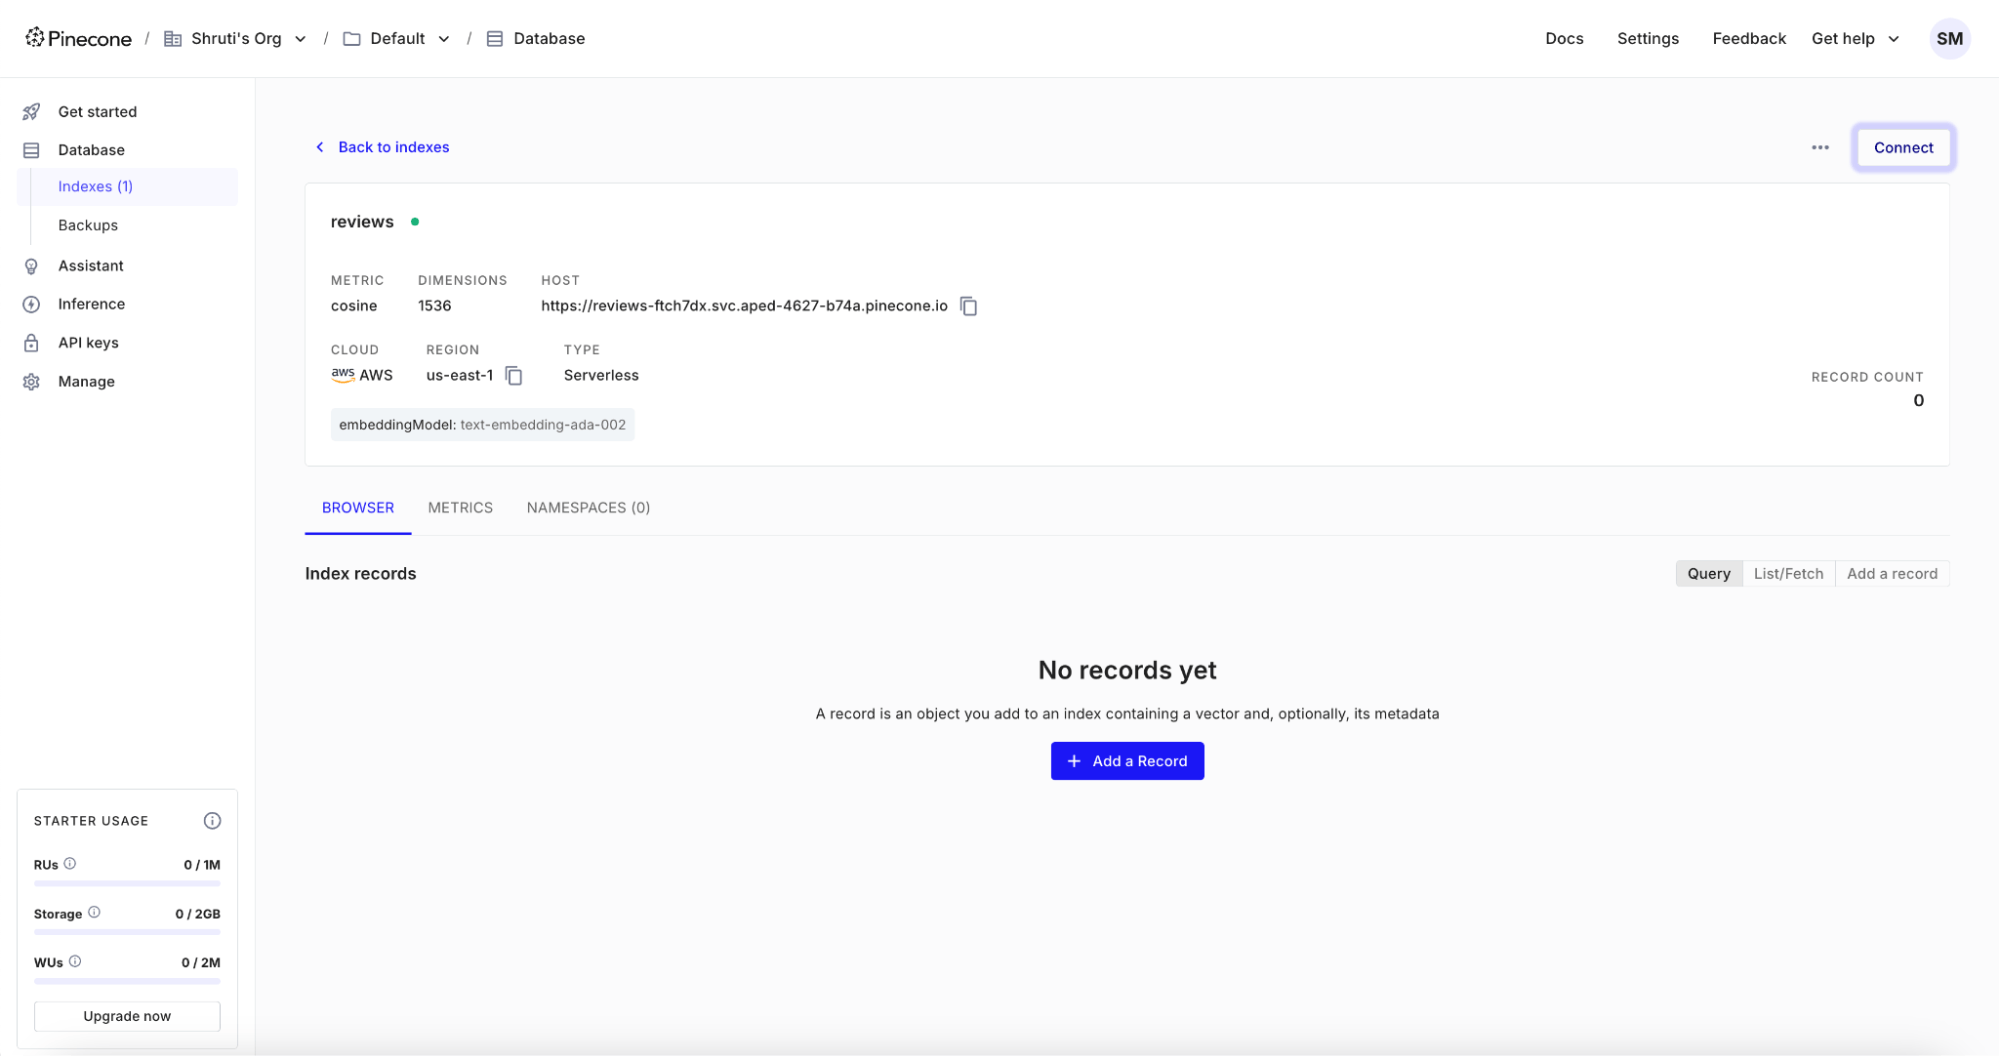
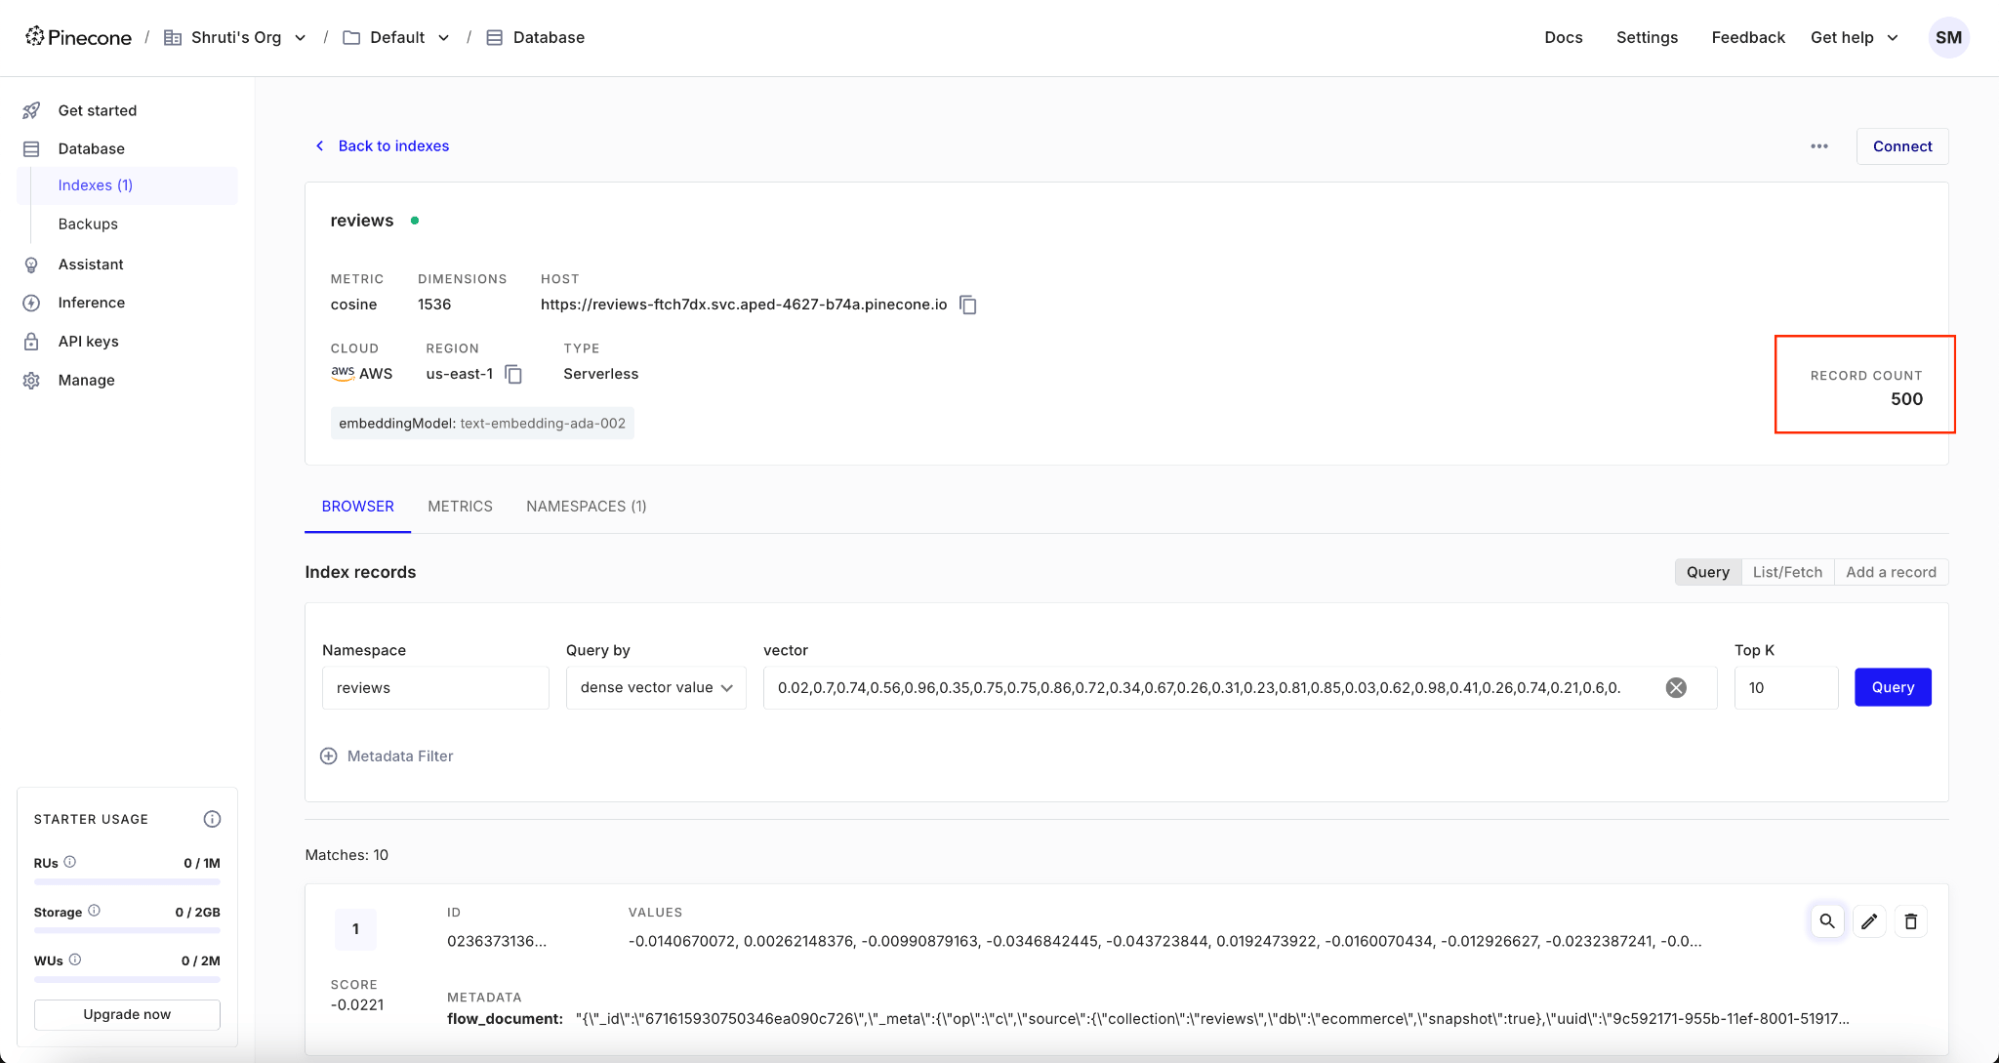
The reviews index will be created in a matter of a few seconds, and you will be directed to a page like below.
While we are in the Pinecone console, let us get an API key for Pinecone connection. Navigate to API Keys from the left navigation menu, and on the API keys page, click on the button Create API Key. Note down the Pinecone API key as we will require it in the future.
Step 4: Creating A Materialization In Estuary Flow
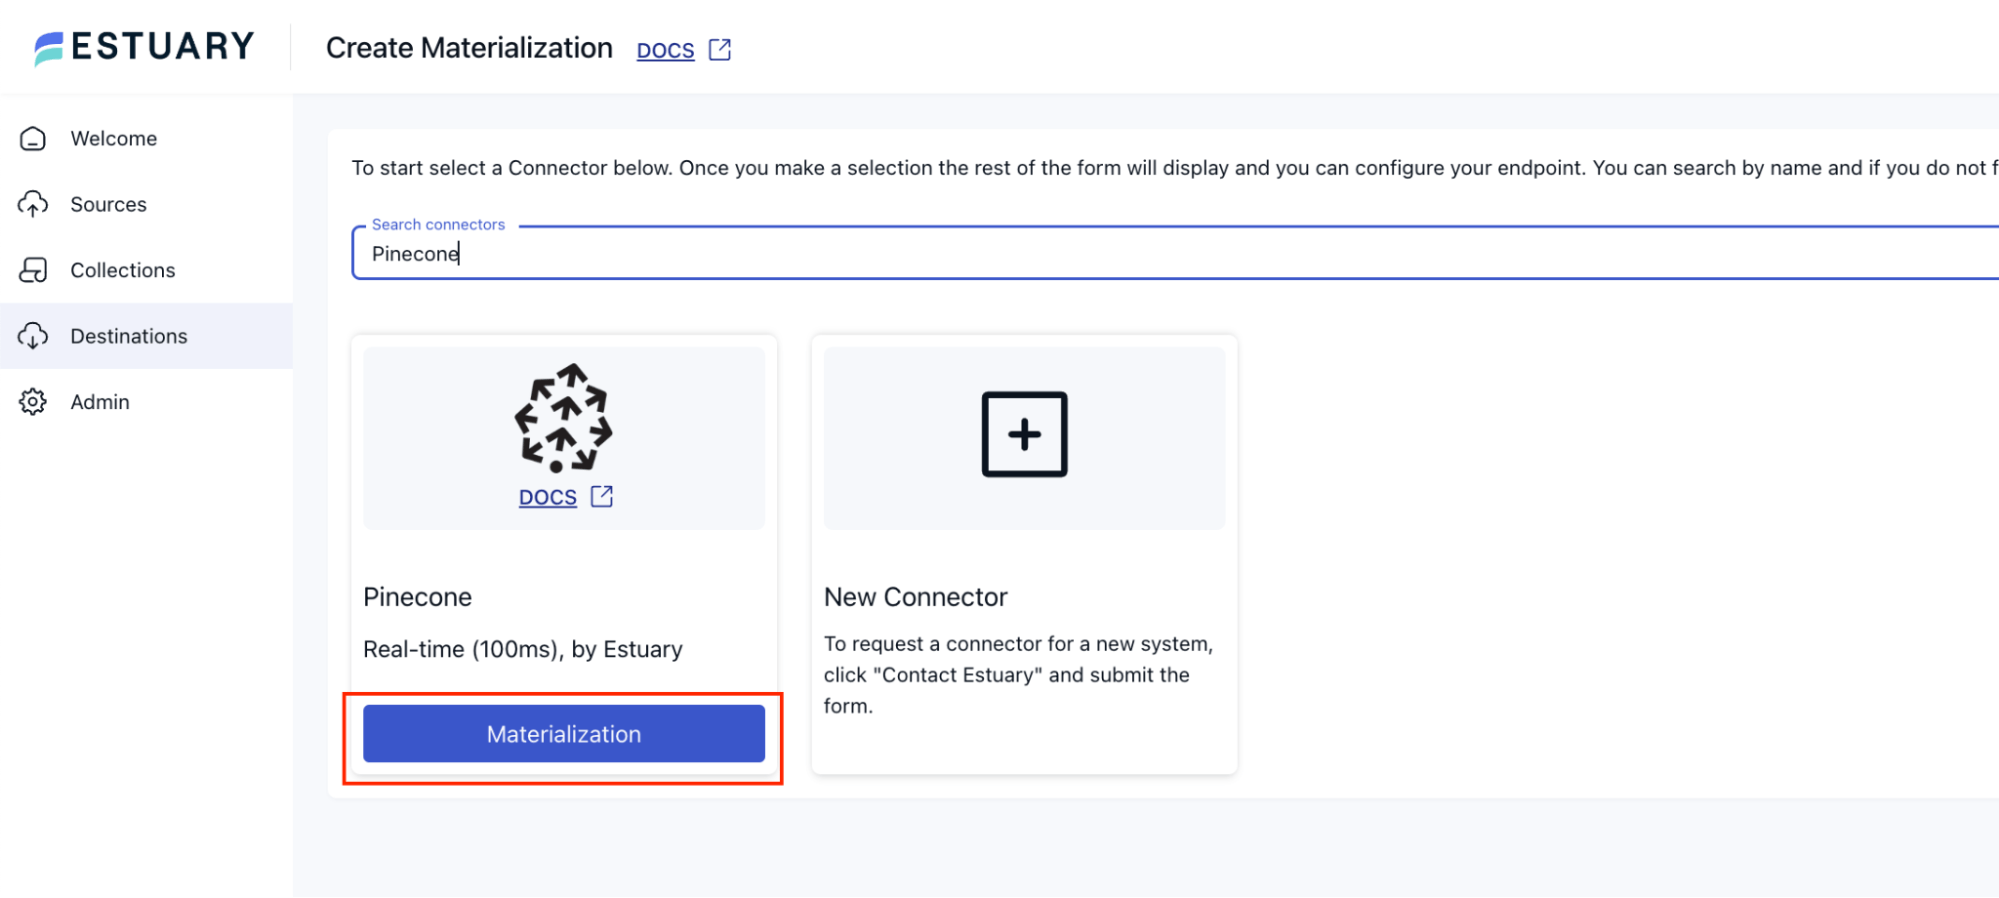
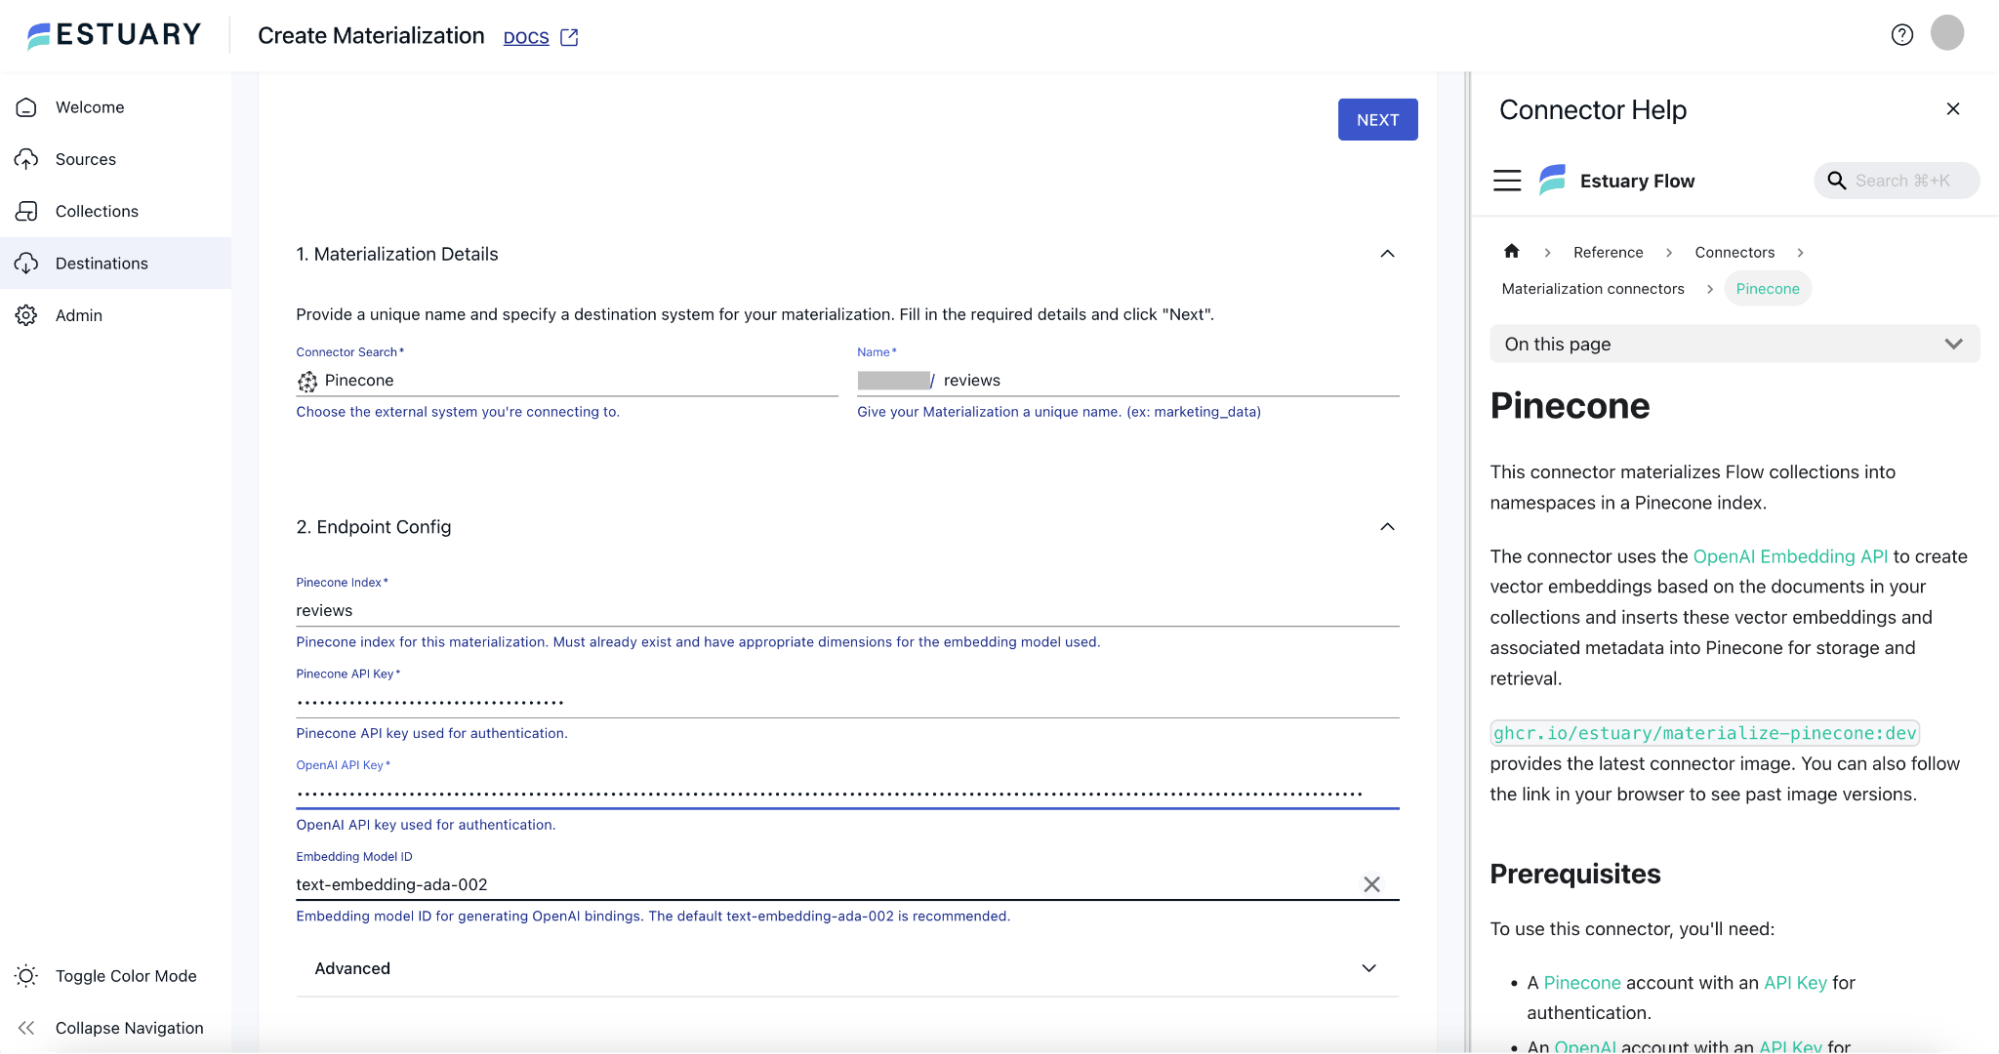
With the reviews index ready in Pinecone, let us come back to Estuary, and navigate to Destinations from the left navigation menu, and click on New Materialization button at the top of the page. Search for Pinecone and click on the Materialization button on the Pinecone tile.
On the Create Materialization page, provide an appropriate name for the materialization. Put appropriate values for the Pinecone Index (this will be the index name that we created in Pinecone in the previous section), Pinecone API Key and OpenAI Key. The Embedding Model ID should be the same as we had selected while creating the Pinecone index.
The Pinecone Materialization connector will take care of creating the vector embeddings of each individual document that is being streamed from the Flow collection by calling the OpenAI API.
Scroll below, and click on Source from Capture button. On the popup that appears, select the MongoDB Capture that we had created earlier, and click on Continue. You can then scroll back to the top, and click on the Next button.
Check that the reviews config is picked up correctly. Also, click on the Test button at the top, and ensure it is successful. Next, you can click on Save and Publish. This will create the Pinecone materialization.
Give it a couple of minutes for the records to be routed to Pinecone. You can open the Pinecone console, and navigate to the reviews index. You should see that all the 500 records have been inserted into the Pinecone index in the vectorized format.
Step 5: Running Streamlit Application
Let us now go back to the estuary/examples code, and open the docker-composer.yml file. Put in appropriate values for PINECONE_API_KEY, PINECONE_HOST and OPENAI_API_KEY. Save the file.
Now, run the Streamlit application using the following command:
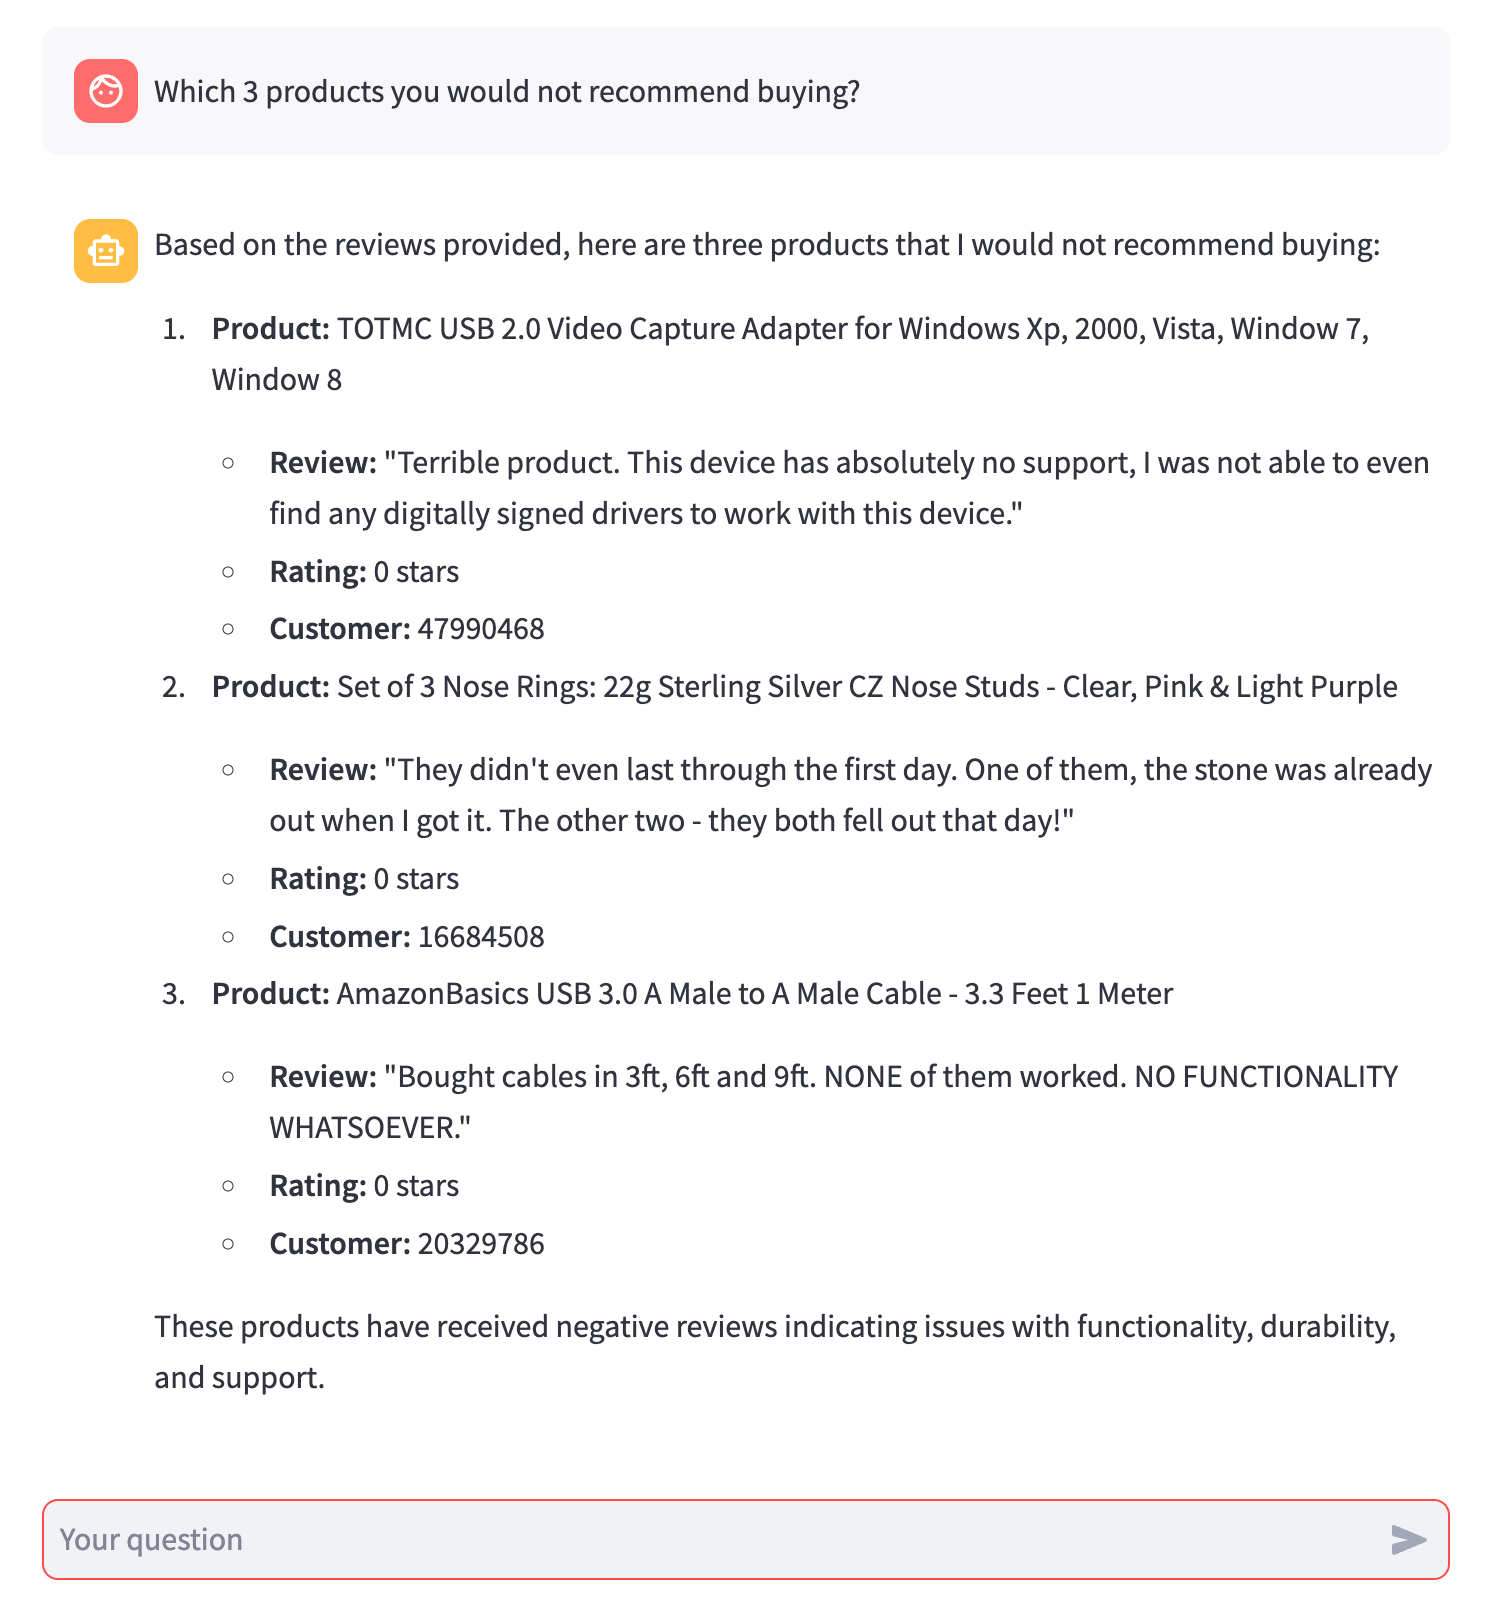
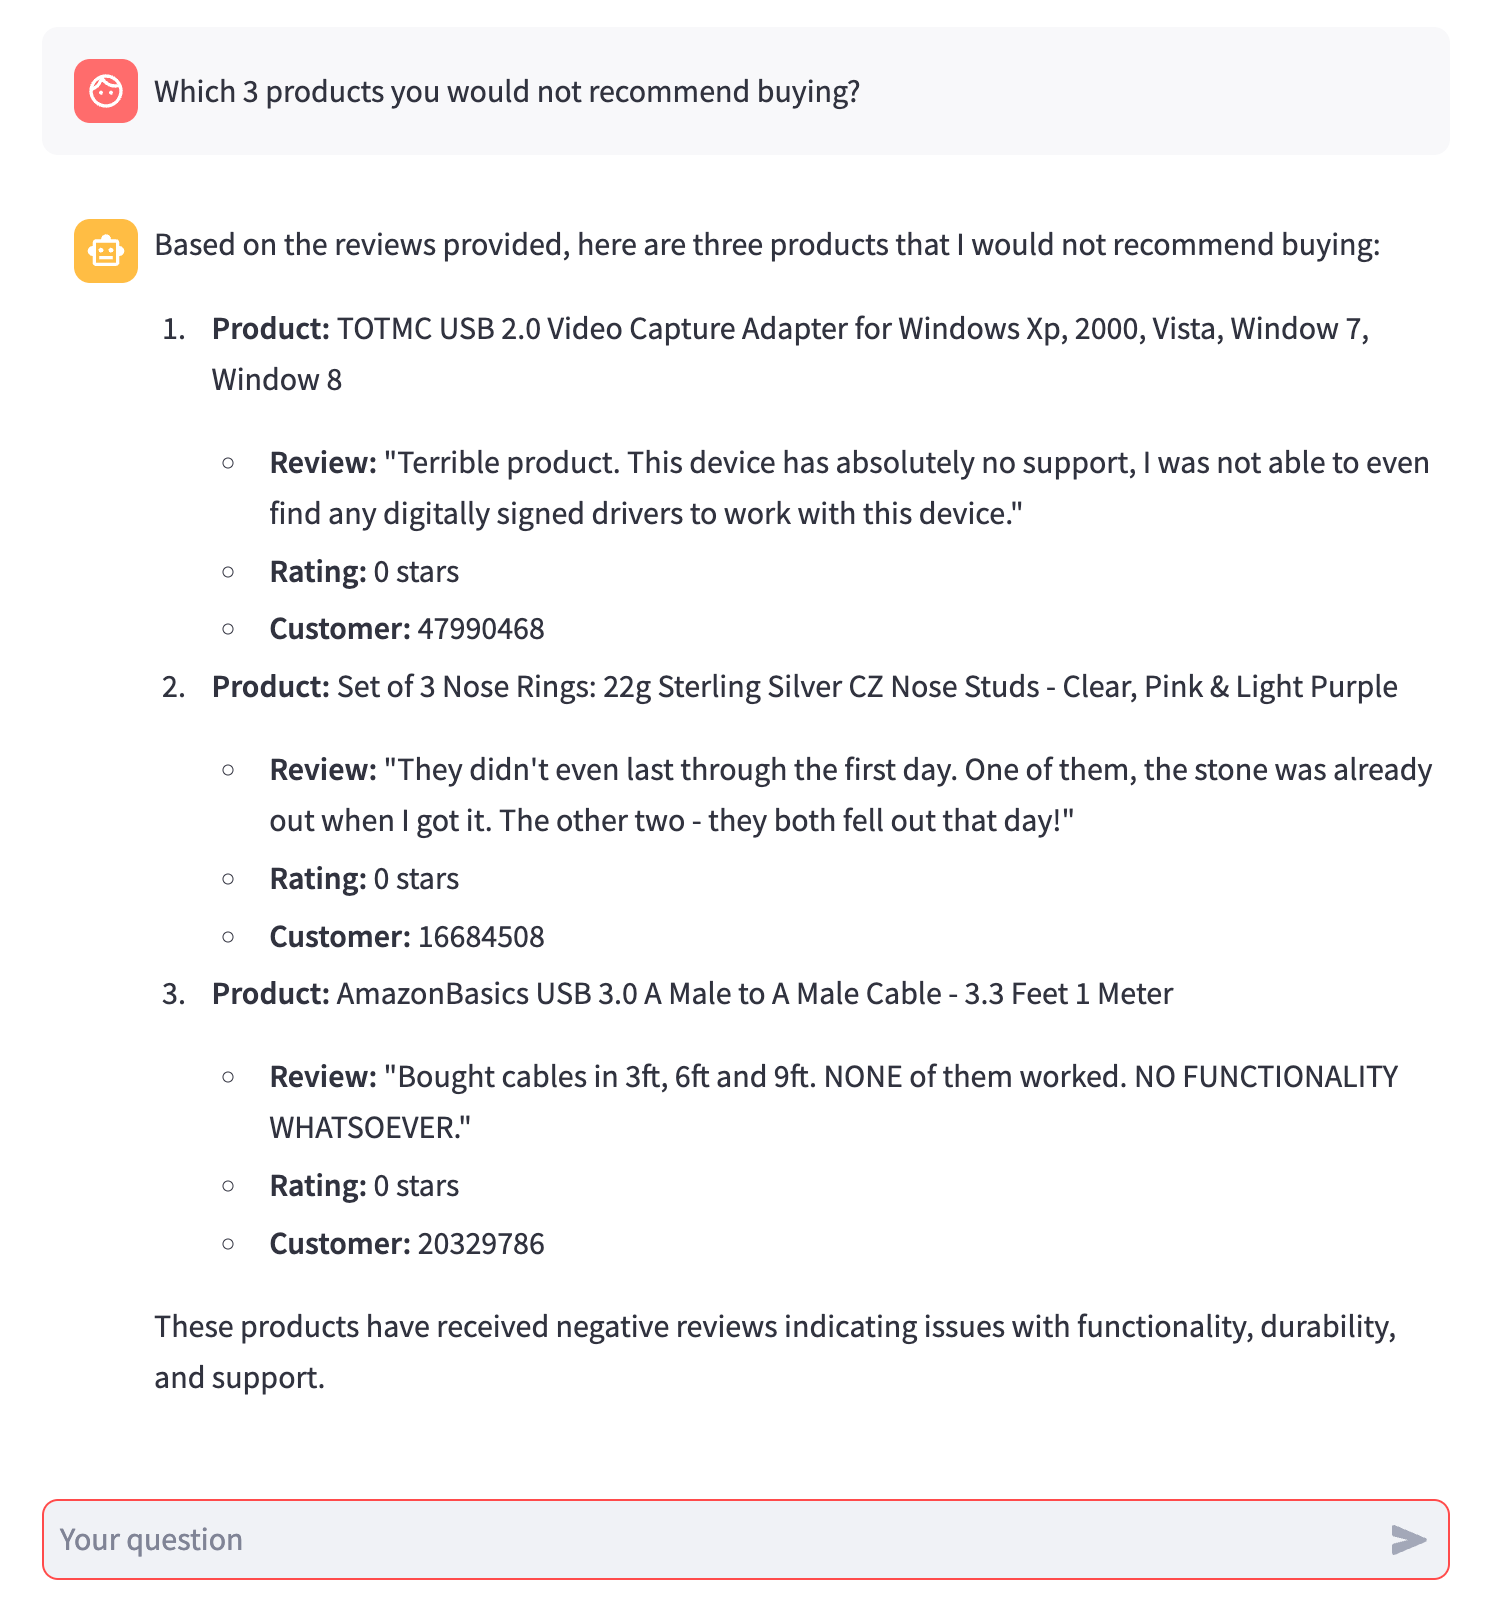
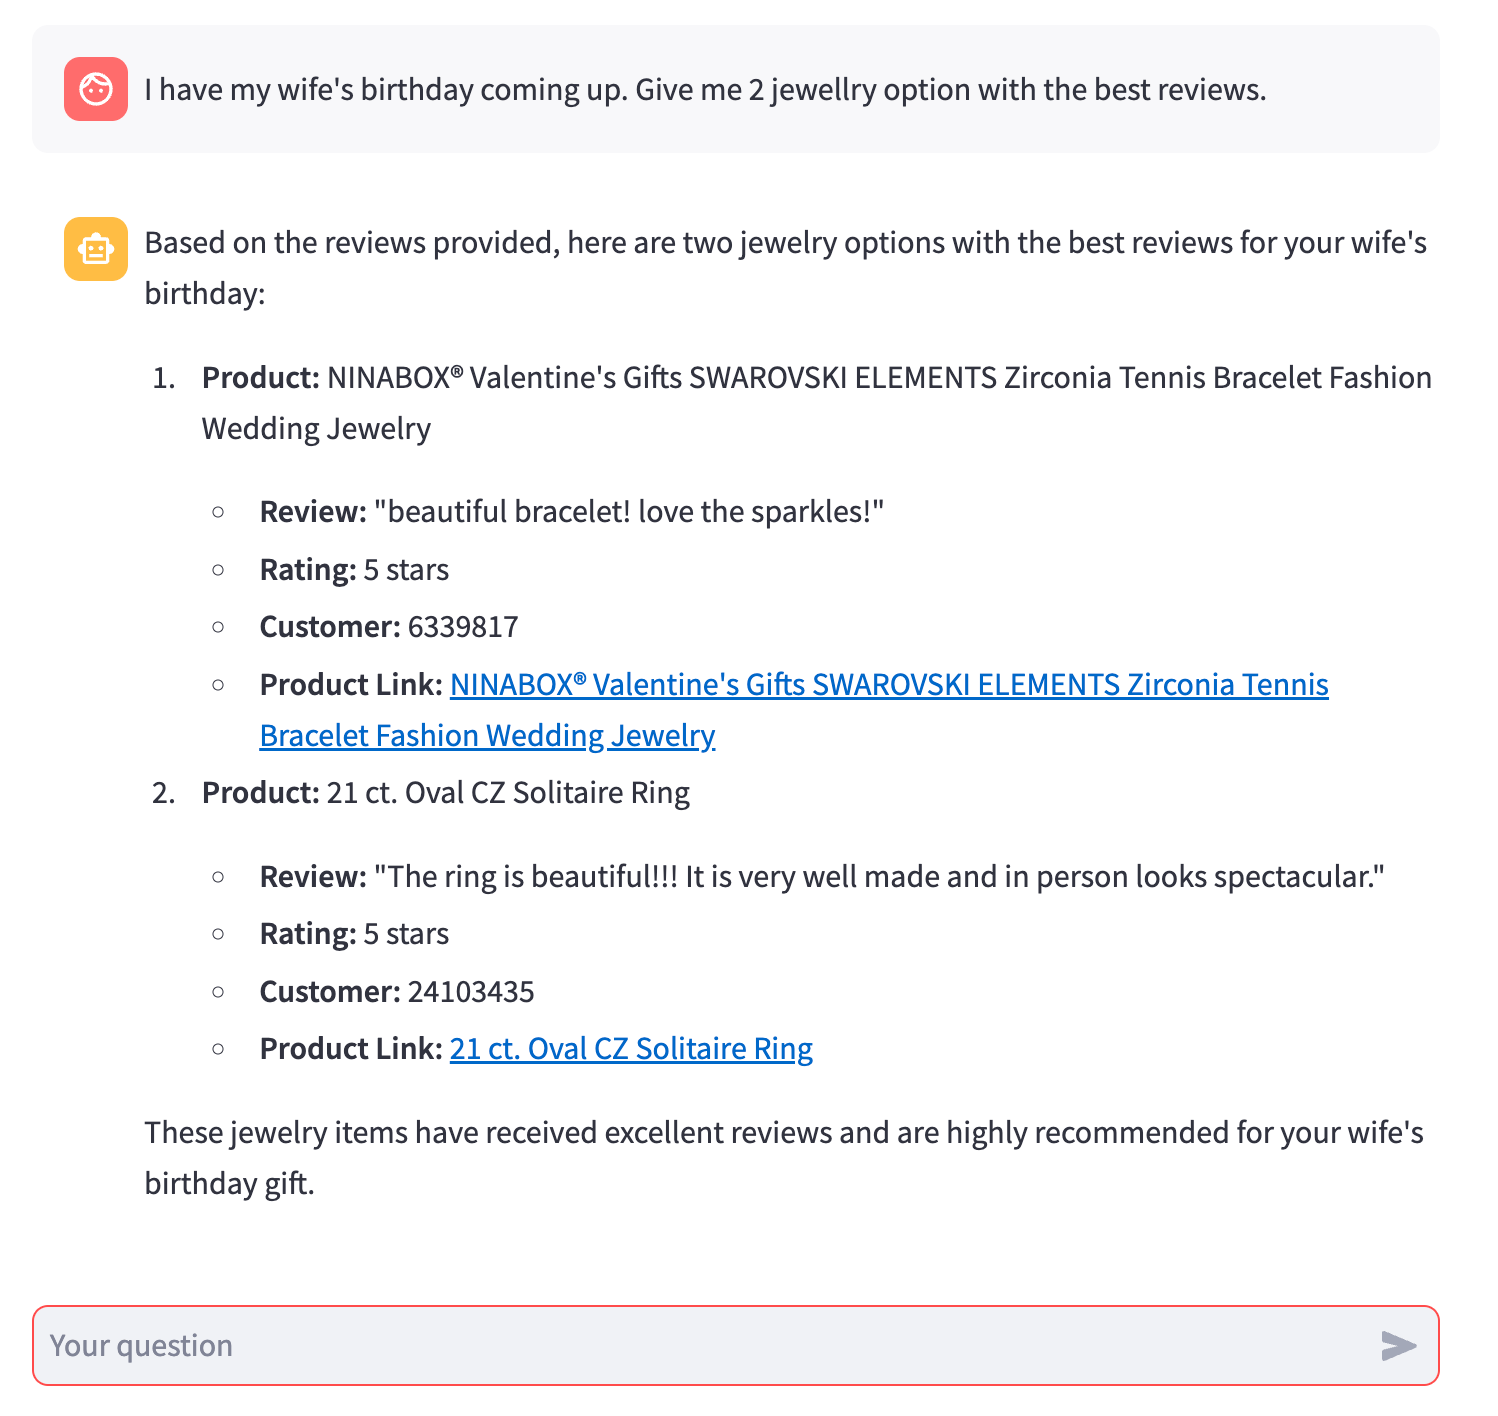
plaintext% docker compose up streamlitThis will open up the application page in the browser using which you can communicate with the RAG chatbot. Start typing in your questions, and see the chatbot respond to you based on the reviews that you had inserted.
Here are a few examples:
Conclusion
Congratulations!! You have just built a RAG application from scratch!
Estuary Flow has made the process of building the RAG application extremely easy by abstracting away the complexity of streaming data into vector database in real-time. Any changes to data automatically gets pushed into the vector database making it respond to you with the latest information.

About the author
Shruti is an accomplished Data Engineer with over a decade of experience, specializing in innovative data solutions. Her passion for exploring new technologies keeps her at the forefront of advancements in the field. As an active contributor to open-source projects and a technical blog writer, Shruti shares her knowledge with the wider community. She is also an Udemy author, with multiple courses in data engineering, helping others build expertise in this domain.


