Maintaining a competitive edge for your organization often requires several innovative solutions. Among the many solutions is the integration of your enterprise resource planning (ERP) systems with robust database solutions. It can promote operational efficiency and business intelligence.
NetSuite is a cloud-based ERP solution that helps streamline processes such as accounting, CRM, reporting, field service, and more. For advanced data management and querying capabilities, you can integrate NetSuite with SQL Server. The relational database infrastructure of SQL Server will facilitate the efficient management of complex and large NetSuite datasets.
In this guide, we’ll walk you through two methods of achieving effective NetSuite to SQL Server integration: the automated approach using Estuary Flow for a streamlined connection and the manual approach involving export/import processes.
Let’s get started with a brief overview of both platforms. However, if you’re already familiar with NetSuite and SQL Server, jump right into the data integration techniques.
What is NetSuite?
NetSuite is a business management platform offered by Oracle. The core functionality of NetSuite is focused on enterprise resource planning (ERP). It helps you manage business processes like finance, inventory, manufacturing, and HR.
NetSuite integrates all these processes into a single system, providing real-time visibility across various departments. Apart from this, NetSuite also offers modules for CRM, e-commerce, and professional services. This enables you to expand the functionality of your business based on specific requirements.
Key Features of NetSuite
- Deep Reporting Capabilities: NetSuite offers advanced reporting capabilities for vast amounts of data from various sources. Using its built-in reporting tools, you can generate detailed reports that make it easy to analyze different aspects of your business for better decision-making. NetSuite also provides role-based dashboards, enabling customized access to relevant data for employees, managers, or executives.
- Flexibility: With its SuiteCloud apps and tools, NetSuite offers impressive customization options for your business processes and corporate structure. You can customize NetSuite to accommodate your processing needs through these tools, extending NetSuite’s functionality to meet your business needs.
- True Cloud: Traditional ERP systems face challenges like vendor lock, slow upgrades, and lack of scalability. Natively built for the cloud, NetSuite provides scalability, multi-tenancy, and real-time access to data. These features ensure your business can grow without any performance issues.
What is SQL Server?
Microsoft SQL Server is a relational database management system that is suitable for both small businesses and large enterprises. It provides a comprehensive set of tools and features essential for storing, processing, and securing data.
You can install SQL Server on Windows or Linux, deploy it in a Linux container, or host it on an Azure Virtual Machine or other virtual platforms. This flexibility in deployment, combined with its robust architecture and extensive capabilities, make SQL Server a popular choice for organizations requiring optimized data management.
Key Features of SQL Server
- Query Store: The Query Store enables you to capture and store query execution plans, making it easy to identify performance variations due to changes in query plans. It also organizes data by time windows, which helps you analyze database usage patterns, monitor performance variations, and optimize efforts.
- Machine Learning: SQL Server supports scalable and distributed machine learning solutions through enterprise data sources. These sources can include relational databases, data warehouses, and CRM systems, providing input data to train ML models. You can also use languages like Python and R to query the data directly within the database.
- Integration Services: The SQL Server Integration Services (SSIS) is a platform used to build enterprise-level data integration solutions. This integration service includes built-in transformations, graphical tools for creating packages, and an SSIS data catalog for storing and managing packages. You can optimize these services to extract and transform data from sources like XML data files or relational sources and load it into the target destination.
Why Move Data From NetSuite to SQL Server?
- Advanced Data Analysis: SQL Server offers analysis tools (SSAS), including OLAP and data mining capabilities. Moving data from NetSuite to SQL Server allows you to perform advanced data analysis and efficiently predict trends. This can provide you with detailed insights into your business operations and market conditions.
- Master Data Service (MDS): SQL Server provides you with a centralized platform, Master Data Services, to manage your master data across various domains, including customers, products, and accounts. With MDS, you can efficiently manage complex data relationships within NetSuite while integrating multiple data sources.
- Reporting Services: Using SQL Server’s Reporting Services (SSRS), you can create and deploy insightful reports from your NetSuite data. These reports can be tabular, graphical, or free-form for diverse business needs. The reporting services also simplify report management and distribution, making it easier to share information across your organization.
For organizations looking to extend their NetSuite analytics, our NetSuite Analytics Warehouse guide provides insights on optimizing business intelligence and reporting.
2 Methods for NetSuite SQL Server Integration
- The Automated Way: Using Estuary Flow for NetSuite SQL Server Connection
- The Manual Way: Using Manual Export/Import to Move Data from NetSuite to SQL Server
Method 1: Using Estuary Flow for NetSuite SQL Server Connection
Estuary Flow is a robust data integration tool that simplifies the process of moving data between various systems. It automates repetitive data workflows, enabling you to set up continuous data syncing with minimal manual intervention.
With Estuary’s 200+ prebuilt connectors, you can build integration pipelines to transfer data between multiple sources and destinations of your choice without writing complex scripts. This includes connecting NetSuite to SQL Server. Your integration setup won’t take more than a few minutes, and there’s also a reduced risk of errors in the process.
Here’s how Estuary Flow simplifies the process of NetSuite SQL Server Integration:
- Low-latency NetSuite Data Integration: The speed of Estuary Flow’s Netsuite connector is highly optimized for streaming, real-time throughput.
- ETL and ELT Integration: Estuary offers ETL and ELT integrations. You can use SQL or Typescript to transform data for ETL pipelines or implement dbt transformation for ELT pipelines.
- Schema Evolution: Estuary’s schema evolution feature enables you to adapt to changes in data format or structure without manual intervention. This feature automatically propagates changes made to your data collections and reflects them in the destination. It helps maintain data accuracy throughout the data integration process.
- Derivations: Estuary Flow derivations allow you to perform a variety of transformations on one or more source collections. These transformations can include filtering data, implementing joins, aggregations, and merging. It helps keep your data organized and consistent.
To create a data pipeline for NetSuite SQL Server integration in Estuary Flow, follow the steps given below:
Prerequisites
- An Estuary Flow account.
- An Oracle NetSuite account.
- You must have access to all account permissions options in NetSuite.
- Create a new token-based authentication for NetSuite.
- A custom role in NetSuite with access to objects you want to capture.
- A new user must be assigned to a custom role.
- Generate an access token for the custom role.
- You will need an SQL Server database (SQL Server 2017 or later).
- The SQL Server Estuary connector will create new tables for the database. You need user credentials to access these tables.
- You need at least one Flow collection.
Step1: Set up NetSuite as a Source
- Log in to your Estuary account.
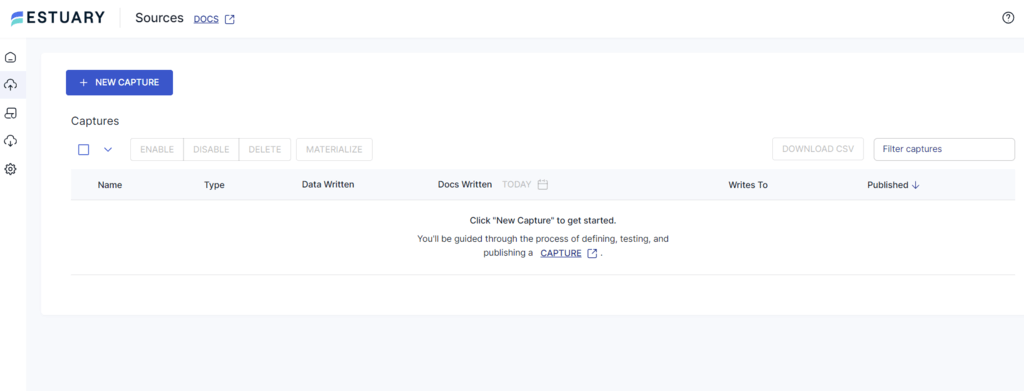
- Select Sources in the left panel and then click on the + NEW CAPTURE button.
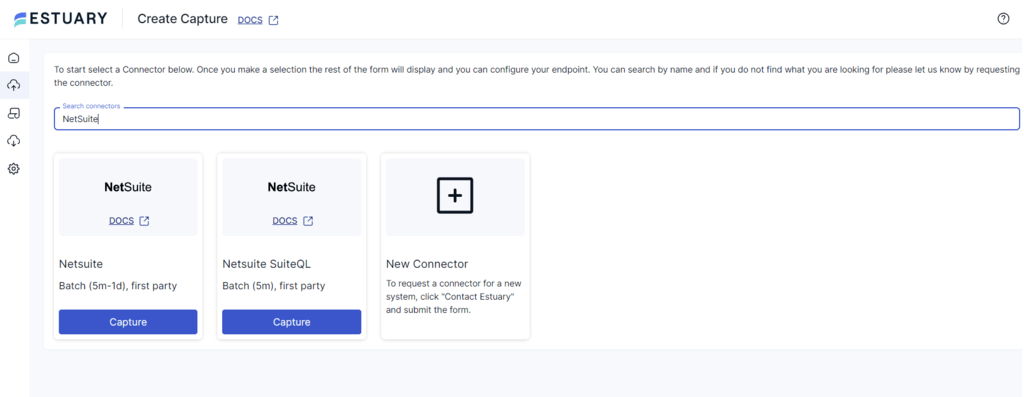
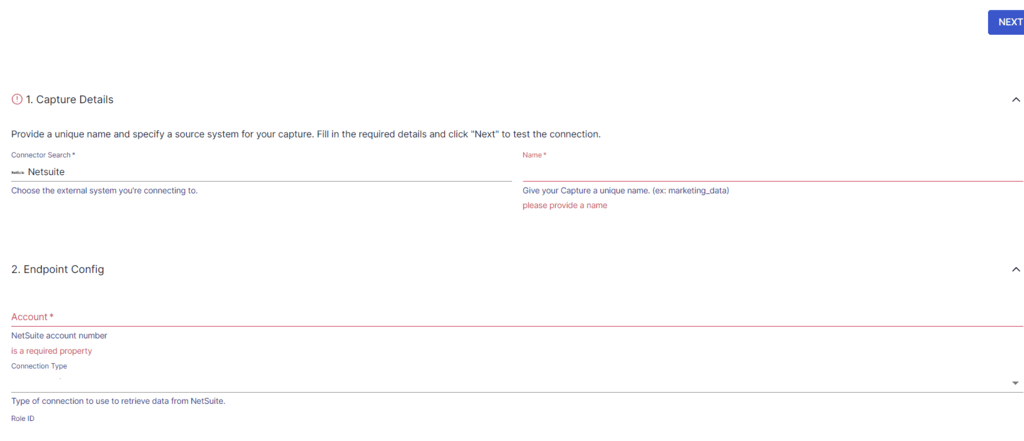
- On the Create Capture page, search for the NetSuite source connector. You will see two options: NetSuite and NetSuite SuiteQL. Select the NetSuite connector and click the connector’s Capture button.
- You will be redirected to the connector configuration page for NetSuite, where you need to specify the mandatory fields:
- Name: Provide a unique name for your capture.
- Account: Enter your NetSuite account number.
- You can authenticate your NetSuite account using TOKEN AUTH or USERNAME/PASSWORD AUTH.
- Once you fill in all the details, click on NEXT and SAVE AND PUBLISH. This completes your source connector configuration.
The connector will capture your data from Oracle NetSuite into a Flow collection.
Step 2: Set up SQL Server as Your Destination.
- Following a successful capture, you will see a pop-up window summarizing the details of the capture. To proceed with setting up SQL Server as the destination end of the connection, click MATERIALIZE COLLECTIONS in this pop-up.
Alternatively, you can navigate back to the Estuary dashboard and click Destinations > + NEW MATERIALIZATION.
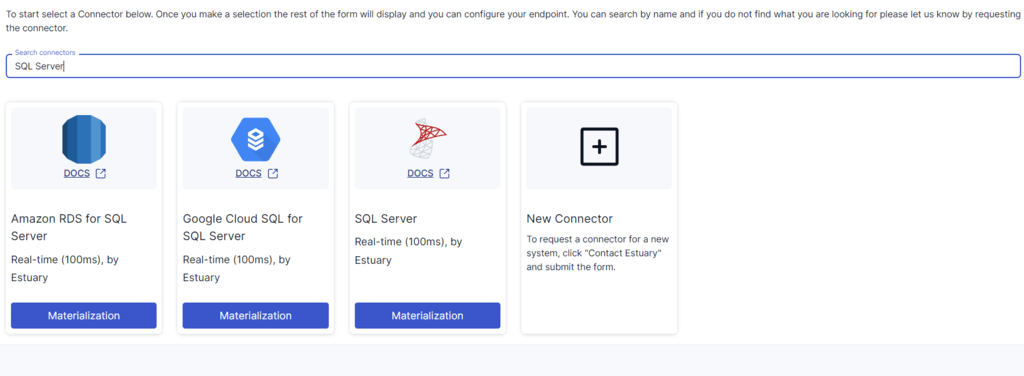
- On the Create Materialization page, search and select the SQL Server connector. Then click on the connector’s Materialization button.
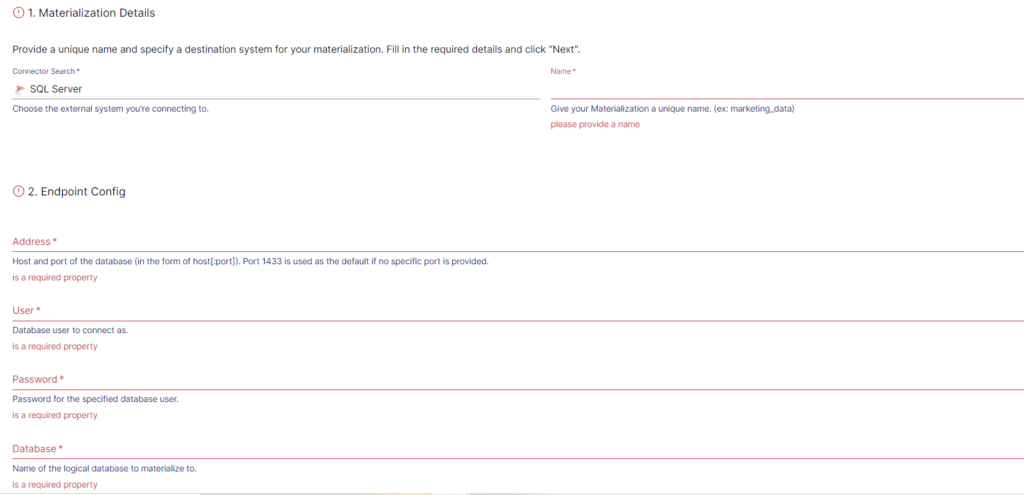
- You will be redirected to the SQL Server connector configuration page, where you must provide the following details:
- Name: Provide a unique name for your materialization.
- Address: Enter the address of your database, specifying the hostname and port number.
- User: Provide your database username.
- Password: Enter the password for the provided database user.
- Database: Specify the name of the database.
- Specify details for the dbt cloud job trigger and Network Tunnel.
- In the Source Collections section, check if the collection of your NetSuite data has been added to the materialization. If it hasn’t been added, you can click the SOURCE FROM CAPTURE button to manually link a capture.
- Click on NEXT and then SAVE AND PUBLISH to complete the configuration.
The connector will materialize the Flow collections of your NetSuite data into SQL Server tables.
Get started with NetSuite to SQL Server integration by registering with Estuary Flow and joining our Slack community for real-time support!
Method 2: Using Manual Export/Import to Move NetSuite to SQL Server
There are two ways to manually transfer your data from NetSuite to SQL Server.
In the first method, you will be using an ODBC driver to connect NetSuite and SQL Server and perform queries using a Linked Server. The second method details how you can export NetSuite data in the form of CSV files and then import those files into SQL Server.
Manual Method 1: NetSuite ODBC SQL Server Integration
You can connect NetSuite to SQL Server using the ODBC driver. To do this, you can use Microsoft SQL Server Management Studio (SSMS). It helps you connect NetSuite data to SQL Server instances. Here, SQL Server uses a Linked server to execute data commands and perform queries against NetSuite data.
Prerequisites
- Install and run the ODBC driver for NetSuite and SQL Server on your system.
- Ensure the data source is a configured system DSN.
- Install .NET Framework 4.5 on your computer.
Step 1: Setup and Configure Linked Server Using SSMS
- Start your SSMS and select SQL Server instance.
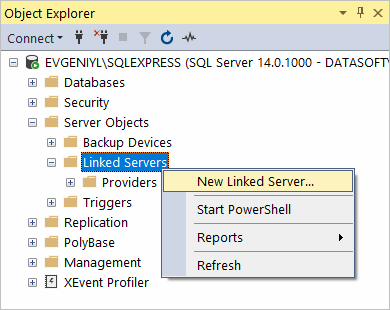
- You will see an Object Explorer pane; click on Server Objects, then right-click on Linked Server and select New Linked Server.
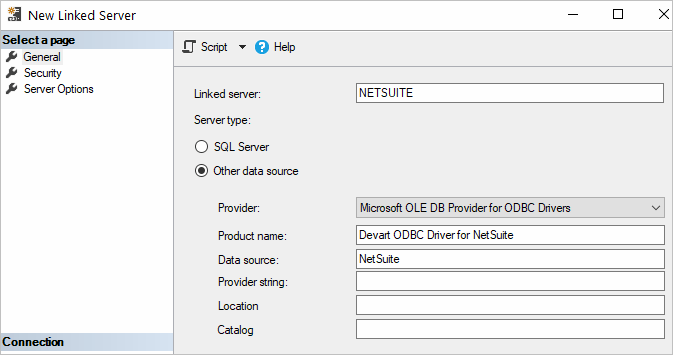
- To configure your linked server:
- Linked Server: Provide a name.
- For Server type, click on Other data source > Microsoft OLE DB Provider for ODBC Drivers.
- In the Data Source field, enter the name of your DSN for NetSuite Driver. You can also specify the ODBC Driver connection string in the Provider field instead.
This allows you to issue distributed queries and access NetSuite databases through SQL Server.
Step 2: Retrieve Data from NetSuite
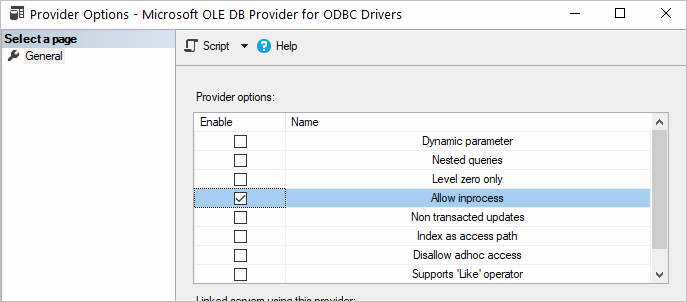
- Go to the Object Explorer pane and select MSDASQL in the list of Linked Servers.
- Enable the Allow inprocess option in the Provider Options window.
- Create a New Linked Server.
- In the Provider field, make sure to select Microsoft OLE DB Provider for ODBC Drivers.
- Enter the name of the Linked Server, which is NetSuite.
- In the Product name and Data source fields, specify the previously generated System DSN. With the NetSuite tables available to be fetched, you can execute a query on the data.
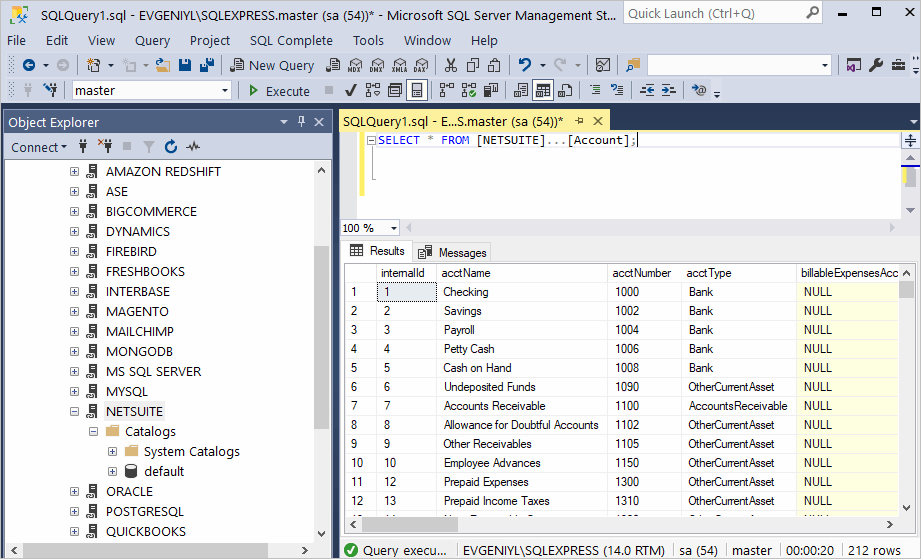
- In the toolbar, click on New Query. Enter your query in the editor window and click on Execute. The contents of the selected data will be retrieved directly from your NetSuite account.
Limitations of Method: NetSuite ODBC SQL Server Integration
- Setting up linked servers through the ODBC driver is complex and requires precise configuration of DSN and OLE DB providers.
- ODBC drivers can be sensitive to network latency, which can slow down the process of data retrieval. This can be an issue, especially for large data volumes or for geographically distributed servers.
- ODBC isn’t capable of handling data type conversions between NetSuite and SQL Server. This can lead to data loss or errors.
Manual Method 2: Using CSV Files for NetSuite SQL Server Integration
In this method you will have to download your NetSuite data as CSV files and then load these files into SQL Server. Let’s look at the steps:
Step 1: Export NetSuite Data as CSV
NetSuite provides you with an export function that you can use to export data in CSV format.
- For Bulk Export
- Navigate to the Setup menu in your NetSuite account.
- Click on Import/Export > Export Tasks.
- Select Full CSV export.
This downloads your NetSuite data as a zip file containing CSV files.
- Extract Data from NetSuite in Parts
- NetSuite also allows you to export specific datasets based on your requirements. You can separately export search results, reports, financial data, CRM data, etc., as CSV files.
Step 2: Import Data to SQL Server
- On your local system, navigate to the folder where you have saved the zip file. Right-click on the file and select Extract All.
- Open the extracted files and confirm the structure of the data.
- Launch SQL Server Management Studio and connect it to your local SQL Server instance.
- Right-click on the target database; select Tasks > Import Data.
- Select the data source type and specify the location of the CSV file to import.
- Follow the import wizard to map the columns from the file correctly into your database table, and then import the data.
Limitations of Using CSV Files for NetSuite SQL Server Integration
- When using CSV files, you have to regularly export the latest data from NetSuite and re-import it into SQL Server. The reloading of data after specific time intervals is time-consuming, especially when dealing with large datasets.
- Another limitation of using CSV files is mapping errors. You have to manually map data into database tables, which may cause errors like missing data, wrong values in fields or tables, or duplicate data.
Conclusion
Moving data from NetSuite to SQL Server facilitates advanced analysis and reporting capabilities. This is important to gain insights into your customer needs, which helps improve decision-making processes.
To integrate data between NetSuite and SQL Server, you can use the ODBC driver or CSV export/import methods. While these approaches are effective, they are also associated with potential drawbacks, such as mapping errors and time delays.
Alternatively, with Estuary Flow, you can automate the process of data integration and leverage real-time synchronization. This real-time ETL tool is effective in reducing manual efforts, minimizing the risk of errors, and saving time.
Estuary Flow can help with instant data transfer across different platforms. Register for your free Estuary account to get started today!
FAQs
How to Connect NetSuite to SQL Server?
You can connect NetSuite to SQL Server using a data integration tool like Estuary Flow. It automates the process of real-time data synchronization and maintains data consistency. Another way to connect NetSuite to SQL Server is via the ODBC driver.
Does NetSuite Run on SQL?
No, NetSuite does not natively run on a SQL database. However, you can use the SuiteQL tool, which is a NetSuite native application used to run SQL-like queries directly within NetSuite.
Related Sync with NetSuite

About the author
With over 15 years in data engineering, a seasoned expert in driving growth for early-stage data companies, focusing on strategies that attract customers and users. Extensive writing provides insights to help companies scale efficiently and effectively in an evolving data landscape.


