Integrating the power of NetSuite, a comprehensive business management suite, with the data warehousing capabilities of Redshift, Amazon's powerful data storage and analytics solution, creates a robust data management ecosystem. This fusion enables you to efficiently streamline your business operations, optimize decision-making processes, and drive growth.
This guide walks you through the step-by-step process of connecting NetSuite to Redshift. By integrating these two platforms, you can enhance your data-driven strategies and innovation.
Eager to dive into the integration process? Jump ahead to explore the step-by-step methods for connecting NetSuite to Redshift.
What is NetSuite?
NetSuite is a cloud-based enterprise resource planning (ERP) software. It offers a suite of applications designed to help businesses manage various aspects of their operations. These include customer relationship management (CRM), e-commerce, inventory control, human resources, and financial management (accounting, budgeting, billing, etc.).
NetSuite is designed to accommodate businesses of varying sizes, from small startups to large enterprises. It can scale as your business grows and its needs change. The platform includes reporting and analytics tools to help businesses gain insights into their operations. It allows you to create custom reports and dashboards to track key performance indicators and make informed decisions.
What is Redshift?
Amazon Redshift is a fully managed, cloud-based data warehousing service provided by Amazon Web Services (AWS). It's designed to handle and analyze large volumes of data for businesses seeking to gain insights and make data-driven decisions. The architecture of Amazon Redshift revolves around a columnar storage model and a massively parallel processing (MPP) approach.
At its core, Amazon Redshift organizes data into columns rather than rows, allowing for more efficient data compression and improved query performance. This is particularly beneficial for analytical workloads where queries often involve aggregations, filtering, and analysis of a subset of columns rather than the entire dataset.
The Massively Parallel Processing (MPP) architecture is a key feature of Amazon Redshift. It divides and processes data across multiple nodes in a cluster and distributes the workload to achieve parallel processing. The cluster consists of a leader node and one or more compute nodes. The leader node manages query coordination, optimization, and distribution, while compute nodes handle data storage and query execution. This architecture ensures high concurrency and fast query performance, enabling multiple users to execute complex analytical tasks simultaneously.
Methods to Replicate NetSuite Data to Redshift
This section explores two methods to migrate your data from NetSuite to Redshift.
- Method 1: Manually Loading NetSuite Data to Redshift
- Method 2: Using SaaS Alternatives like Estuary
Method 1: Manually Loading NetSuite Data to Redshift
To manually move NetSuite data to Redshift, start by extracting the data from NetSuite and saving it as a CSV file. Next, upload this CSV file to an Amazon S3 bucket to stage the data. Then, utilize Redshift's COPY command to migrate the data from the CSV file into the Redshift table. Let's explore all the steps involved for a more detailed understanding.
Step 1: Extracting NetSuite Data in CSV Format
- Log in to NetSuite and go to Setup > Import/Export > Export Tasks > Full CSV Export.
- To utilize the CSV export function, users must hold the administrator role.
- Click Submit to start the export and track progress with the progress bar.
- Once done, click Save this file to disk in the File Download window.
- Name the file with a .ZIP extension and save it.
- This process retrieves your NetSuite data in CSV format. Now, you can upload the CSV files into an Amazon S3 bucket.
Step 2: Uploading CSV Files to an Amazon S3 Bucket
- Log in to the AWS Management Console and go to the Amazon S3 service.
- From the left navigation pane, click on Buckets and select the specific bucket where you want to upload your files and folders.
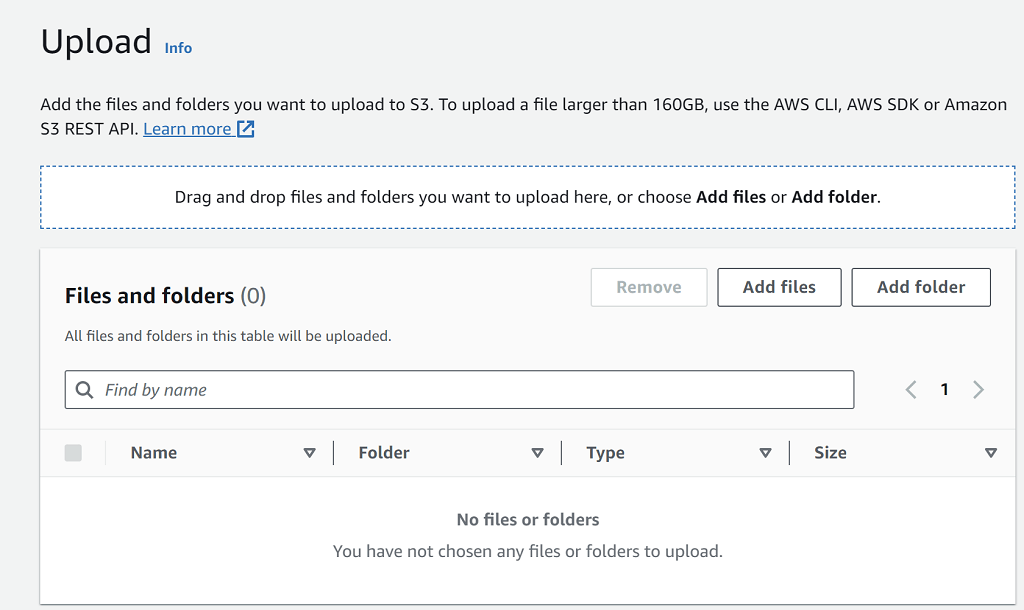
- Now, Click Upload. In the Upload window, you have two options:
- Drag and drop files or folders directly into the Upload window.
- Choose Add file or Add folder, select the items you want to upload, and click Open.
- Drag and drop files or folders directly into the Upload window.
- If you want to enable versioning for the uploaded objects, under the Destination section, select Enable Bucket Versioning.
- Click Upload at the bottom of the page. Amazon S3 will start uploading your files and folders.
- Once the upload is completed, you'll see a success message on the Upload status page.
Step 3: Loading Data into Amazon Redshift from S3
- The COPY command is used to pull data from S3 and load it into your desired table in Amazon Redshift.
- Use the CSV keyword in the command. This helps Amazon Redshift recognize the CSV format. Define the table’s columns and their order in the command. This ensures the data aligns correctly with your table schema:
plaintextCOPY table_name (col1, col2, col3, col4)
FROM 's3://<your-bucket-name>/load/file_name.csv'
credentials 'aws_access_key_id=<Your-Access-Key-ID>;aws_secret_access_key=<Your-Secret-Access-Key>'
CSV;- Replace the following information with your specific details:
- Table_name with the name of your target Redshift table. Ensure you safeguard your credentials during this process by following best security practices.
- col1, col2, etc., with the column names from your table
- <your-bucket-name> with the name of your S3 bucket.
- File_name.csv with the name of your CSV file.
- <Your-Access-Key-ID> with your AWS access key.
- <Your-Secret-Access-Key> with your AWS secret access key.
- Table_name with the name of your target Redshift table. Ensure you safeguard your credentials during this process by following best security practices.
- If your CSV files have headers, you can ignore the first line using the IGNOREHEADER option.
- Executing the COPY command in the Redshift SQL client or query editor, you can load your CSV data from S3 into the specified Redshift table.
Limitations of Manual Method:
Even though the manual method is suitable for one-time data migrations, it does come with certain limitations:
- Time-Consuming and Complexity: The CSV-based method involves multiple manual steps, including data extraction, file staging on S3, and executing SQL commands in Redshift. This can be time-consuming, especially when dealing with significant volumes of data or frequent updates.
- Lack of Real-Time Data Sync: Due to manual interventions at each step, this method can introduce delays, leading to data latency. This means the data in Redshift may not reflect the most up-to-date information from NetSuite. As a result, this will impact the accuracy and timeliness of business insights and decisions.
Method 2: Using SaaS Alternatives like Estuary Flow
Utilizing Software-as-a-Service (SaaS) alternatives like Estuary Flow offers a streamlined approach to transferring NetSuite data to Amazon Redshift. Unlike the manual method, SaaS alternatives provide automated and optimized solutions for data integration.
Here are some of the benefits of using Estuary Flow for loading data from NetSuite to Amazon Redshift:
- Pre-Built Connectors: Estuary Flow offers a wide range of pre-built connectors that cover various data sources and destinations. These connectors streamline the integration process, ensuring smooth and efficient data migration.
- User-Friendly Interface: With Estuary Flow, configuring data transfer settings becomes effortless. Its intuitive interface lets you quickly connect your NetSuite and Redshift accounts. You can select the data to transfer and set up the transfer parameters with just a few clicks.
- Built-In Testing: Estuary Flow includes built-in features for data quality checks, schema validation, and unit testing. This functionality ensures the highest level of data accuracy, assuring you the quality of your transferred data.
- Scalability: Estuary Flow is designed to manage large data volumes. It can handle active workloads up to 7GB/s change data capture (CDC) from databases of any size.
- Data Transformation: Estuary Flow excels as a robust DataOps platform because it can swiftly modify and process data in real time. This is achieved through the use of streaming SQL and Typescript transformations, allowing for efficient and quick data modifications and enhancements.
Let's delve into the step-by-step process in detail.
Prerequisites:
Before initiating the migration process, it's essential to ensure that certain prerequisites are in place:
- NetSuite Source Connector: Set up the NetSuite connector with Flow.
- Redshift Destination Connector: Set up the Redshift connector with Flow.
Step 1: Capture the Data From Your Source
- Access your Estuary account by logging in. If you're new, sign up for a free account. After logging in, navigate to the Sources > + NEW CAPTURE.
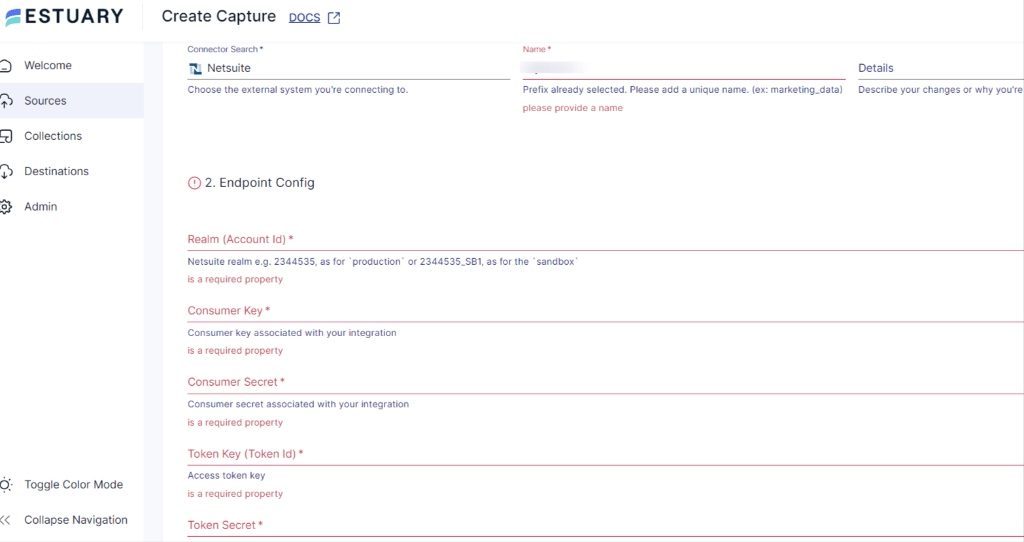
- On the Captures page, search for the NetSuite option and click on the Capture button to initiate the capture setup.
- In the Create Capture page, provide details including Capture Name, Account ID, Customer Key, Customer Secret, Token Key, Token Secret, and Start Date.
- Once you've entered all the details, click NEXT > SAVE AND PUBLISH. Now, Estuary Flow will establish a secure connection with your NetSuite account.
Step 2: Set Up Your Data Destination
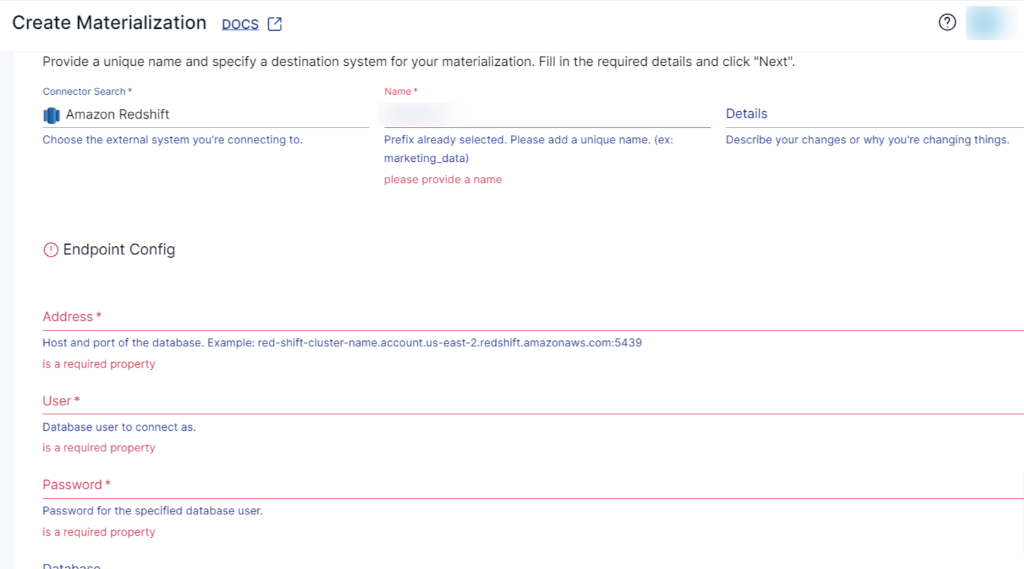
- From the dashboard, click Destinations > + NEW MATERIALIZATION.
- On the Materialization page, search for Amazon Redshift and choose it as your destination for materialization.
- In the Create Materialization page, provide the unique Name and fill in the Endpoint config details, including Host Address, Username, Password, Database Name, Database Schema, Access Key ID, and Region.
- After entering the necessary details, click NEXT. If your NetSuite data collections aren't visible in your Redshift table, utilize the Source Collections feature to locate and add them.
- Once the setup is complete, click SAVE AND PUBLISH to finalize the materialization setup. Now, Estuary Flow will establish real-time data replication from your NetSuite source to Amazon Redshift.
- For more detailed instructions, refer to Estuary Flow documentation:
Conclusion
Connecting NetSuite to Amazon Redshift offers a powerful data management solution that streamlines your business operations and enhances decision-making. While the manual approach offers a feasible solution for one-time migrations, it comes with limitations such as time-consuming processes and potential data latency.
On the other hand, leveraging Software-as-a-Service (SaaS) alternatives like Estuary Flow offers a streamlined and automated method to ensure efficient data integration. Estuary Flow enhances data migration with pre-built connectors for easy setup, intuitive interfaces for users, and built-in testing for accuracy. Its scalability handles diverse data sizes, and data transformation capabilities ensure exact transfers.
Use Flow today and leverage its extensive features to effortlessly create your NetSuite to Redshift data pipeline.
Exploring options to link NetSuite with a different data warehouse? Explore our comprehensive guides:

About the author
With over 15 years in data engineering, a seasoned expert in driving growth for early-stage data companies, focusing on strategies that attract customers and users. Extensive writing provides insights to help companies scale efficiently and effectively in an evolving data landscape.


