MySQL and SQL Server both are powerful database solutions in the era of data management, offering similar features such as. Some of these features include the use of SQL for querying, support for ACID transactions, stored procedures, triggers, and compatibility with various programming languages and frameworks.
However, SQL Server is a preferable choice when dealing with intricate queries, extensive datasets, and robust security needs. It offers multiple advanced features, including seamless integration with BI tools and Microsoft products. These capabilities make organizations shift their data from MySQL to SQL Server when managing complex data workloads, especially if they’re already using Microsoft technology.
In this guide, we’ll explore two efficient methods for migrating MySQL data to SQL Server. Let’s get started!
MySQL vs. SQL Server: Key Differences
MySQL Overview
MySQL, developed in the mid-1990s, has established itself as a robust and widely used open-source relational database management system (RDBMS). It is trusted by developers and businesses to proficiently manage their structured data.
Over last few decades, MySQL has added a host of features and been hardened across thousands of deployments, making it a suitable choice for applications ranging from e-commerce to management systems.
SQL Server Overview
SQL Server is another powerful RDBMS that has been around since 1989 and hardened by thousands of enterprise deployments. It supports SQL (Structured Query Language) for querying and manipulating data. It also has advanced enterprise features to ensure scalability and high availability options that reduce downtime for critical applications, including database mirroring, always on availability groups, and failover clustering.
In addition to the above features, SQL Server also provides a wide range of tools dedicated to business intelligence and reporting: SQL Server Reporting Services (SSRS) for report creation, SQL Server Integration Services (SSIS) for seamless data integration, and SQL Server Analysis Services (SSAS) for performing data mining and analytical activities.
Also Read: MySQL vs SQL Server
2 Easy Methods to Migrate Data from MySQL to SQL Server
Here are two methods you can use to transfer data from MySQL to SQL Server efficiently:
Method #1: Automated MySQL to SQL Server Migration Using Estuary Flow (No-Code Solution)
No-code data integration tools like Estuary Flow provide a wide range of pre-built connectors to swiftly integrate data from multiple sources and destinations. These connectors eliminate the need for manual interventions and do not require any coding skills for the data integration process. As a result, you can invest more time in analysis, reporting, and other value-added tasks.
Estuary Flow is built for both speed and scale. It supports CDC throughput of up to 7GB/s, making it capable of handling the largest enterprise workloads. At the same time, it delivers sub-100ms latency between OLTP databases like MySQL, PostgreSQL, and SQL Server, so every individual change is propagated almost instantly.
By following the steps outlined below, you can quickly replicate your data from MySQL to SQL Server using Estuary Flow:
Step 1: Login or Register
Before initiating the transfer process, ensure the following requirements are met:
Prerequisites:
Step 2: Set Up MySQL as the Source
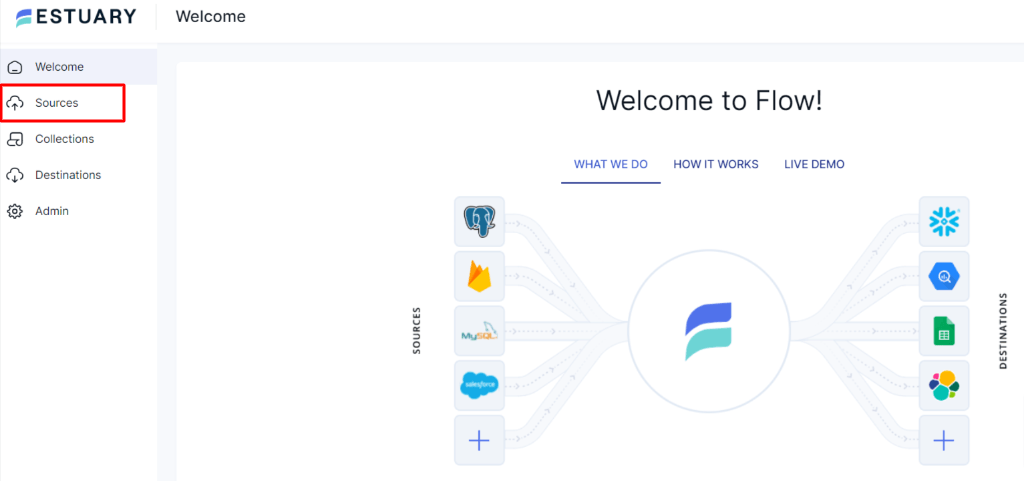
- On the Estuary dashboard, click Sources located on the left-side pane.
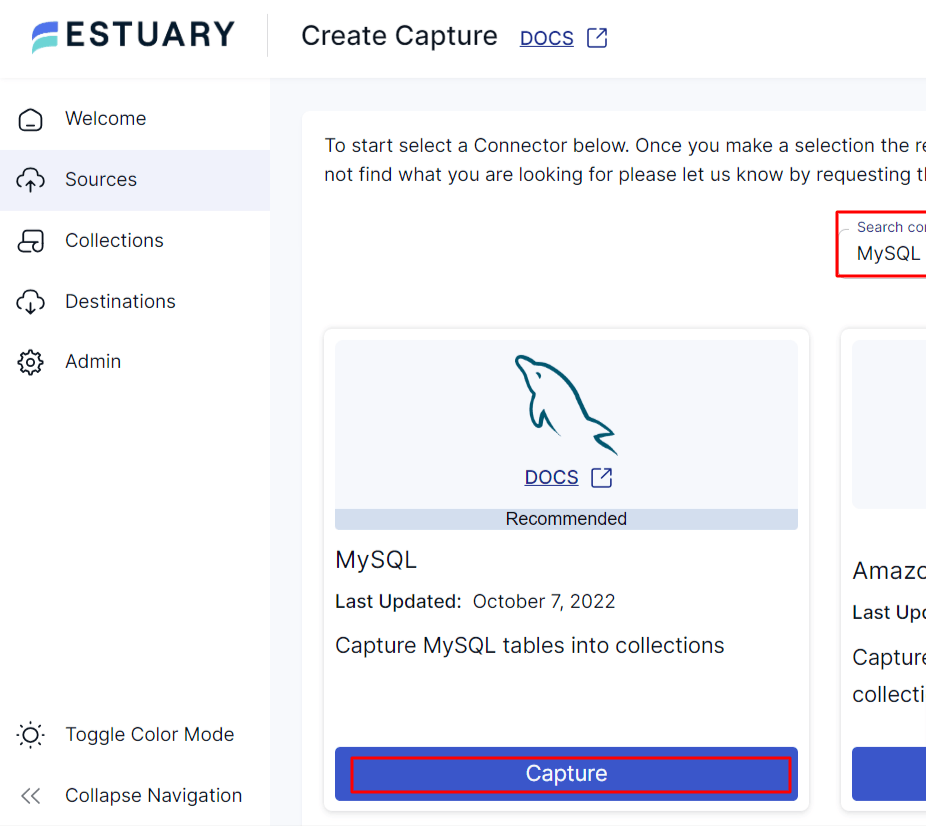
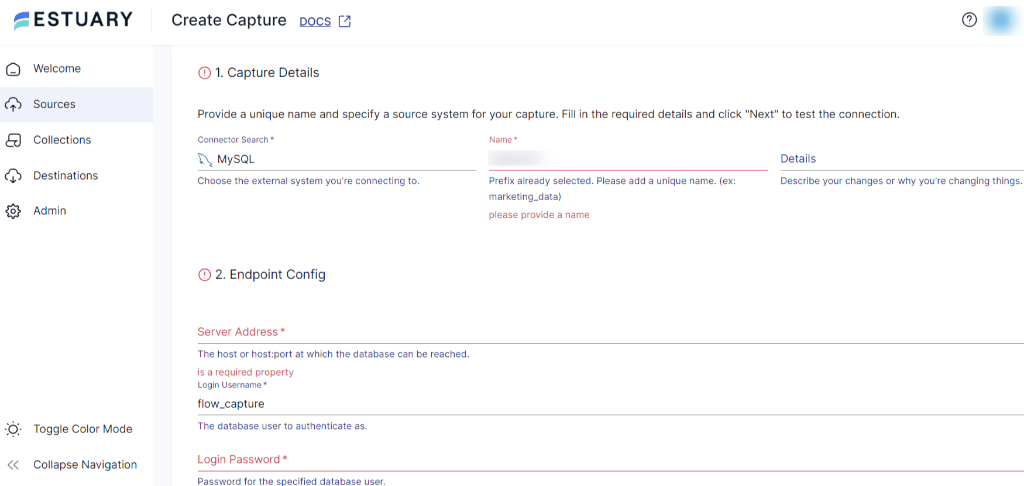
- Click + NEW CAPTURE and search for MySQL.
- On the Create Capture page, search MySQL in the Search connectors box. Once you locate the connector, click on the Capture button.
- Under the Capture Details section, provide a unique Name, and under the Endpoint Config section, fill in the Server Address and Login Password.
- Once you’ve filled in all the mandatory fields, click on NEXT > SAVE AND PUBLISH.
Step 3: Configure SQL Server as the Destination
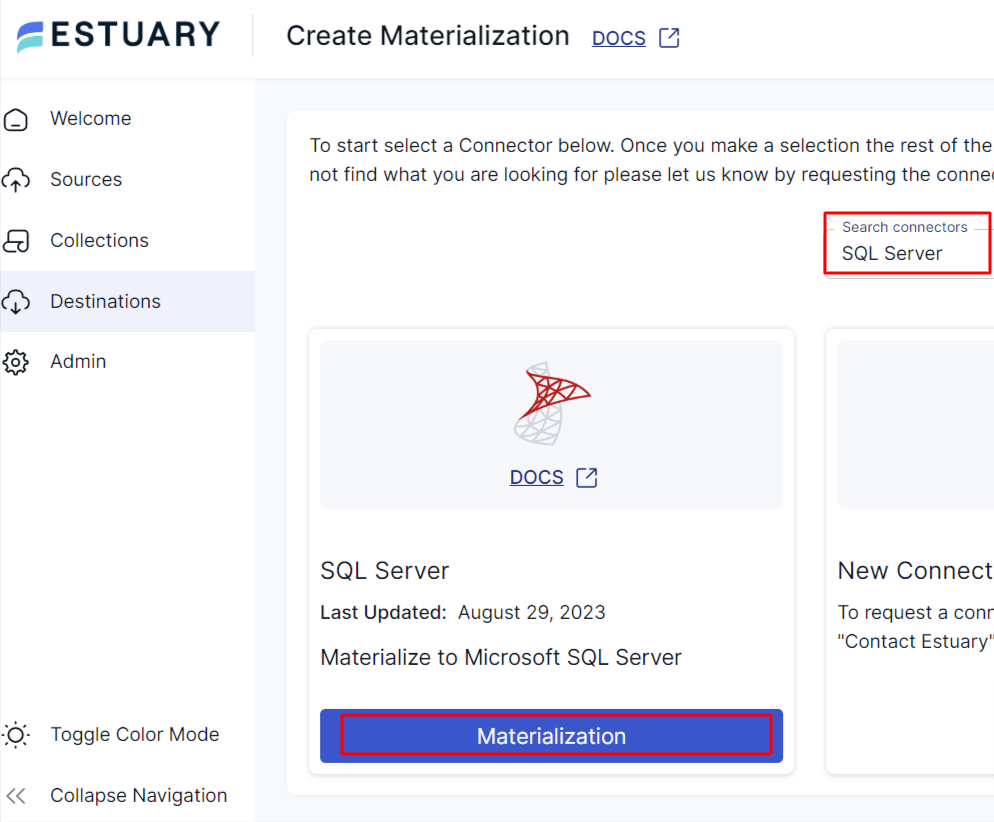
- On the Estuary dashboard, click on Destinations > + NEW MATERIALIZATION.
- On the Create Materialization page, search SQL Server in the Search connectors box. Once you locate the connector, click on the Materialization button.
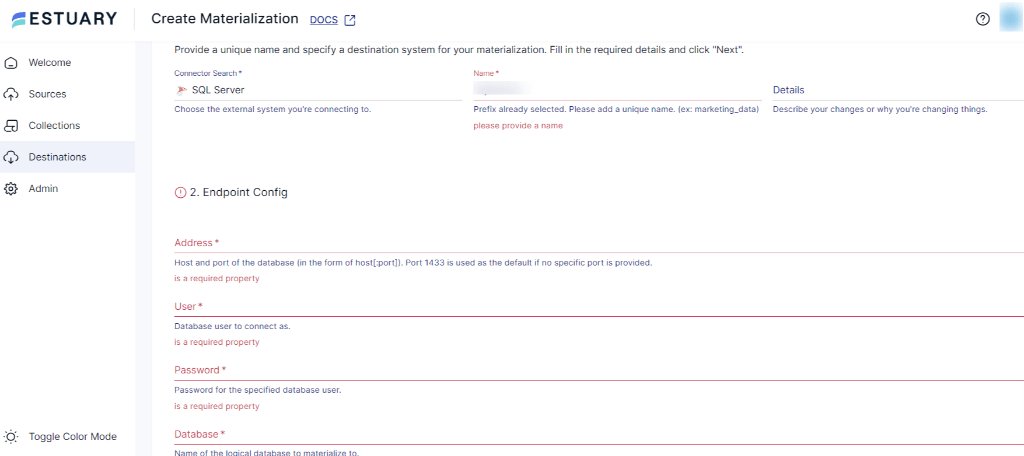
- You’ll be directed to the SQL Server Create Materialization page. Provide a unique Name in the Materialization Details section. Fill in the Address, User name, Password, and Database name fields in the Endpoint Config section.
- The data collections you captured from MySQL might already be pre-selected. If not, utilize the Source Collections section to find and include them.
- After providing all the mandatory details, click on NEXT > SAVE AND PUBLISH.
Estuary Flow will now automatically extract, transform, and load (ETL) your MySQL data into SQL Server in real time.
🚀 Get Started Now! Register for free to experience seamless MySQL to SQL Server migration. Need help? Contact Us for expert assistance!
Method #2: Manual MySQL to SQL Server Migration Using SQL Server Management Studio (SSMS)
If you prefer a manual approach, you can export MySQL data as CSV files and import them into SQL Server using SSMS.
Step 1: Extract MySQL Data into CSV Files
Several tools can be used to export MySQL data, including:
- Using the Command Line
- Using Mysqldump
- Using phpMyAdmin
- Using the CSV Engine
- Using MySQL Workbench
In this guide, we’ll extract data into CSV files using the command line approach. For in-depth steps of alternative methods, please refer to MySQL to CSV: 5+ Ways to Export Data article.
Using the Command Line
- Open the command prompt and connect to the MySQL server.
- Once you’re connected to the MySQL server, your command prompt will look like this:
plaintextmysql>- Select the specific database with the use command and table with the Select command that you want to export in the CSV file format.
- To export the table into the CSV file, you can use the INTO OUTFILE statement. Here’s an example.
plaintextSELECT * FROM table_name
INTO OUTFILE 'path_to_csv_files/filename.csv';
Replace table_name with your MySQL table and specify the output file path.
- You can use the SELECT and UNION statements in the above code to include column headers in your CSV file.
- Once you have executed the above query, check if the CSV files are generated correctly with the specific MySQL table data.
- Repeat the entire process for each table.
Step 2: Data Transformation & Cleanup
Once the CSV files are downloaded to your local machine, perform data transformation. This might include:
- Removing duplicate rows or records
- Handling missing or null values
- Standardizing inconsistent data formats
- Data mapping or data type conversion, if needed
- Verifying the need for special characters
- Validating data for predefined rules, and more
Step 3: Import CSV into SQL Server via SSMS
You can export data to SQL Server either by using the SSMS tool or by using the sqlcmd interface. In the following steps, you’ll get to know how to transfer CSV files into SQL Server using SSMS.
- Open SQL Server Management Studio (SSMS) and connect to your instance.
- If you haven't installed SSMS, install and configure it before proceeding.
- Create a new database or open an existing one.
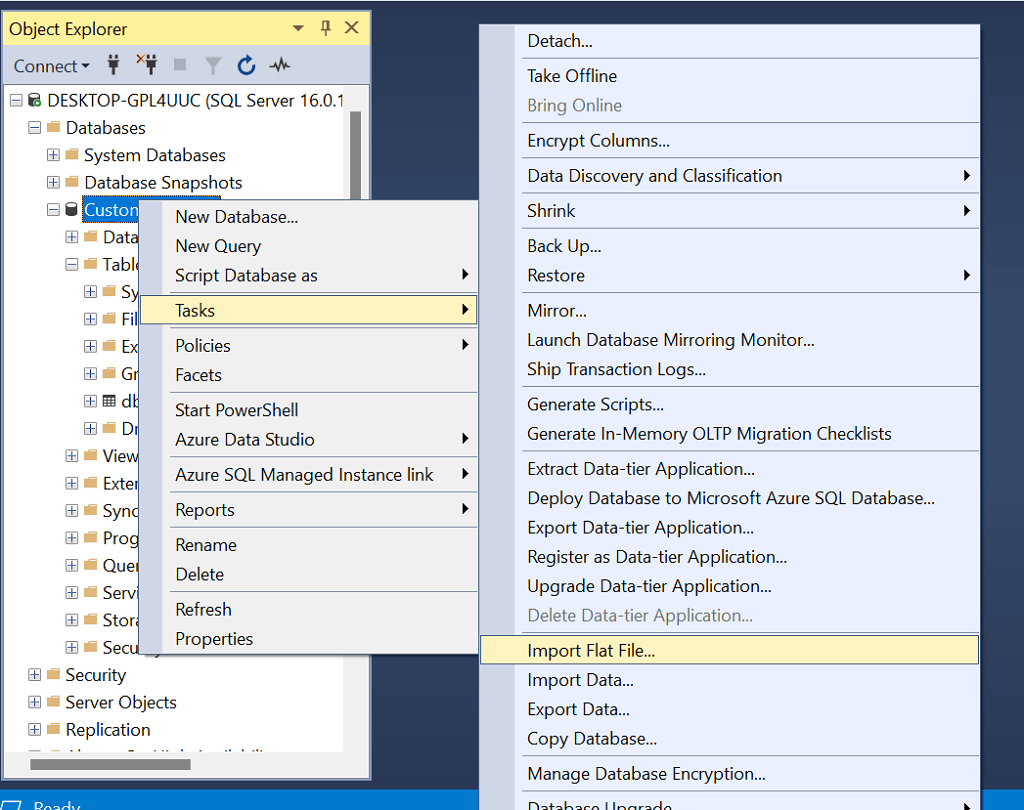
- Expand the Databases section, right-click your target database, and select Tasks > Import Flat File.
- In the Import Flat File Wizard, click Browse to locate your CSV file.
- Enter a name for the table in the New Table Name field. SQL Server defaults to the dbo schema if none is specified.
- Click Next to preview the first 50 rows of data and verify that all columns are correctly mapped.
- On the Modify Columns tab, adjust column settings such as data type, primary key assignment, and nullability as needed.
- Click Next and then Finish to begin the replication process.
- Once completed, you’ll see the Operation Complete message.
- Refresh the database and verify the data by right-clicking on the table and selecting Select Top 1000 Rows.
The manual approach offers flexibility and is best suited for infrequent data transfer, one-off, or backup scenarios. But it comes with several limitations:
- Time-Consuming: In the above method, you would need to repeatedly perform the extraction, cleaning, and loading process for each table. This manual intervention can be burdensome, time-consuming, and error-prone when dealing with large-scale data transfers.
- Lack of Automation: The manual method lacks automation and real-time data synchronization capabilities. For example, e-commerce platforms require up-to-date inventory details. If the transfer frequency is suddenly increased, manually exporting and importing CSV files becomes an impractical approach. As a result, this makes it less efficient for real-time data integration needs.
- Scalability: As your organization's data increases over time, the size of datasets you need to transfer can increase. When using SSMS and CSV-based approach, you might face challenges related to storing and managing these large datasets.
Why Use Estuary Flow for MySQL to SQL Server Migration?
Estuary Flow offers a fully automated, real-time, and scalable data replication solution. Here’s why it stands out:
- SQL CDC with sub-100ms latency: Estuary’s CDC capabilities allow you to track and replicate changes made to your MySQL source and apply them to SQL Server in under 100ms, keeping systems perfectly aligned for analytics and BI.
- Scalability: Estuary Flow efficiently handles increasing data volumes and can accommodate demanding workloads. It supports CDC of upto 7GB/s, irrespective of the database size.
- Seamless Integration: Works with multiple sources and destinations for unified data management.
Final Thoughts
Migrating from MySQL to SQL Server enhances data security, scalability, and business intelligence capabilities. In this guide, we covered two approaches to transfer data from MySQL to SQL server:
- Using Estuary Flow (No-Code, Automated Solution) – Best for real-time, scalable data integration.
- Using SSMS (Manual CSV Import) – Suitable for one-time transfers but lacks automation.
For hassle-free, real-time MySQL to SQL Server replication, get started with Estuary Flow today!
Need guidance for your pipeline? Join the Estuary Community on Slack to connect with our team and get expert support.
Frequently Asked Questions (FAQs)
1. What is the fastest way to migrate MySQL to SQL Server?
The fastest way to migrate MySQL to SQL Server is by using Estuary Flow, which automates the process and provides real-time data synchronization using Change Data Capture (CDC).
2. Can I migrate MySQL to SQL Server without coding?
Yes, tools like Estuary Flow offer a no-code solution with pre-built connectors, allowing seamless migration without the need for coding expertise.
3. How do I ensure data consistency during migration?
To ensure data consistency, use Change Data Capture (CDC) to track changes in real-time and verify data integrity after migration using SQL queries.
Related Sync with MySQL

About the author
With over 15 years in data engineering, a seasoned expert in driving growth for early-stage data companies, focusing on strategies that attract customers and users. Extensive writing provides insights to help companies scale efficiently and effectively in an evolving data landscape.


