When moving data between databases, organizations often transition from MongoDB to SQL Server to improve analytics, ensure better integration, or return to a structured relational model.
So, how do you migrate MongoDB to SQL Server seamlessly?
The best approaches include:
- No-Code ETL Tools (e.g., Estuary Flow) – Automate and streamline data migration in real time.
- SQL Server Integration Services (SSIS) – Use scripts or ODBC connectors to move data.
- Custom Scripts – Manually extract, transform, and load data with MongoDB’s export tools.
This guide explores each method, compares their pros and cons, and explains why Estuary Flow is the fastest, most efficient solution for real-time, automated MongoDB-to-SQL Server migrations.
Interested in the reverse process? check out our comprehensive guide on moving data from SQL Server to MongoDB.
What Is MongoDB? An Overview
MongoDB is an open source NoSQL, document-oriented database management system. Instead of the traditional rows and columns found in relational databases, MongoDB uses documents in a JSON-like format to store data.
It uses the BSON (Binary JSON) format to store its data both internally and over the network. Anything that can be represented in JSON can be stored in MongoDB and retrieved just as easily in JSON. Each BSON document corresponds to a record in the database. BSON supports embedding objects, arrays, and other documents for hierarchical data structures.
One of the most attractive features of MongoDB is that it doesn’t require a fixed schema for data storage — unlike traditional databases. The database lets you store documents of different structures in the same collection. This flexibility makes it easier to model any data structure and adapt the model to unique requirements.
What Is SQL Server? An Overview
Microsoft SQL Server is a relational database management system (RDBMS) that dates all the way back to 1989. With built-in tools for data integration, reporting, and advanced analytics, SQL Server is an ideal platform for data storage, retrieval, and transformation.
The database engine — the core component of SQL Server — consists of a relational engine responsible for evaluating user requests and executing them. Also known as the query engine, it performs memory management, distributed query processing, buffer management, and thread and task management. The database engine also consists of a storage engine that is responsible for storing and retrieving data from the storage systems and the buffer manager.
SQL Server provides support for integration, business intelligence, and analytics with the use of platforms such as SQL Server Integration Services (SSIS), SQL Server Analysis Services (SSAS), and SQL Server Reporting Services (SSRS). While SSIS is used for data integration and transformation, SSAS provides data mining and online analytical processing capabilities. SSRS, on the other hand, creates and manages a wide range of interactive and printed records.
How to Migrate MongoDB to SQL Server?
To move data from MongoDB to SQL Server, you can use one of the following methods:
- Method #1: No-Code ETL Tools like Estuary Flow
- Method #2: SSIS
- Method #3: Custom Scripts
Method #1: Using No-Code ETL Tools like Estuary Flow to Export Data from MongoDB to SQL Server
No-code ETL tools are easy-to-use options that can efficiently manage data transfers. They’re designed to be user-friendly so that individuals without technical backgrounds can use them proficiently.
Estuary Flow is one such no-code tool that you can use to export data from MongoDB to SQL Server. An advanced DataOps platform, Flow can handle real-time data operations with managed extract, transform, and load (ETL) and change data capture (CDC) pipelines. Flow supports automation of the ETL process, from extracting data from the source to performing complex real-time transformations and loading the data into the destination. It has rapid data transfer capabilities, resulting in an end-to-end latency in the millisecond range.
To begin setting up an ETL pipeline between MongoDB and SQL Server with Estuary Flow, you must sign in to your Estuary account. If you don’t already have one, register for a free account. Once you’ve logged into Estuary, follow these steps to complete the migration process.
Step 1: Configure MongoDB as the Data Source
Before you use Estuary’s MongoDB connector, make sure you complete the prerequisites.
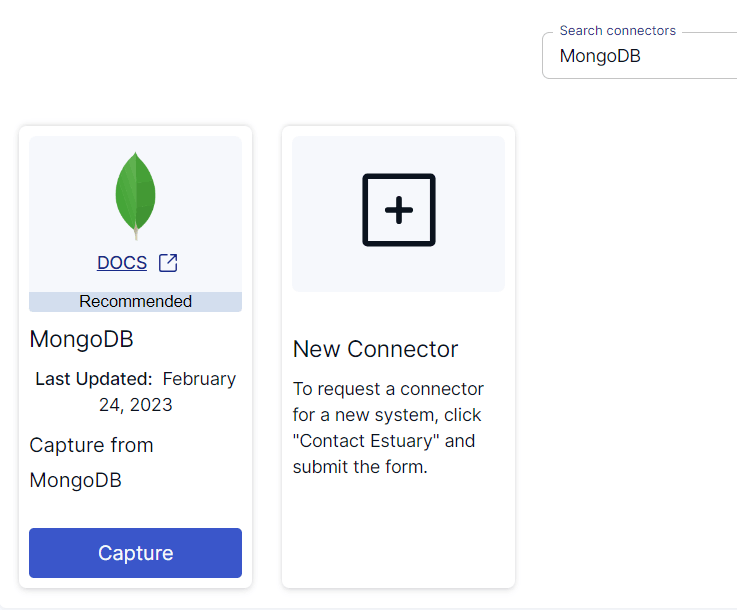
After signing in, you’ll be directed to the Estuary Flow dashboard. Navigate to Sources > + NEW CAPTURE. In the Search connectors box, look for the MongoDB connector. When you see the connector in the search results, click the Capture button.
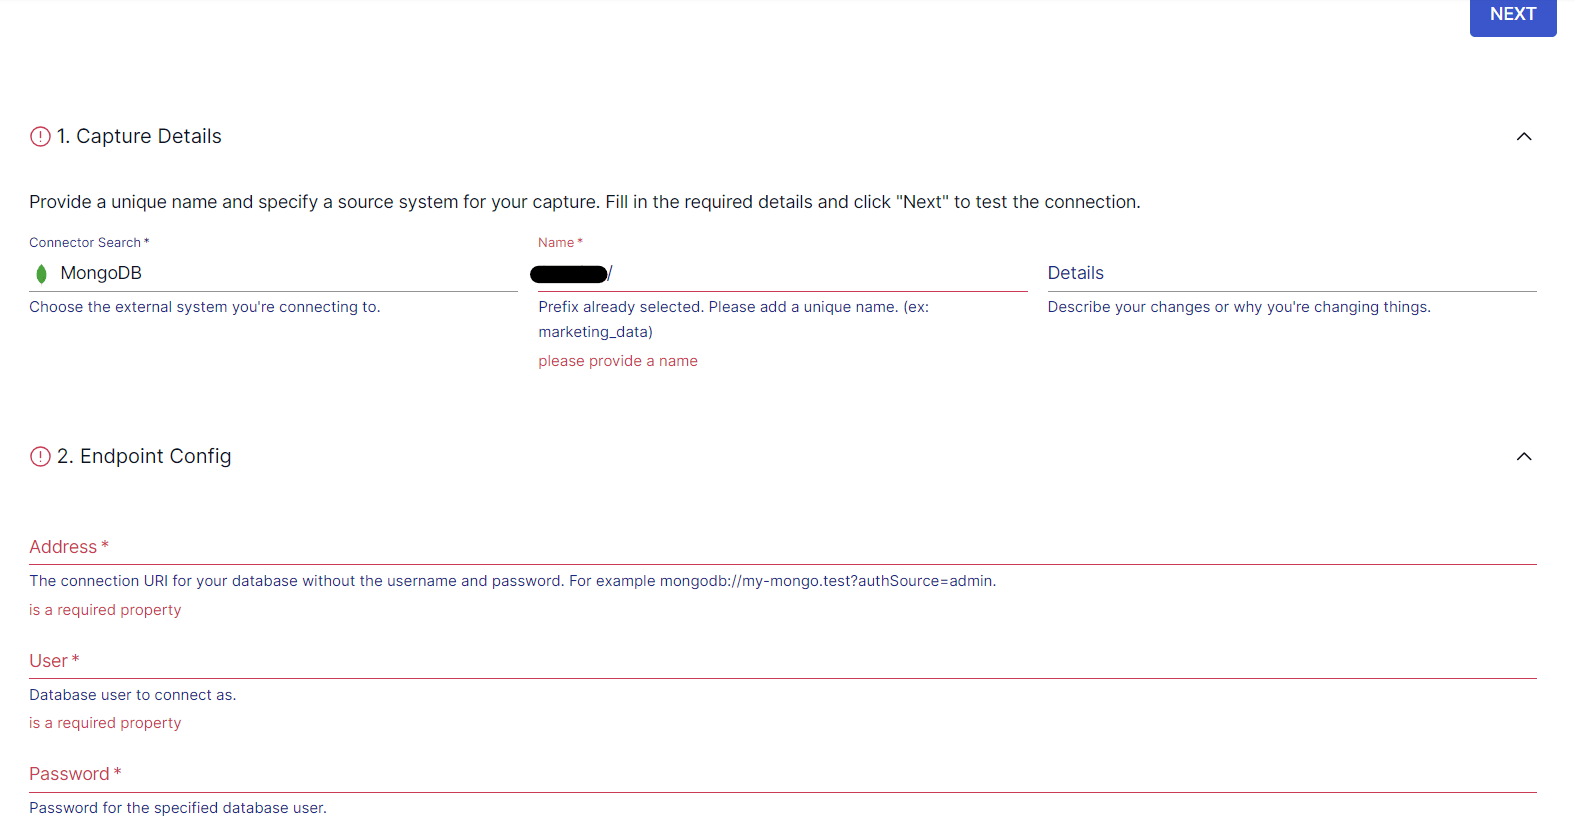
This will redirect you to the MongoDB connector page where you must specify the necessary details. In the Capture Details section, provide a unique name for your capture and specify a source system. In the Endpoint Config section, enter the Address, User, Password, and Database details. Then, click NEXT followed by SAVE AND PUBLISH.
The connector will capture data from MongoDB into Flow collections. It starts by backfilling data from the specified collections until it reaches the current time. After that, the connector uses change streams to capture change events from the database.
Step 2: Configure SQL Server as the Destination
After a successful capture, you’ll see a pop-up with relevant details. Click the MATERIALIZE CONNECTIONS button in this pop-up to proceed with the setup of the destination end of the pipeline.
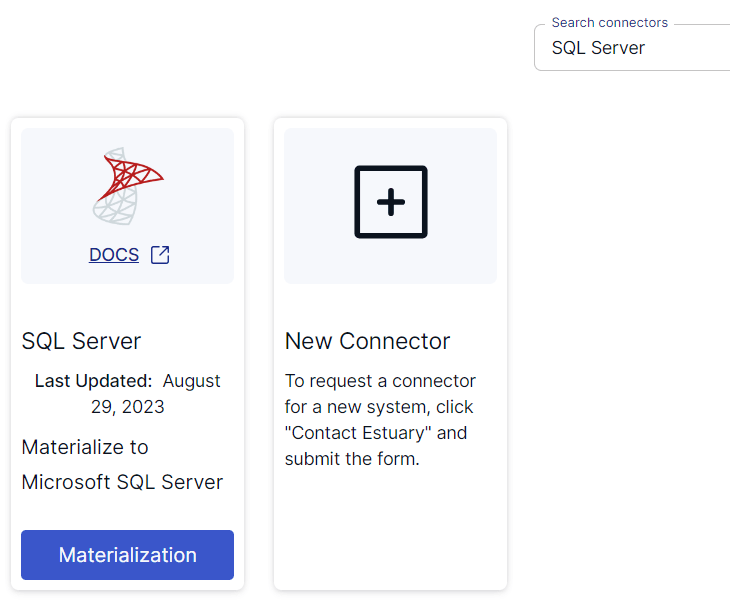
Alternatively, you can click the Destinations option on the navigation pane on the left-hand side of the Estuary dashboard followed by the + NEW MATERIALIZATION button. This will redirect you to the Create Materialization page where you can search for SQL Server using the Search connectors box. When you see the connector in the search results, click the Materialization button.
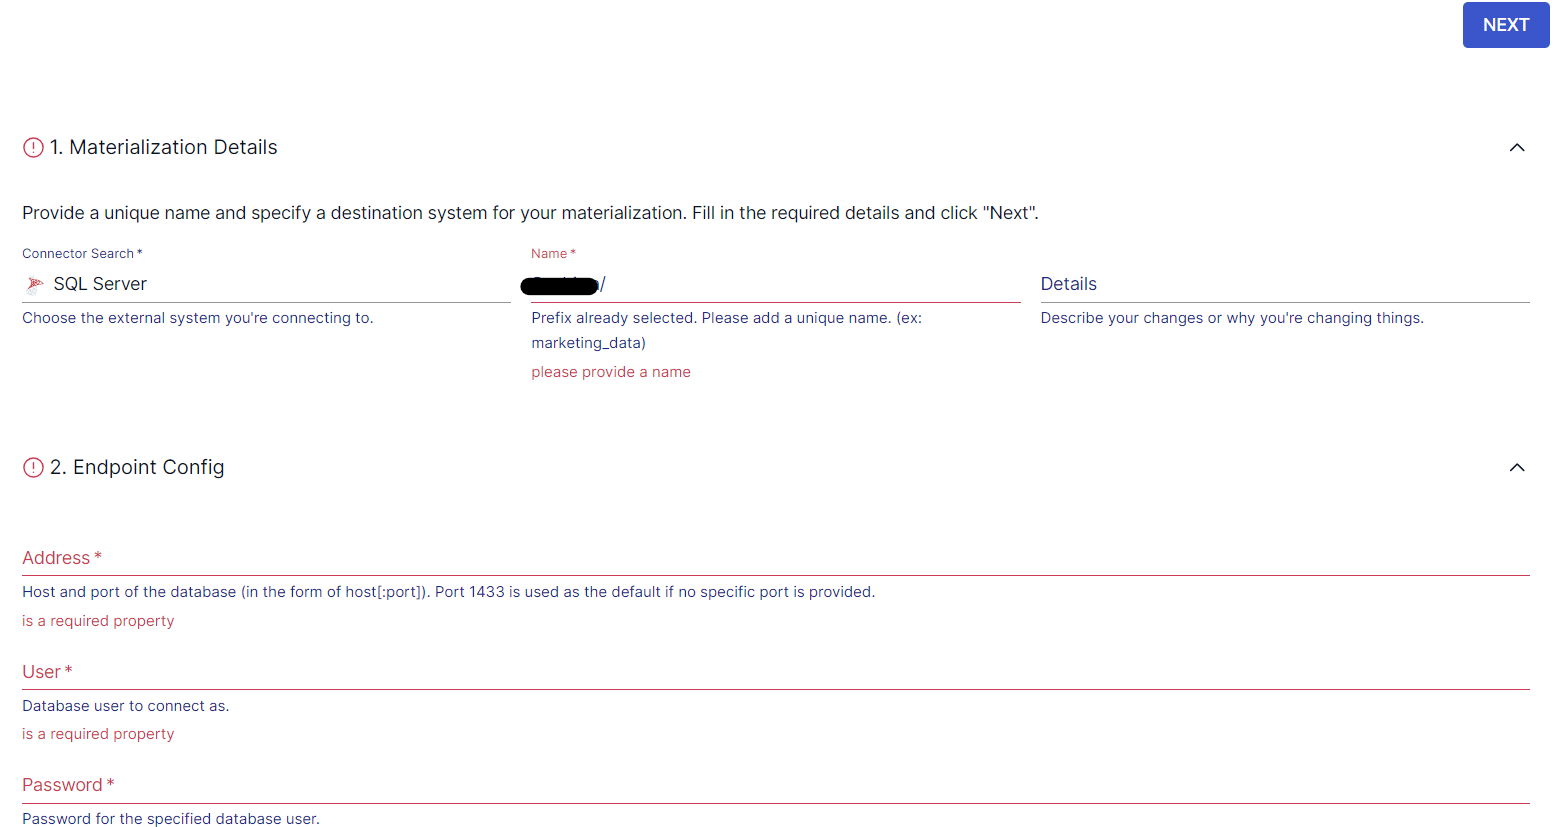
On the SQL Server connector page, specify details such as Name for the materialization, Address, User, Password, and Database. If the data captured from MongoDB wasn’t filled in automatically, use the Source Collections section to manually add the collections. Then, click NEXT > SAVE AND PUBLISH.
The SQL Server connector will materialize the Flow collections of MongoDB data into the SQL Server database.
Method #2: Using SSIS to Move Data from MongoDB to SQL Server
You can use SSIS to import data from MongoDB to SQL Server with two different methods:
- Using a script
- Using the ODBC connection
A. Using a Script
If you don’t have much programming experience, you probably won’t prefer this solution because you’ll need to write a lot of code to create a script. For more information on how you can import data from MongoDB to SQL Server using a script, read this article.
B. Using the ODBC Connection
This option involves creating a MongoDB ODBC data source and then connecting MongoDB to SQL Server. Here are the steps involved in this process:
- Install the Microsoft Visual C++ 2015 redistributable.
- Download and install the MongoDB ODBC BI connector for Windows. To connect to MongoDB via ODBC, you’ll need the MongoSQL service, which is installed within the BI connector.
- Install the MongoDB BI connector ODBC Driver. This is required since SSIS and Visual Studio only read connections for the 32-bit platform. If you’re using a 64-bit installation, you must also install the 32-bit drivers.
- Since MongoDB is a NoSQL database, you must define a relational schema file allowing the ODBC driver to read documents relationally into import data.
Use the mongodrdl.exe tool within the BI connector to generate a .drdl file from an existing connection within your database. Here’s the syntax of the command:
plaintextmongodrdl -d <database_name> -c <collection_name> -o <output_name>- Navigate to the installation directory to create a new file named mongosqld.config. You can access this file using a text editor and copy the following lines:
plaintextNet:
bindIp: “127.0.0.1”
port: 3307
systemLog:
path: ‘C:Program FilesMongoDBConnector for BI2.14logsmongosqld.log’
quiet: false
verbosity: 1
logRotate: “rename”
processManagement:
Service:
name: “mongosql”
displayName: “MongoSQL Service”
description: “MongoSQL accesses MongoDB data with SQL”
Schema:
path: ‘C:DemoCollection1.drdl’
NOTE: The specified directories must exist.
Next, install and activate this service. To do this, open a command prompt and run the following commands:
plaintextmongosqld install –config “<BI connector installation
directory>mongosqld.config”
net start mongosql- Now, it’s time to define a system DSN within Windows, which you can do by taking the following steps:
- Navigate to Control Panel and select Administrative tasks > ODBC data sources administration.
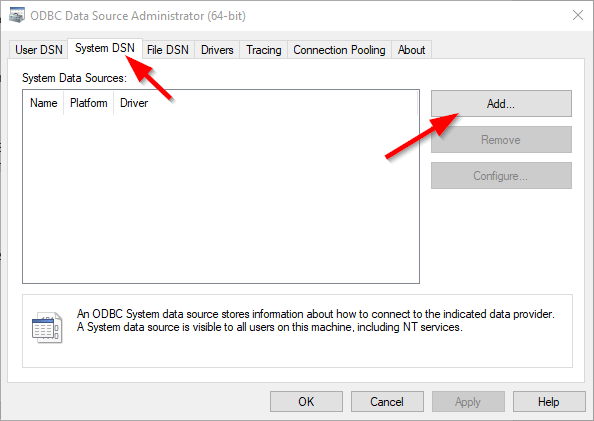
- The ODBC Data Source Administrator dialog box pops up. Click the Add button in the System DSN tab.
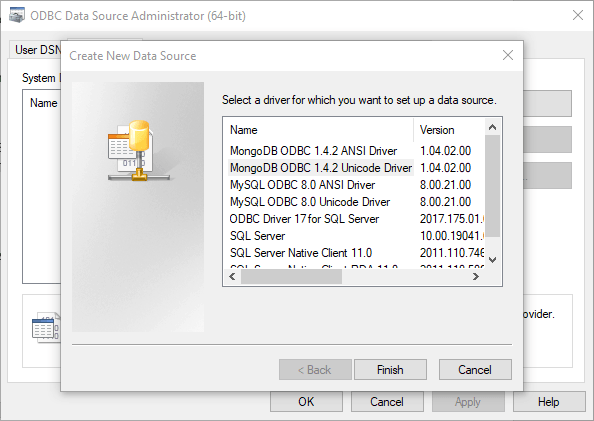
- A Create New Data Source pop-up box will appear. Select the MongoDB ODBC 1.4.2 Unicode Driver option and click Finish.
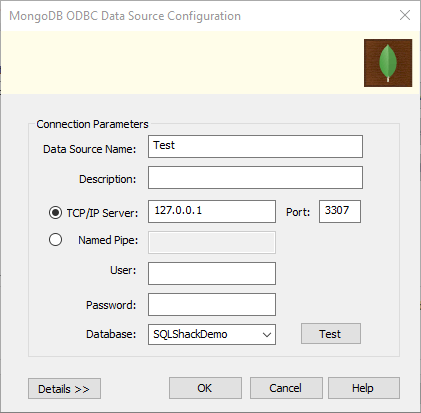
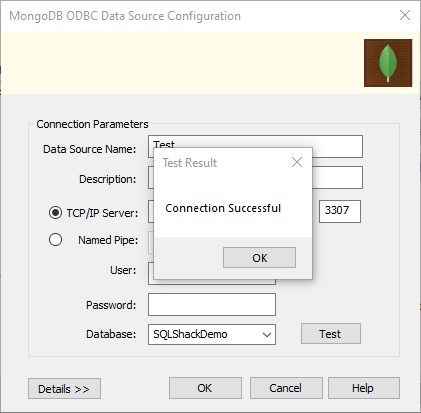
- In the MongoDB ODBC Data Source Configuration dialog box, specify a Data Source Name, the mongosql service address, and the Database name.
- Click the Test button. A Test Result dialog box will appear with a Connection successful message. Click OK followed by the OK button in the MongoDB ODBC Data Source Configuration window.
If you’re using a 64-bit installation, repeat the same steps within the 32-bit ODBC data sources.
- The final step is to read data using ODBC Source. Here’s how:
- Open Visual Studio and create a new Integration Services project.
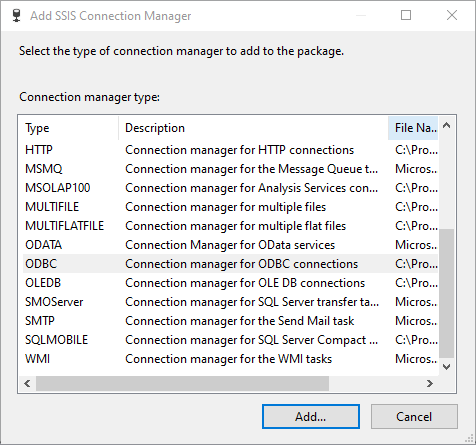
- On the Connections Manager tab, add a New Connection and select ODBC connection from the list of connection managers.
- Add an OLE DB connection manager for the SQL Server destination to provide the destination database name.
- Within the control flow, add a Data Flow Task. Also, add an ODBC Source to read from MongoDB and an OLE DB destination to create (or select) the destination table in the Data Flow Task.
This completes the process of loading data from MongoDB to SQL Server.
Method #3: Using Custom Scripts to ETL MongoDB to SQL Server
The third method involves extracting data from MongoDB, transforming it, and then loading the data to an SQL Server database. If you’re interested in using custom scripts to complete this process, here’s what you need to do.
Step 1: Extract Data from MongoDB
MongoDB provides a command line tool known as mongoexport to export data of a collection from your MongoDB database in a JSON or CSV format. You can also use features like sort and limit on a collection while exporting the data.
Here’s the syntax to export data in JSON format:
plaintextmongoexport –db database –collection collection_name –out name_or_path_of_the_file- –db specifies the database name in which mongoexport will run.
- –collection specifies the collection to export.
- –out specifies the directory and file where the exported data will be stored.
Note: mongoexport doesn’t run in the mongo shell; you must exit from the mongo shell when you use the mongoexport tool.
Step 2: Transform the Data
MongoDB and SQL Server have different data types. As such, you might need to transform certain data types to SQL Server-compatible types. This is especially important since MongoDB is a non-relational database while SQL Server is a relational database.
Additionally, MongoDB supports nested data structures, and SQL Server, being relational, doesn’t have native support for similar complex data types. You may have to flatten out or un-nest your MongoDB data.
Step 3: Load the Data to SQL Server
OPENJSON, a table-valued function that parses JSON text, returns properties and objects from the JSON input as rows and columns. The JSON data will be loaded into a SQL Server table.
Here’s an example code of the OPENJSON function:
plaintextSELECT book.*
FROM OPENROWSET (BULK 'C:JSONBooksooks.json', SINGLE_CLOB) as j
CROSS APPLY OPENJSON(BulkColumn)
WITH(
Id nvarchar(100),
Name nvarchar(100),
Price float,
Pages_i int,
Author nvarchar(100)
) AS book
This will return a table with columns for Id, Name, Price, Pages_i, and Author.
Limitations of Using SSIS or Custom Scripts to Move Data from MongoDB to SQL Server
While you can use SSIS and custom scripts to move data from MongoDB to SQL Server, both approaches have several disadvantages:
- Lacks real-time data loading capabilities. While suitable for infrequent data transfers, both methods aren’t the best choice for streaming data between the two platforms. Setting up a cron job to perform the steps of the custom script method still requires writing additional code.
- Resource-intensive. Both methods consume a large amount of engineering bandwidth. They aren’t very well-suited for small organizations that lack expert data developers.
- Time-consuming. While the SSIS method involves multiple steps, the custom script method requires writing a considerable amount of code. Either way, these approaches won’t benefit fast-paced organizations that work with tight deadlines.
- Data transformation difficulties. Both methods involve manual data transformations to convert MongoDB data to SQL Server-compatible format. Unlike simpler transformations — like currency conversions — there’s no way to perform quick data transformations using these approaches.
Benefits of Using Estuary Flow for MongoDB to SQL Server Integration
To overcome the challenges associated with the SSIS and custom script methods, you can use Estuary Flow. Here are some reasons why today’s leading organizations are increasingly using Flow to migrate data from MongoDB to SQL Server:
- Built-in connectors: Estuary Flow offers a range of pre-built connectors for popular sources and destinations. This helps reduce errors in the data migration process when compared to manually migrating data.
- Fully managed: From infrastructure management to automatic updates, Estuary manages the backend so you don’t have to worry about maintenance tasks, fixes, or patches.
- Real-time integrations: You can use Estuary Flow to build real-time data pipelines with materializations with millisecond latencies.
- Scalability: The fully managed enterprise-grade system of Estuary Flow can support data flows of 7GB/s for 10TB tables.
- Change data capture (CDC): Estuary Flow uses advanced log-based CDC techniques to capture granular data changes at the source. This helps maintain data integrity and reduce latency.
Final Thoughts: Migrating MongoDB to SQL Server
Migrating from MongoDB to SQL Server can unlock better analytics, structured data management, and seamless integrations. However, traditional methods like SSIS and custom scripts are time-consuming, complex, and lack real-time capabilities.
To simplify this process, Estuary Flow offers a no-code, automated ETL solution that enables real-time data streaming with minimal effort.
With its range of readily available connectors, intuitive interface, and automation capabilities, Estuary Flow is an impressive choice for setting up data integration pipelines. All it takes is a few minutes to configure a pipeline and start the data migration process. To learn more, register for a free account and get started with Flow today!
MongoDB to SQL Server FAQs
Why would I want to migrate data from MongoDB to SQL Server?
- Advanced Analytics: SQL Server offers powerful querying capabilities and integration with reporting tools, making it ideal for complex data analysis.
- Structured Data: SQL Server's relational model is better suited for structured data with defined relationships between entities.
- Integration: SQL Server integrates easily with other Microsoft products and many third-party tools.
- Business Requirements: Your organization's needs might have changed, requiring a more structured approach to data management.
Can I migrate data from MongoDB to SQL Server in real-time?
Yes, real-time data migration is possible using ETL (Extract, Transform, Load) tools like Estuary Flow. These tools can capture changes in MongoDB as they happen and replicate them to SQL Server with minimal delay.
What are the challenges of migrating data from MongoDB to SQL Server?
Yes, you can selectively migrate specific collections or databases from MongoDB to SQL Server. All three migration methods (ETL tools, SSIS, and custom scripts) allow you to filter and choose the data you want to transfer.
Can I use MongoDB's change streams to track data changes during the migration process?
Yes, tools like Estuary Flow utilize change streams to capture real-time data updates in MongoDB and replicate them to SQL Server.

About the author
With over 15 years in data engineering, a seasoned expert in driving growth for early-stage data companies, focusing on strategies that attract customers and users. Extensive writing provides insights to help companies scale efficiently and effectively in an evolving data landscape.


