You’re trying to figure out how to move data from MongoDB into Snowflake. Great! Let's get started.
Before anything else, you first need to understand the given use case, and why this body of work is important to fulfilling business objectives. This is important so the solution you come up with both fulfills the requirements and adheres to your organization’s larger data strategy.
For this example, let’s assume the following:
- You’ve been asked to move source data from MongoDB into your company’s data warehousing tool, Snowflake.
- You’re using a cloud provider like AWS, or Azure.
- The pipeline needs to capture both historical data and incremental changes in near real-time.
- This data will be used for downstream analytics in a third-party BI tool, queried with SQL.
- You prefer managed tools over open-source frameworks.
In this guide, we’ll cover several methods for moving data from MongoDB to Snowflake, including native cloud tools, custom Python scripts, and Estuary, to help you decide which is the most suitable for your business.
Key Considerations for Moving Data from MongoDB to Snowflake
When evaluating methods for moving data from MongoDB to Snowflake, focus on the following:
- Future-proofing: Does the solution meet both your current needs and future growth?
- Performance: How scalable is the solution, and does it ensure reliable, real-time updates?
- Resources: Do you have the necessary technical staff to implement and maintain the solution?
- Time to implement: How quickly can the solution be deployed and become operational?
- Maintenance: Is the solution easy to maintain and adaptable to future changes?
- Cost: Consider both direct costs (licenses, cloud services) and indirect costs (engineering time, maintenance).
Introduction to MongoDB
MongoDB is an open-source NoSQL document database that can be deployed on-premises or in any cloud service provider. MongoDB, the company that is the leading contributor to the open source project, also provides a cloud service, Atlas. MongoDB supports JSON-based documents. It is designed to provide an efficient way of handling data sets and to quickly adapt and change the structure and functionality of your applications, including horizontal scaling and automated failover functionality.
Introduction to Snowflake
Snowflake is a cloud data warehouse built for speed and scalability. It lets you run complex analytical SQL queries across massive datasets. Unlike traditional data warehouses, Snowflake separates storage and compute, allowing you to scale dynamically based on current computing needs, which helps lower costs and optimize performance.
Methods to Connect MongoDB to Snowflake Data Warehouse
Here are three effective ways to move data from MongoDB to Snowflake, focusing on both real-time and batch data ingestion.
- Method #1: Using Native Cloud Tools & Snowpipe to Transfer Data from MongoDB to Snowflake
- Method #2: Custom Python and Airflow for MongoDB to Snowflake ETL
- Method #3: Real-Time MongoDB Integration with Snowflake Using Estuary
Method #1: Using Native Cloud Tools & Snowpipe to Transfer Data from MongoDB to Snowflake
Snowpipe is a Snowflake service for ingesting data. It allows you to move away from scheduled batch loading techniques like the SQL COPY into command towards automated ingestion or near real-time streaming.
At a high level, Snowpipe performs this by loading data as soon as it’s available in a staging environment. You can create smaller micro batches to reduce latency. Your other option for more real-time streaming is to use Snowpipe streaming, which is a separate approach.
You might use Snowpipe with the native services offered by your cloud provider, like AWS or Azure. Here are just two examples, one for each cloud provider, of how your platform infrastructure could be designed and, given that, how you could move data from MongoDB to Snowflake with that cloud provider.
- AWS — You could have a Kinesis delivery stream responsible for landing your MongoDB source data into an S3 bucket. If you have an SNS system enabled, you can use that associated successful run id to load data into Snowflake via Snowpipe.
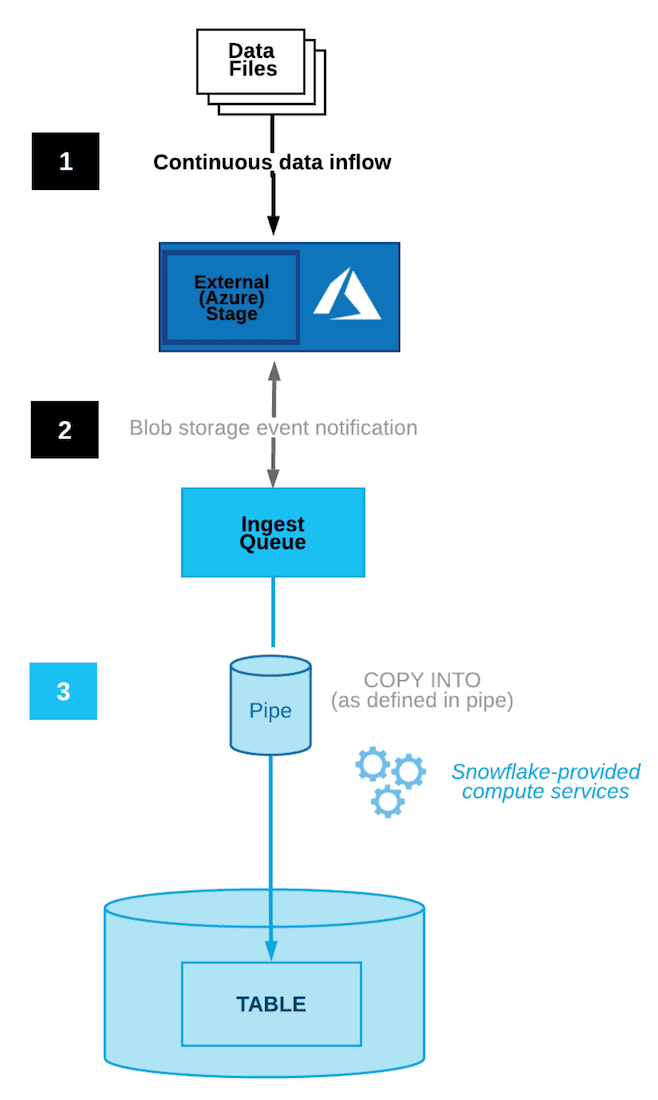
- Azure — You could trigger Snowpipe using an Event Grid message for Blob storage events. Basically, your MongoDB files would be loaded into an external Azure stage. You’d create a blob storage event message, that would notify Snowpipe via Event Grid when those files are ready to be dropped into Snowflake. Snowpipe would then copy those queued files into a target table you created in Snowflake. Snowflake has a complete guide on connecting Snowpipe to Azure blob storage, which you can find here.
There are a few important considerations with this approach.
First, it requires a thorough understanding of NoSQL databases like MongoDB, Snowflake, and your cloud provider. Troubleshooting and identifying the root cause of problems within a complex data pipeline like this requires significant domain expertise. This can be a difficult hurdle to overcome for immature or small data teams who “wear many hats”.
Second, this approach can be difficult to assign ownership over, especially regarding long-term management. This is because the resources you’re using to create this data pipeline are typically owned by a totally different team outside of Data. Choosing this approach would require significant discussion across other engineering teams to establish clear boundaries of ownership and long-term responsibility.
Third, it will be difficult to schematize your data. Without native tools to add schema to noSQL data, it can be of limited value in your data warehouse.
Method #2: Custom Python and Airflow for MongoDB to Snowflake ETL
A second option is to write an ETL pipeline in Python, orchestrated by Airflow or a similar tool.
Assuming you’re using AWS, you could use the MongoToS3Operator to move data from MongoDB to your S3 bucket, then use the SnowflakeOperator to move said data from the S3 bucket into a Snowflake table.
Astronomer, a popular managed service for Airflow, provides useful pipeline examples in their GitHub repository. Astronomer also offers a tutorial you can follow to practice building an ETL pipeline with Python on your local machine.
Pros of connecting MongoDB to Snowflake with Python and Airflow include:
- Coding gives you the flexibility to customize each pipeline.
- Airflow has a large offering of custom sensors, hooks, and operators that can address a wide variety of potential use cases for your organization.
- Airflow offers a visual monitoring and management interface, which is helpful when you're troubleshooting a pipeline error and need to see what's going on at each step.
Of course, there are cons to consider.
Cons of this approach:
- You have to maintain the code for each pipeline. This can become difficult as scale and complexity increase, or if the pipeline needs to be changed regularly.
- The process is slower. This is because you have to wait for an engineer to modify the code itself before you see the changes you requested be enabled. Depending on the urgency of a particular request, and an engineering team's current bandwidth, these requests can remain in the backlog for weeks, or months at a time.
- It can be difficult to maintain consistency across each pipeline if a clearly defined standard doesn't exist for the team to follow. Each developer has their own “style” of approaching problems, syntax, etc. This approach requires teams to spend significant time establishing and documenting a quality standard for design, coding, use of frameworks, hooks, and operators, and more to ensure pipelines are well maintained and expectations are clear.
- As per method #1, it can be quite difficult to manage schema using this method, especially as schema changes.
- It’s a batch process, not real-time. If you need low-latency MongoDB to Snowflake, this is not the best approach.
Method #3: Real-Time MongoDB Integration with Snowflake Using Estuary
There are a number of available SaaS tools that can handle your data ingestion needs for you.
This approach is helpful for teams that:
- Need to make data available downstream as quickly as possible.
- Prefer not to deal with challenges associated with manual deployment.
These tools can get your source data from MongoDB to Snowflake via packaged connectors. The individual fields from your MongoDB source data may become varchar data type columns as JSON objects in Snowflake, or if you're using a system like Estuary, which handles automated schema conversion, you may be able to sync it in a tabular format.
Once your data becomes available in Snowflake, you can begin using SQL to explore your source data. Because of the nature of this ingestion process, it's important to build a clear strategy around schemas and data organization, and create clear documentation the entire team can access.
There are a number of pros that come with choosing a managed service for your data pipeline. Here are just a couple:
- You can execute much faster. This is true for both making data available to your stakeholders, and resolving issues within the pipeline itself. This is because the managed tool is handling what's going on “under the hood” for you. You no longer need to spend hours troubleshooting in your CLI, or guessing which part of the pipeline is causing your log file error.
Basically, it allows you to skip all the annoying parts of a more typical data ingestion process and deliver faster. This is particularly relevant for teams who own the data ingestion process, but have limited platform, data engineering, or other specialty resources. - It allows you to expand client offerings and services. Most managed tools offer hundreds of existing connectors for various sources and destinations. This gives you more bandwidth to support additional clients, and more complex use cases that may be unfeasible otherwise.
Estuary is one such data pipeline tool. It allows you to create a data flow that connects MongoDB to Snowflake using a web-based UI or command-line interface (CLI) for free, as well as automate how to update schema in Snowflake as it changes in MongoDB.
Steps to Move Data from MongoDB to Snowflake Using Estuary:
Pre-requisites: (see Estuary documentation for MongoDB to Snowflake)
- A MongoDB instance or MongoDB Atlas account
- Ensure you have read access to your MongoDB database and oplog.rs
- Access to a Snowflake account that includes appropriate access levels to an existing target database, schema, and virtual warehouse.
- Snowflake account host URL formatted using the Snowflake account identifier
Step1: Sign Up for Free on Estuary
- Visit the Estuary website and create a free account to unlock access to MongoDB and Snowflake connectors.
Step 2: Set Up MongoDB Capture
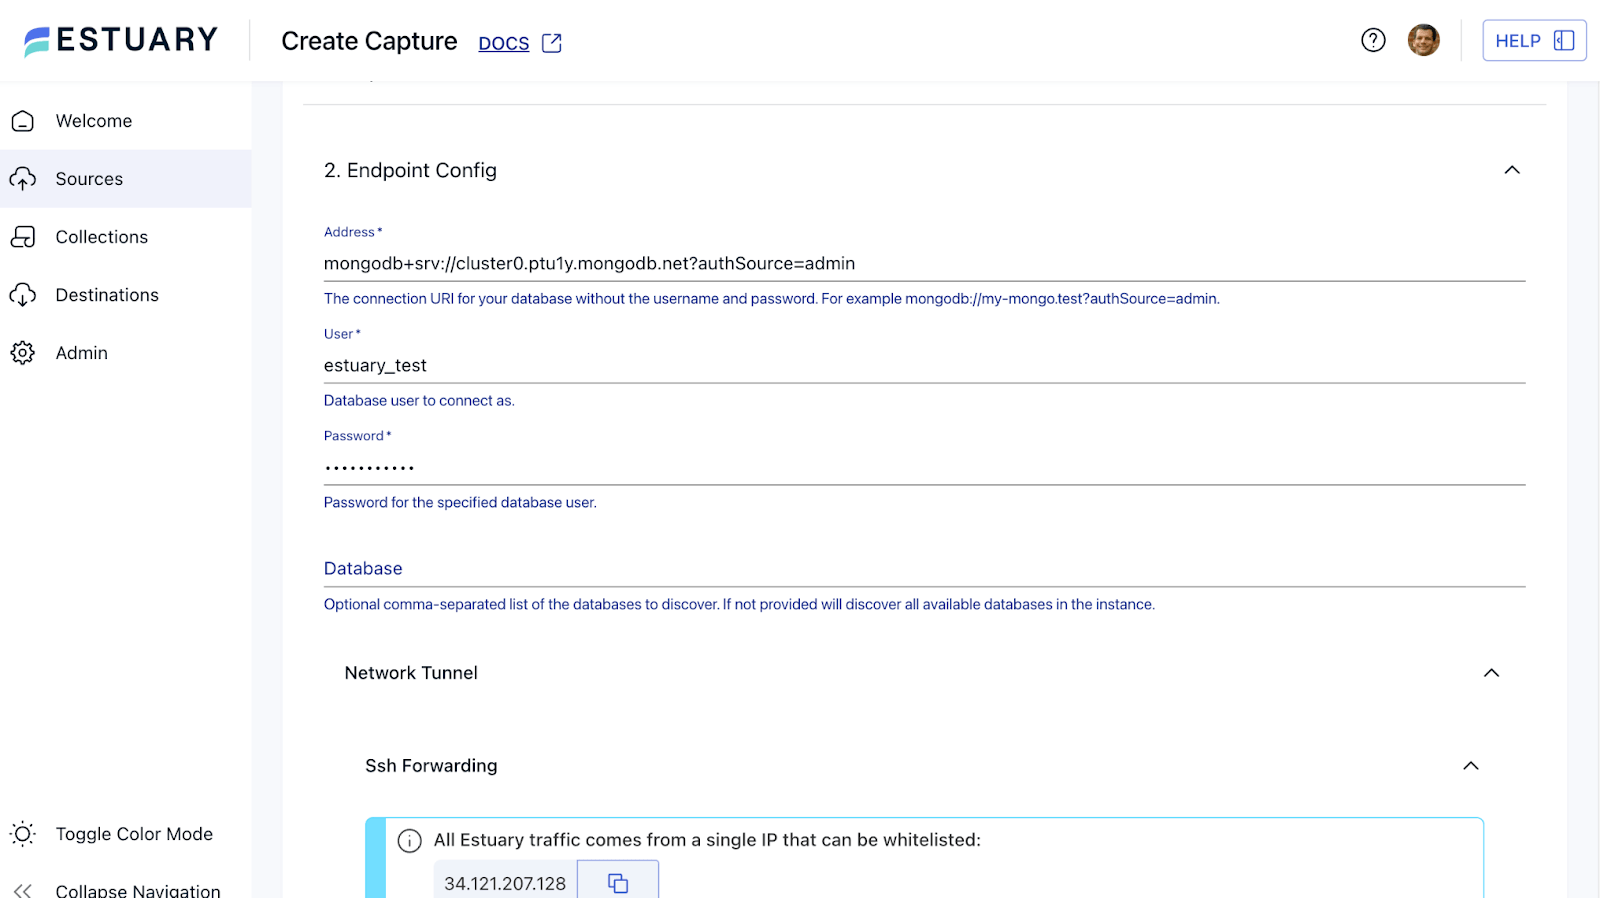
- Navigate to the "Sources" tab and click "New Capture".
- Select MongoDB as the source and provide your credentials (ensuring you have read access).
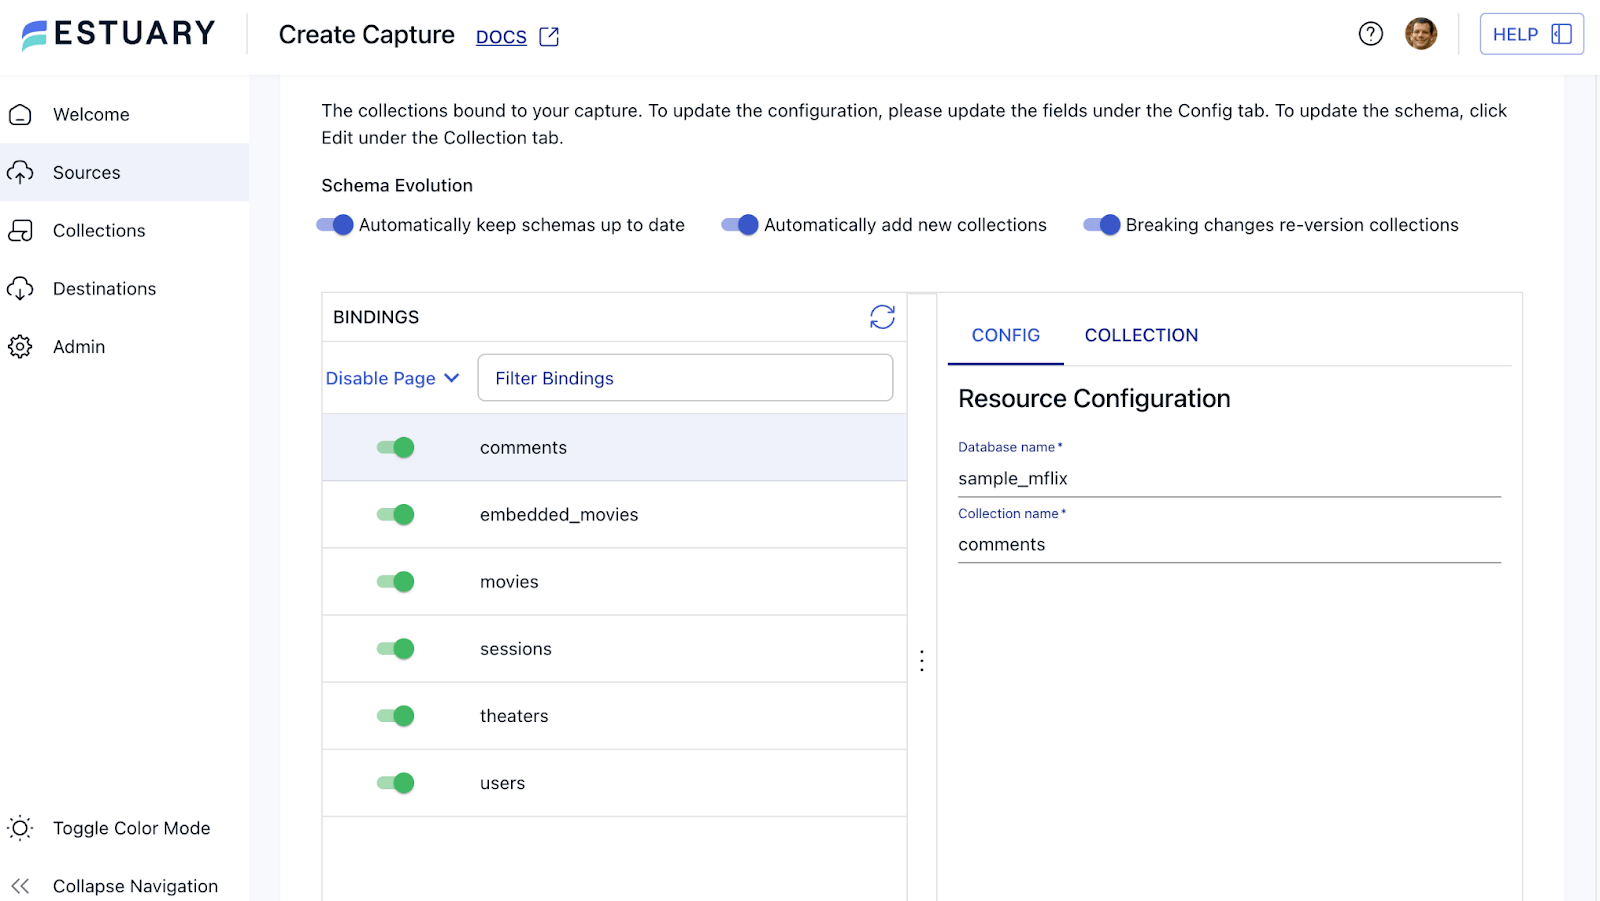
- Estuary will automatically discover available MongoDB collections. Select the ones you wish to replicate, then save and publish.
Step 3: Configure Snowflake as a Destination
- Go to the "Destinations" tab and click "New Materialization."
- Select Snowflake as your destination.
- Enter the required connection details such as your Snowflake account URL, database name, schema, and warehouse credentials.
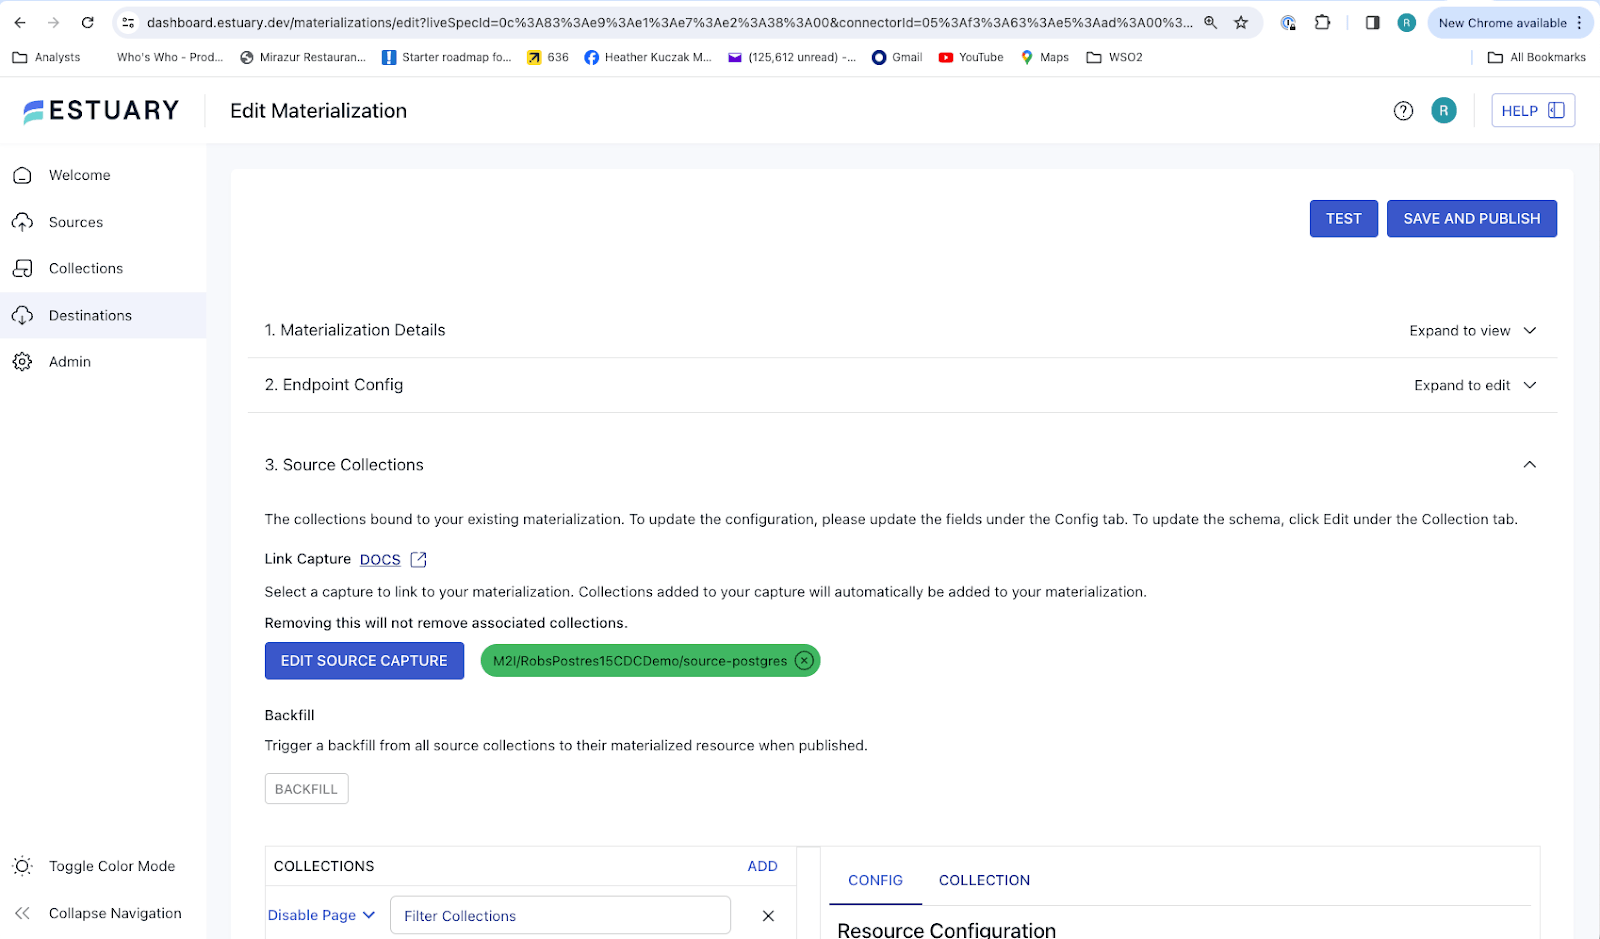
- Test the connection to ensure it's configured correctly, then click "Save and Publish."
Step 4: Start Real-Time Data Flow
- Once both the MongoDB source and Snowflake destination are configured, Estuary will begin streaming data automatically.
- It captures both historical data and real-time changes from MongoDB, ensuring continuous updates in Snowflake.
Step 5: Monitor Your Data in Snowflake
- With the data pipeline running, you can access your MongoDB collections within Snowflake for querying and analysis.
- Use the Estuary dashboard to monitor the pipeline, review logs, and configure alerts.
Ready to try it out? Sign up for Estuary today and start moving data from MongoDB to Snowflake in minutes! Need help? Join our Slack community to get real-time support and advice.
What’s the best way to move data from MongoDB to Snowflake?
The best method to move data from MongoDB to Snowflake depends on your specific use case and resources:
- If you have a large team of engineers that excels at building pipelines, and batch is OK, it may make sense to use cloud provider tools and Snowpipe, or better yet, Airflow.
- Otherwise, if you want to focus on delivering business value faster with fewer resources, or need lower latency, you should focus on a managed data pipeline tool like Estuary.
Final Thoughts
By following this guide, you can choose the best method to move data from MongoDB to Snowflake based on your organization’s requirements and technical capabilities. If your team needs a low-latency, managed solution with minimal setup, Estuary provides the fastest and most scalable option.
Frequently Asked Questions (FAQ)
1. What are some of the challenges with moving data from MongoDB to Snowflake?
The first is the actual integration. Setting up connections can be hard to setup and even harder to troubleshoot. The second is transforming documents, which are non-relational, into a relational schema. The final challenge is implementing real-time streaming using change data capture (CDC.) It is not recommended to do this on your own. Evaluate vendors carefully, as many implement batch CDC, not streaming.
2. What is the best way to move data from MongoDB into Snowflake?
There is no one good answer. For low latency or near real-time integration, change data capture (CDC) to snowpipe (streaming) is the best answer. When using dbt be sure to use incremental materializations. For batch, there are several answers Airflow is a great option for batch if you have lots of custom tasks and sources and are comfortable investing in staff to implement it. ELT vendors provide good batch integration options that require less staff. Most support dbt, which is the most commonly used technology for transforming data in Snowflake other than custom SQL.
3. Should I use batch or streaming integration for MongoDB to Snowflake?
Streaming integration via CDC is more efficient and has lower latency, but it's complex and more costly. If latency isn’t a concern, batch processing (e.g., Airflow) may be more cost-effective.
Related articles:

About the author
With over 15 years in data engineering, a seasoned expert in driving growth for early-stage data companies, focusing on strategies that attract customers and users. Extensive writing provides insights to help companies scale efficiently and effectively in an evolving data landscape.


