One of the top data warehouses, Snowflake is a popular choice for cloud-agnostic storage and analytics. However, Snowflake hasn’t historically been known for real-time analytics: data refreshes could stay reasonably up-to-date, enough for the data analysts and BI dashboard-builders downstream, but it wasn’t built for instantaneous results. This comes from a tradition of batching data for daily or weekly reports. This type of setup can be fine for certain use cases, but building day-long lag into pipelines by default entrenches inherent limitations on what you can reasonably expect to do with that data.
Thankfully, the batch-first mindset for Snowflake is changing, opening up new opportunities. Snowflake is providing faster ingestion methods, notably with its millisecond-latency Snowpipe Streaming.
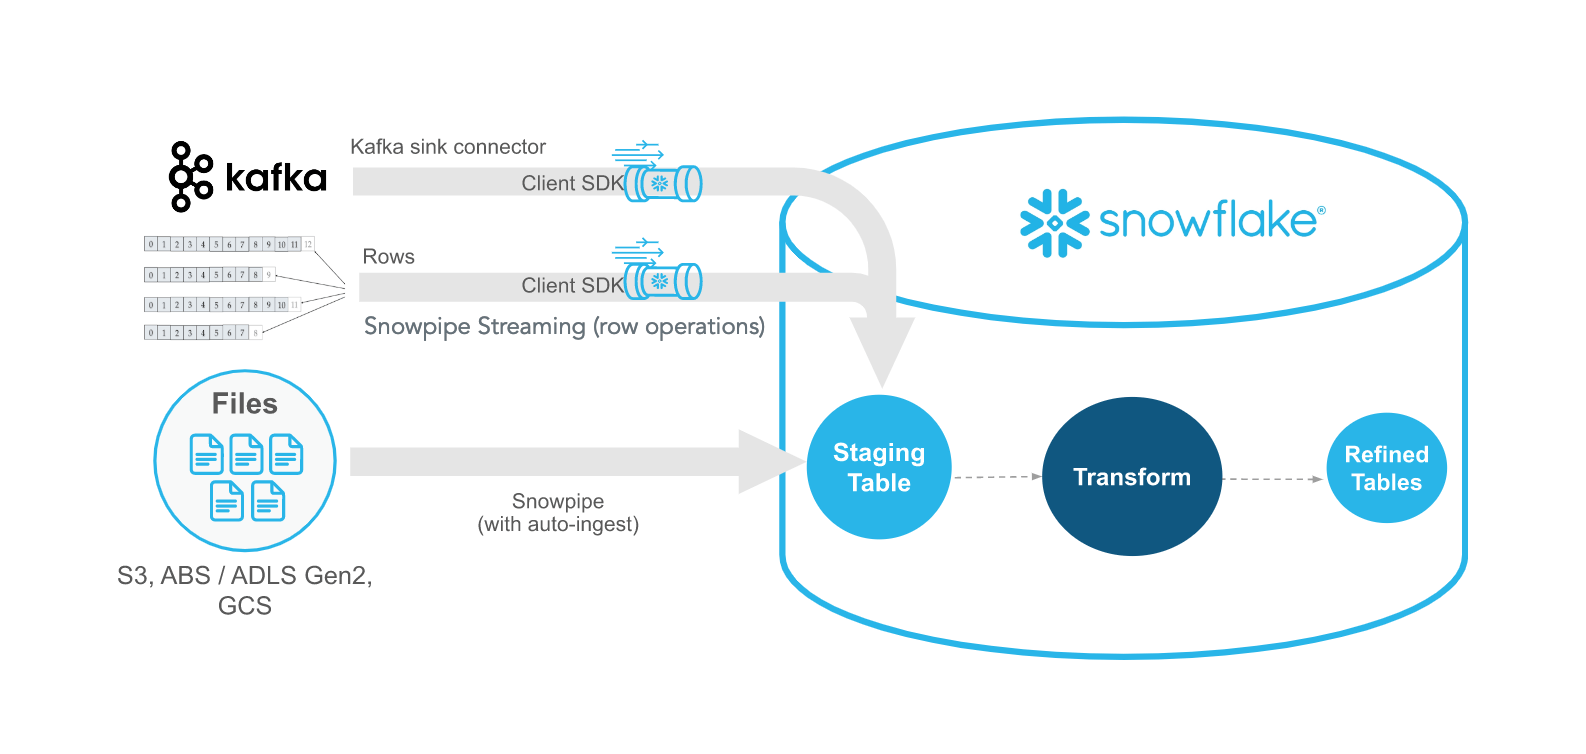
Snowpipe Streaming is Snowflake’s real-time ingestion method that streams row-level data directly into tables without staging. It enables sub-second latency for continuous analytics workflows.
So, how exactly does Snowpipe Streaming work? What makes it so different from Snowflake’s other ingestion options? And why does delayed analytics matter, anyway? We’ll explore all of these topics through the rest of this article.
Snowflake Data Ingestion Methods
To help explain Snowpipe Streaming, let’s first take a step back and consider Snowflake’s other ingestion methods. Comparing these methods against each other will more clearly explain what use cases each option is designed for.
There are several main ways to load data into Snowflake. We’ll explore:
- Bulk
COPY INTO - Snowpipe (continuous
COPY INTO) - Snowpipe Streaming
Bulk Copy
Essentially what it says on the tin, Bulk Copy is the option of manually running a COPY INTO <table> command. It’s meant for large batches of data, like initially loading up tables or periodically pulling the latest data in one big batch.
The COPY INTO command copies data from a staging source into a Snowflake table. This stage is generally cloud storage in one of the big 3 cloud platforms (AWS, GCP, and Azure), such as AWS S3 or a Google storage bucket.
Snowpipe
Snowpipe also uses the COPY INTO command, but as part of a continuous loading model. Snowpipe still works in batches, just much smaller ones, or “micro-batches.” These more incremental loads are meant to be available much faster, in a more automated way, than the large, bulk batches. Even if they’re “micro,” these batches still aren’t real-time: data can take minutes to ingest.
As the underlying loading method is the same as for Bulk COPY INTO, Snowpipe also requires data to first be in a staging source. There are, however, some efficiencies to loading data over the Bulk method: Snowpipe can load data without waking the Snowflake warehouse, resulting in more performant, cheaper loads.
Snowpipe Streaming
Despite the similarity in name, Snowpipe Streaming is a fairly different beast from Snowpipe and other COPY INTO implementations. This API ditches the requirement to stage data altogether, and instead streams changes directly to Snowflake tables. It also works on a row-based model rather than loading in whole files.
This allows for a much lower overall latency, and can reach sub-second speeds. The overall pipeline becomes more efficient, with lower costs for data load.
Snowpipe vs. Snowpipe Streaming: What’s the Difference?
Snowpipe and Snowpipe Streaming? Bulk COPY INTO and continuous COPY INTO (AKA Snowpipe)? Besides “Baseline,” “Faster,” and “Fastest,” what are the real differences between these ingestion options?
Each of these options have their own ideal use cases, and each of them present their own difficulties. Snowpipe Streaming could be a clear winner, as the only option with real-time replication and the only option that cuts the staging step out of the equation, except for one major cost. Not the Snowflake cost. The engineering cost.
Snowpipe Streaming requires Java development (or working with a REST API for what Snowflake terms “lightweight workloads”) to implement. Before Maven dependencies and JAR files scare you off, we’ll look at an easier way to implement Snowpipe Streaming in a bit (yes, it involves Estuary).
Want to skip to the easy solution? Check out the Estuary setup demo below.
In the meantime, you can review the main differences between Snowflake’s ingestion methods here:
Bulk COPY INTO | Snowpipe | Snowpipe Streaming | |
| Use Case | Ad-hoc data ingestion for one-time or infrequent transfers | Continuous, but not instantaneous, data replication | Real-time data replication |
| Setup | Manual run of COPY INTO command | Create a new Pipe with a defined COPY INTO statement; automate with REST APIs or cloud messaging | Custom application that implements one of two Java SDKs or REST APIs |
| Complexity | Theoretically as simple as COPY INTO <table> FROM <source>; with additional complexity from options, compute setup, and staging setup | You don’t need to worry about provisioning compute resources, but you do need to define a way for the Pipe to receive notifications of new data | More complex; requires robust Java or REST development and additional configuration |
| Latency | Deterministic | Half-minute to minutes | Sub-second/millisecond latency |
| Granularity | Batch files | Micro-batches | Row-level streaming |
| Compute | Requires a user-provided and sized virtual warehouse | Utilizes serverless Snowflake compute resources | Utilizes serverless Snowflake compute resources |
| Staging Storage | Requires extra data storage for staging area | Requires extra data storage for staging area | Does not require staging, streamlining architecture |
| Costs | Compute costs plus warehouse management costs | Compute costs plus per-file charge (Snowflake announced this would change to a per-GB charge) | Depends on SDK used; throughput/per-GB cost or compute costs plus client connection costs |
As shown, besides offering different latencies, each option requires different resources to set up, and operates on different granularities. Row-based Snowpipe Streaming may seem optimal, for example. But if the data you’re working with is naturally file-based, like unstructured blob storage with videos and images, you may want to stick with regular Snowpipe.
How Snowpipe Streaming Works: Channels, Performance & Versions
So far, we know that Snowpipe Streaming is the fastest way to get data into Snowflake. We also know that, in most cases, it requires using a Java SDK. It’s row-based, and doesn’t need a staging area for data. What else do we need to know to start using it?
For one, there’s actually two versions of Snowpipe Streaming: Classic and High-Performance. The basic idea remains the same across both, but the details vary, including which SDK you use.
High-Performance vs. Classic Snowpipe Streaming
June 2025 saw the announcement of Snowflake’s new high-performance architecture for Snowpipe Streaming. Intended for lower latency and higher throughput, the new version also changes other aspects of how Snowpipe Streaming is used: with different SDKs and requirements, the two versions are not compatible with each other.
One main difference is that High-Performance setups will require a Snowflake PIPE object instead of streaming new rows directly into the target table. While adding new architectural pieces might seem like the opposite of streamlining a data pipeline, the PIPE object allows you to make use of features like schema validation and basic transformations—useful, if those features aren’t already part of your upstream pipeline process.
There are also pricing differences. High-Performance offers a new flat-rate pricing model on throughput, charging per uncompressed GB of data ingested. Classic, on the other hand, charges on compute costs plus the number of open client connections. This can balloon costs if you stream from a number of sensor or IoT devices, and Snowflake suggests aggregating this data before ingestion to reduce the number of connections.
There’s also the fact that High-Performance is currently still in Preview mode, with the attendant risks and limitations of any beta product.
So, which version will work best for your use case? Here’s a side-by-side comparison to help distinguish between the two Snowpipe Streaming varieties:
| Classic | High-Performance | |
| SDK | snowflake-ingest-java | snowpipe-streaming |
| Availability | Generally available | In Preview for accounts on AWS only |
| Data Flow | Streams data directly to target tables | Streams data through a PIPE object before landing in target tables |
| Schema Validation | Primarily client-side | Enforced by Snowflake PIPE |
| Transformations | Primarily client-side | In-flight filtering and other simple transformations via PIPE |
| Pricing | Compute costs plus active client connections | Throughput-based/per-GB pricing |
Additional detailed implementation differences between the two SDKs are available in Snowflake’s documentation.
Streaming Clients & Channels in Snowpipe Streaming
Even with two non-interchangeable versions of Snowpipe Streaming to choose from, there are some concepts the two share in common.
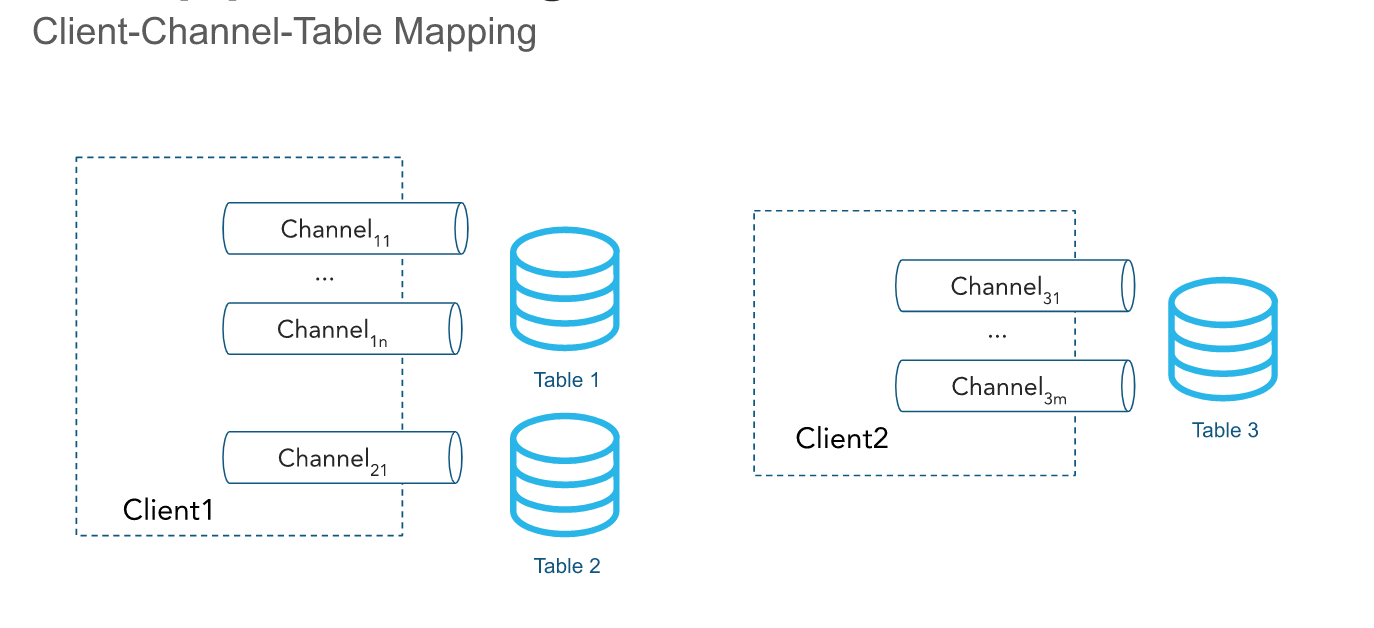
As mentioned, one is that a client application is required for a Snowpipe Streaming integration. The client needs to be able to run continuously and gracefully handle errors. And, in both cases, this client application will open and manage channels.
Essentially, channels are the streaming connections that transfer your data to Snowflake. A client needs to open at least one channel per destination table, so one client connection can manage many different channels. A table can also receive input from multiple channels.
In Classic integrations, these channels are opened directly against the table they stream to. For High-Performance, channels are opened against a PIPE object instead.
Of note, channels allow for ordered insertions, something that regular Snowpipe doesn’t support. Just be aware that row ordering is only preserved within a specific channel. If multiple channels stream into the same table, ordering is not guaranteed.
Clients can track channel ingestion progress by using offset tokens. These offset tokens can also be used to ensure exactly-once delivery and to perform de-duplication within the client application.
These are useful features for any data integration, but it can be daunting to implement it all yourself from scratch. Thankfully, our demo coming up can be implemented in a few minutes rather than weeks of engineering work.
Snowpipe Streaming Use Cases
So far, Snowpipe Streaming might seem more like a hassle than anything else. But real-time data inherently opens up new opportunities to interact with and implement analytics in workflows. While these instantaneous insights can be more necessary for some industries than others, even verticals that are used to batch-based data can benefit from reliably automated Snowpipe Streaming, ingesting data without waking the warehouse, or simply cutting out manual report processes.
To help illustrate, here are a few use cases where Snowpipe Streaming excels.
Fast Turnaround for Health and Finance
When you think of both sensitive and time-sensitive data, a couple categories rise to the top: healthcare and financial services. Snowpipe Streaming is ideal for these types of industries, where it can be important to incorporate analyzed data back into the workflow ASAP.
Fast turnarounds in these industries can save lives and protect people from fraud. Not only can individual cases be analyzed and acted on in a timely manner, but each new instance can provide data to help identify shifting trends.
Financial fraud detection models can be updated in real-time as scammers implement new tactics. Healthcare models can incorporate imaging and detection data to improve accuracy and care for future patients.
Collecting IoT Device and Sensor Data
Even if you don’t need to analyze your data immediately, Snowpipe Streaming can help you keep up with IoT device data: you definitely don’t want to manually use bulk COPY INTO statements when you’re working with thousands of different devices.
Still, many applications working with sensor data could be improved by incorporating real-time analytics. Analyzing weather data in real-time helps identify storm systems and provide early warning of dangerous conditions. Clean energy providers can balance active power sources with battery storage as demand and resources change.
Just make note of client connection costs with Classic Snowpipe Streaming. These use cases may find High-Performance a better deal to work with, or may want to implement additional consolidation of sources before connecting with Snowflake.
Responsive, Global Applications
People have increasingly begun to expect interactive, responsive applications, whether watching media, shopping online, or playing games. Any apps that don’t live up to expectations get passed over.
Much of this responsiveness can be powered by—you guessed it—real-time analytics embedded into the workflow. Users expect to see recommendations based on watch history or past purchases. Gamers need performant servers streaming a lag-free experience, no matter how many people log on or where they log on from; and, in a competitive landscape, this has to happen while analyzing behavior to detect possible cheats or exploits.
If any of these experiences aren’t real-time, users will notice.
Estuary: An Easier Way to Stream
So, you’ve determined that Snowpipe Streaming would really be beneficial for your use case, but there’s still the slight issue of setting up a client with Snowflake’s Java SDK. Maybe you even like the idea of schema validation and in-flight transformations, but aren’t sure about spinning up a whole integration with the High-Performance SDK just yet.
There’s a simple solution: use a pre-existing integration with Snowpipe Streaming.
For example, Estuary is purpose-built to make data integrations easy. A standard pipeline with Estuary completely cuts code out of the equation, so you don’t have to wrangle with implementing Java SDKs or learning the most efficient use of a new API.
Besides no-code setup, Estuary also provides:
- Intelligent schema evolution and validation
- Simple transformations (like renaming or removing fields) through the UI, with options for more advanced SQL and TypeScript derivations
- Low latency throughout the pipeline, including using CDC for source systems
- Efficient data handling that reduces Snowflake compute cost/credit usage
Or, if your entire solution doesn’t neatly fit within one ingestion paradigm, you can easily set up batch right alongside real-time streaming.
Supported Snowflake Ingestion Methods in Estuary
Depending on how you configure your Snowflake materialization in Estuary, you can essentially choose the ingestion method that works best for your use case.
Standard merge updates use Snowflake’s basic Bulk COPY INTO option. With merge updates, Estuary automatically uses reductions to efficiently materialize data. You can also optimize performance further by configuring collection keys or setting sync schedules for batch updates.
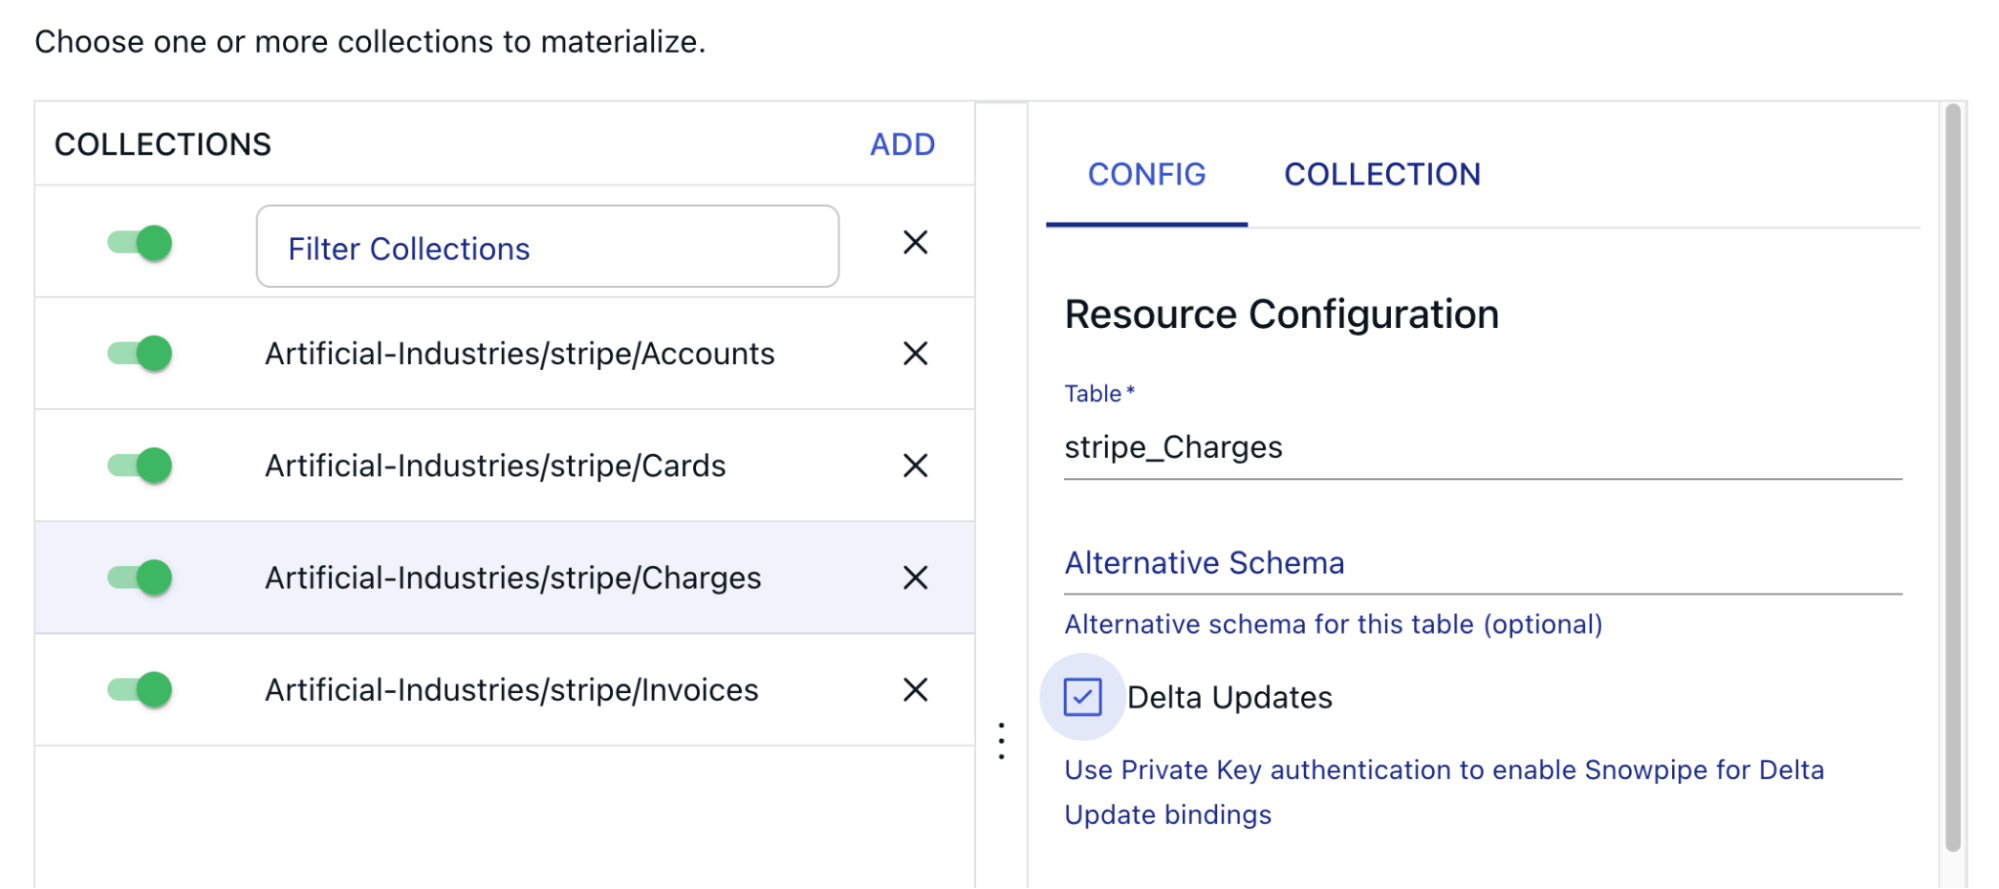
Estuary’s delta updates use Snowpipe Streaming by default for ultra-low latency workflows. Delta updates do not merge, or reduce, data. This means that the process to materialize new data doesn’t take the time to query existing documents in Snowflake, which can reduce latency. The tradeoff is that this method works best when all events are guaranteed to have their own unique keys; otherwise, the final table in Snowflake won’t be fully reduced.
Delta updates can also support standard Snowpipe, with the same benefits and caveats of other delta update options. To use Snowpipe rather than Snowpipe Streaming, you can currently add a feature flag (no_snowpipe_streaming) to your configuration in Estuary as an advanced option.
You can choose between standard or delta updates on a per-binding, or table-level, basis. So you can even use a single materialization to manage different workflows, with some bindings set for low-latency streaming with others on a batch-based schedule.
Want to try it out? Let’s check out a demo to see how to set up a Snowflake materialization with Estuary.
How to Set Up Snowpipe Streaming in Estuary (Step-by-Step)
Prerequisites
- An Estuary account—you can register for free
- At least one data collection
- Don’t have a source capture handy? For fast test setup, try out a demo Wikipedia collection
- A Snowflake account
Step 1: Prepare Snowflake Resources for Connection
To connect with Snowflake, we’ll need to create and configure several resources within the Snowflake account. This includes:
- A user and role specific to the integration, so we can tightly manage required permissions
- JWT credentials for this user
- A database, with associated schema, where we’ll materialize our data
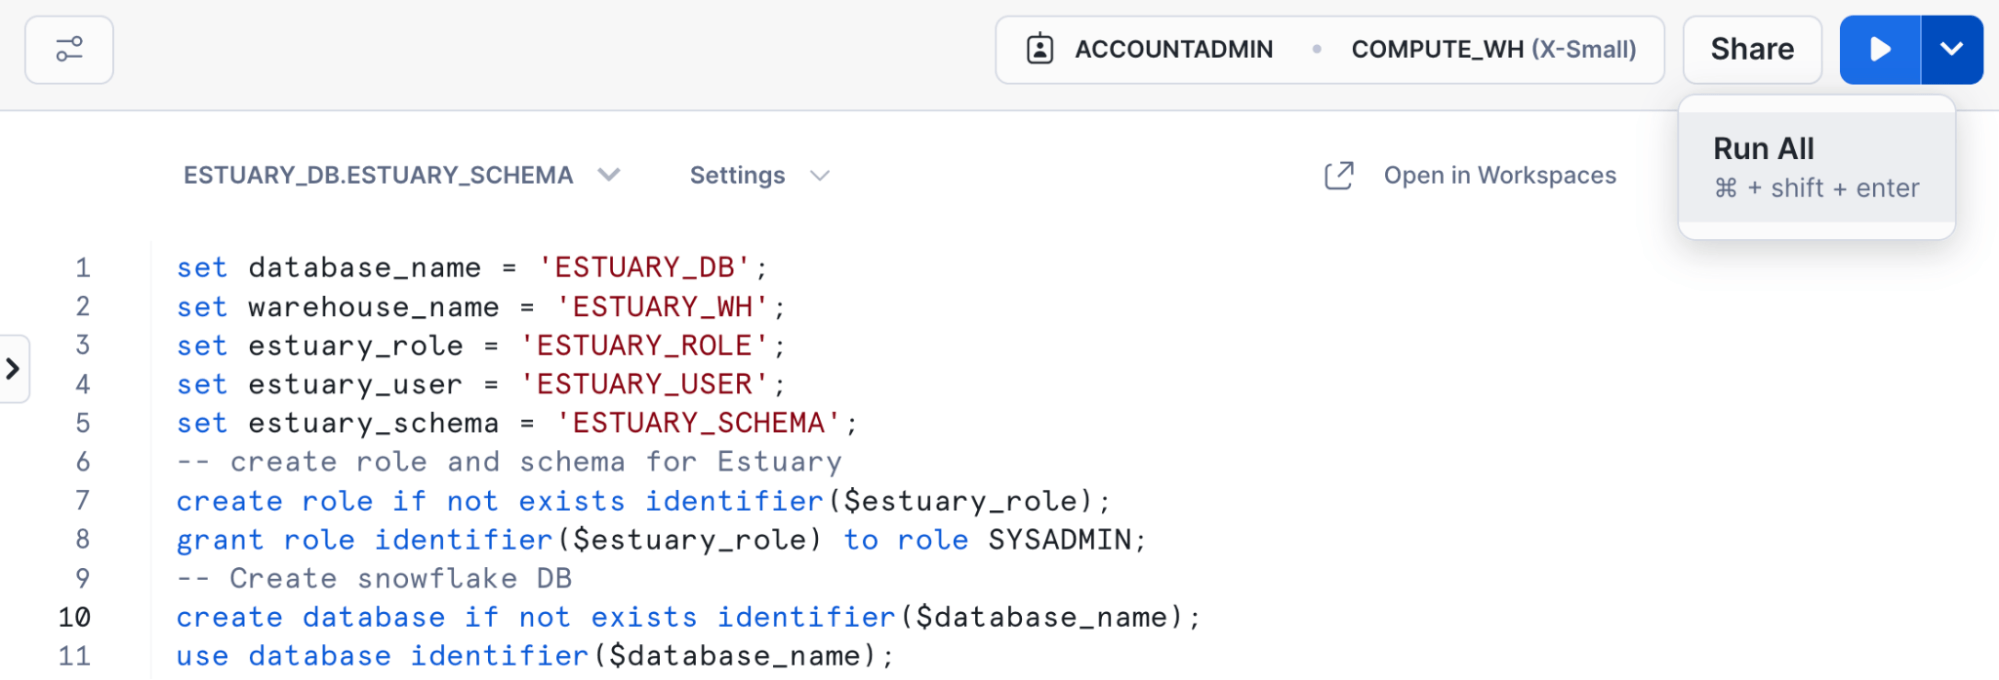
We can configure these resources by running a sequence of commands in Snowflake:
- Copy this script into the Snowflake SQL editor:
plaintextset database_name = 'ESTUARY_DB';
set warehouse_name = 'ESTUARY_WH';
set estuary_role = 'ESTUARY_ROLE';
set estuary_user = 'ESTUARY_USER';
set estuary_schema = 'ESTUARY_SCHEMA';
-- create role and schema for Estuary
create role if not exists identifier($estuary_role);
grant role identifier($estuary_role) to role SYSADMIN;
-- Create snowflake DB
create database if not exists identifier($database_name);
use database identifier($database_name);
create schema if not exists identifier($estuary_schema);
-- create a user for Estuary
create user if not exists identifier($estuary_user)
default_role = $estuary_role
default_warehouse = $warehouse_name;
grant role identifier($estuary_role) to user identifier($estuary_user);
grant all on schema identifier($estuary_schema) to identifier($estuary_role);
-- create a warehouse for estuary
create warehouse if not exists identifier($warehouse_name)
warehouse_size = xsmall
warehouse_type = standard
auto_suspend = 60
auto_resume = true
initially_suspended = true;
-- grant Estuary role access to warehouse
grant USAGE
on warehouse identifier($warehouse_name)
to role identifier($estuary_role);
-- grant Estuary access to database
grant CREATE SCHEMA, MONITOR, USAGE on database identifier($database_name) to role identifier($estuary_role);
-- change role to ACCOUNTADMIN for STORAGE INTEGRATION support to Estuary (only needed for Snowflake on GCP)
use role ACCOUNTADMIN;
grant CREATE INTEGRATION on account to role identifier($estuary_role);
use role sysadmin;
COMMIT;- Change any of the variables in the first five lines as desired. You can, for example, specify an existing warehouse or database. If you change the username, make sure to update additional SQL commands that specify
ESTUARY_USER. - Select the dropdown next to the Run button to choose Run All.
Once the user is created and properly permissioned, we’ll need to create and assign key-pair authentication, or JWT credentials, to this user. This will allow Estuary to replicate data to Snowflake through this user later on.
To learn more about key-pair authentication or for any troubleshooting, see Snowflake’s guide.
- Open a terminal window and run the following commands to generate a key-pair. Make sure to save these keys in a secure location. You can print the private key to the terminal using
cat rsa_key.p8or directly upload the key file to Estuary later.
plaintext# generate a private key
openssl genrsa 2048 | openssl pkcs8 -topk8 -inform PEM -out rsa_key.p8 -nocrypt
# generate a public key
openssl rsa -in rsa_key.p8 -pubout -out rsa_key.pub
# read the public key and copy it to clipboard
cat rsa_key.pub
Your output should look something like this:
plaintext-----BEGIN PUBLIC KEY-----
MIIBIj...
-----END PUBLIC KEY------ In the Snowflake SQL editor, assign the public key to the Estuary user:
plaintextALTER USER ESTUARY_USER SET RSA_PUBLIC_KEY='MIIBIjANBgkqh...'Having trouble running this command? Make sure you’re using a role with the permissions to modify authentication methods for users.
- You can verify that the public key is configured correctly by running the following commands and ensuring the output matches:
In Snowflake:
plaintextDESC USER ESTUARY_USER;
SELECT TRIM((SELECT "value" FROM TABLE(RESULT_SCAN(LAST_QUERY_ID()))
  WHERE "property" = 'RSA_PUBLIC_KEY_FP'), 'SHA256:');
In the terminal:
plaintextopenssl rsa -pubin -in rsa_key.pub -outform DER | openssl dgst -sha256 -binary | openssl enc -base64Step 2: Create Snowflake Materialization in Estuary
Once all your resources are configured on the Snowflake side, you can complete your integration in Estuary.
- In the Estuary dashboard, go to the Destinations page.
- Click New Materialization.
- Search for “Snowflake” and select Materialization.
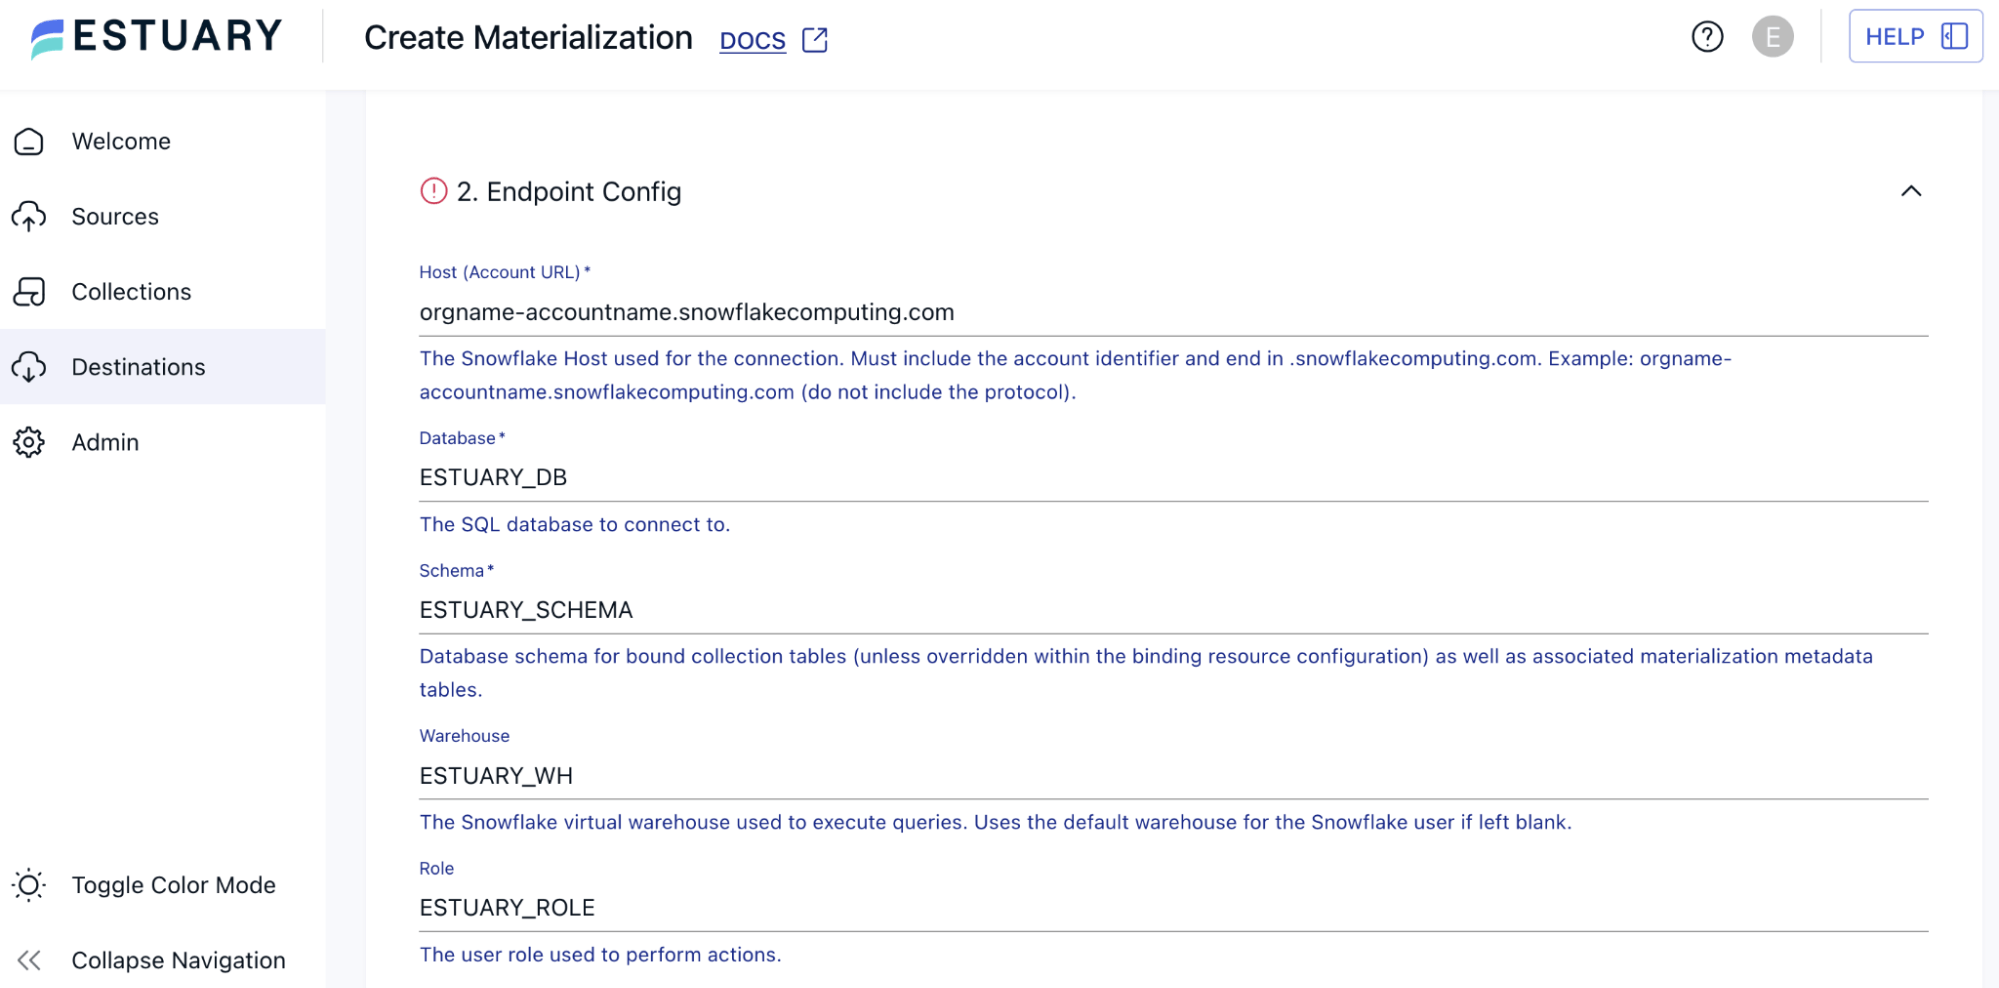
- Fill out the configuration details:
- Name: a unique name of your choice for your connector
- Data plane: ensure you use the same data plane as your source collections
- Host: the Snowflake account URL (minus the protocol), such as:
orgname-accountname.snowflakecomputing.com - Database, Schema, and Warehouse: the names from the Snowflake script, such as
ESTUARY_DB,ESTUARY_SCHEMA, etc. - JWT Authentication: the user (such as
ESTUARY_USER) along with the private key (thersa_key.p8file) you generated as part of the key-pair
You will then be able to choose between ingestion methods.
- Bulk Copy: The default, since it can make use of efficient merges for a fully reduced table. You don’t need to do anything else to select the Bulk
COPY INTOoption, but you can customize it by filling in a sync schedule under the Endpoint Config. - Snowpipe Streaming: To use Snowpipe Streaming, simply enable delta updates (see below).
- Snowpipe: To use Snowpipe, enable delta updates. Then, add the
no_snowpipe_streamingfeature flag under Advanced Options in the Endpoint Config.
In the Source Collections section, you can link a capture or individually add data collections to be materialized.
To enable delta updates for Snowpipe or Snowpipe Streaming, you can either choose to make delta updates the default for new collections or enable it on individual data collections.
Enable on all new bindings
- In the Source Collections section, find Collection Settings.
- Toggle this setting to on: “Default setting for the "Delta Updates" field of newly adding bindings.”
- Add your collections.
- Any existing collections will not be affected by this change.
- Any new collections will automatically have “Delta Updates” checked.
Enable or disable on individual bindings
- Select the binding you’d like to modify in the Collections table.
- In the Resource Configuration to the side, find the Delta Updates setting.
- Check the setting to enable delta updates or uncheck it to use standard merge updates.
Once you’ve added and configured your data collections as desired, click Next and Save and Publish to finalize materialization setup.
In Summary
While Snowflake offers a number of ways to ingest data, Snowpipe Streaming is gaining popularity as a way to implement real-time data in Snowflake analytics flows. Though it’s fast and efficient, Snowpipe Streaming also comes with a high engineering burden.
You can eliminate that downside by using a pre-built Snowpipe Streaming integration. Estuary, which cuts out complexity and streamlines data pipelines, makes a good option. All you need to get started is to create a Snowflake materialization and choose to use it in delta updates mode.
If you have any questions along the way, join the Estuary team in Slack. And keep up with future announcements about Snowflake and our other connectors by following our Data Digest newsletter on LinkedIn.

About the author
Emily is a software engineer and technical content creator with an interest in developer education. She has experience across Developer Relations roles from her FinTech background and is always learning something new.


