MongoDB has been a reliable option for applications handling unstructured and semi-structured data because of its flexibility and document-oriented nature. However, with the evolution of data management requirements, coupled with the need for scalable solutions, moving to a serverless database like DynamoDB often becomes an exciting and powerful substitute.
This migration can open up new opportunities for companies looking for comprehensive database solutions, regardless of whether they are motivated by a need for improved performance, easier maintenance, or better scalability.
Let’s explore the ways to connect MongoDB to DynamoDB and, most importantly, how to go about doing so without any hassle.
Check out our comprehensive guide for the reverse migration from DynamoDB to MongoDB
Introduction to MongoDB (Your Data Source)
MongoDB, a leading NoSQL database, is well-associated with scalability and flexibility. It stores data in BSON (Binary JSON) format using a document-oriented approach, allowing developers to deal with various dynamic data structures.
Some of the reasons businesses use MongoDB include server-side JavaScript execution, aggregation, load balancing, indexing, and ad hoc queries.
The key features of MongoDB:
- When two or more MongoDB instances are used to offer high availability, a replica set is created. The primary MongoDB server manages all read and write operations, and the secondary replica keeps a copy of the data.
- With MongoDB, scalability may be achieved both vertically and horizontally. Vertical scaling boosts the capacity of an existing machine, whereas horizontal scaling adds new machines to your resource base.
- MongoDB provides load balancing through scalability, eliminating the need for an additional, specialized load balancer.
- MongoDB is a schema-less database, so data management may occur without a blueprint.
- Because MongoDB stores data as documents with key-value pairs, it is more versatile than data in other databases.
Introduction to DynamoDB (the Data Destination)
Amazon DynamoDB, the NoSQL key-value and document database, offers smooth scaling and reliable performance. It is a multi-region, multi-active, fully managed, and long-lasting database. Some of its attractive offerings include security protections, backup and restore options, and in-memory caching for internet-scale applications.
With a pay-as-you-go pricing approach, DynamoDB is also affordable for companies of all sizes; you only pay for the resources you utilize.
In comparison, the top features of DynamoDB include:
- As DynamoDB is a fully managed NoSQL database service, no maintenance costs are associated with the server.
- To assist you in preserving data accuracy, DynamoDB supports atomicity, consistency, isolation, and durability (ACID) transactions.
- DynamoDB has built-in high availability and data durability. Your data is saved on solid-state discs (SSDs) and automatically duplicated across various Availability Zones in an AWS Region.
- DynamoDB uses the AWS Application Auto Scaling service to dynamically modify granted throughput capacity in response to traffic patterns.
Best Ways to Migrate MongoDB to DynamoDB
Now, let’s look at the methods you can use to achieve MongoDB and DynamoDB integration:
- Method 1: Using Estuary Flow to Migrate MongoDB data to DynamoDB
- Method 2: Using AWS Data Migration Services to Migrate MongoDB to DynamoDB
Method 1: Using Estuary Flow to Migrate MongoDB to DynamoDB
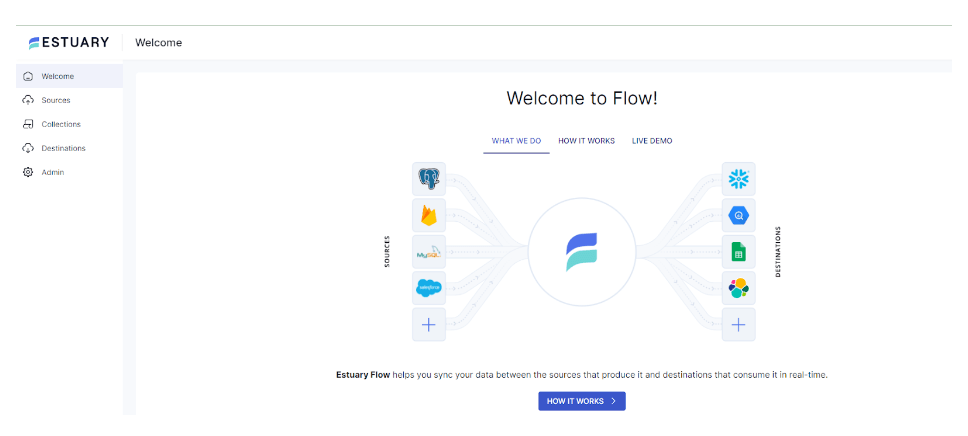
Low-code, user-friendly ETL (extract, transform, load) tools are a great option for data migration, especially if you don’t have extensive technical expertise. Estuary Flow is one such efficient ETL tool that can streamline real-time data replication from MongoDB to DynamoDB. Here’s a step-by-step guide to help you with this.
Prerequisites
Step 1: Connect MongoDB as a Source
- Click the Sources option on the dashboard.
- On the Sources page, click the + NEW CAPTURE button on the top left.
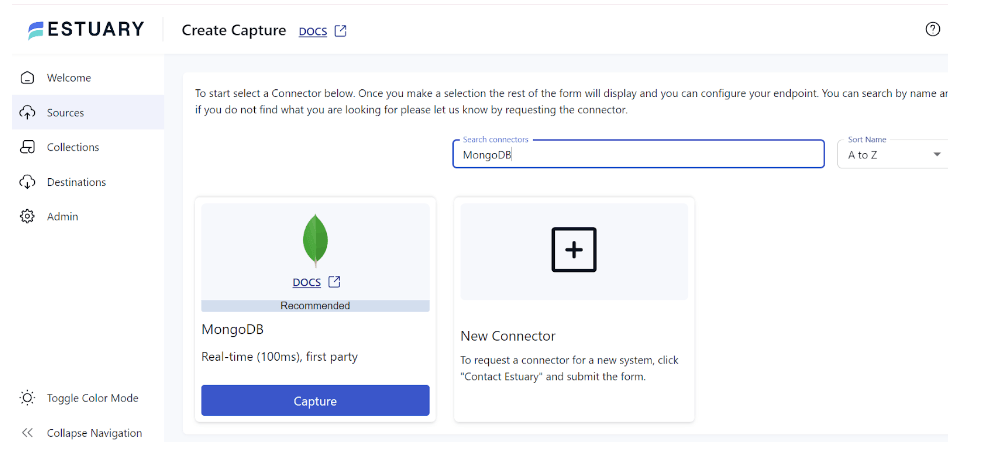
- Type MongoDB in the Search connectors box. When you see the MongoDB connector in the search results, click on its Capture button.
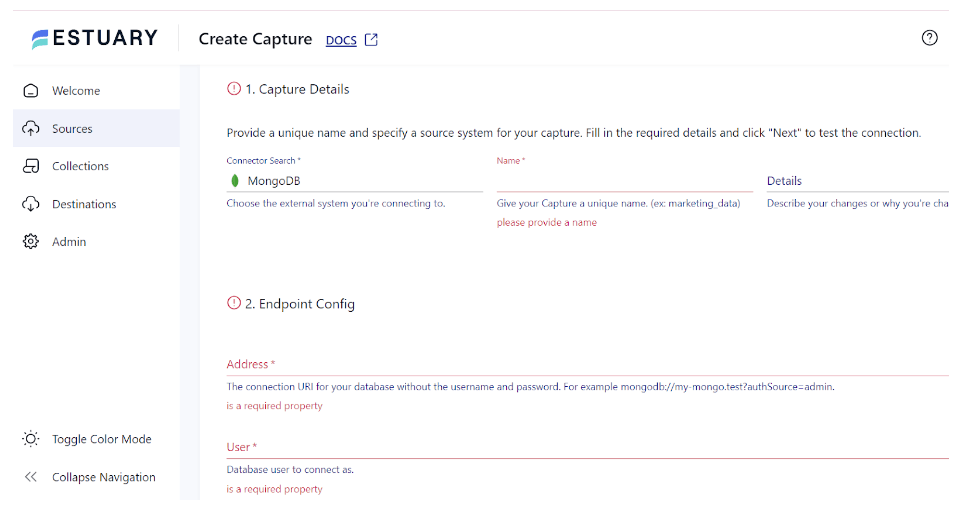
- On the Create Capture page, enter details like Name, Address, User, and Password. Click NEXT > SAVE AND PUBLISH. The connector will capture data from MongoDB collections into Flow collections.
Step 2: Configure DynamoDB as the Destination
- Once the source is set, click on the Destinations option on the dashboard.
- Click on the + NEW MATERIALIZATION button on the Destinations page.
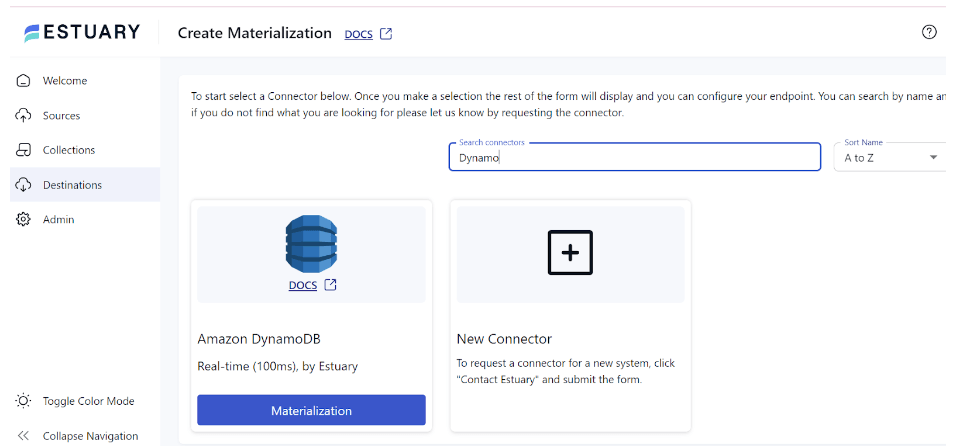
- In the Search connectors box, type in DynamoDB and click the Materialization button of the connector when you see it in the search results.
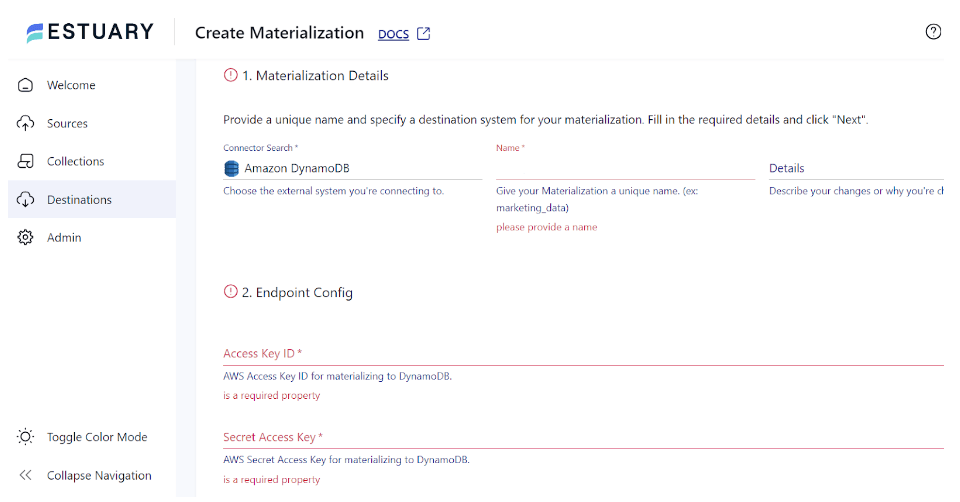
- On the Create Materialization page, enter details like Name, Access Key ID, Secret Access Key, and Region.
- While collections added to your capture would automatically be added to your materialization, you can use the Source Collections to do this manually.
- Then, click NEXT > SAVE AND PUBLISH. This will complete the configuration of the destination end of your integration pipeline. The connector will materialize Flow collections into DynamoDB tables.
Key Features of Estuary Flow
Here are some of the impressive features of Estuary Flow, making it a suitable choice for your varied data integration needs.
- Wide Range of Connectors: Estuary Flow provides more than 200+ pre-built connectors. Without writing a single line of code, you can easily use these connectors to extract data from multiple sources and load it into the destination.
- Real-time Data Processing: Estuary Flow makes real-time, continuous data migration from MongoDB to DynamoDB possible. This allows you to be confident that your downstream apps are using the most recent data possible.
- Change Data Capture: Estuary Flow utilizes sophisticated log-based Change Data Capture (CDC) algorithms to collect granular data changes. This actively contributes to latency reduction and integrity maintenance.
Ready to simplify your data migration? Try Estuary Flow for an easy, real-time MongoDB to DynamoDB integration, or sign up for a free account today. Have questions? Contact us to explore tailored enterprise solutions.
Method 2: Using AWS Data Migration Services to Migrate MongoDB to DynamoDB
AWS DMS offers two migration modes: Document Mode and Table Mode. For the migration, we will employ Table mode.
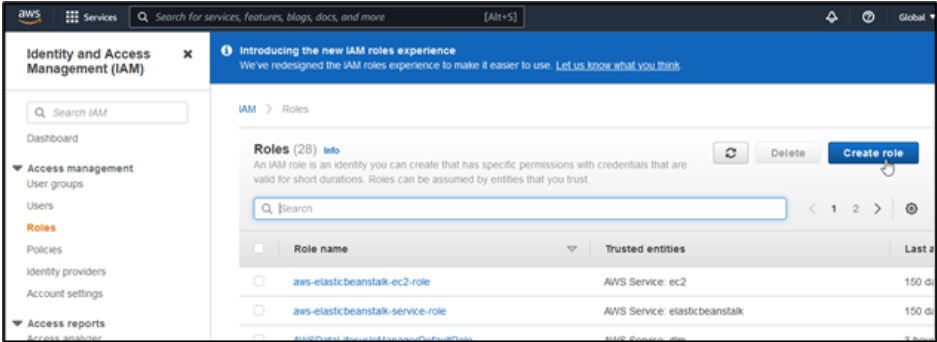
Step 1: Create a Role within Your AWS Account
- Open IAM and create a role.
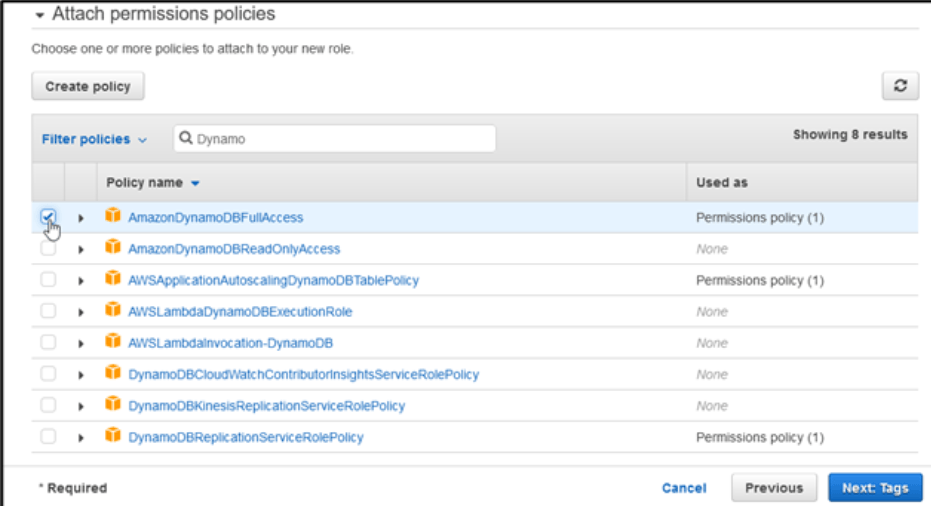
- Select DMS. Then, click Next Permissions and add AmazonDynamoDBFullAccess policy to the role.
- If necessary, utilize tags and designate the role as DMS-dynamo-role. Finally, click Save.
Step 2: Navigate DMS in the AWS Console
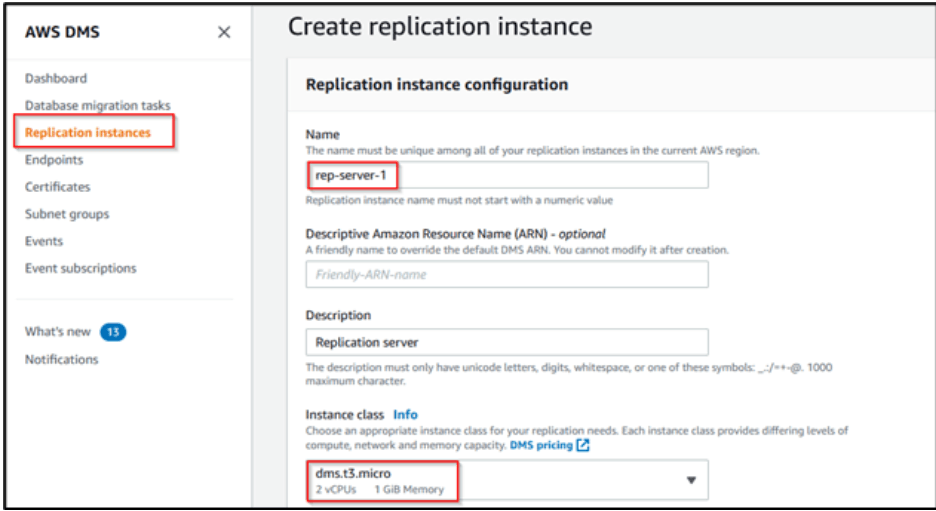
- To perform the migration, create a replication server in a VPC and set a name of your choice.
- Select the VPC where you want to launch and choose an instance type. In this case, it’s t3.micro.
- For Demo purposes, select the Dev workload (Single AZ), and for production workload, select the multi-AZ option.
Step 3: Open Your MongoDB Database and Grant Access
The Replication server needs permission to access the database.
- Use Admin to create the role mentioned below.
plaintextuse admin
db.createRole(
{
role: "changestreamrole",
privileges: [
{ resource: { db: "", collection: "" }, actions: [ "find","changeStream" ] }
],
roles: []
}
)- Next, create a user in the database to be migrated.
plaintext> use test
> db.createUser(
{
user: "dms-user12345",
pwd: "password",
roles: [ { role: "changestreamrole", db: "admin" }, "read"]
})
Step 4: Establish the Source and Target Endpoints
To move data from the source database to DynamoDB, the DMS task requires the following endpoints.
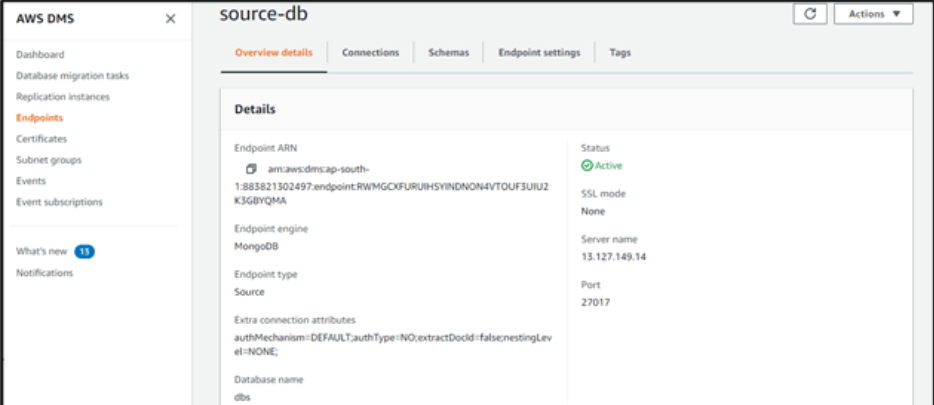
- Establish a source endpoint and provide a name.
- Server name as the MongoDB machine’s public IP.
- Name the database with the required permissions created in the previous step.
- The endpoint will be as shown below:
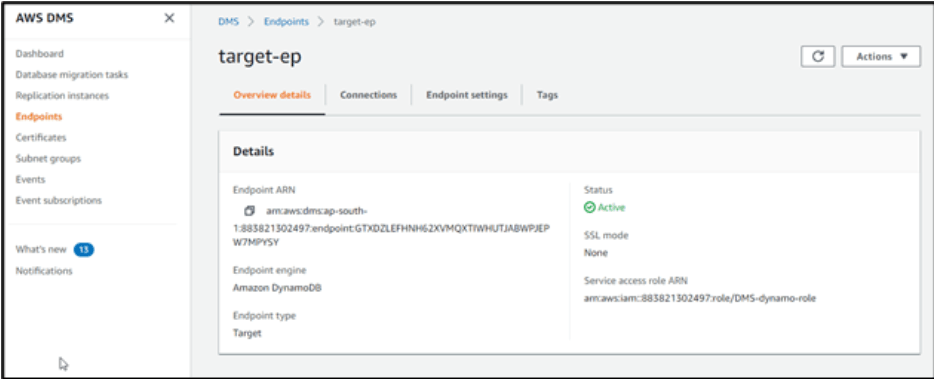
- Establish the target endpoint and provide a name.
- Choose DynamoDB as the target engine.
Step 5: Check the Endpoint Connection
- This step involves verifying the connectivity of an endpoint to ensure a successful connection. Click on the Run test button to proceed with this.
Step 6: Create a Database Migration Task
- In the DMS Console, navigate Database migration tasks > Create task. Give the task a name.
- Choose the replication server that you created.
- Next, select the source and target endpoints.
- Select the table mode.
- Click Create to start the database migration.
- You can now see your tables in DynamoDB in the AWS Console.
Limitations of Using AWS Data Migration Services to Migrate MongoDB to DynamoDB
- Documents inside a collection must use the same data type for value in the same field while in table mode.
- When the _id option is configured as a separate column, the ID string cannot contain more than 200 characters.|
- In Table mode, columns that are prefixed with oid and array are created from object ID and array type keys.
- AWS DMS does not accept collections with the same field name in different scenarios when they are in table mode and have an RDBMS target.
- The source filters are not compatible.
- The following functionalities of MongoDB version 5.0 are not supported by AWS DMS:
- Live resharding
- Client-Side Field Level Encryption (CSFLE)
- Migration of timeseries collection
Conclusion
DynamoDB is an appealing alternative to MongoDB due to its serverless scalability, solid security features, flexible pricing strategy, consistent low latency, and seamless connection with the AWS ecosystem. To migrate from MongoDB to DynamoDB, you can either use AWS DMS or Estuary Flow.
Using AWS DMS requires extensive technical knowledge of both platforms. Additionally, it works well with smaller datasets or in situations where control over the migration process is essential. However, with bigger datasets or intricate schema transformations, the complexity can increase fast.
With 200+ connectors, an intuitive UI, transformation capabilities, and real-time integration, Estuary Flow is ideal for larger migrations; it streamlines the process and cuts down on development time.
Estuary Flow is a one-stop solution for building real-time data pipelines that can link various sources and destinations. To get started, sign up for a free Estuary account today.
FAQs
What are the key differences between MongoDB and DynamoDB that I should be aware of during migration?
MongoDB’s query language is more complicated than DynamoDB, which relies on main and secondary indexes for more advanced querying.
What are the cost implications of migrating from MongoDB to DynamoDB?
The price of moving from MongoDB to DynamoDB is dependent on several factors, including storage needs, data volume, throughput demands, and AWS service usage. To calculate the total cost, it is important to project the cost of storage, data transmission, and DynamoDB provisioned throughput.

About the author
With over 15 years in data engineering, a seasoned expert in driving growth for early-stage data companies, focusing on strategies that attract customers and users. Extensive writing provides insights to help companies scale efficiently and effectively in an evolving data landscape.


