MongoDB, a widely-adopted NoSQL database, is renowned for its ability to handle vast volumes of varied, unstructured data with exceptional performance and scalability. However, while MongoDB is powerful in data storage, it lacks the advanced analytical capabilities required for deep data exploration and insights.
By ingesting data from MongoDB into Databricks, you can leverage Databricks' advanced analytics tools to gain deeper, more actionable insights from your data. Databricks is distinguished by its comprehensive analytical features, making it a prime choice for complex data processing. Its collaborative workspace, combined with robust machine learning support, significantly enhances the value of integrating MongoDB with Databricks.
In this guide, we will explore the most effective methods to connect MongoDB to Databricks, beginning with an in-depth overview of each platform.
MongoDB – The Data Source
MongoDB is a powerful NoSQL database that uses a flexible, document-oriented model to efficiently manage data that does not have a fixed schema.
Unlike traditional SQL databases, MongoDB stores data in Binary JSON (BSON) documents. BSON supports complex and nested data structures, which simplifies data management and querying processes.
A standout feature of MongoDB is its flexible document model, which allows for schema-less data insertion. This flexibility supports dynamic and evolving data structures, accelerating application development and minimizing the complexities associated with data handling.
Common use cases for MongoDB include content management systems, IoT applications, and mobile app development, where the ability to manage unstructured and semi-structured data efficiently is crucial.
Databricks – The Destination
Databricks is a robust analytics platform designed to streamline and accelerate data processing tasks. It employs a lakehouse architecture, merging the strengths of both data lakes and data warehouses to create a solid foundation for efficient data management and advanced analytics.
Key features of Databricks include:
- Unified Data Analytics Platform: Databricks provides a unified platform that combines data engineering, data science, and machine learning. This integration allows teams to collaborate seamlessly on a single platform, enabling faster development of data pipelines, models, and analytics solutions.
- Delta Lake: Delta Lake is an open-source storage layer which enhances data lakes with reliability, performance, and ACID (Atomicity, Consistency, Isolation, Durability) transactions. It supports both batch and streaming data in a unified architecture, ensuring data consistency, robust versioning, and the ability to "time travel" through historical data states.
- Optimized Apache Spark: Databricks is built on top of Apache Spark, and it offers a highly optimized version of Spark that improves performance and scalability for big data processing. This includes enhanced capabilities for processing large datasets, running distributed machine learning workloads, and managing real-time data streams.
Why Integrate Data from MongoDB into Databricks?
- Unified Data Platform: By integrating MongoDB with Databricks, you can consolidate data from various sources into a single, unified platform. This integration brings together data science, engineering, and analytics capabilities, simplifying data management and enhancing accessibility. As a result, your organization can more effectively leverage all its data assets, enabling better collaboration and more informed decision-making across teams.
- Scalable Machine Learning Workflows: Ingesting MongoDB data into Databricks enables you to scale your machine learning workflows more effectively. By leveraging Databricks’ built-in machine learning tools and libraries, you can train, deploy, and monitor models directly on the ingested data. This approach streamlines the entire machine learning lifecycle, from data ingestion to model deployment, allowing for faster iteration and more accurate predictive analytics.
- Real-Time Data Transformation and Analysis: Ingesting MongoDB into Databricks allows you to perform real-time data transformation and analysis at scale. With Databricks' powerful processing capabilities, you can clean, transform, and analyze your data as it streams in, enabling you to generate immediate insights and make timely, data-driven decisions. This real-time capability enhances your ability to respond to changing conditions and emerging trends in your data.
3 Methods for Ingesting MongoDB into Databricks
- Method 1: Use Estuary Flow to Ingest MongoDB into Databricks
- Method 2: Export MongoDB data to CSV, and then Import into Databricks
- Method 3: Ingest MongoDB data into Databricks with Pyspark
Method 1: Use Estuary Flow to Ingest MongoDB into Databricks
Estuary Flow is an open-source, cost-effective ETL data integration platform optimized for real-time data ingestion with sub-second latency. While Estuary Flow is available as an open-source project, it also offers a fully-managed version that simplifies data ingestion with a user-friendly, point-and-click interface, eliminating the complexities of deployment and ongoing maintenance, all at a fraction of the cost of competitors like Fivetran or Kafka Confluent. This combination of flexibility, affordability, and ease of use makes Estuary Flow an ideal solution for implementing Change Data Capture (CDC) and streaming ETL workflows, enabling you to efficiently manage continuous data flows between diverse sources and destinations.
With a pre-built library of over 200+ connectors, Estuary Flow effortlessly integrates with databases, data warehouses, and APIs, enabling you to unify and manage your data across diverse environments with ease.
Prerequisites for Using Estuary Flow to capture data from MongoDB and load to Databricks
- An Estuary account. If you don’t have one yet, sign up for free
- Credentials for your MongoDB instance and database.
- A Databricks account configured with a Unity Catalog, SQL Warehouse, schema, and the appropriate user role.
Step 1: Configure MongoDB as the Source
- Sign in to your Estuary account or Sign Up For Free
- Select Sources from the side menu. Then, click on the + NEW CAPTURE button on the Sources pag
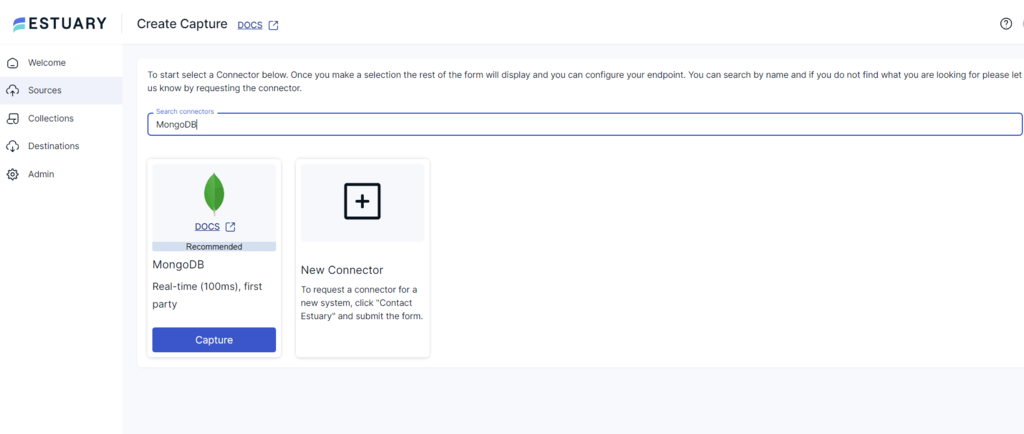
- Search for MongoDB using the Source connectors field on the Create Capture page. When the connector appears in search results, click its Capture button.
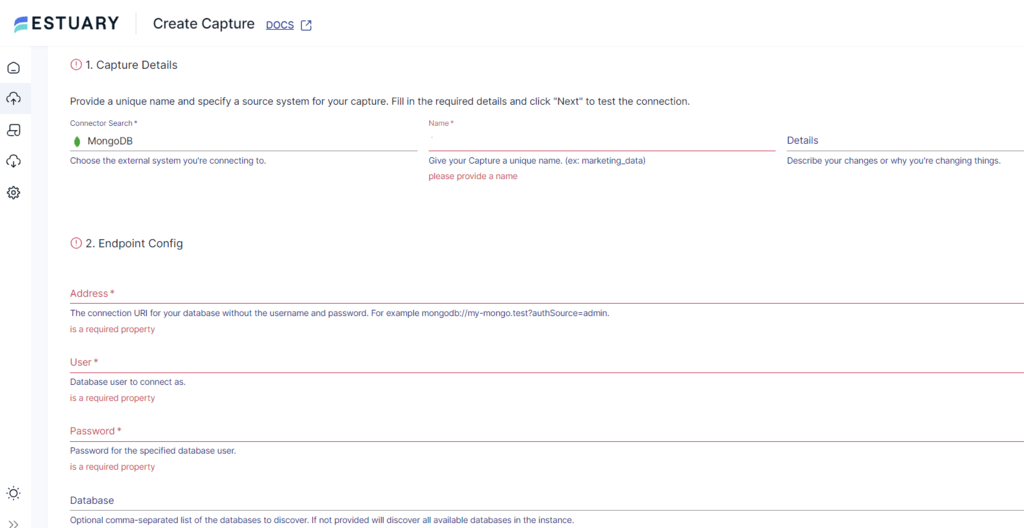
- You will be redirected to the connector configuration page, where you can specify the following details:
- Name: Enter a unique name for your source capture.
- User: Provide the username of the user.
- Password: Provide the Password of the user.
- Address: Provide a connection URI (Uniform Resource Identifier) for your database.
Your URI might look something like this:
plaintextmongodb://username:password@hostname:port/database_name- Click on NEXT. Then click on SAVE AND PUBLISH.
Once published, the real-time connector begins by running a full backfill, which collects all of the historical data from your MongoDB collections and converts it into Flow collections. Once this is done, the connector automatically switches to an incremental, streaming, real-time mode, collecting any new or updated documents with millisecond latency.
The next step is to set up our materialization (destination).
Step 2: Configure Databricks as the Destination
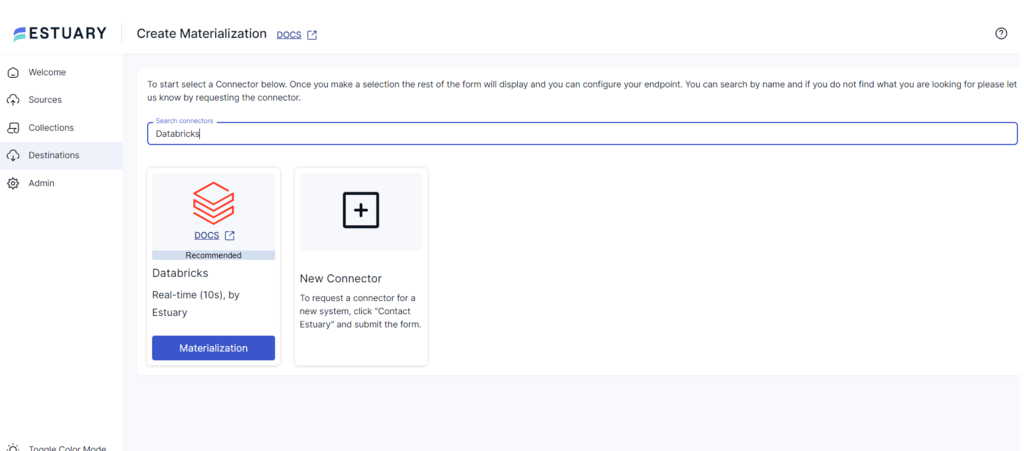
- Select Destinations from the dashboard side menu. On the Destinations page, click on + NEW MATERIALIZATION.
- Search for Databricks in the Search connectors field on the Create Materialization page. When the connector appears, click on its Materialization button.
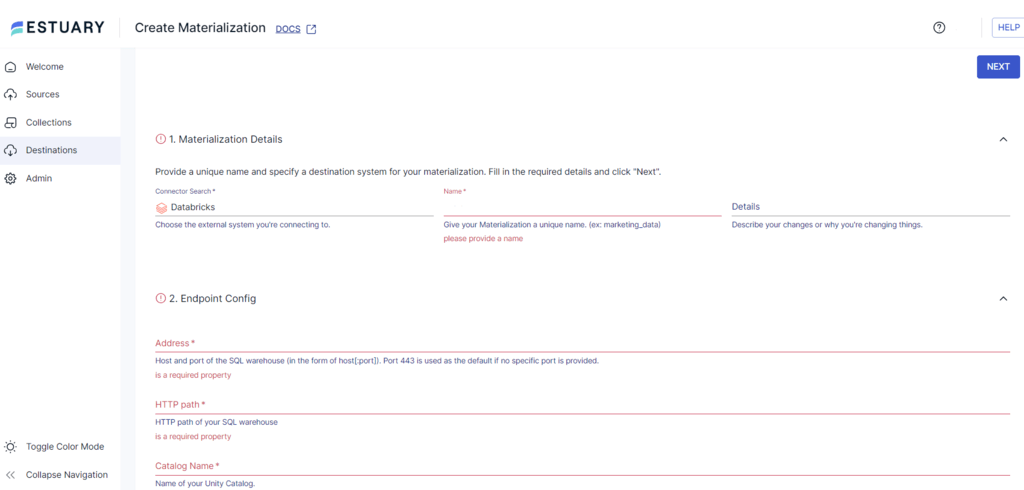
- You will be redirected to the Databricks connector configuration page, where you must provide the following details:
- Name: Enter a unique name for your materialization.
- Address: Provide the SQL warehouse's host and port name. If you don’t specify a port number, the default value of 443 will be used.
- HTTP Path: Enter the HTTP path for your SQL warehouse.
- Unity Catalog Name: Specify the name of your Databricks Unity Catalog.
- Personal Access Token: Provide a Personal Access Token (PAT) which has permissions to access the SQL warehouse.
- Click on NEXT and then select the specific collections that you want ingested into Databricks
- Click on SAVE AND PUBLISH to complete the configuration process.
The real-time connector will materialize the data ingested from the Flow collections of MongoDB data into the Databricks destination.
Benefits of Using Estuary Flow
- Change Data Capture (CDC) Technology: Estuary Flow leverages CDC technology, specifically utilizing MongoDB's Change Streams, to identify, capture, and deliver changes in your source data to the destination with sub-second latency. Change Streams provide real-time monitoring of data modifications, enabling Estuary Flow to subscribe to detailed change events such as insertions, updates, or deletions. This ensures efficient data propagation from MongoDB to Databricks, allowing for immediate analysis and informed decision-making based on the most current data.
- In-Flight Data Transformations: Estuary supports in-flight data transformations using TypeScript and SQL, allowing you to modify and clean data as it moves through the pipeline. This feature ensures your data is ready for use upon arrival at its destination, minimizing the need for post-processing.
- Managed Backfills: Managed backfills allow you to fill your destination storage with the historical data of a source system. With Estuary Flow, you can easily handle and orchestrate these historical backfills without breaking your real-time streaming ingestions.
Method 2: Export MongoDB data to CSV, and then Import into and Databricks
In this method, you first export MongoDB data as a CSV file to your local computer. After exporting the data, you manually import the CSV file into Databricks via the web UI.
Step 1: Export MongoDB Data as a CSV
MongoDB allows you to export collections or table data in CSV format to your local system.
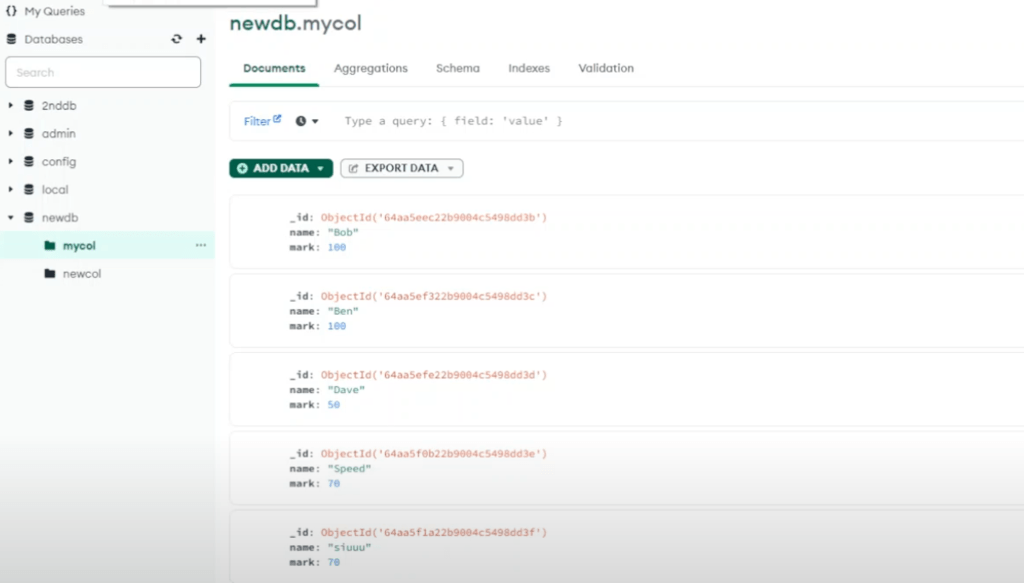
- Navigate to your MongoDB Compass dashboard.
- In the sidebar, click on Databases.
- Select the database from which you want to export data. You will see a list of all the collections within the database.
- Click on the collection you want to export.
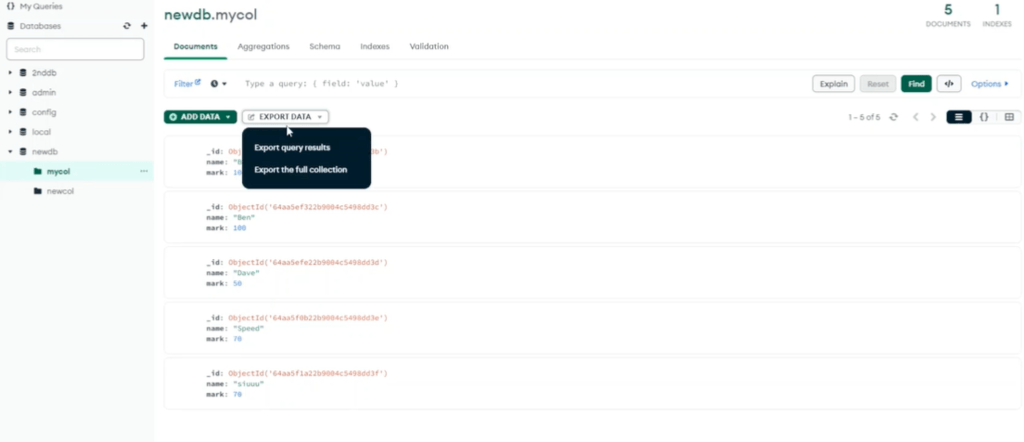
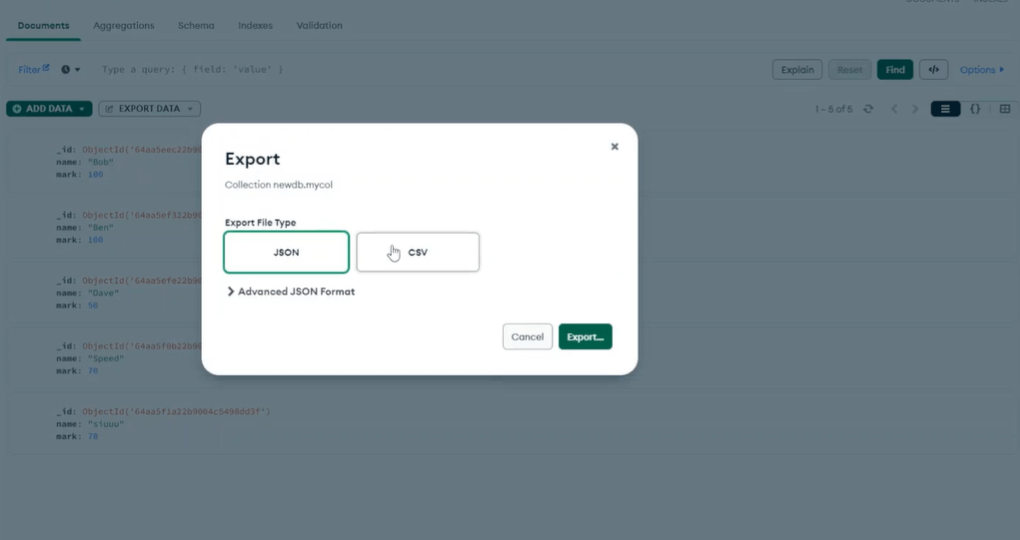
- Click the EXPORT DATA button.
- NOTE: If you don’t find an EXPORT DATA button on the collection page, go to the Navigation bar and click on Collections > Export.
- NOTE: If you don’t find an EXPORT DATA button on the collection page, go to the Navigation bar and click on Collections > Export.
- In the dropdown menu, select Export the full collection.
- Select the Export File Type as CSV in the dialog box.
- Click the Export button; your MongoDB data collection will be exported to your local system as a CSV file.
Step 2: Import the MongoDB CSV File into Databricks
The Databricks UI offers a straightforward process to import a CSV file from your local system and create a Delta table.
- Upload the File
- Navigate to the Databricks workspace and click on + New > Add Data.
- Choose Create or Modify a Table.
- Use the browser or drag-and-drop option to upload your CSV file.
The uploaded file will be stored in a secure, internal location within your Databricks account.
- Preview, Configure, and Create a Table
- Choose an active compute resource to preview and configure your table settings.
- For workspaces enabled with Unity Catalog, select whether to use a catalog or legacy system to store your schema.
- Within the chosen catalog, select a specific schema/database where the table will be created.
- Click on Create to finish the table setup. Ensure you have the necessary permissions to create a table in the chosen schema/database.
- Format Options
Configure how your CSV file is processed:
- First Row as Header: Enabled by default, this option interprets the first row of the CSV file as column headers.
- Column Delimiter: Specify the character that separates columns in the CSV file.
- Auto-detect Column Types: Enabled by default, this allows Databricks to automatically determine each column's data type.
- Row Span Multiple Lines: Disabled by default, this option specifies whether a single column’s value spans multiple lines.
- Merge Schema Across Multiple Files: If uploading multiple files, Databricks can combine and infer a unified schema.
You can also edit the column names and types directly in Databricks to ensure that the schema accurately reflects the structure of your data.
Limitations of Using CSV Export/Import to Connect MongoDB and Databricks
- Formatting Challenges and Scalability Issues: The process of formatting CSV files to ensure compatibility with Databricks can be time-consuming, especially with larger datasets. This manual effort not only leads to lost time but also highlights the lack of a scalable process. As your data grows, the need for constant reformatting can become a bottleneck, reducing overall efficiency and delaying critical insights.
- File Upload Restrictions: The Databricks interface limits you to uploading only up to ten CSV files at a time through the Create or Modify Table feature. This restriction slows down the data import process when working with a large number of files, reducing operational efficiency.
- Lack of Real-Time Capabilities: MongoDB is typically used for managing rapidly evolving data, where up-to-the-second accuracy is crucial. However, by the time the data is exported, formatted, and uploaded to Databricks, it may already be stale, making this method inadequate for those who rely on real-time data for immediate insights and operational analytics.
Method 3: Ingest MongoDB into Databricks with PySpark
Prerequisites:
- An active MongoDB Atlas account.
- An active Databricks account with permissions to create and manage clusters, notebooks, and SQL warehouses.
- Access to the MongoDB connection string (including authentication credentials) with permissions to read data from a specific database or collection.
- MongoDB Spark Connector installed in your Databricks environment (ensure compatibility with your Spark version).
- A Databricks cluster configured to run with PySpark.
- Ensure the Databricks cluster has network access to MongoDB Atlas, such as through IP whitelisting or VPC peering.
- Any necessary JAR files (e.g., MongoDB Spark Connector JAR) should be available to the Databricks cluster.
Step 1: Create and Configure Databricks Cluster (If not already done in Prereqs)
- Create a Databricks cluster.
- Navigate to the cluster detail page, select the Libraries tab, and click Install New.
- Select Maven as your library source. Add the MongoDB connector for Spark package coordinates based on the Databricks runtime version.
- Install Spark, then restart your Databricks cluster.
Step 2: Set Up MongoDB Atlas
- Create a MongoDB Atlas instance and whitelist Databricks cluster IP addresses for network acces.
- Obtain the MongoDB connection URI from MongoDB Atlas UI.
Step 3: Configure Databricks Cluster
- Navigate to the Configuration tab on your Databricks cluster detail page and click Edit.
- Under Advanced Options > Spark Config, add the following configurations:
plaintextspark.mongodb.input.uri=<connection-string>
spark.mongodb.output.uri=<connection-string>- Replace the <connection string> with your MongoDB Atlas connection URI.
Option 2: Configure via Python Notebook
You can also configure your Databricks cluster directly in a Python notebook. Below is an example code snippet to read data from MongoDB:
plaintextfrom pyspark.sql import SparkSession

spark = SparkSession.builder \
    .config("spark.mongodb.input.uri", "<connection-string>") \
    .config("spark.mongodb.output.uri", "<connection-string>") \
    .config("spark.jars.packages", "org.mongodb.spark:mongo-spark-connector_2.12:<connector-version>") \
    .getOrCreate()

database = "your_database"
collection = "your_collection"

df = spark.read.format("com.mongodb.spark.sql.DefaultSource") \
    .option("uri", "<connection-string>") \
    .option("database", database) \
    .option("collection", collection) \
.load()- Replace <connection-string> with your MongoDB Atlas connection URI, ensuring all necessary parameters are included.
- Replace <connector-version> with the appropriate MongoDB Spark Connector version compatible with your Databricks runtime. For example:
- Use 3.0.1 for Spark 3.x
- Use 2.4.4 for Spark 2.x
- Specify the database and collection names to read data from the desired source in MongoDB.
Limitations of Ingesting Data from MongoDB to Databricks Using Python
- Complex Setup Process: The integration requires multiple configurations, including setting up clusters, managing Spark configurations, and installing external libraries. This process can be complex and time-consuming, especially for users unfamiliar with Databricks or PySpark.
- Dependency on External Libraries: The reliance on external libraries, such as the MongoDB Spark Connector, introduces potential compatibility and versioning issues. Mismatches between the library versions and the Databricks runtime can cause integration challenges, requiring careful management of dependencies to ensure a smooth connection.
In Summary
Ingesting data from MongoDB to Databricks enables you to leverage powerful analytics capabilities on your MongoDB data, but the approach you choose significantly impacts the efficiency and effectiveness of your data pipeline.
This article explored three methods for connecting MongoDB to Databricks:
- Using Estuary Flow - A fully-managed, no-code, real-time Change Data Capture solution that offers seamless data ingestion with sub-second latency. Estuary Flow is cost-effective, scalable, and simplifies the process, letting data engineers focus on building and optimizing data pipelines rather than managing and troubleshooting data integration tasks.
- Exporting MongoDB Data to CSV and Importing into Databricks - A straightforward but manual process that involves exporting data as CSV files and then importing them into Databricks. While this method is simple, it lacks real-time capabilities, can lead to stale data, and is unreliable for large or rapidly changing datasets.
- Ingesting MongoDB Data into Databricks Using PySpark - This method allows for direct integration through PySpark, providing flexibility and control over the data pipeline. However, it requires complex setup and deep expertise, including configuring clusters, managing dependencies, and ensuring compatibility between the MongoDB Spark Connector and the Databricks runtime. This approach works, but you could find yourself spending all day troubleshooting compatibility issues.
Each method has its own strengths and limitations. Estuary Flow offers a hands-off, real-time solution ideal for those seeking efficiency and scalability. The CSV method, while accessible, is limited by its manual nature and lack of real-time support. The PySpark approach offers flexibility but at the cost of much increased complexity and potential integration challenges.
Estuary Flow’s user-friendly interface allows you to streamline data integration and optimize workflows. Sign up today for seamless connectivity between MongoDB and Databricks.

About the author
With over 15 years in data engineering, a seasoned expert in driving growth for early-stage data companies, focusing on strategies that attract customers and users. Extensive writing provides insights to help companies scale efficiently and effectively in an evolving data landscape.


