Data is the driving force of the modern digital era, but keeping data under control in your organization is no small task. When it comes to real-time monitoring of data changes, the relational database management system (RDBMS) can be a great tool. And Microsoft SQL Server change data capture is especially powerful in this respect – once you set things up properly.
Whether you are handling data analytics in a data warehouse or trying to keep your employee databases synced, the value of change data capture (CDC) is enormous. But what exactly is CDC and how do you make it work on the Microsoft SQL Server database?
That is the question we will be answering in this article. We will also discuss what change data capture is and show you how to set up a real-time data pipeline using the no-code data pipeline platform Estuary Flow and use it to capture change data from SQL Server.
By the end, you will have a much better understanding of CDC and be familiar with how to enable it on SQL Server.
So let’s get started.
What Is Change Data Capture?
Before taking on the nitty-gritty of setting up SQL Server for change data capture, let’s get acquainted with what CDC is.
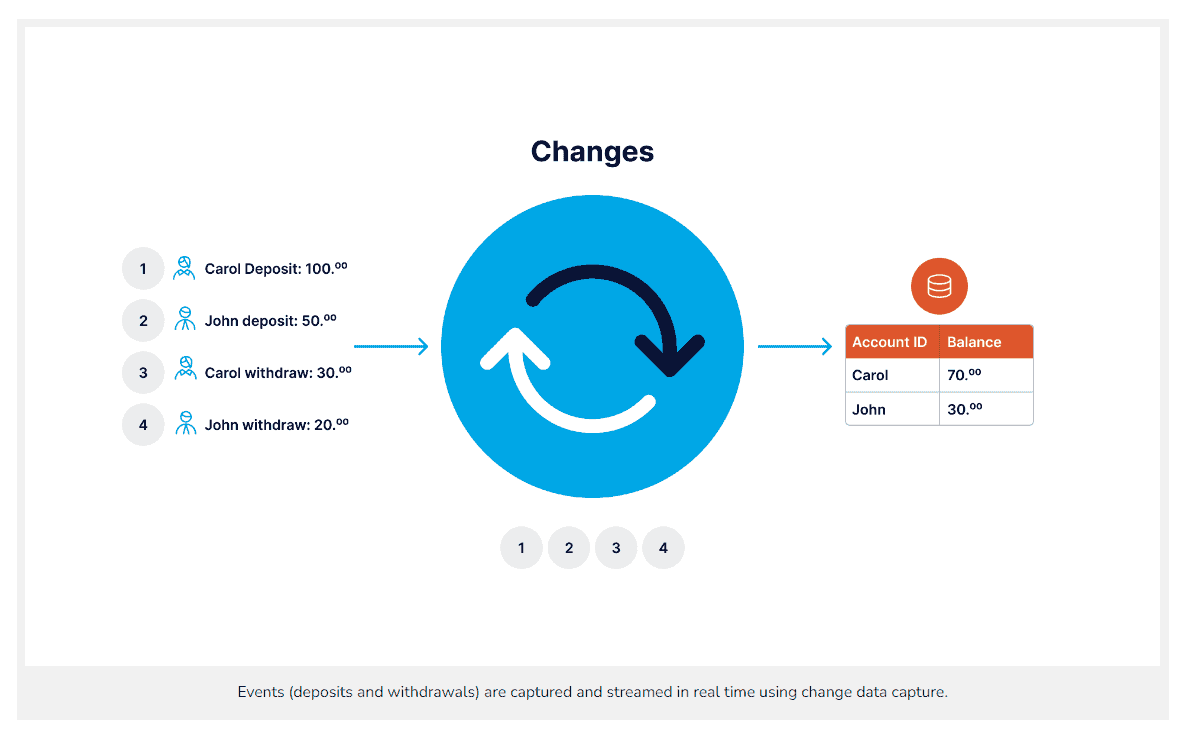
Change capture data refers to monitoring changes in a data source and then transmitting those changes to a target system.
But why is change data capture or CDC so important?
Well, the reason is actually pretty simple.
CDC ensures that your systems remain synced and prevents you from missing out on the minute details in time-sensitive business decisions. However, it is crucial to choose a reliable CDC solution; after all, the organization’s data is an irreplaceable asset.
CDC Best Practices
With modern-day GUI tools, like Estuary Flow, duplicating database changes downstream is not difficult.
But whether you’re choosing a CDC tool to invest in or building one yourself, there are several crucial items to keep in mind. Here are some best CDC practices you should stick to.
- Use asynchronous pub/sub style change propagation to consumers to decouple the producer and consumer systems. This allows the target system to process changes at its own pace without blocking the source system.
- Preserve the order of changes to ensure consistency between the source and target systems and to avoid conflicts.
- Support lightweight message transformations to match the event payload format with the input format of the target system, allowing for easy consumption of the data being propagated by CDC.
- Regularly monitor the CDC process to ensure that it’s working as expected and detect and address any issues promptly.
- Ensure that the CDC solution is scalable and can handle large volumes of changes and consumers without affecting performance or reliability.
- Consider using a CDC solution that supports change filtering so that only relevant changes are propagated to the target system. This can help reduce unnecessary network traffic and improve overall efficiency.
- Use a CDC solution that provides a way to handle conflicts such as using timestamps or other unique identifiers to ensure that changes are applied in the correct order.
- Ensure that the CDC solution is secure and that sensitive data is not exposed or leaked during the propagation process.
- Consider using a CDC solution that supports data masking or anonymization, especially when sensitive data is being propagated to non-production environments for testing or development purposes.
- Train and educate your team on CDC best practices and ensure that they understand how to use the solution effectively and efficiently.
Now that we are familiar with the basics of CDC, let’s understand the fundamentals of Microsoft SQL Server and its architecture.
What Is Microsoft SQL Server?
Microsoft SQL Server is a relational database management system developed by Microsoft that helps you manage and store large amounts of structured data.
The suite works on SQL (the standard database language), allowing everything from query data stored in Microsoft SQL Server to creating analytical reports and importing and exporting data. Like other relational database management systems, SQL Server connects different tables in the database and allows the application of constraints to maintain integrity.
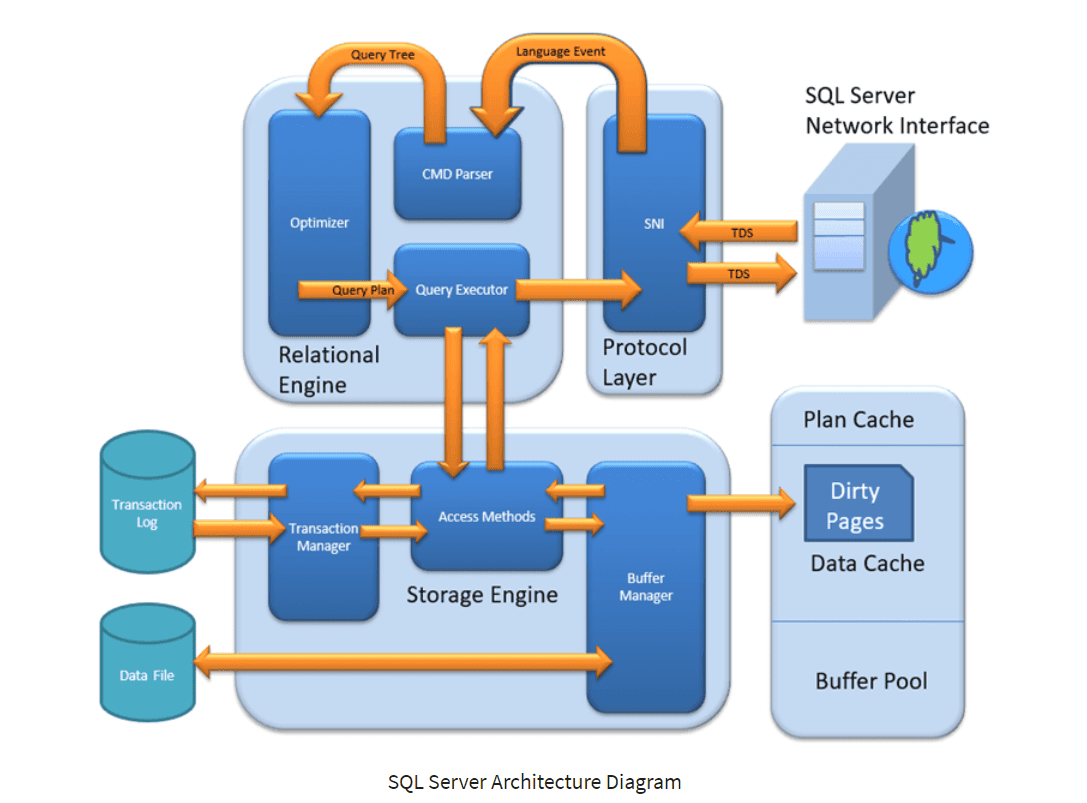
Microsoft SQL Server architecture comprises 3 fundamental layers.
- The first layer is the protocol layer which establishes a connection between the client and the SQL server. This layer further incorporates 4 protocols: Shared Memory, Named Pipes, TCP/IP, and Virtual Adapter Interface.
- Next comes the most critical component of the Microsoft SQL server architecture – the SQL relational engine, also known as the query processor. It is made up of 3 key components: CMD Parser, Optimizer, and Query Executor, which check for errors, optimize the query, and execute it, respectively.
- The last layer in the architecture is the Storage Engine which stores and retrieves data as needed. It has 3 components:
- The first is the Access Method component which interfaces with the Buffer Manager and SQL Server Transaction Log.
- The Buffer Manager component manages the Plan Cache, Data Parsing, and Dirty Pages.
- Finally, the Transaction Manager manages Non-Select Transactions using Log and Lock Managers.
3 Features Of Microsoft SQL Server
If you are wondering why you should choose Microsoft SQL Server, here are the top 3 features that set Microsoft SQL Server apart from other SQL-based database management systems.
A. Big Data Integrations & Virtualization
Microsoft SQL server bags advanced big data integration capabilities. Its support for Apache Spark and Hadoop allows you to easily integrate and analyze data from a collage of sources.
Data virtualization enables you to access and query data from multiple sources as if stored in a single location. It reduces data duplication and sky-rockets data quality and accuracy.
B. Enhanced Security Features
The latest versions of MS SQL Server come with various security enhancements to ensure data protection. Features such as Always Encrypted (to encrypt data during rest and transit) and Secure Enclaves (for securing the computation of sensitive data) make it easier to meet regulatory requirements and safeguard your data against cyber threats.
C. Intelligent Query Processing
SQL Server uses machine learning algorithms to optimize query processing. The Batch Mode on Rowstore feature enables faster query processing on large data sets. Similarly, Scalar UDF Inlining reduces CPU usage while enhancing query performance.
Now let’s take a look at how to enable Change Data Capture in SQL server.
6 Steps To Enable Change Data Capture In The SQL Server
SQL Server change data capture works for newly created and existing databases. Here we will look at both methods.
Step 1: Creating A New Database
To create a new SQL database, power up your Microsoft SQL Server Management Studio and run the following code:
Code Example:
plaintext-- Create a database
CREATE DATABASE New_Source_DB
USE [New_Source_DB];
GO
EXEC sp_changedbowner 'admin'
GO
Let’s dissect this code block.
The CREATE DATABASE command takes the name of the database as an argument. In this example, the name of our new database is New_Source_DB.
Next is the sp_changedbowner command which changes the database owner. As mentioned earlier, you need admin privileges to enable CDC. So, with this command, you get the required access level.
Step 2: Creating Table
The next step is creating the SQL Server database table. You can use the following code to get this step done.
Code Example:
plaintext-- Create a Users table
CREATE TABLE Users
(
   ID int NOT NULL PRIMARY KEY,
   FirstName varchar(30),
   LastName varchar(30),
   Email varchar(50)
)
With the above code block, we have added the required column names and constraints. Of course, you can customize it according to your own needs.
Step 3: Enabling CDC
Now comes the most awaited part – enabling CDC. However, remember that you can enable CDC for the entire database or independent tables. We will discuss both here.
First, let’s see how an entire database can be set up for CDC.
Code example:
plaintext-- Enable Database for Change data capture
USE New_Source_DB
GO
EXEC sys.sp_cdc_enable_db
GO
That was easy but where exactly did we enable the change data capture?
It’s that little thing saying sys.sp_cdc_enable_db.
Next, let’s say you want to enable change data capture for a specific table only. Here is how you can do it.
Code example:
plaintext-- ======================
-- Enable a Table for CDC
-- ======================
USE New_Source_DB
GO

EXEC sys.sp_cdc_enable_table
@source_schema = N'dbo',
@source_name   = N'Users',
@role_name     = N'admin',
@filegroup_name = N'MyDB_CT',
@supports_net_changes = 1
GO
Simply enabling the change data capture will do the job.
You’ll also need to double-check things to ensure everything is in place. Use the following snippet to verify the enabled CDC.
Code Example:
plaintext-- Check that CDC is enabled on the database
SELECT name, is_cdc_enabled
FROM sys.databases WHERE database_id = DB_ID();
Step 4: Insert values Within The Table(s)
Now it is time to put our work to the test.
We’ll update some values in the table and see if the CDC reflects them.
plaintextINSERT INTO Users Values (1, 'Jorge', 'Ramos', 'ramos@yahoo.com')
INSERT INTO Users Values (2, 'Andrew', 'Strudwick', 'andrew@yahoo.com')
INSERT INTO USERS Values (3, 'Thomas', 'Tuchel', 'tuchel@gmail.com')
After inserting the values, run the following command to see the changes in CDC.
plaintext-- Query the results of the changes captured
SELECT * FROM [cdc].[dbo_Users_CT]
GO
Step 5: Verify Whether The CDC Is Functioning Correctly Or Not
Now, we’ll upscale our testing to ensure that our CDC tracks real-time changes.
plaintextDELETE FROM Users WHERE ID = 1
UPDATE Users SET LastName = 'Snow' WHERE ID = 2
DELETE FROM Users WHERE ID = 3
View the CDC table by running the following query:
plaintextSELECT * FROM [cdc].[dbo_Users_CT]
GO
Now that was all about running the SQL server CDC on a newly created database. But how would you make a CDC table for an existing database? We’ll cover that next.
Enabling CDC For Existing Database
Creating a CDC table for an existing database is much easier. We will use the ‘Adventureworks2019’ sample database for this example as it comes with an MS SQL server.
Start by running the following queries for databases or tables.
plaintextUse Adventureworks2019;
EXEC sys.sp_cdc_enable_db;
Instead, if you want to enable CDC for a specific table, you can use this code:
plaintextUSE Adventureworks2019
GO
EXEC sys.sp_cdc_enable_table
@source_schema = 'dbo',
@source_name = 'DimCustomer',
@role_name = null,
@supports_net_changes = 0;
This code enables CDC for the ‘DimCustomer’ table.
Now you can verify if the CDC is working (i.e. it’s enabled). Here is how you do it.
plaintextUSE Adventureworks2019
GO

select name, is_cdc_enabled
from sys.databases where name = 'Adventureworks2019'
GO
If you enabled CDC for a table, use the following snippet to verify CDC. Here, remember that here the SQL server database title is ‘Adventureworks2019’ and the table name is ‘DimCustomer’, so the code looks something like this:
plaintextUSE Adventureworks2019
GO
select name,type,type_desc,is_tracked_by_cdc
from sys.tables
where name = 'DimCustomer'
GO
Enabling SQL Server Agent
If you’re self-hosting SQL Server, For the CDC to work correctly, the SQL Server Agent service must be set up to start and run automatically. (If you use a cloud hosting provider like Azure SQL Database, this is automatically taken care of and you can skip this step).
Here are the steps to do it:
- Start the MS SQL server and run the SQL Server Configuration Manager from the left pane.
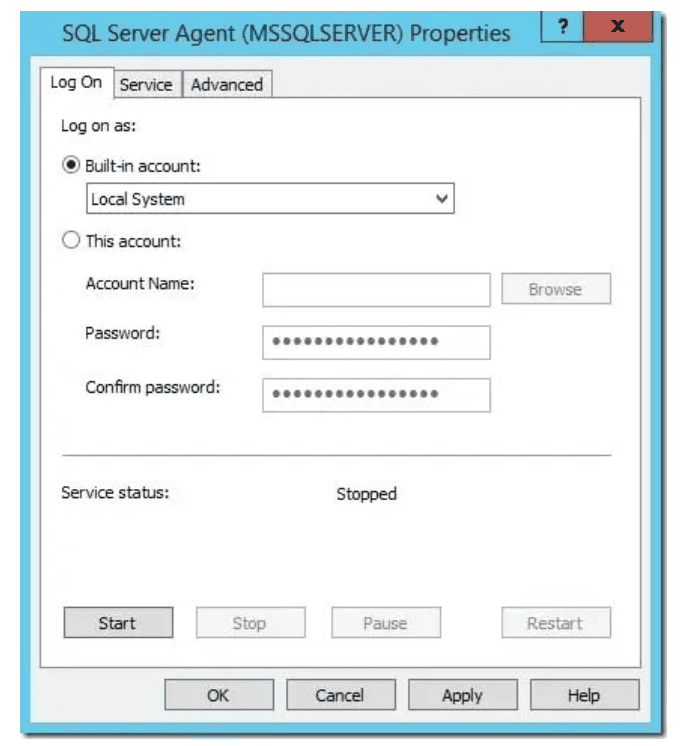
- Open the Properties of SQL Server agent service. In the properties, windows populate the necessary details of the desired account.
- In the Log On tab, enter the account details.
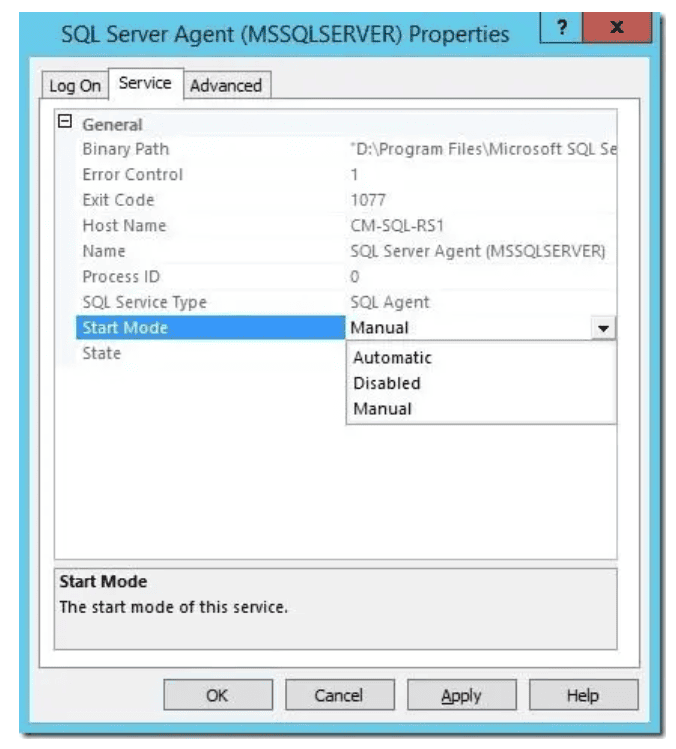
- Move to the Service tab and click Start Mode. From the drop-down menu, select Automatic. Click Apply and then the OK button to save the changes.
- Finally, start the SQL Server agent service.
SQL Server CDC: Pros & Cons
Microsoft SQL Server provides a whole lot of functionalities for CDC, but nothing is perfect.
Below, we discuss a few important advantages of using SQL Server for CDC along with some of its disadvantages.
Pros Of SQL Server CDC
- CDC has a minimal overhead on the system which means it does not impact the performance of the database.
- The significant advantage of Microsoft SQL server CDC is that the tables replicated to the target instance don’t require a primary key.
- SQL Server CDC is a good option for Always On Availability Groups as the changes captured in CDC transfer to all replicas in real time.
- It allows granular control over the data that is captured which means you can choose to capture only the data that is relevant to your application.
- CDC can be integrated with other SQL Server tools such as data replication and data warehouses, making it a valuable tool for data analysis and reporting.
Cons Of SQL Server CDC
- You must take effective maintenance measures over time to ensure database integrity.
- Although MS SQL Server offers native integration for CDC, there is a significant amount of coding needed to complete the data pipeline.
- For on-prem databases, the entire CDC process depends on the SQL Server Agent service running. If it stops, the process fails.
Before we conclude, let's introduce an exciting integration: Cloud SQL to BigQuery. This integration allows you to seamlessly transfer and analyze your data between Google Cloud SQL and BigQuery. Now, let's explore how you can use Estuary Flow for change data capture from SQL Server. Now that we know how to enable Change Data Capture in the SQL server, let’s explore how you use Estuary Flow for this purpose.
Using Estuary Flow For Change Data Capture From SQL Server
Estuary is an open-source data integration platform that helps organizations set up scalable real-time data pipelines without writing any code. We offer a simple GUI-based interface to quickly design, configure and execute data pipelines across various instances.
However, the biggest takeaway is the seamless support for CDC which allows modification replication from source to target systems in moments.
Estuary supports CDC for the Microsoft SQL server as well. However, it is only compatible with SQL Server 2017 and higher versions. The SQL Server database types Estuary supports include:
- Azure SQL Database
- Self-hosted SQL Server
- Amazon RDS for SQL Server
- Google Cloud SQL for SQL Server
However, we will focus on creating a CDC with a self-hosted SQL Server. Let’s take a look at the steps:
- First, make sure that the SQL Server has been set up for CDC. If not, you can use the steps discussed above to enable CDC for your database.
- Next, create a username and a password for the Estuary Flow connector.
Now it is time to grant user permissions to the schemas containing tables you want to capture. We’ll assume the tables are all in the schema ‘dbo’ for the snippet below.
- Follow your permission-granting tradition for watermark tables as well.
- Now we will add some data in the watermark table to ensure our connection is running well.
- Next, it is time to enable CDC on the tables. Note that the below example is not an all-rounder. It only allows CDC for the watermarks table.
And that’s it. Estuary Flow can now connect with your SQL Server.
If you want to enable CDC for your cloud-hosted SQL Database, continue reading here.
Conclusion
CDC or change data capture is a powerful technique that replicates changes from data sources to target systems, resulting in efficient data analysis and accurate time-sensitive business decisions.
However, managing all that data can be next to impossible without good resources. That is where GUI tools and database engines come into the scene. Microsoft SQL server is a terrific database engine and it supports CDC alongside other performance-intensive operations.
In this article, we looked at how to set up SQL Server change data capture. We also discussed how to set up Microsoft SQL Server CDC for use with Estuary Flow, the perfect option for setting real-time change data capture pipelines.
With Estuary Flow, capturing real-time change data has never been simpler. So sign up for a free account and get started with your real-time data processing journey today.
For more on this subject, check out our Complete Guide to Change Data Capture in SQL Server!
plaintextEXEC sys.sp_cdc_enable_table
@source_schema = 'dbo',
@source_name = 'flow_watermarks',
@role_name = 'flow_capture',
@capture_instance = 'dbo_flow_watermarks';plaintextINSERT INTO dbo.flow_watermarks VALUES (0, 'dummy-value');plaintextCREATE TABLE dbo.flow_watermarks(slot INTEGER PRIMARY KEY, watermark TEXT);
GRANT SELECT, UPDATE ON dbo.flow_watermarks TO flow_capture;plaintextGRANT SELECT ON SCHEMA :: dbo TO flow_capture;
GRANT SELECT ON SCHEMA :: CDC TO flow_capture;plaintext--Create user and password for use with the connector.
CREATE LOGIN flow_capture WITH PASSWORD = 'secret';
CREATE USER flow_capture FOR LOGIN flow_capture;Explore these related blogs to deepen your understanding of change data capture and real-time data integration.

About the author
With over 15 years in data engineering, a seasoned expert in driving growth for early-stage data companies, focusing on strategies that attract customers and users. Extensive writing provides insights to help companies scale efficiently and effectively in an evolving data landscape.


