A shift from a DynamoDB to Postgres is a transformative step in enhancing data management and analytics strategies. As both databases can handle structured and semi-structured data for analysis, this migration is a common approach for many businesses. Whether for autonomy or disaster recovery, DynamoDB Postgres migration will help you perform complex queries, advanced analytics, ACID transactions, and more.
This post explores two methods to connect DynamoDB and PostgreSQL, but before that, let's take a moment to get a better understanding of each of these platforms.
DynamoDB Overview
DynamoDB is a NoSQL database that provides a dynamic and scalable solution for managing massive amounts of data with low-latency performance.
As a NoSQL database, it eliminates the need for complex schema management and accommodates flexible data structures. Its key-value document-based model allows you to store and retrieve data without predefined structures. The flexibility of Amazon DynamoDB further extends due to its serverless architecture. This allows you to seamlessly handle growing workloads without manual interventions, making it a versatile choice for various applications, from mobile apps to gaming and IoT platforms.
PostgreSQL Overview
PostgreSQL, often known as Postgres, has a rich history dating back to 1986, when it originated as the POSTGRES project at the University of California, Berkeley. Over the years, it has become one of the most advanced open-source Object-Relational Database Management Systems (ORDBMS). Today, Postgres is a popular database globally used by businesses and developers to efficiently manage both structured and semi-structured data.
With features like support for advanced data types, powerful indexing capabilities, and a large set of extensions, Postgres is a reliable choice for handling a wide range of data needs. Its versatility extends to various use cases, including web applications, analytics, and geospatial applications, making it a suitable database solution in today’s data-driven world.
How to Achieve DynamoDB Postgres Integration
- Method 1: Create a DynamoDB to Postgres Data Pipeline Using SaaS Tools
- Method 2: Manually move Data from DynamoDB to PostgreSQL
Method 1: Create a DynamoDB to Postgres Data Pipeline Using SaaS Tools
While the above method does provide customization and control at various levels, its limitations can hinder real-time insights. To address these challenges, a data integration tool like Estuary Flow is an effective solution that streamlines the data transfer process. Its automated, no-code approach helps to reduce the time and resources needed during the overall replication journey.
Estuary’s DynamoDB connector provides change data capture (CDC) capabilities, which lets you track changes in your database and capture them into Flow collections that can be migrated to Postgres (and other supported destinations!).
Let’s look at the detailed steps and prerequisites to connect DynamoDB to PostgreSQL using Estuary Flow.
Prerequisites:
- DynamoDB table with Streams enabled.
- An IAM user with the necessary table permissions.
- The AWS access key and secret access key.
- A Postgres database with necessary database credentials.
Step 1: Connect to DynamoDB Source
- Log in to your Estuary Flow account or register for a new account if you don’t already have one.
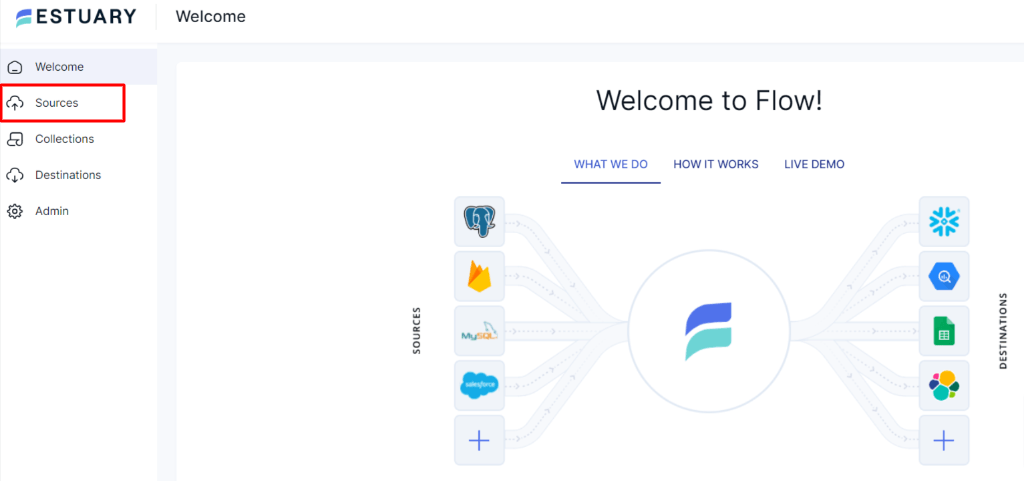
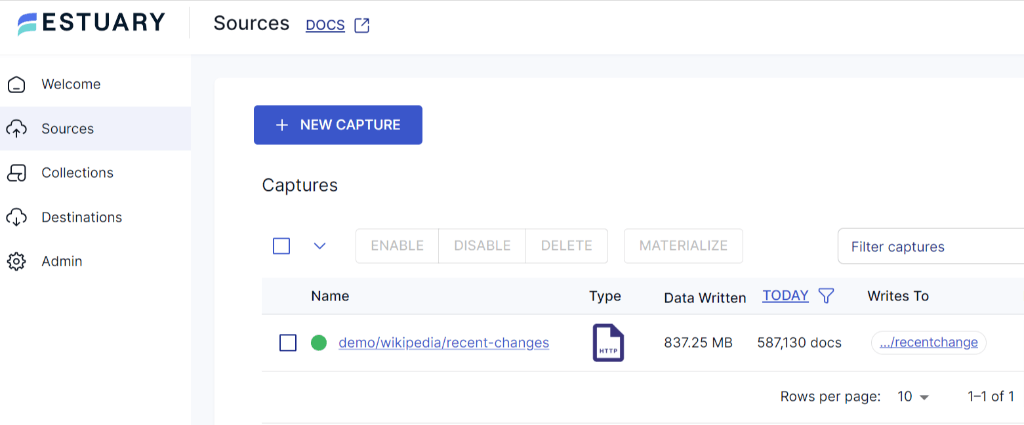
- On the Estuary dashboard, click on the Sources present on the left side of the page.
- Within the Sources page, locate and click on the + NEW CAPTURE button.
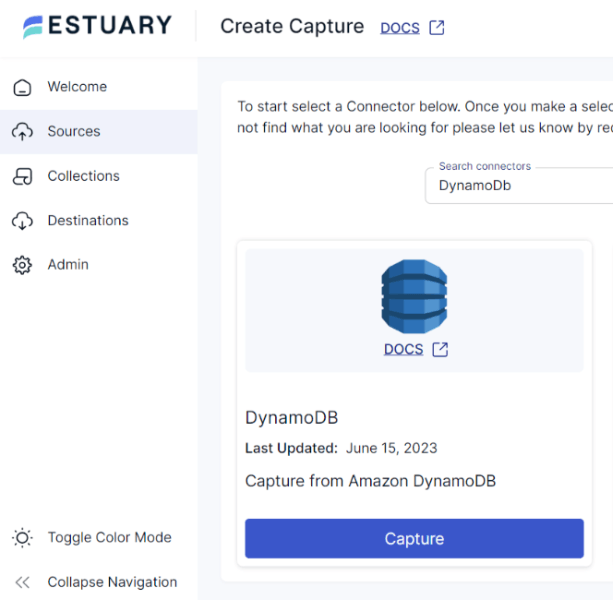
- On the Create Capture page, use the Search connectors box to find the DynamoDB connector. When you see the connector in the search results, click on the Capture button.
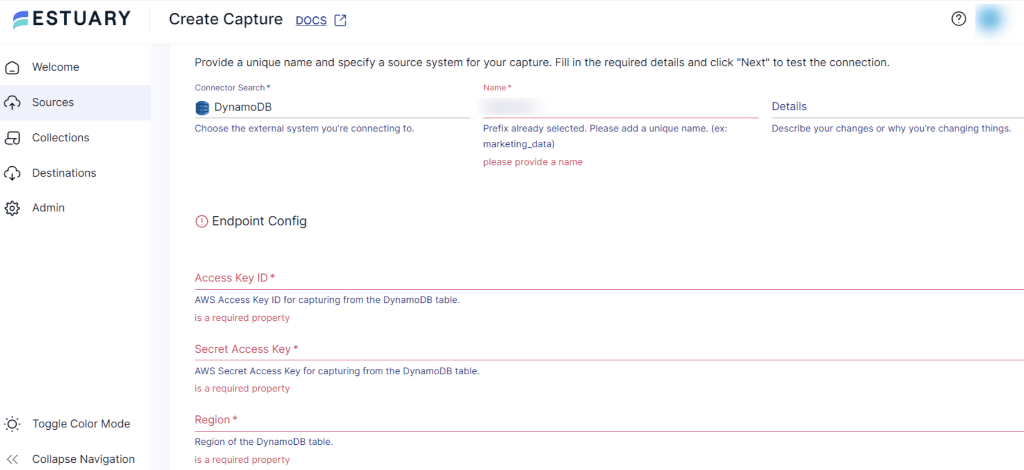
- On the DynamoDB Create Capture page, provide a unique Name for your connector. Specify the mandatory Endpoint Config details, including Access Key ID, Secret Access Key, and Region.
- Once you fill in all the required fields, click on Next > Save and Publish.
Step 2: Connect to PostgreSQL Destination
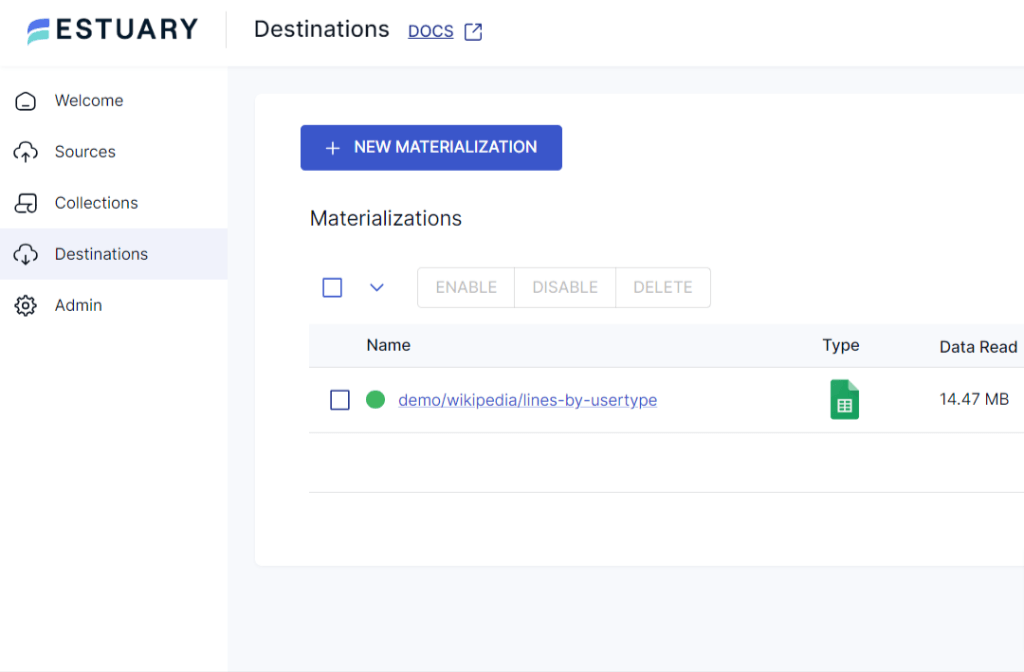
- Navigate back to the Estuary dashboard and click on Destinations to configure PostgreSQL.
- Within the Destinations page, click on the + NEW MATERIALIZATION button.
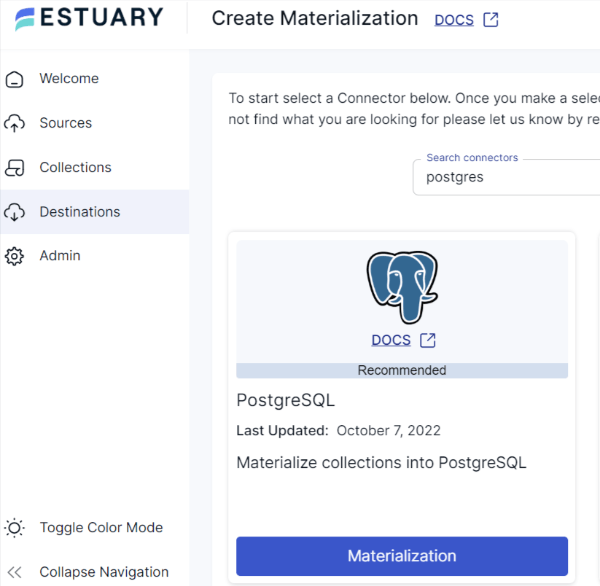
- On the Create Materialization page, use the Search connectors box to locate the PostgreSQL connector. Once you locate it, click on the Materialization button within the same tile.
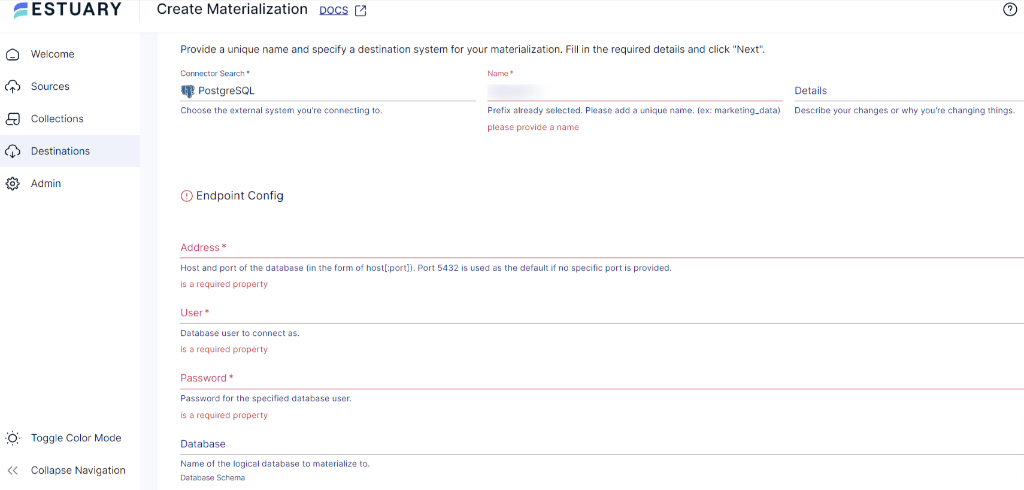
- On the PostgreSQL Create Materialization page, provide a distinct Name for the connector. Provide all the necessary information, including Database Username, Password, and Address.
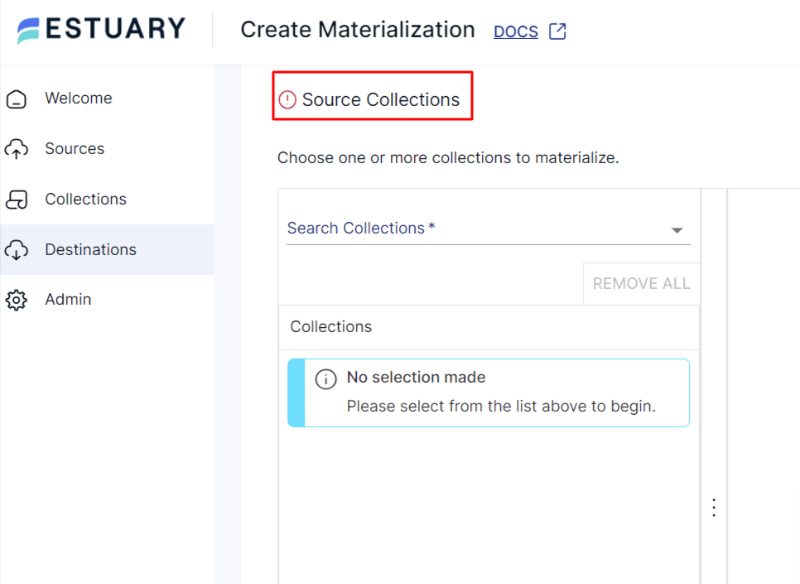
- In case the data from DynamoDB hasn’t been filled in automatically, you can manually add it from the Source Collections section.
- After filling in all the details, click on the NEXT button. Then click on SAVE AND PUBLISH.
After completing these two simple steps, Estuary Flow will continuously migrate your DynamoDB data to Postgres in real-time, ensuring that your database is always up-to-date.
Get a complete understanding of the above flow from Estaury’s documentation:
Benefits of Using Estuary Flow
No-Code: Estuary Flow eliminates the need for coding during extraction and loading, allowing you to perform data transfers without requiring advanced programming skills. This enables technical as well as non-technical users to effectively manage the migration process.
Pre-built Connectors: With a wide range of 100+ inbuilt connectors, Flow facilitates effortless integration between multiple sources and destinations. This reduces the overall time and complexity required to set up the migration process.
Change Data Capture: Flow leverages change data capture technology to detect and replicate only the modified data. This minimizes the data transfer volume and ensures the target database always remains up-to-date.
Method 2: Manually Move Data from DynamoDB to PostgreSQL
There are two main steps to manually load data from DynamoDB into PostgreSQL:
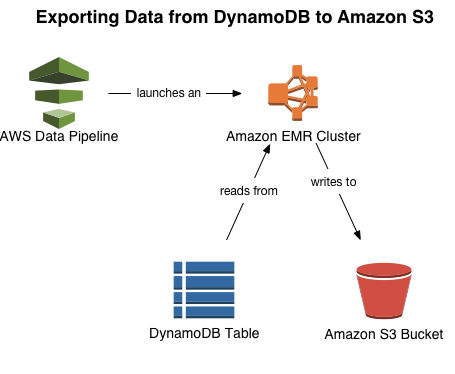
- Exporting data from DynamoDB to Amazon S3 using the Data Pipeline service provided by Amazon Web Services (AWS).
- Importing data from S3 to PostgreSQL using a tool like AWS Database Migration Service (DMS) or custom Python scripts.
Prerequisites:
- AWS account
- Amazon DynamoDB table
- S3 bucket
- IAM roles with appropriate permissions for Data Pipeline, S3, and DynamoDB
Here’s a detailed breakdown of these two steps:
Step 1: Export DynamoDB Data to Amazon S3 Using Data Pipeline
You can use Data Pipeline service to create workflows for migrating data between different AWS services. Here’s how to create it:
- Create a Pipeline
- Sign in to the AWS Management console.
- Go to the AWS Data Pipeline service to create a pipeline.
- You’ll be redirected to the Create Pipeline Page. Provide a unique name for your pipeline.
- To configure the source, select Build using a template option.
- A drop-down menu of available templates will appear. From the menu, choose Export Dynamodb table to S3.
- In the Source DynamoDB Table, select the DynamoDB table you want to export.
- In the S3 Output, specify the Amazon S3 bucket and directory path where the exported data should be stored. The format of the URI must be S3://bucket_name/folder_name
- Configure the other settings, such as data format, schedules, or required transformations.
- After configuring the data pipeline setting, Activate the data pipeline. By following these steps, AWS Data Pipeline will create a workflow that automatically exports data from DynamoDB to a given S3 location at the specified time.
The image below illustrates how the entire process takes place.
Step 2: Replicate Data From S3 to PostgreSQL
You can replicate data stored in S3 to PostgreSQL either by writing custom Python scripts or using DMS.
- Custom Python Scripts
For increased customization and control over data, you can opt to write custom scripts using Python. Utilize AWS SDK for Python, also known as Boto3, a library that allows you to interact with various AWS services using Python. Boto3 enables you to programmatically access AWS services, such as S3, DynamoDB, Lambda, and more, directly from your Python script.
Next, use the s3.download_file() function to download the data file from S3 and save it on your local machine. Specify the S3 bucket name and destination path where you want to save the files in this function.
Once the files are downloaded, apply the necessary transformations to match with the PostgreSQL schema. You might have to reformat dates, handle data types, or perform necessary adjustments depending on PostgreSQL data types.
To upload data into PostgreSQL, install the Psycopg library. It provides an efficient way to interact with the PostgreSQL database using Python scripts. You can perform various database operations like connecting to a database, executing SQL queries, etc. After installing this library, specify your PostgreSQL database details, such as username, password, and host address. Then write a code to insert data into the PostgreSQL database using SQL INSERT statements. Finally, execute your code.
- AWS DMS
AWS Database Migration Service is a fully-managed service provided by Amazon to facilitate database migration tasks. It allows you to migrate data from one database to another, whether it is on-premise or cloud database.
You can use the AWS DMS console or AWS CLI to migrate the data. If you’re using a DMS console, you need to set up an instance that will act as a replication server. Create source and destination endpoints, with the source pointing to the S3 bucket containing the exported data and the destination pointing to the PostgreSQL database. Now, define table mappings to determine how data from S3 will be mapped to Postgres tables. Once you’ve configured the migration settings, run the migration task from the DMS console. DMS will start loading data from S3 into PostgreSQL according to your configured settings.
Start the DMS replication task to begin loading data from the S3 bucket to the PostgreSQL database.
Refer to the article linked here for a comprehensive guide to replicate data from S3 to PostgreSQL.
Limitations of the Manual Method
Human Error: The manual method includes human intervention at several stages of the data transfer process. This introduces a range of risks, including inaccuracies in data mapping, syntax errors in SQL scripts, and data inconsistencies. These errors can result in inaccurate data in the target database leading to improper analytical decisions.
Data Delays: Due to the involvement of several steps, this process delays the loading of the data to the target database. This hinders real-time data synchronization and accessibility.
Resource Intensive: Manual data transfers require dedicated resources for each step, including extraction, transformation, and loading. This allocation of resources can burden both human efforts and infrastructure capabilities.
Conclusion
To sum up, we’ve explored the process of integrating DynamoDB and Postgres seamlessly. To migrate data from DynamoDB into Postgres, you can either manually move the data or use SaaS tools like Estuary Flow. The manual method involves using an S3 bucket and custom scripts or AWS tool to set up the DynamoDB to Postgres data pipeline. However, this method is prone to human errors and data delays.
Estuary Flow provides a user-friendly interface and streamlines the data integration process. By using Flow, you can automate the integration tasks without writing extensive code in just two simple steps. This allows you to quickly perform real-time analysis and reporting tasks on up-to-date data.
Experience seamless data replication between DynamoDB and Postgres with Estuary Flow and unlock the power of effortless automation. Sign up to build your first pipeline for free.

About the author
With over 15 years in data engineering, a seasoned expert in driving growth for early-stage data companies, focusing on strategies that attract customers and users. Extensive writing provides insights to help companies scale efficiently and effectively in an evolving data landscape.


