Many people and organizations prefer storing data in CSV because of its simplicity, compatibility, and database import/export support. While CSV files have their advantages, they also come with some drawbacks. For instance, CSV may not be suitable for complex data structures or scenarios where data relationships need to be preserved.
Importing a CSV file into a robust database like PostgreSQL allows for reliable and persistent data storage. By moving data from CSV to PostgreSQL, organizations can leverage powerful SQL queries to organize and analyze data, helping to extract insights and make data-driven decisions.
In this comprehensive guide, we’ll cover three methods to import CSV data into PostgreSQL: using no-code tools, the COPY command, and pgAdmin. It explains step-by-step processes, highlights challenges of manual methods, and emphasizes automation for seamless, real-time data integration.
⚡ Tired of re-uploading CSVs or writing scripts every time data updates?
Estuary Flow turns CSV files (hosted or in Sheets) into real-time PostgreSQL pipelines — with zero code.
👉 Start Free | Skip to Setup ↓
What is CSV?
A Comma Separated Value (CSV) file is a lightweight text file used to store data separated by commas with a .csv extension. As data in a CSV file is stored using a comma-delimited format, it’s easier to convert your data into rows and columns. This enables you to easily read, edit, and transfer your data to various systems. As a result, CSV files are a popular choice for data professionals when importing and exporting data between databases.
What is PostgreSQL?
PostgreSQL, also commonly known as Postgres, is an open-source object-relational database management system (ORDBMS). It is a highly scalable database that can be used for both relational (SQL) as well as non-relational (JSON) querying. To help you perform complex operations on tables, PostgreSQL supports different SQL functions, such as user-defined functions, subqueries, and triggers. Because of such flexibility, it is used as a primary database for many web, mobile, and IoT applications.
Key features of PostgreSQL include:
- PostgreSQL offers true ACID semantics for transactions.
- It is highly secure and reliable.
- PostgreSQL is free to download and use.
- PostgreSQL supports various operating systems, including Linux, Windows, Solaris, OS X, and FreeBSD.
3 Methods to Move CSV File Data to PostgreSQL
Let's dive into the three methods for importing your CSV data into PostgreSQL:
- Method 1: Import CSV to PostgreSQL using no-code data integration tools
- Method 2: Import CSV to PostgreSQL using the Copy command
- Method 3: Import CSV to PostgreSQL using pgAdmin
Method 1: Import CSV to PostgreSQL Using No-Code Data Integration Tools
No-code Cloud ETL tools offer a range of pre-built connectors to facilitate data movement between platforms. Among top data integration tools for building pipelines, Estuary Flow stands out as a reliable, cost-effective choice.
Flow is a powerful cloud-based data integration platform that can help you move data between different sources and destinations in real time. It allows you to capture data from a CSV hosted at any HTTP endpoint or from Google Sheets. What’s more, you can also use Flow to export data from PostgreSQL to CSV file if needed.
Here’s how you can go about loading data from CSV to PostgreSQL using Estuary Flow:
Step 1: Sign Up or Sign In
Sign in to your Estuary account or register for free.
Step 2: Create a New Capture
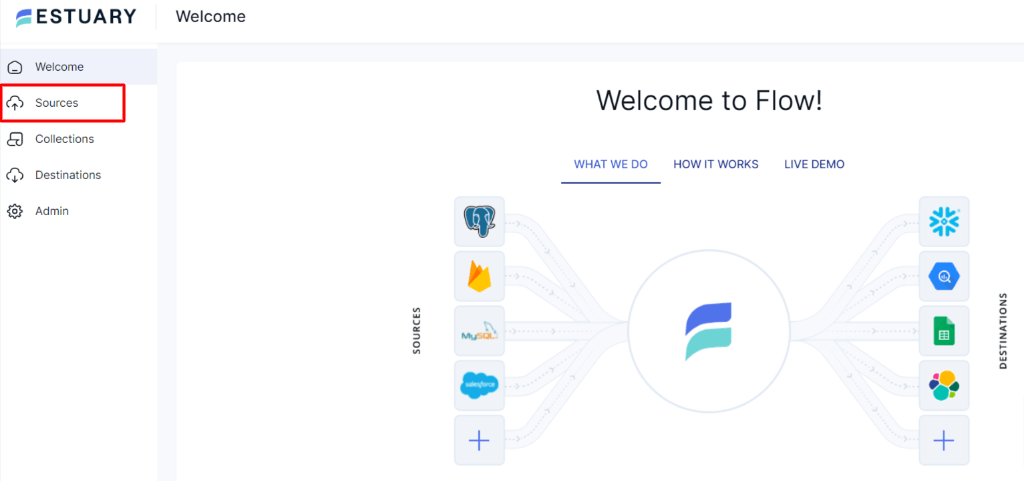
From your Estuary dashboard, navigate to "Sources" and click "+ New Capture."
Step 3: Choose Your CSV Source
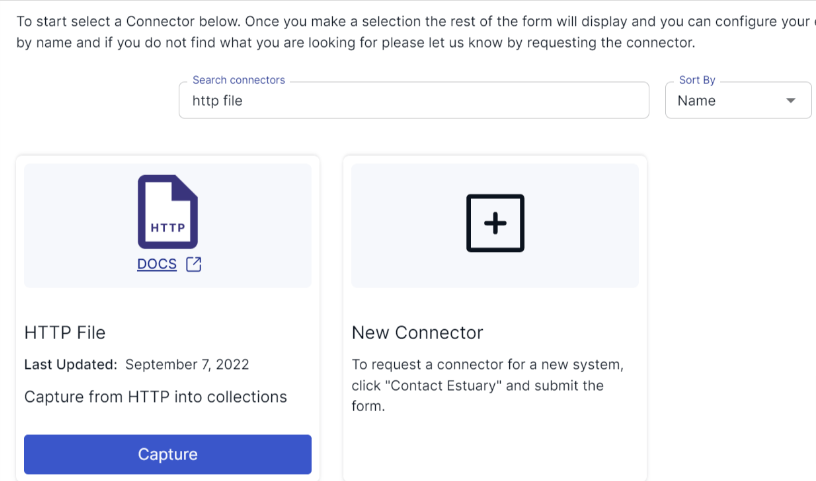
If your CSV is hosted online (e.g., on a website), select the "HTTP File" connector. If it's in Google Sheets, choose the "Google Sheets" connector.
Step 4: Configure the Capture
Provide the necessary details like the CSV file URL or Google Sheets link.
Step 5: Save and Publish
Click "Next," then "Save and Publish" to complete the capture setup.
Step 6: Create a New Materialization
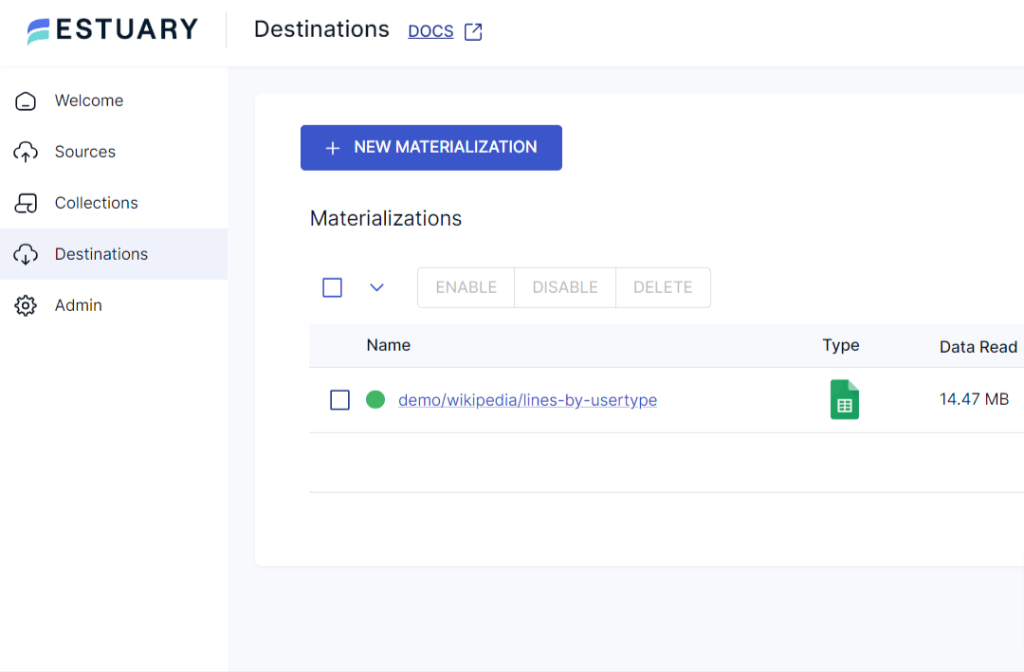
Switch to the "Destinations" tab and click "+ New Materialization."
Step 7: Select PostgreSQL
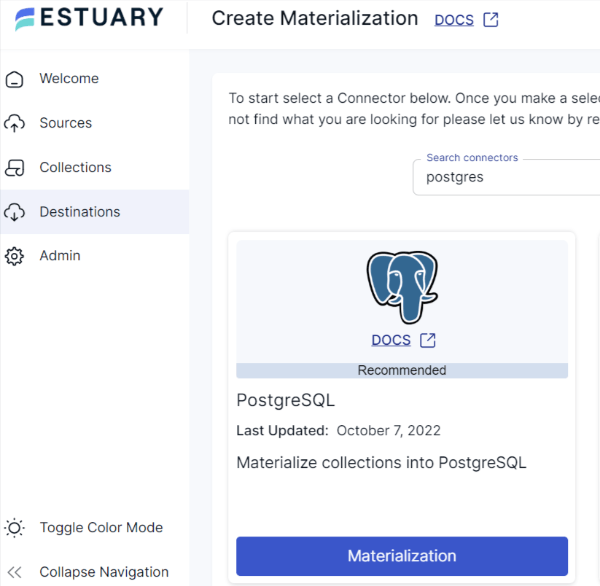
Since you're copying your data from CSV to PostgreSQL, search for PostgreSQL in the Search Connectors box. Click on the Materialization button of the PostgreSQL connector. You will be redirected to the PostgreSQL materialization connector page.
Step 8: Complete Prerequisites
Before you proceed to connect PostgreSQL, make sure you have completed the prerequisites steps. Once you are done with the necessary steps, you can proceed to set up your destination.
Step 9: Configure PostgreSQL Connection
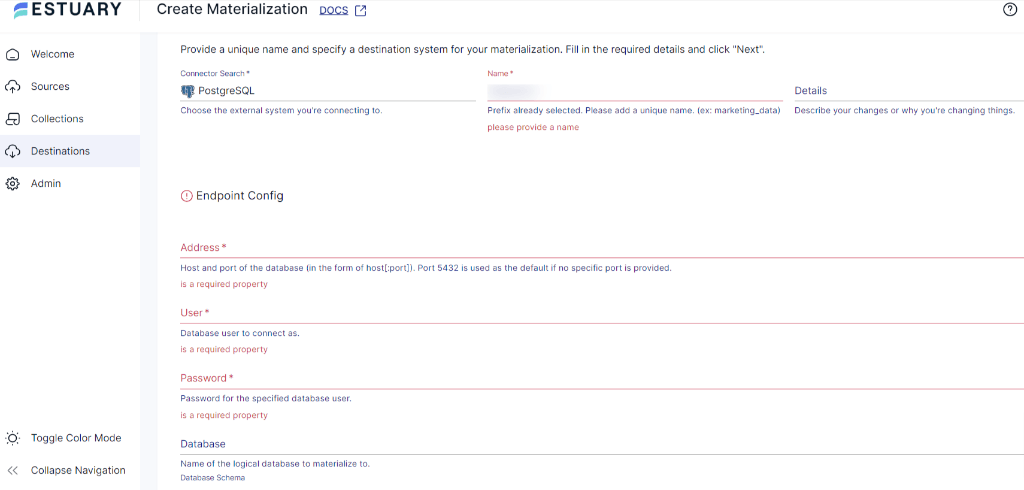
On the Create Materialization page, fill in the details such as the Name of the connector, Address, Username, and Password of the database. If your Flow collections aren’t automatically selected for materialization, you can use the Source Collections option to select your collections.
Step 10: Save and Publish
Click on the Next button. Then, click on Save and Publish. After completing these steps, Estuary Flow will continuously replicate your CSV data to PostgreSQL in real time.
Ready to simplify your data integration? Try Estuary Flow for free today and start importing your CSV data into PostgreSQL with ease! Sign Up for Free. Need assistance? Our team is here to help—Contact Us
Benefits of Moving Data With Estuary Flow
- Real-Time Data Transfer: Estuary Flow uses open-source data connectors that are compatible across platforms and work in real-time. This reduces the repetitive manual efforts to reliably transfer data.
- Scalability and Performance: Flow offers high scalability with performance and ensures you can handle large volumes of data in milliseconds.
BONUS: If you need to load data from Google Sheets to PostgreSQL, check out this handy guide.
Method 2: Import CSV to PostgreSQL Using the Copy Command
Using the COPY command to replicate data from CSV to Postgres is one of the simplest manual methods available. To copy the data, all you need is PostgreSQL superuser access.
The COPY command in PostgreSQL is used to copy data between a PostgreSQL table/database and any source/destination file. Based on your requirement, the COPY command can be used as COPY-TO or COPY-FROM. While COPY-TO copies the data from the table to a specified file, COPY-FROM copies the data from a file to the table.
For a better understanding, let’s consider the following CSV file data and PostgreSQL table.
Step 1: Assume your CSV file data is structured as follows:
plaintextStudent ID, First_Name, Last_Name, DOB, City
1,Ben,Stone,2000-02-10,Brisbane
2,Grace,Landon,1994-12-04,Melbourne
3,Jack,Meyer,1996-05-07,Sydney
4,John,Alves,1991-05-09,Sydney
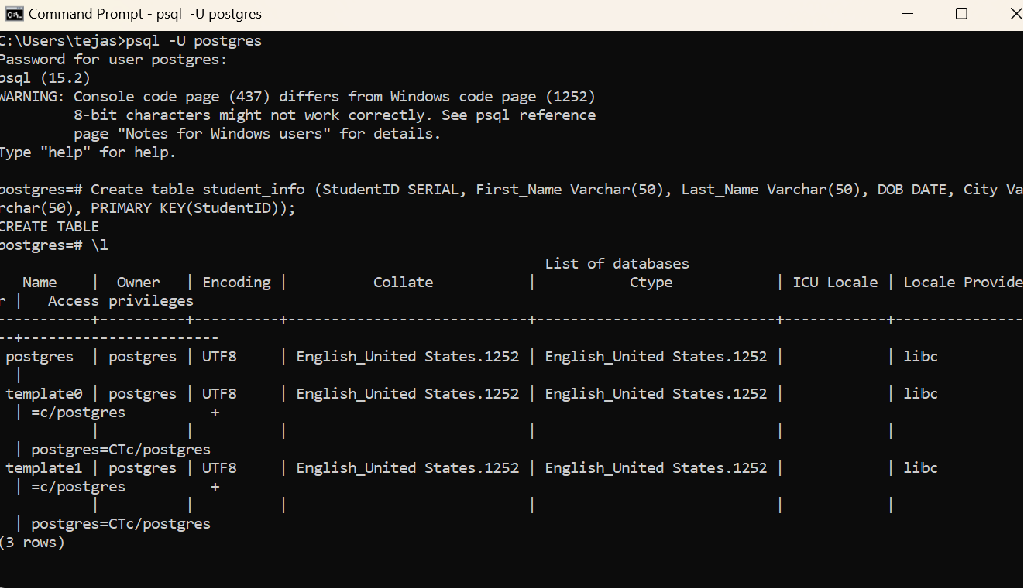
Step 2: Open the command-line tool in your machine and connect it with your local PostgreSQL server using the following command:
plaintextpsql -U postgresStep 3: On execution of the above command, you will be prompted to enter the password.
plaintextEnter password: ******Step 4: Now, you’re connected to the PostgreSQL server. The command prompt should now appear as follows:
plaintextpostgres=#Step 5: Create a table in PostgreSQL using the following command:
plaintextcreate table student_info (StudentID SERIAL, First_Name Varchar(50), Last_Name Varchar(50), DOB DATE, City Varchar(50), PRIMARY KEY(StudentID));Upon successful execution, a table named student_info will be created, with StudentID as the primary key.
Step 6: To check the list of databases, enter the below command:
plaintext\lAfter executing the above command, you can see a list of databases. To check if the table is successfully created in the database, run the \dt command.
Once the PostgreSQL table is ready, you can use the COPY command to move data from CSV to PostgreSQL.
Step 7: To import the CSV file into the PostgreSQL student_info table, use the below COPY command in your command prompt:
plaintextCOPY student_info (StudentID, First_Name, Last_Name, DOB, City) From ‘C:\Program Files\PostgreSQL\Sample1.csv’ DELIMITER ‘,’ CSV HEADER;Output:
plaintextCOPY 4The output COPY 4 indicates that all four rows from the CSV file have been copied to your PostgreSQL table.
Let’s understand the above query in more detail:
- COPY-FROM: Used to copy data from a file to the PostgreSQL table.
- student_info: This is the table name where you want to move CSV data. Mentioning column names will copy data from the CSV file to the PostgreSQL table in the given sequence.
- C:\Program Files\PostgreSQL\Sample1.csv: The path and name of the CSV file from where data is to be imported into the PostgreSQL table.
- DELIMITER ‘,’: It defines how the values in the CSV file are separated.
- CSV: Used to specify that data is imported from a CSV file.
- HEADER: Specifies that the CSV file contains a header line with the names of each column. So, the PostgreSQL table will import CSV data from the second row.
Step 8: To check if the tables are imported successfully, run the following command.
plaintextselect * from student_info;That’s it! You’ve successfully moved CSV file data to the PostgreSQL table. Similarly, you can also use the COPY command to copy PostgreSQL output to CSV.
Method 3: Import CSV to PostgreSQL Using pgAdmin
pgAdmin is an open-source tool for administrating and managing your PostgreSQL databases. You can easily download it from their official website.
Follow the steps below to copy data from CSV to the PostgreSQL table using pgAdmin.
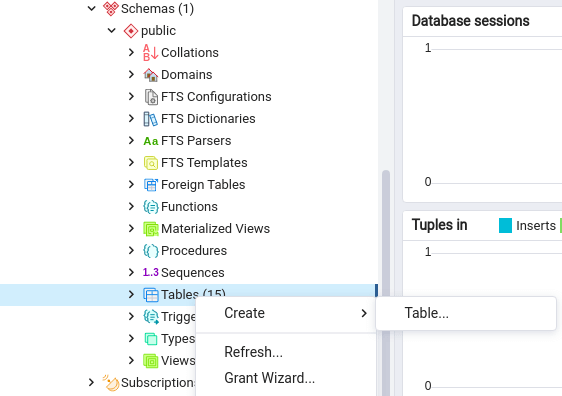
Step 1: With pgAdmin, you can directly create a table using its GUI. In the schema section, navigate to Tables > Create > Table.
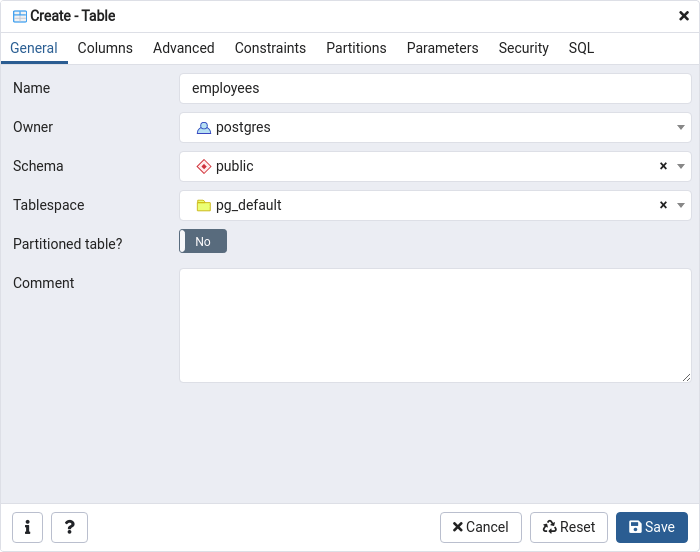
Step 2: You will be redirected to the Create-Table window. Enter the Name and Schema of the table.
Step 3: Now, click on the Save button to create a table.
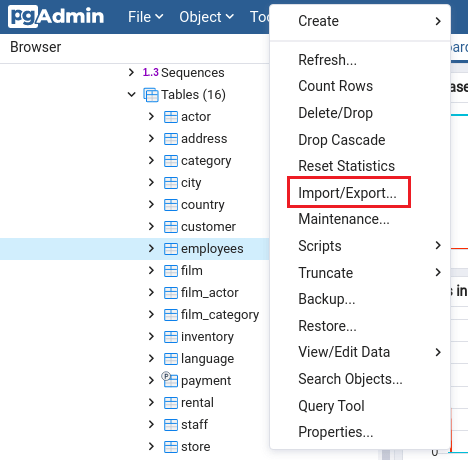
Step 4: After creating the table, right-click on the table name and select the Import/Export option.
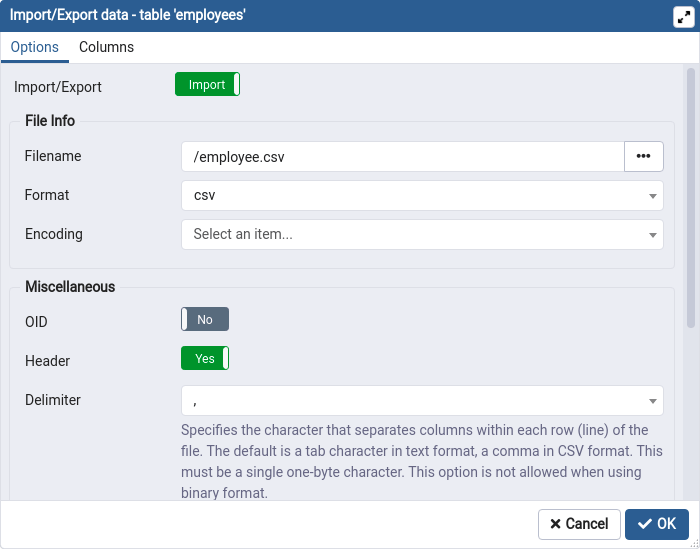
Step 5: An Import/Export Data window with two tabs—Options and Columns—will be opened for that specific table. Select the Options window and enable the Import option from the Import/Export toggle button. Now, mention the path of the file that needs to be imported. Select the format of the file as CSV and specify the delimiter of the file. If your file consists of the headers, enable the header option.
Step 6: Click on the OK button to start the importing process.
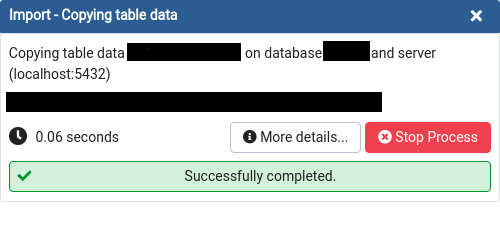
A popup window will appear once the data from the CSV file has been successfully copied to PostgreSQL.
pgAdmin not only allows you to copy data from CSV to PostgreSQL but also lets you make PostgreSQL copy to CSV.
Limitations in Manually Copying CSV to PostgreSQL
While the two manual methods to copy CSV to PostgreSQL are quite simple, there are a few challenges involved.
- Manual methods typically limit the ability to clean and transform data during the import process.
- To achieve no loss data transfer, you would need to continuously review and manage the end-to-end data flow. This requires significant effort, which can be time-consuming.
- For real-time use cases, it would require you to import data manually as soon as the CSV source file data is updated. This necessitates repeating the entire migration process, which can be tedious.
Conclusion
Copying CSV to PostgreSQL shouldn’t be a challenging task, especially if you use the right approach. This guide covered multiple methods for PostgreSQL import CSV to table, including the COPY command, pgAdmin, and no-code tools.
If you’re considering a less manual approach, no-code platforms like Estuary ensure data consistency and real-time updates, allowing you to automate your data pipeline and focus on core business objectives.
Estuary Flow allows you to connect data from various sources to PostgreSQL seamlessly. It offers an automated, streamlined solution that helps save both time and hassle. Get integrated, try Flow for free!

About the author
With over 15 years in data engineering, a seasoned expert in driving growth for early-stage data companies, focusing on strategies that attract customers and users. Extensive writing provides insights to help companies scale efficiently and effectively in an evolving data landscape.


