Efficiently migrating and synchronizing data between different database systems is critical for modern data-driven applications. Enterprises adopting cloud-native architectures often need to migrate data stored in NoSQL databases such as Azure CosmosDB with traditional SQL databases like Microsoft SQL Server. This is done to take advantage of RDBMS solutions' advanced analytics and reporting capabilities.
However, migrating data from NoSQL to an SQL database can be complex. This is due to intrinsic differences in the data models and performance considerations, especially when dealing with large datasets. Apart from requiring extensive knowledge of the two database systems, you’ll also require technical expertise, careful planning, and execution.
In this step-by-step tutorial, we will cover the no-code and manual methods to migrate data from CosmosDB to SQL Server. But first, let’s start with a quick overview of each platform.
What is CosmosDB?
Azure CosmosDB is Microsoft’s globally distributed, multi-modal database service. It offers high availability, scalability, and low-latency access to data for modern applications. A key feature of CosmosDB is its ability to offer multiple data models, including SQL, MongoDB, Cassandra, Gremlin, and Table API. This flexibility lets you choose the most suitable data model for your application, enabling seamless integration with existing data systems.
Another key feature is its global distribution capabilities. With the click of a button, you can replicate data across multiple regions worldwide, ensuring high availability and low-latency access for users worldwide. This feature also enables compliance with data residency requirements and disaster recovery options.
Here are some key features of CosmosDB:
- Partial Document Update: CosmosDB supports partial document updates, allowing you to update only the changed data in the document. This reduces network payload and unnecessary read responses. It’s particularly useful for managing large documents where only a small portion needs modification.
- Linear Scalability: CosmosDB offers seamless horizontal scaling of throughput and storage to support hundreds of millions of transactions per second. This linear scalability helps handle increased data load by adding more servers to the cluster as required.
- Schema Agnostic: CosmosDB’s database model is schema-agnostic, enabling automatic indexing of data without requiring schema and index management.
- Multi-Consistency Support: The service supports five consistency levels: Eventual, Prefix, Session, Bounded, and Strong. This enables you to choose the correct consistency model for your application.
What is SQL Server?
SQL Server is Microsoft’s enterprise-grade relational database management system (RDMS) designed to efficiently manage, store, and retrieve data. One of the key features of SQL Server is its Online Transactional Processing (OLTP) capabilities. OLTP is a type of data processing that emphasizes quick, reliable, and transactional performance, making it ideal for applications that require rapid data updates and real-time analysis.
In terms of security, SQL Server offers a comprehensive security model. It provides granular control over user permissions and data access, allowing you to safeguard sensitive information. The platform’s built-in encryption capabilities protect data both at rest and in transit, minimizing the risk of breaches. Additionally, SQL Server's Always-On high availability feature ensures minimal downtime. The automatic failover mechanisms keep critical systems operational even during hardware or software failures. This makes it a reliable and robust choice for business applications.
Here are some of the top features of SQL Server:
- Performance: SQL Server provides industry-leading performance with in-memory technology and intelligent query processing, ensuring fast transaction processing and analytics.
- Vendor Independence: SQL Server supports Structured Query language, making it vendor-independent. It makes migrating databases and programs from one database management system to another easier.
- Integration: SQL Server integrates well with other technologies, such as Java, through Java Database Connectivity (JDBC), allowing SQL programs to link to existing relational databases.
Connect CosmosDB to SQL Server
There are two methods to migrate from CosmosDB to SQL Server:
- The No-Code Method: Using Estuary Flow to Migrate Data from CosmosDB to SQL Server
- The Manual Approach: Using CSV Export/Import to transfer data from CosmosDB to SQL Server
The No-Code Method: Using Estuary Flow to Migrate Data from CosmosDB to SQL Server
You can easily migrate data from CosmosDB to SQL Server with user-friendly, no-code ETL tools, even without much technical expertise. Estuary Flow is one of the best options in the market for real-time Extract, Transform, Load operations.
Flow lets you easily automate the data migration process from CosmosDB stream to SQL Server. But, before you start setting up the streaming pipeline, you’ll need to meet the following prerequisites:
Step 1: Configure DynamoDB as the Source
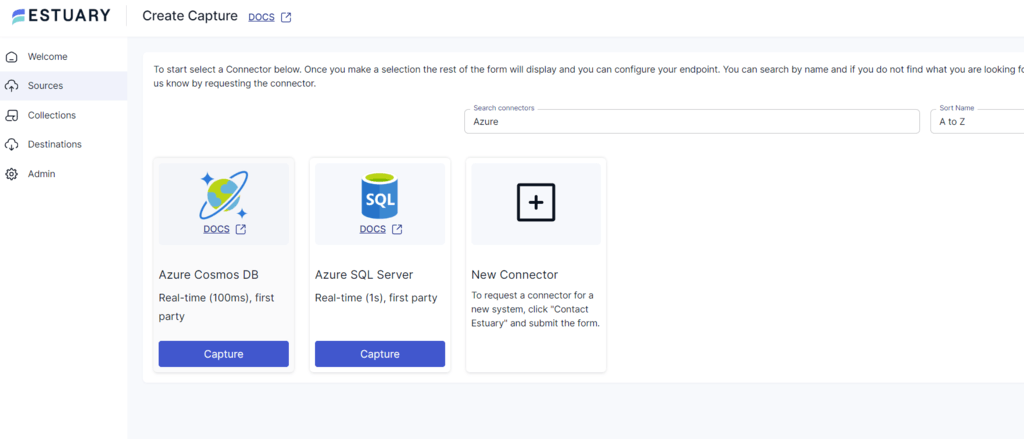
- Log in to your Estuary account and click the Sources tab on the left navigation pane.
- Click on the + NEW CAPTURE button to initiate the source setup process.
- Next, use the search bar to find the Azure CosmosDB connector. Click the connector’s Capture button to proceed with the configuration.
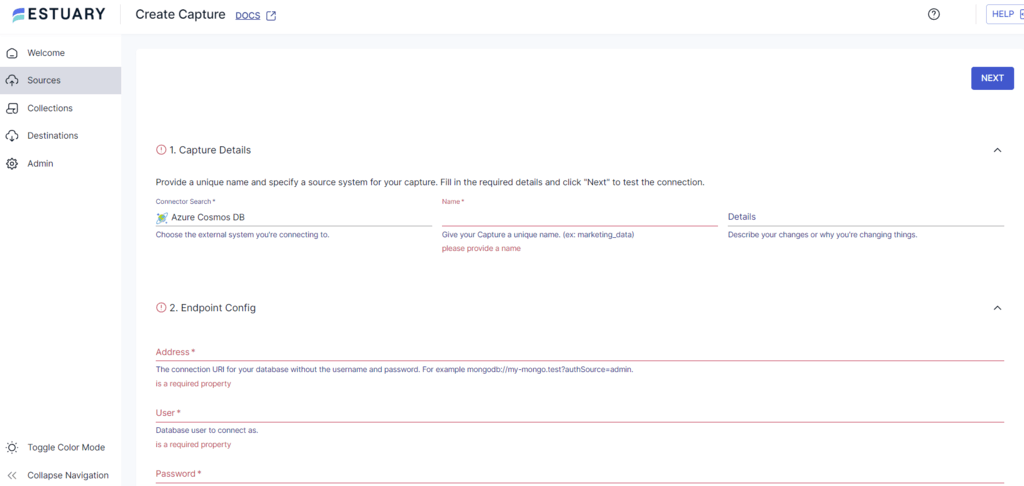
- In the Create Capture page, provide the required connection details such as Name, Address, User, and Password.
- Click NEXT > SAVE AND PUBLISH to complete configuring the CosmosDB connector as the source. This will enable Estuary Flow to capture data from CosmosDB into Flow collections.
Step 2: Configure SQL Server as the Destination
- After a successful capture, you must set up the destination end of the data pipeline. Click MATERIALIZE COLLECTIONS in the resulting pop-up window or the Destinations option on the dashboard.
- Click + NEW MATERIALIZATION to start the setup.
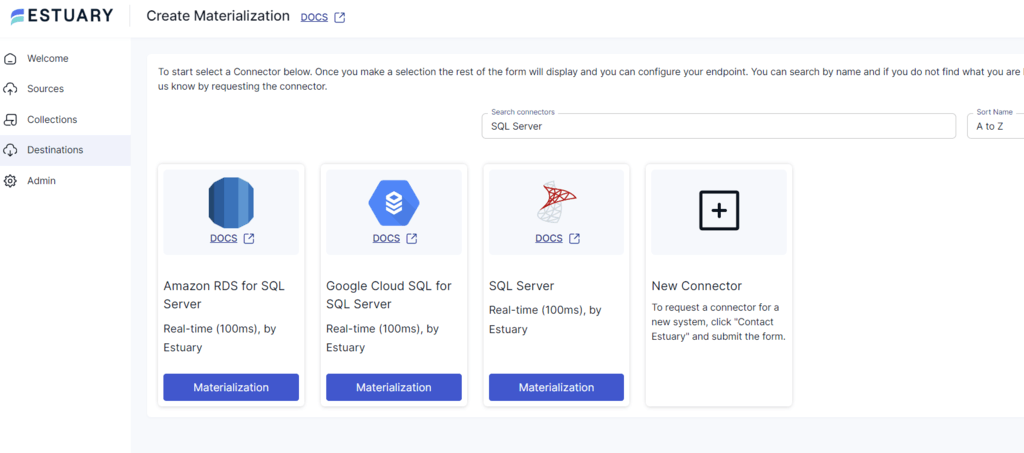
- Search for SQL Server in the Search connector box and click the Materialization button of the SQL Server connector.
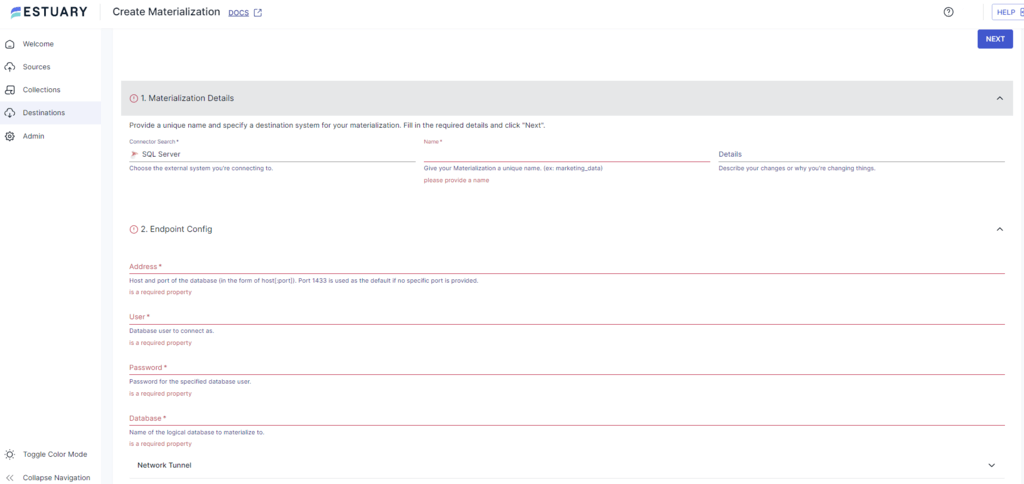
- On the Create Materialization page, enter the necessary connection parameters such as Name, Address, User, and Password, among others.
- If the CosmosDB data collections are not automatically linked to the materialization, you can manually link them using the Link Capture option in the Source Collections area.
- Click NEXT > SAVE AND PUBLISH to complete the process. The connector will materialize Flow collections in your SQL Server database.
Why Use Estuary Flow?
- No-code Configuration: Estuary Flow offers 300+ ready-to-use connectors to simplify the source and destination configuration process. You needn’t write a single line of code to set up the data integration pipeline.
- Real-time Data Processing with CDC: The platform leverages Change Data Capture (CDC) for real-time data processing and replications, ensuring data integrity and minimizing latency.
- Data Cleansing: Estuary Flow's data cleansing capabilities enable you to clean, filter, and validate data during the transformation process, ensuring the accuracy and integrity of data transferred to your target database. This improves data quality, efficiency, and effectiveness in business and academic settings.
Ready to simplify your migration process? Create your free Estuary Flow account to get started today!
The Manual Approach: Using CSV Export/Import to Migrate Data From CosmosDB to SQL Server
Manually migrating data from CosmosDB involves two main steps: First, extract the data from CosmosDB into CSV. Then, upload the CSV data to an SQL Server. Here is a detailed guide to manually migrate data from CosmosDB to SQL Server:
Step 1: Exporting data from CosmosDB to CSV
You can use three methods to export data from CosmosDB to a CSV.
Method 1: Export Data to CSV using the AzureDB Storage Explorer
Here are the steps to export data to CSV using the Azure Storage Explorer tool.
- Access your CosmosDB table through the Azure Storage Explorer.
- Navigate to the appropriate storage account.
- Click on the storage table you wish to export.
- Locate the export option within the explorer to export the data directly to a CSV file without writing code.
Method 2: Using Custom Scripts to Export the Data
The custom scripts method provides more granular control over the data export process and the data format. However, this method’s execution requires technical expertise. Here are the steps to follow.
- Utilize the Azure.Data.Tables SDK to query items from your CosmosDB table.
- Export the queried items into CSV using the StreamWriter.
- Leverage the CsvHelper library in the custom scripts to facilitate writing the data to a CSV file.
Method 3: Export Data Directly to Azure BLOB Storage
This method is useful for storing exported data in the cloud for longer periods of time. Here are the steps.
- Use the Azure.Data.Tables SDK to export data from CosmosDB.
- Next, use the File.WriteAllLines method to write the exported data to Azure Blob Storage directly.
Step 2: Importing CSV File to SQL Server using SQL Server Management Studio (SSMS)
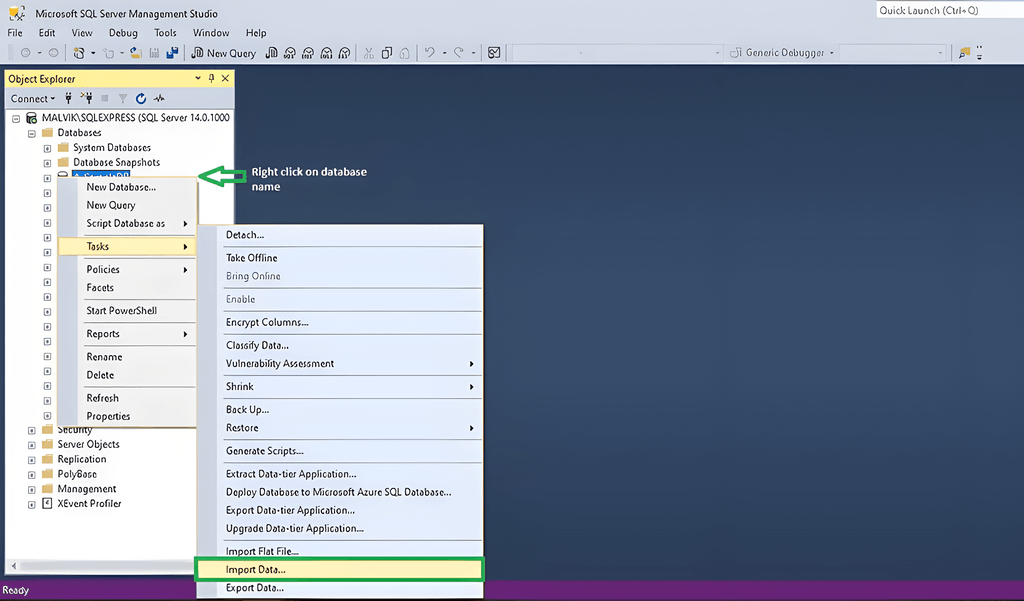
- Access your database by signing in to SQL Server Management Studio.
- Right-click on the database name and choose Tasks > Import Data. Then, click the Next button to proceed to the next step.
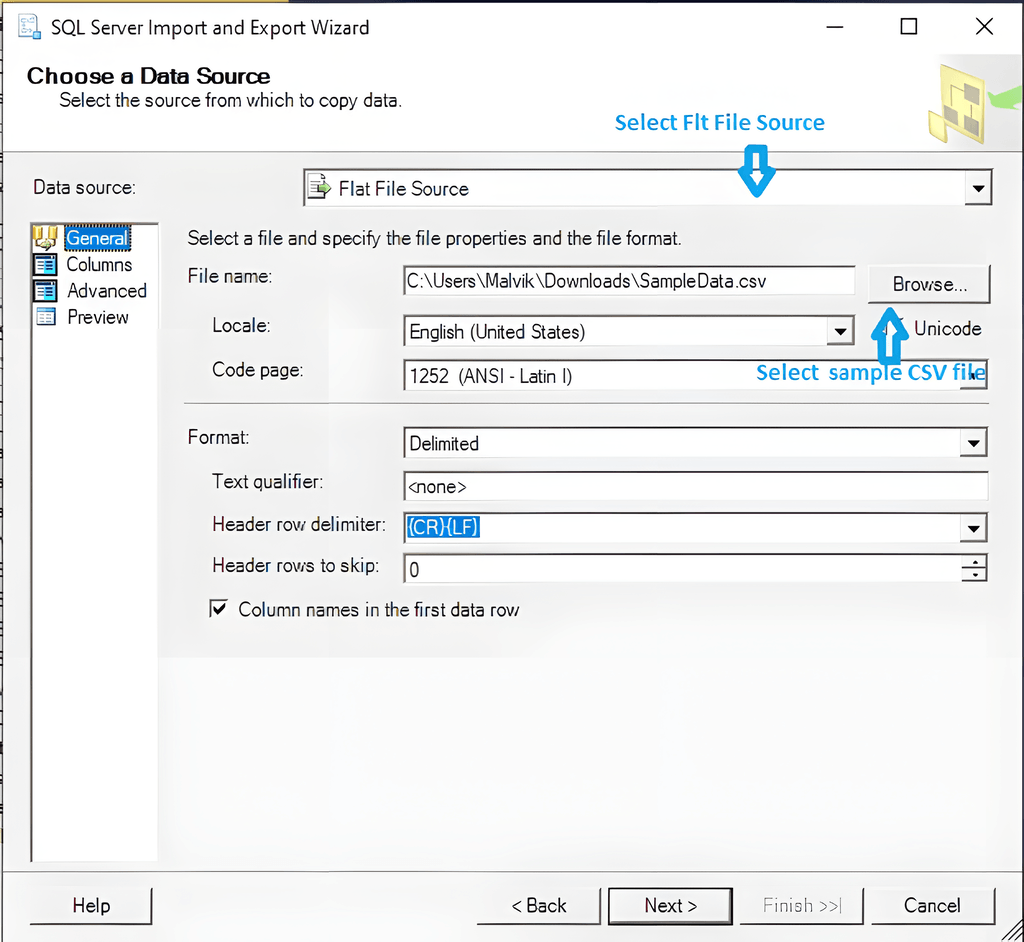
- On the Data Source selection, pick Flat File Source and browse to locate your CSV file.
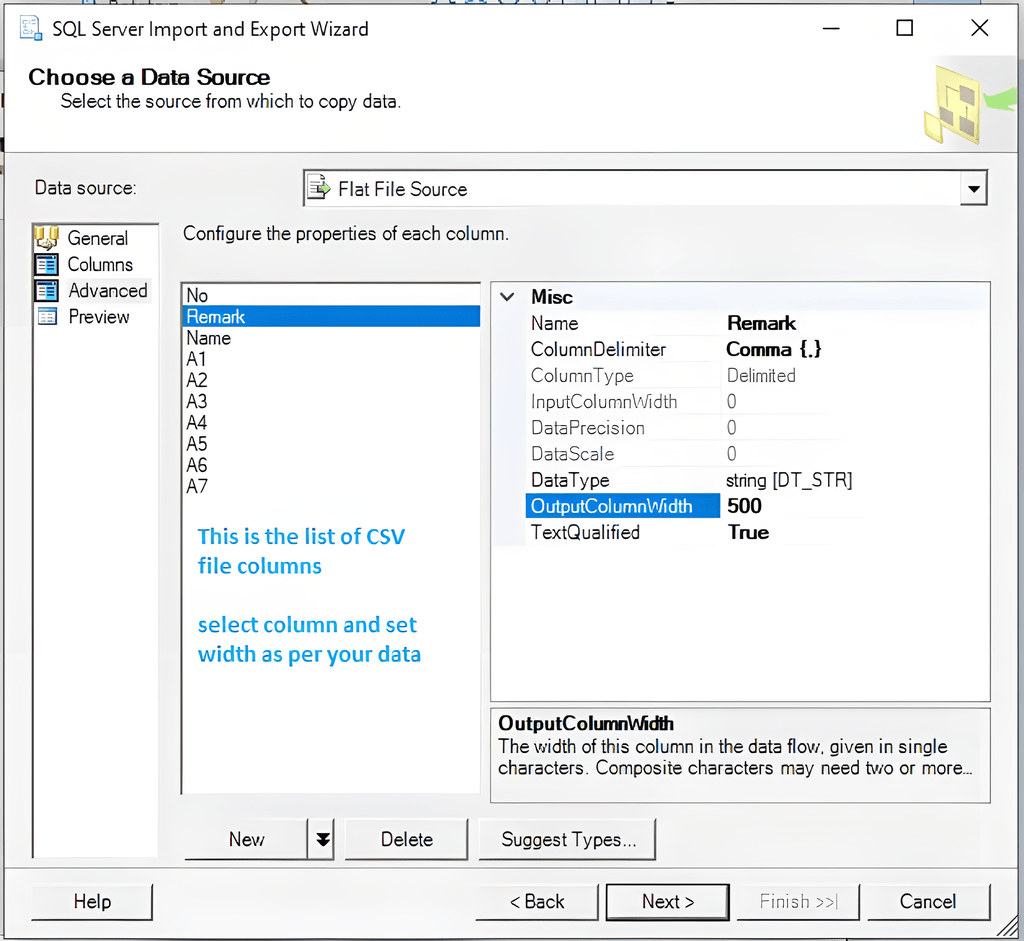
- If necessary, adjust the column width settings for your CSV data under Advanced. Then, click Next to proceed to the next step.
- Choose SQL Server Native Client as the destination and provide your Server name and authentication details.
- Click Next to skip through the next couple of screens. On the final screen, click Finish to start the import.
By following the above steps, you can easily import your CosmosDB CSV data into SQL Server. However, this method has a couple of limitations.
- Lack of Automation: This method lacks automation capabilities. Each migration task must be initiated and monitored manually, making it difficult to establish regular data synchronization.
- Absence of Data Validation and Quality Checks: Manual processes lack built-in data validation and quality checks. It’s difficult to ensure the accuracy of migrated data without any automated data validation method.
- Time-consuming Process: This is a lengthy process that involves multiple steps, such as manual ETL. It is crucial to execute each step carefully to maintain data integrity, which significantly extends the overall migration process duration.
- Lack of Real-time Capabilities: This method lacks real-time capabilities as each step needs to be done manually. It means that any updates or modifications made to the source data, in this case Cosmos DB data, after the initial migration will require additional manual effort to be synchronized.
Want a seamless migration experience without the hassle? Register for Estuary Flow to try it out, or Contact Us for expert guidance!
The Takeaway
Migrating data from a NoSQL database like CosmosDB to a relational database like SQL Server can be challenging due to the intrinsic differences between the two data models. While the manual CSV export/import is one approach, it is associated with several limitations, such as performance issues, time-consuming, effort-intensive, and lack of real-time synchronization.
A streamlined approach involves leveraging efficient ETL tools like Estuary Flow, which automates the migration process without the need for extensive technical knowledge. Ultimately, the method you choose depends on your needs and level of expertise.
Estuary Flow provides an extensive and growing list of connectors, CDC capabilities, and an intuitive UI. Sign up today to simplify and automate data migration from CosmosDB to SQL Server.
FAQs
- What is the difference between Cosmos DB and SQL Server?
Cosmos DB is a NoSQL database, while SQL Server is a traditional relational database. Therefore, Cosmos DB is schema-agnostic, highly scalable, and designed for modern web and mobile apps. On the other hand, SQL Server enforces a rigid schema and is commonly used for structured, transactional workloads.
- Does Cosmos DB support SQL?
Yes, Cosmos DB supports SQL through its SQL API. It provides a SQL-like query language for querying JSON documents stored in Cosmos DB. However, the SQL dialect is limited compared to full T-SQL used in SQL Server.
- Can I use Cosmos DB as a relational database?
While Cosmos DB is primarily a NoSQL database, it can store and query relational-like data using its document model and SQL API. However, due to its limitations in SQL support and lack of strict schemas, it may not be the best fit for all relational use cases.

About the author
With over 15 years in data engineering, a seasoned expert in driving growth for early-stage data companies, focusing on strategies that attract customers and users. Extensive writing provides insights to help companies scale efficiently and effectively in an evolving data landscape.


