Moving data from MySQL to Snowflake is a critical step for organizations looking to leverage the scalability and performance of cloud-based data warehouses. Whether you need to move data for analytics, reporting, or real-time processing, this guide will walk you through the most effective methods to transfer your data.
There are two main approaches for moving data from MySQL to Snowflake: automated CDC (Change Data Capture) pipelines and manual exports. Using modern tools like Estuary’s real-time CDC service can simplify the process, ensuring continuous synchronization between MySQL and Snowflake. Alternatively, for smaller datasets or one-time transfers, manually exporting and uploading data to Snowflake may be the best option.
In this article, we will provide detailed, step-by-step instructions for both methods, ensuring that you can choose the right solution for your specific use case. Let’s dive into the best practices and tools for successfully moving data from MySQL to Snowflake.
What is MySQL?
MySQL, Developed in the early 1980s, MySQL has often been called the first database management platform available to the general consumer. While not strictly accurate, the statement does have some truth to it considering how MySQL was one of the primary data management tools available during the heyday of modern computing.
MySQL is a relational database (RDBMS) used to power OLTP (Online Transactional Processing) systems.
Since its development, MySQL has gone through various iterations across almost four decades of community and developer support to become one of the most robust and widely-adopted DBMSs available today.
Its prominence and prowess are best understood by the sheer number of apps and websites that are powered by MySQL. Facebook, YouTube, and Wikipedia all use MySQL for data storage.
It is a user-friendly platform that supports ANSI SQL, which makes its deployment one of the easiest available today. And the fact that it handles millions of users daily shows its versatility and reliability.
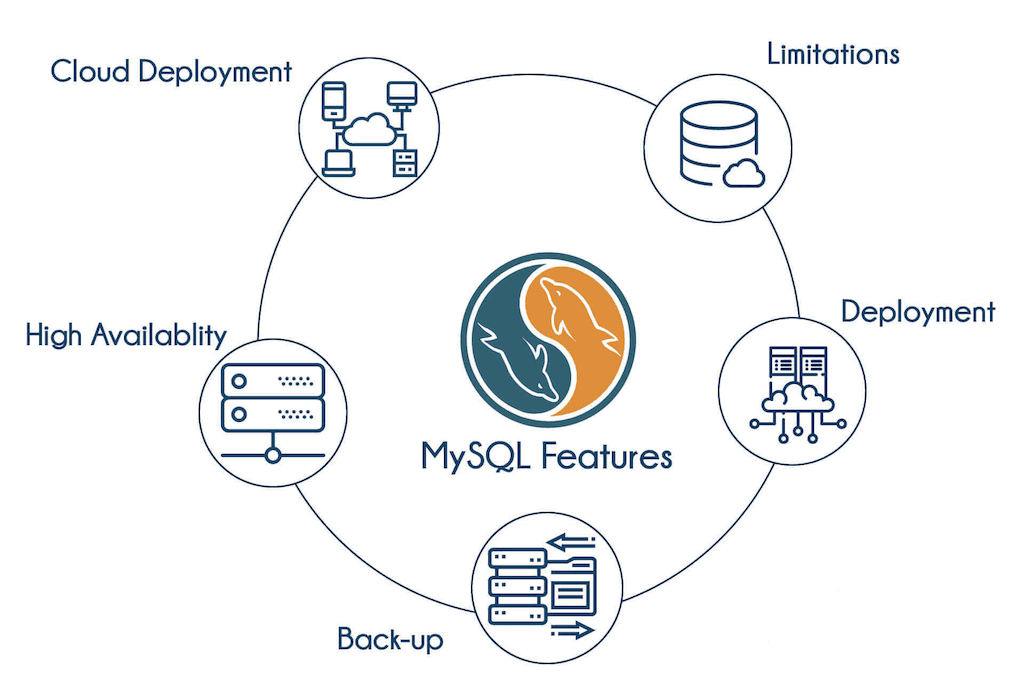
Key features of MySQL include:
MySQL’s strength lies in its ability to efficiently manage transactions – that is, write operations – inserting, deleting, and updating records. Its robust storage-engine framework offers comprehensive support for complex transactional operations and various programming languages Its flexibility and efficiency make MySQL a favored choice for powering the backend of web applications.
The platform primarily manages the core transactional data of applications, such as:
- Purchases for e-commerce systems
- Customer details like name and shipping address
- Tracking inventory and available stock
What is Snowflake?
Unlike traditional, transactional databases, OLAP (Online Analytical Processing) data warehouses like Snowflake are an ideal environment for analytics, data science, and machine learning.
Snowflake is a data warehouse: an analytical database with columnar storage, a SQL processing engine, and more recently offers general purpose compute with Snowpark that can be used and extended beyond the limits of a typical data store.
It’s delivered as a fully-managed, easy-to-use SaaS (Software as a Service) which requires no hands-on management of the underlying platform or infrastructure, leading it to become one of the most widely-adopted cloud data warehouses on the market and a core player in the Modern Data Stack along with dbt, Databricks, and Google BigQuery.
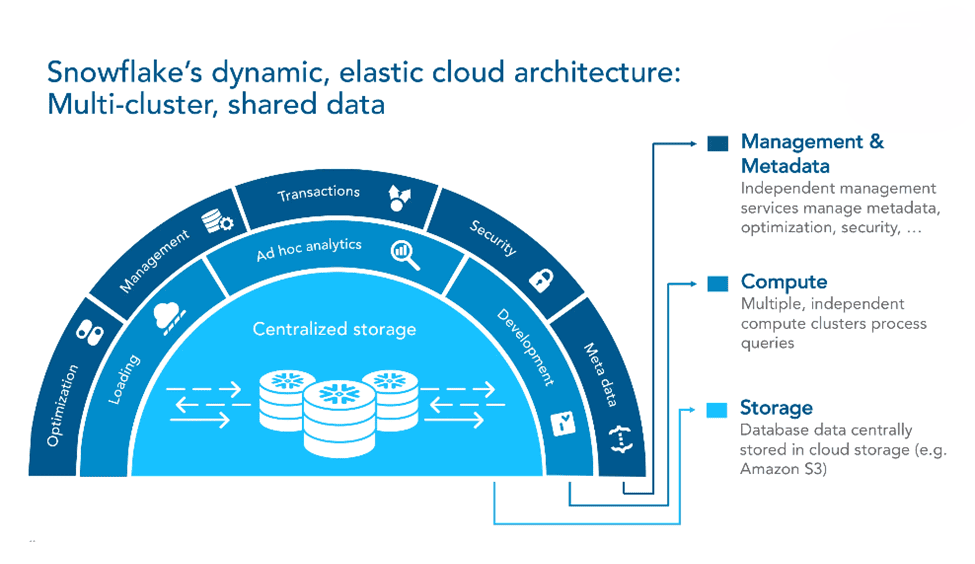
Key features of Snowflake include:
While other data warehouses exist, most users and businesses will find Snowflake their preferred choice. This preference has a few benefits to back it up.
- Leading Performance: Snowflake’s decoupled storage and compute has delivered a top-of-its-class price-to-performance ratio. This is due to its true elastic scale, but also from how its query optimization works with more recent advancements in indexing, as well as materialized views and dynamic tables.
- Simplicity: Snowflake is smart enough to handle everything from the autoscaling of computing to the encoding of columns. While expertise is recommended, it doesn’t take being a 10+ year data engineering veteran to get the hang of things. Most tech-literate individuals can pick up the basic concepts in a few hours or less.
- Unbiased Cloud Vendor Support: The platform supports multiple cloud vendors and provides more choices to users when working with other vendors. It also helps analyze data with the same tools, thus mitigating vendor-specific solutions.
- Supports Unlimited Concurrency: Computing power scales both vertically and horizontally, and so the platform doesn’t get bogged down when occasional (or frequent) high activity is occurring.
Snowflake deployments and migrations from other data warehouses are simple and done in the fastest time since a lot of other platforms support Snowflake. Many business intelligence and analytical platforms offer easy integrations with Snowflake.
However, the process of continuous data integration between an RBDMS and Snowflake is more challenging. A separate data pipeline or data integration provider like Estuary can make this process easy for you.
Snowflake’s three core components—Database Storage, Query Processing, and Cloud Services—make it a preferred choice for businesses needing advanced data processing and analytics capabilities.
Why Replicate Data From MySQL To Snowflake?
MySQL and Snowflake serve completely different purposes. MySQL powers transactional systems, while Snowflake handles analytics. For businesses to gain actionable insights, it's crucial to replicate MySQL data into Snowflake. This process allows you to leverage Snowflake's analytical capabilities while maintaining MySQL’s transactional efficiency.
Replicating data ensures that both systems contain the same accurate data, enabling real-time analysis and decision-making. This is essential for any business that relies on up-to-date information to guide operations.
2 Methods to Move Data from MySQL To Snowflake
We’ve established that it’s beneficial to use both MySQL and Snowflake in your data stack and that it’s critical to have a scalable and reliable pipeline between them.
There are many ways to connect MySQL to Snowflake, generally falling into two categories: hard-coding a pipeline or using a data pipeline platform.
In this section, we provide a comprehensive step-by-step tutorial for the 2 best methods to move data from MySQL into Snowflake
- Method 1: Move Data from MySQL to Snowflake Using Estuary’s CDC Service
- Method 2: Manual download from MySQL & manual upload into Snowflake
Method 1: Move Data from MySQL to Snowflake Using Estuary’s CDC Service
Using a data pipeline platform like Estuary saves you much of the engineering legwork, and often allows your team to produce a more sophisticated pipeline than they’d have time to create on their own.
Estuary includes all of the important features you’ll want in your MySQL to Snowflake integration:
- Data validation
- Real-time data transfer
- No-code interface.
- Cost-effective, flexible, and highly scalable
- Data transforms in-flight
- Secure cloud backups to protect against failure
There are two primary approaches to capture changes from MySQL and replicate them in Snowflake:
Prerequisites
- An Estuary account. Sign up for a free trial of our premium tier or get some quick hands-on experience with our forever-free plan here
- A MySQL database configured to accept Change Data Capture connections. Read our docs on how configure that here.
- A Snowflake account configured with objects to land your MySQL data, and a user to facilitate access. Read our docs on how to configure that here.
- Credentials for your MySQL database and Snowflake user.
Step 1: Capture Data from Your MySQL Source
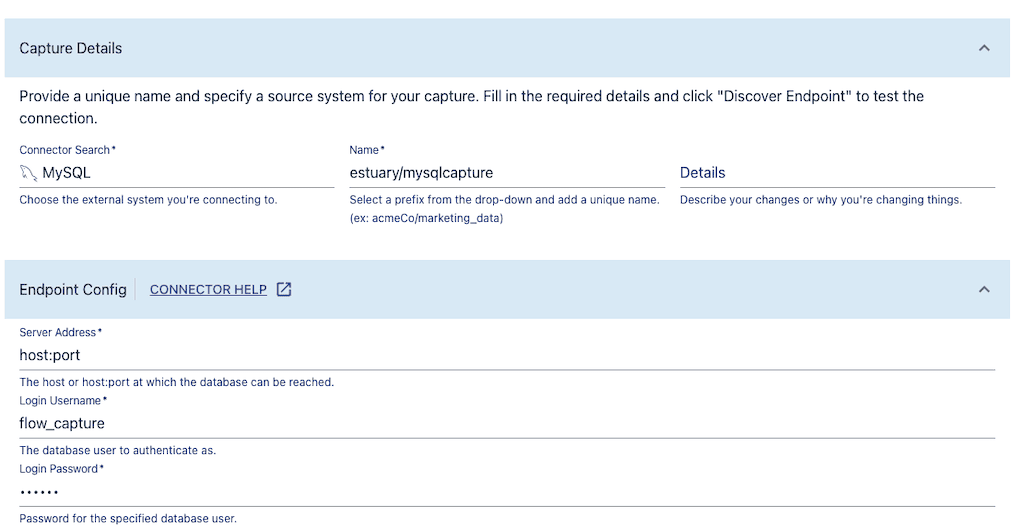
- After logging into Estuary, go to the create a new capture page of the Estuary app and select the MySQL connector.
- Create a unique name for this data source. Provide the MySQL host address, database, and the username (this should be “flow_capture” if you followed the prerequisite steps) and password.
- Click the Next button. Estuary lists all the tables in your MySQL database, and those which are selected will be added to the pipeline and converted into Flow data collections. You can remove or pause any tables you don’t want to capture.
- Click Save and Publish.
Step 2: Materialize Data to Snowflake
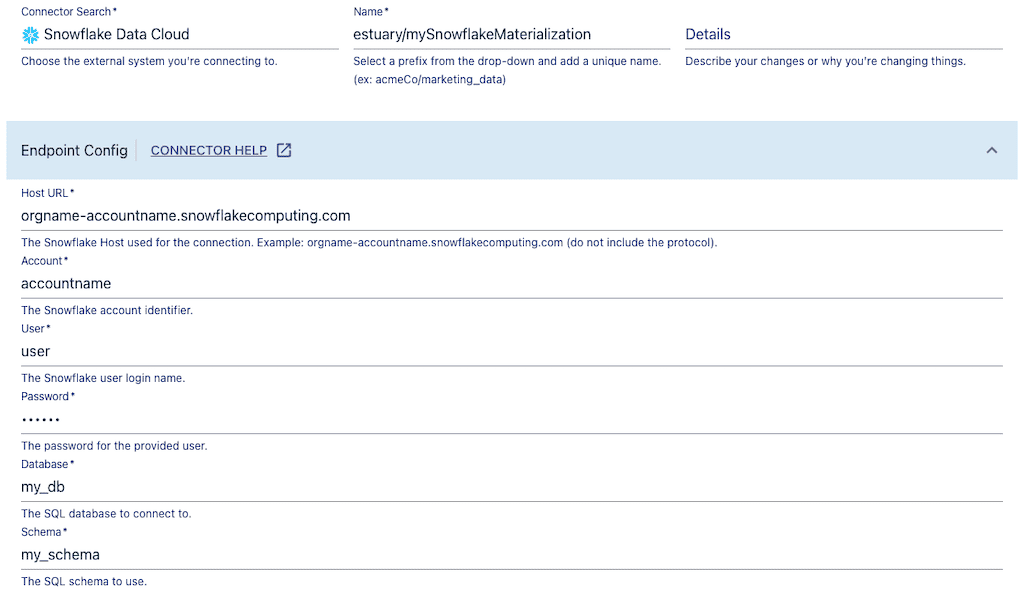
- Click Materialize Collections and choose the Snowflake connector.
- On the configuration page, fill in the following fields:
- Host URL (e.g., orgname-accountname.snowflakecomputing.com)
- Database and Schema where the data should land
- Warehouse (the compute warehouse to use)
- Username and Private Key (for the Snowflake user configured with key-pair authentication)
- Review the collection mappings. Each MySQL table captured into Estuary will be materialized into a table in Snowflake. You can:
- Rename the target tables
- Filter or exclude fields
- Apply in-flight transformations
- Choose the materialization mode:
- Standard merges (default)
- Delta updates (recommended for append-heavy tables, using Snowpipe Streaming for lower latency and cost)
- Click Save and Publish to activate the pipeline. Estuary will first backfill historical rows from MySQL, then continuously stream CDC events into Snowflake.
All historical data from your MySQL database will be backfilled into Snowflake, and any new changes in MySQL will then be continuously streamed in real time.
The setup takes only a few minutes, and because pricing is transparent — $0.50/GB of change data + $0.14/hour per connector — you get an enterprise-grade pipeline without unpredictable costs. Plus, Estuary offers a free tier (10 GB/month and up to 2 connector instances) so you can try it without risk.
For more help with using Estuary for Change Data Capture from MySQL to Snowflake, refer to the following documentation:
- Create a Basic Data Flow (tutorial)
- The MySQL Connector (reference)
- The Snowflake Connector (reference)
Method 2a: Download the MySQL data as a file and then upload directly into a table using the Snowsight interface
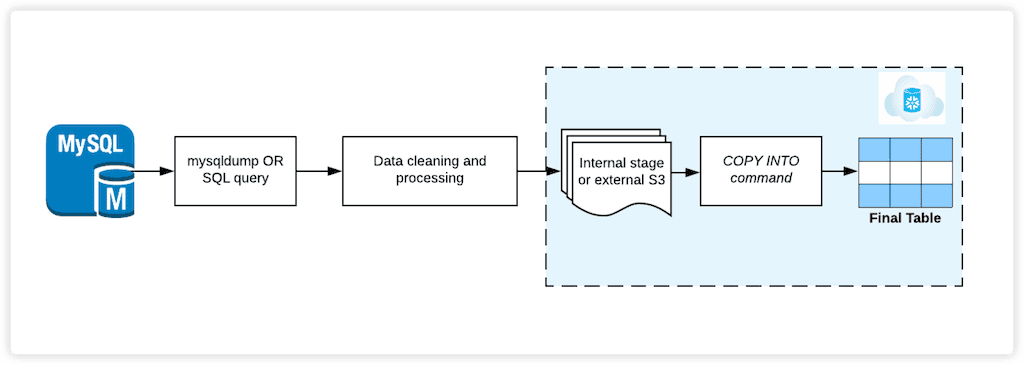
While using a data ingestion platform offers a best-in-class, streamlined, and automated approach, manual data migration techniques offer a quick-and-dirty, just-get-it-done, hands-on approach which is good in a pinch, but should really be used only in a pinch. These techniques involve using command line tools such as mysqldump or a custom SQL query to perform an export of data from MySQL tables to CSV files. For incremental exports, SQL queries containing predicates to extract only modified records can be run against MySQL tables..
Staging the extracted data on external or internal staging areas in Snowflake can be done using a read-replica of the MySQL database for improved performance. Snowflake’s COPY INTO command can be used to load large datasets from staged files into a Snowflake table using the compute power of virtual warehouses.
Prerequisites
- MySQL server with login credentials
- Snowflake Account with login credentials and proper permissions
You can check the privileges of your user’s role by running the following query in a worksheet:
plaintextUSE ROLE <your_role>;
SHOW GRANTS TO ROLE <your_role>;
Necessary Privileges:
- Ensure that you’re using a role with the USAGE privilege granted to it on the database and schema where you want to store the data.
- Additionally, ensure your role has the SELECT and INSERT privileges granted on the table in which you want to upload it.
If you intend to create a new database, schema, or table in this process, then ensure that your role has the privileges CREATE DATABASE, CREATE SCHEMA, and CREATE TABLE granted to it respectively. You can use the following queries to achieve this or ask your account administrator to grant you these privileges.
...
# Best practice is to use the SECURITYADMIN role to grant privileges. If you don’t have access to this or another privilege-granting, contact your Snowflake account administrator.
plaintextUSE ROLE SECURITYADMIN;
# Grant CREATE for these new objects for your role
GRANT CREATE DATABASE ON ACCOUNT TO ROLE <your_role>;
GRANT CREATE SCHEMA IN DATABASE <your_database> TO ROLE <your_role>;
GRANT CREATE TABLE ON SCHEMA <your_database>.<your_schema_name> TO ROLE your_role_name;
# Grant usage and insert on existing objects
GRANT USAGE ON DATABASE <your_database> TO ROLE <your_role>;
GRANT USAGE ON SCHEMA <your_database>.<your_schema> TO ROLE <your_role>;
GRANT SELECT, INSERT ON TABLE <your_database>.<your_schema>.<your_table> TO ROLE <your_role>;
...
Step 1: Extract the MySQL data into flat files (CSV)
- Login to your MySQL interface via the terminal
```
plaintextmysql -h <hostname> -P <port> -u <username> -p <password>```
- Once you’re logged in, you need to use the specific database from which you want to extract your data with the following command: USE <your_database_name>;
- Finally, extract the the data you want by running a simple select query into an outfile in the specified directory like below:
plaintext```
NATEDSELECT * FROM your_table
INTO OUTFILE 'filepath/mysql_data.csv'
FIELDS TERMINATED BY ','
ENCLOSED BY '"'
LINES TERMI BY '\n';
```
If you’re logged into a remote server, use scp to copy the file from the remote server to your local machine like so:
plaintext```
# Copy file from remote server to your local desktop
scp <username>@<hostname>:/filepath/mysql_data.csv /Users/<your_username>/Desktop/
```
Step 2: Upload the extracted files to Snowflake using the web console
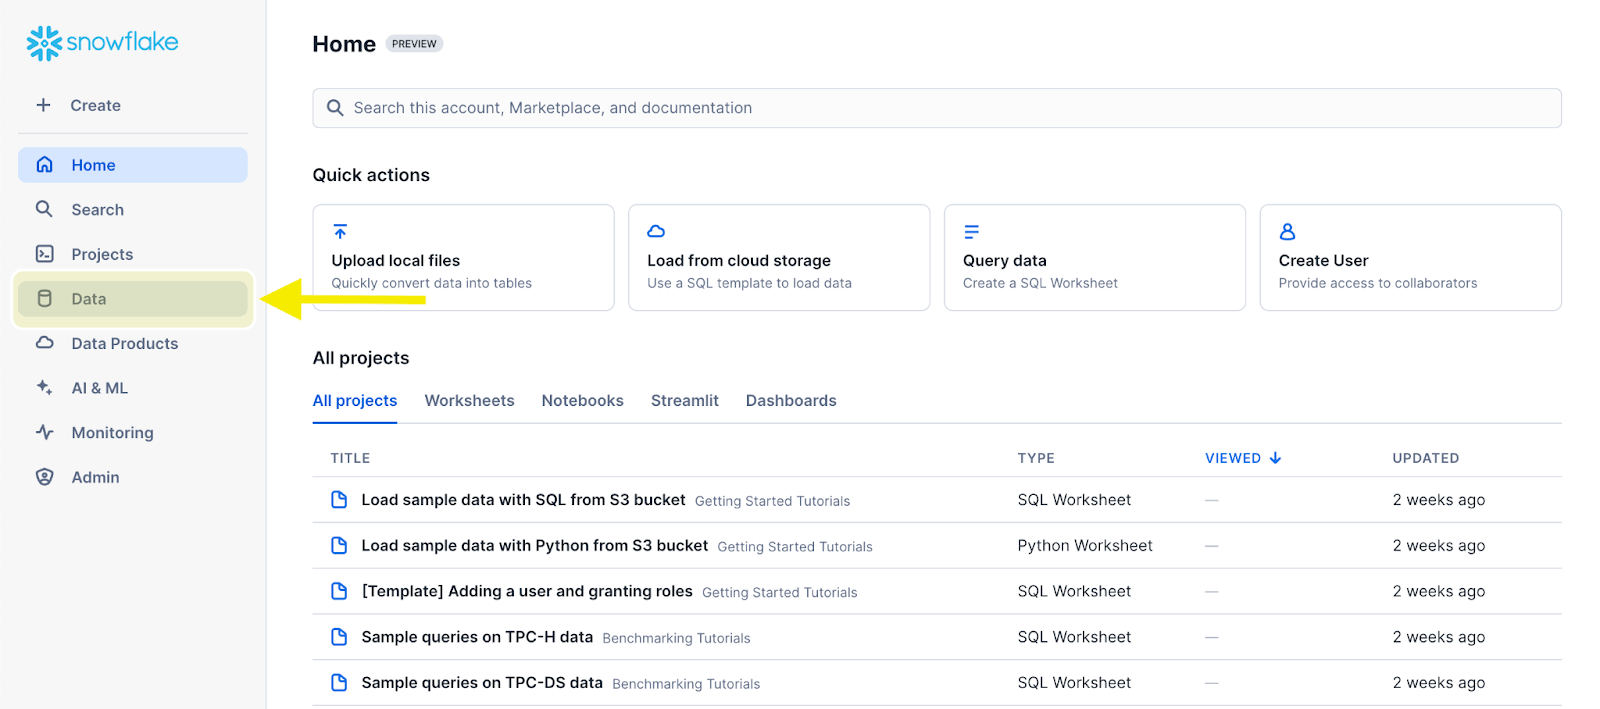
- You’re halfway there. Now that you’ve extracted the data, you simply need to login to Snowsight and use the provided interface to upload it.
If you’ve got your privileges squared away, the only thing standing between your extracted file and a populated Snowflake table is a few clicks in the Snowsight interface.
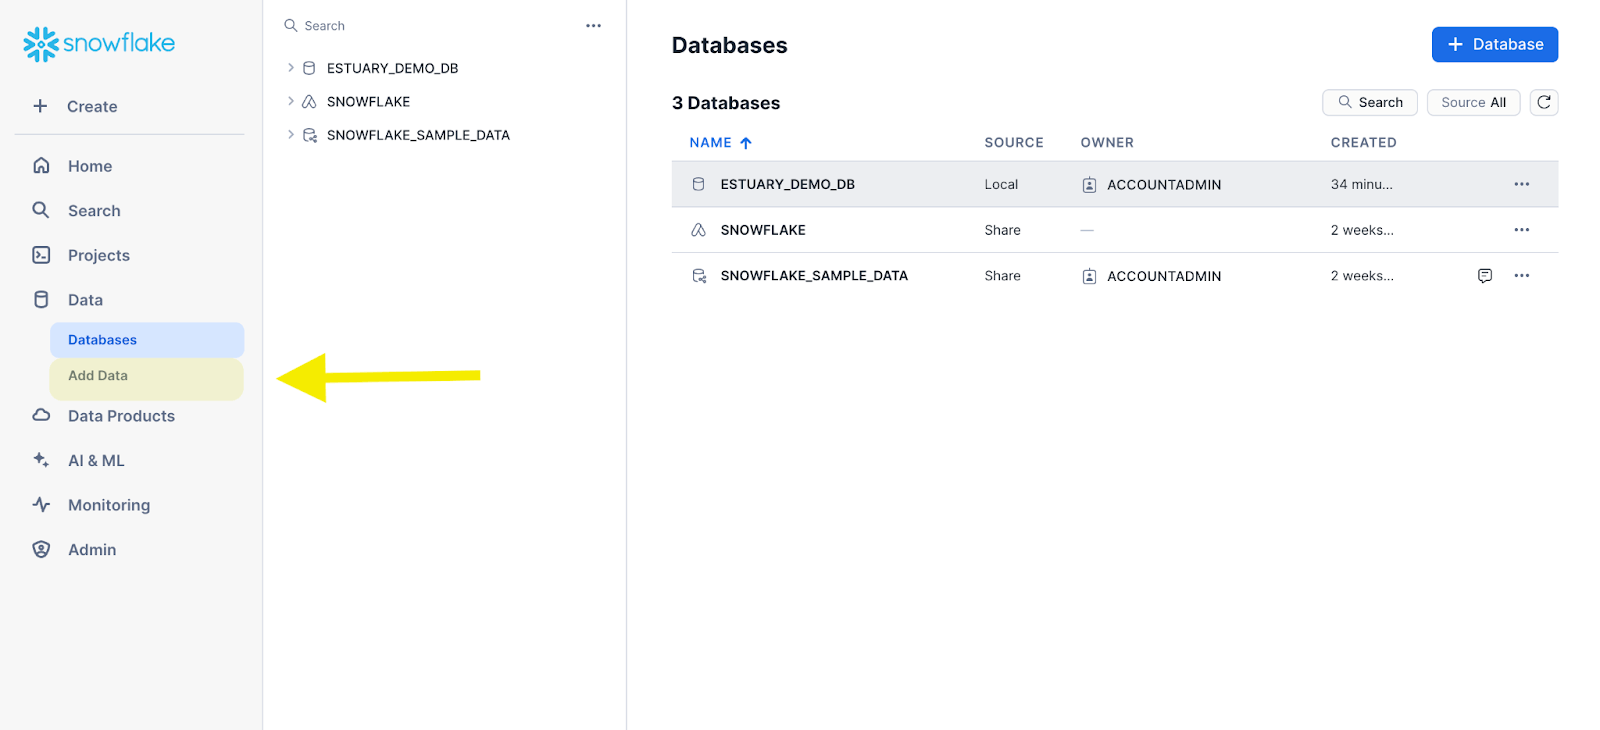
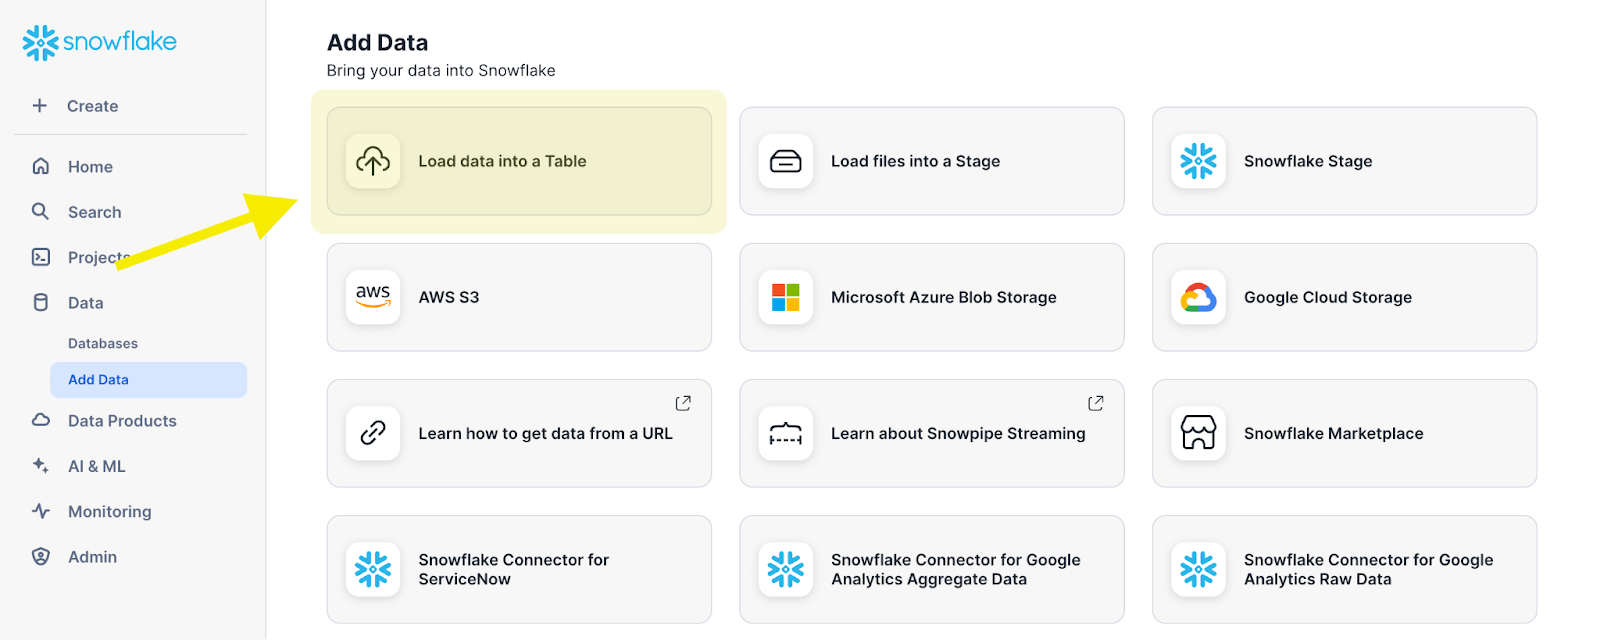
- In the left sidebar, select the DATA tab
- Right below it, click ADD DATA
- Choose the option LOAD DATA INTO TABLE. This is the option to upload a file from your local computer.
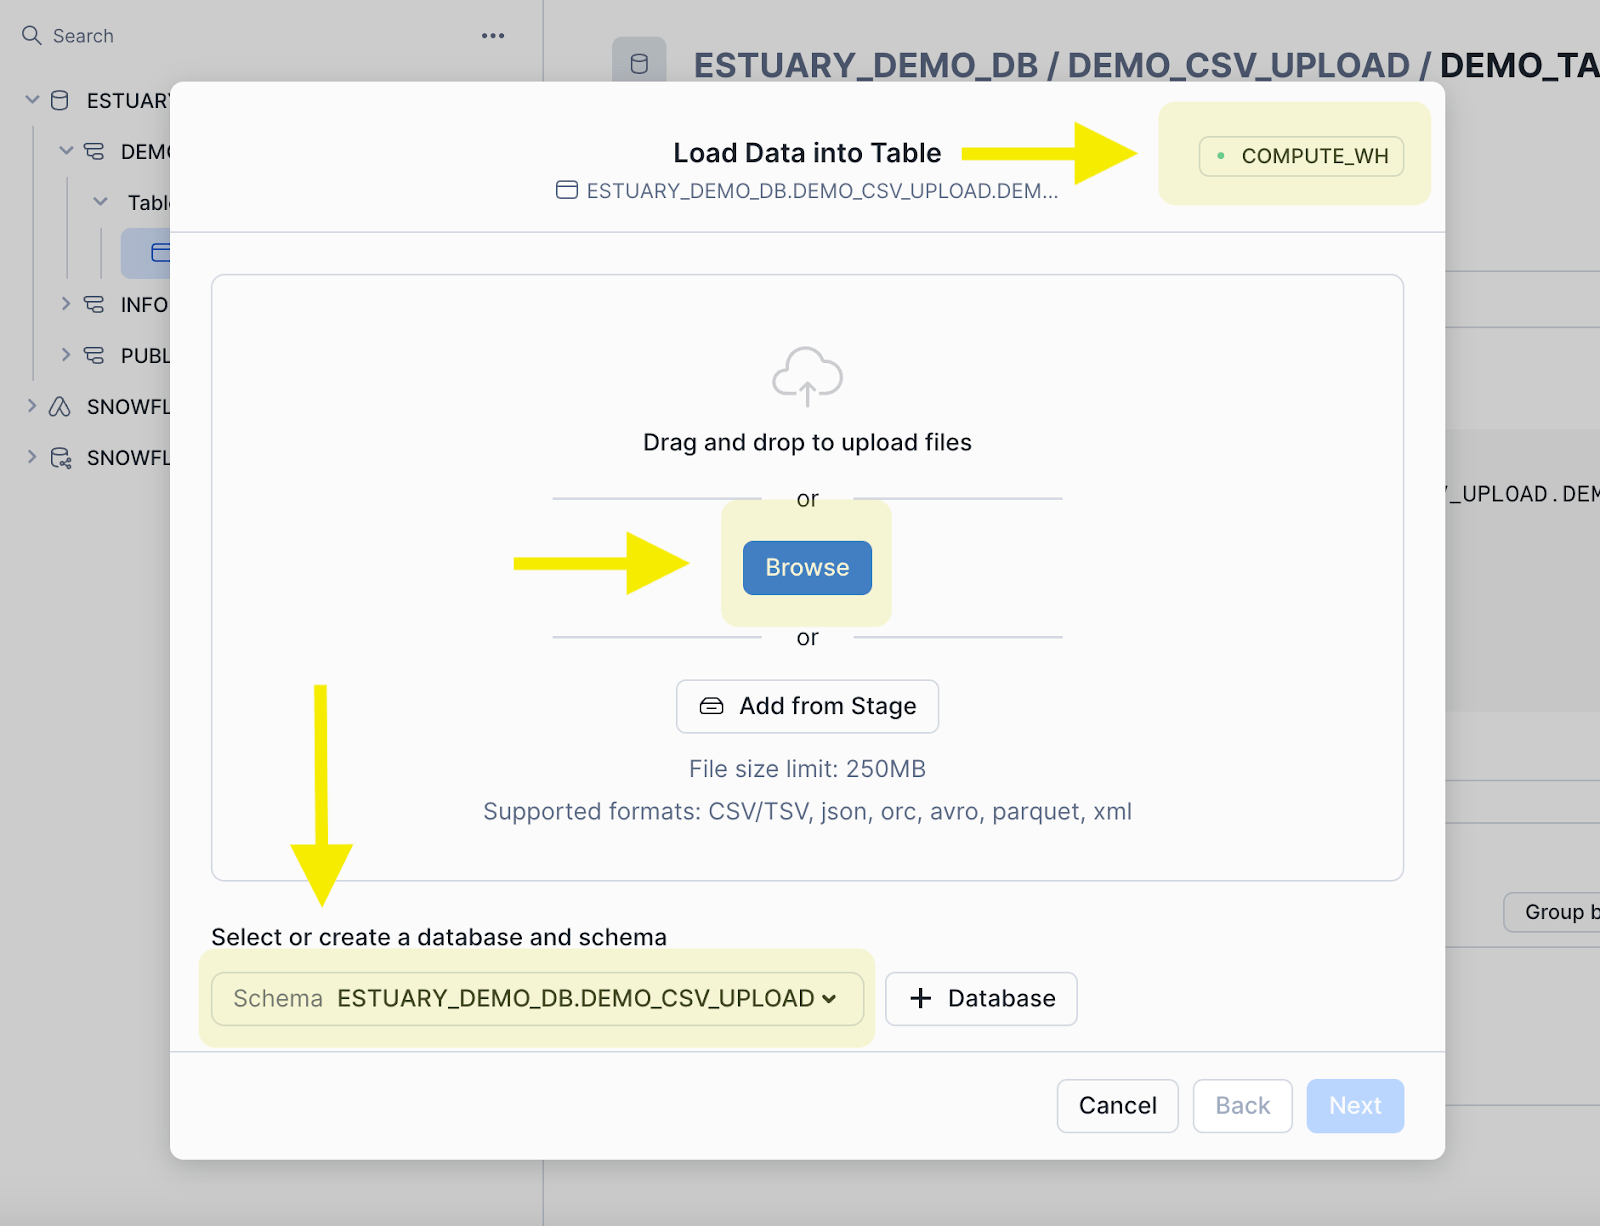
So in this next window pane, there’s three thing to pay attention to:
- FIRST: The top right shows the virtual warehouse that will be used to run the compute which powers the upload and any other object creations (here, an object refers to a database, schema, or table)
- SECOND: If you want to add a file from your local computer, click on the big blue BROWSE button in the middle. This will allow you to choose a file from your local computer that is included in the compatible file types listed just below: CSV/TSV, json, orc, avro, parquet, or xml.
- Alternatively, you could load the file from a Snowflake stage. Checkout [method 2b.] for instructions on how to do that.
- Alternatively, you could load the file from a Snowflake stage. Checkout [method 2b.] for instructions on how to do that.
- THIRD: At the bottom, you will see SELECT DATABASE AND SCHEMA. Here is where you choose where to put this data. You can use an existing database or schema, or you can use the CREATE NEW DATABASE button to start fresh, and that virtual warehouse we selected before will generate and run the DDL queries needed to create those objects.
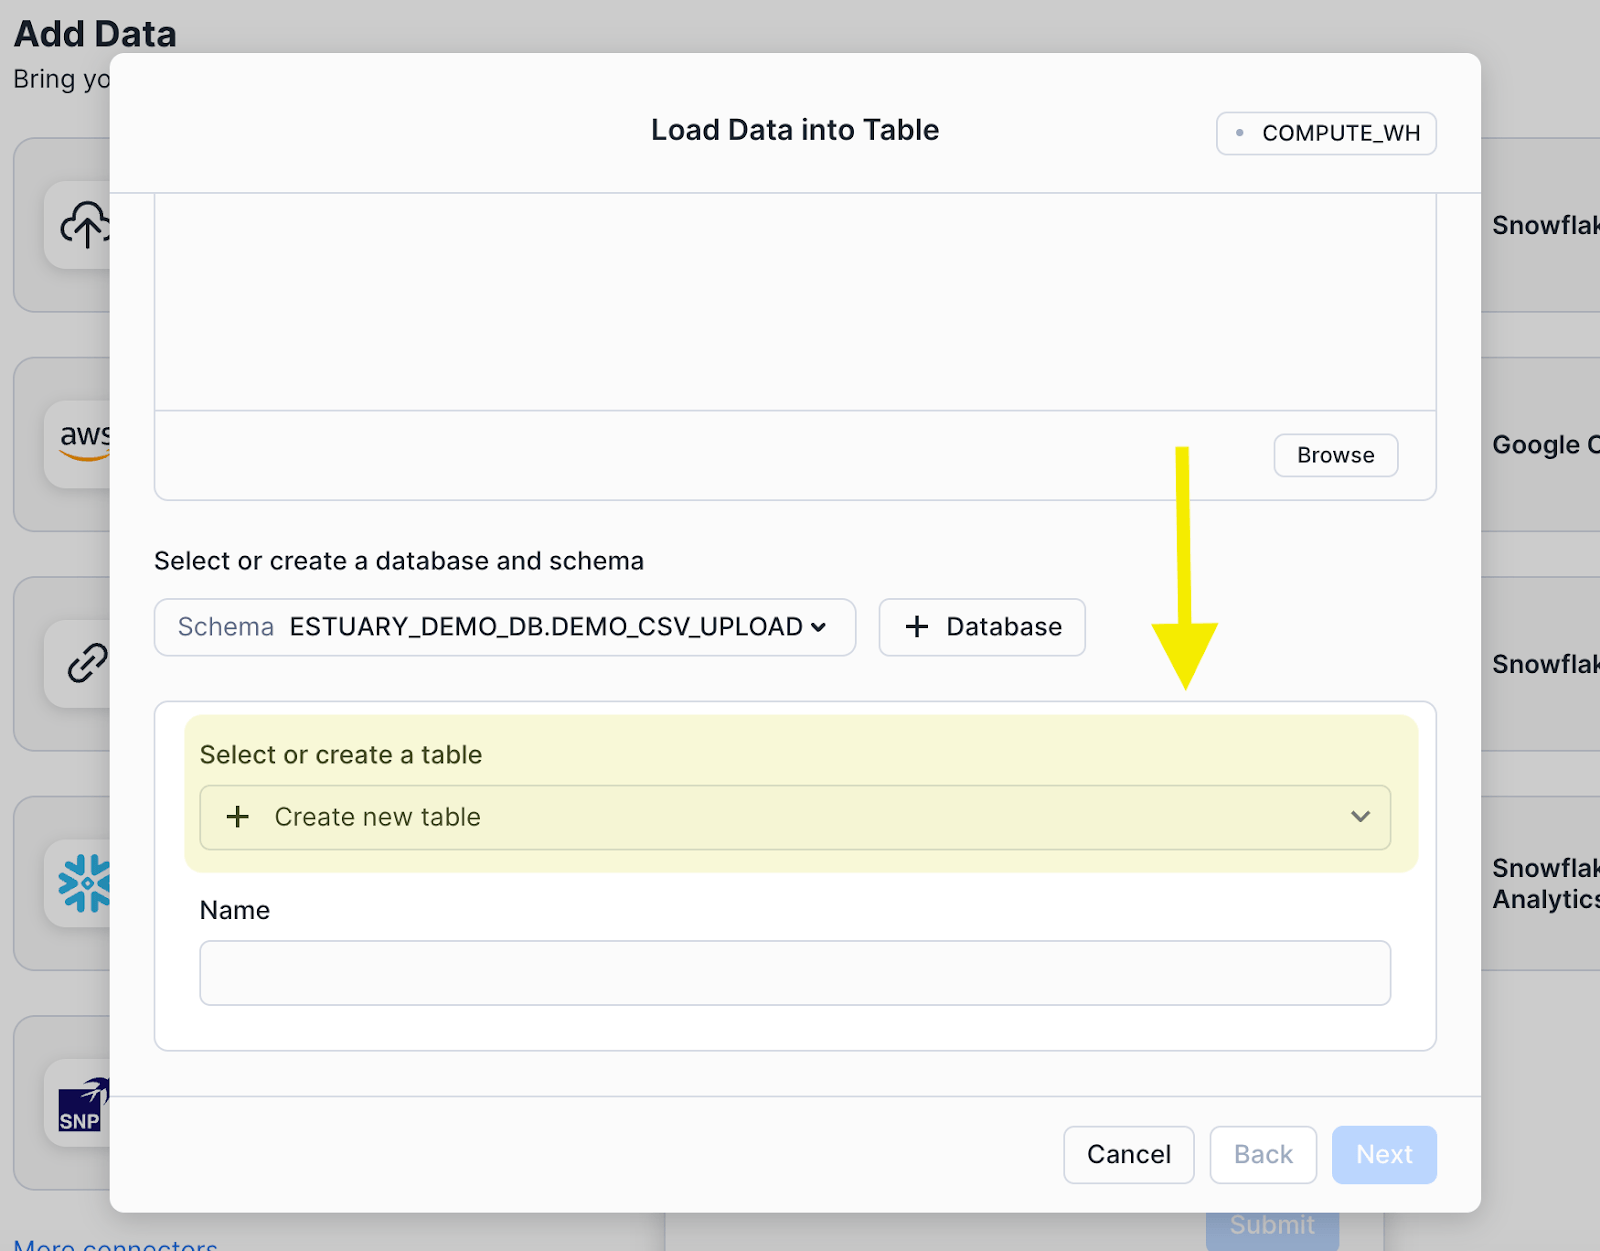
- Once you have your database and schema selected, you need to pick the destination table. This table is the object where the data will actually reside inside your database and schema. You can append the CSV to an already existing table or create a new table from scratch, and Snowflake will automatically infer the datatypes of your CSV.
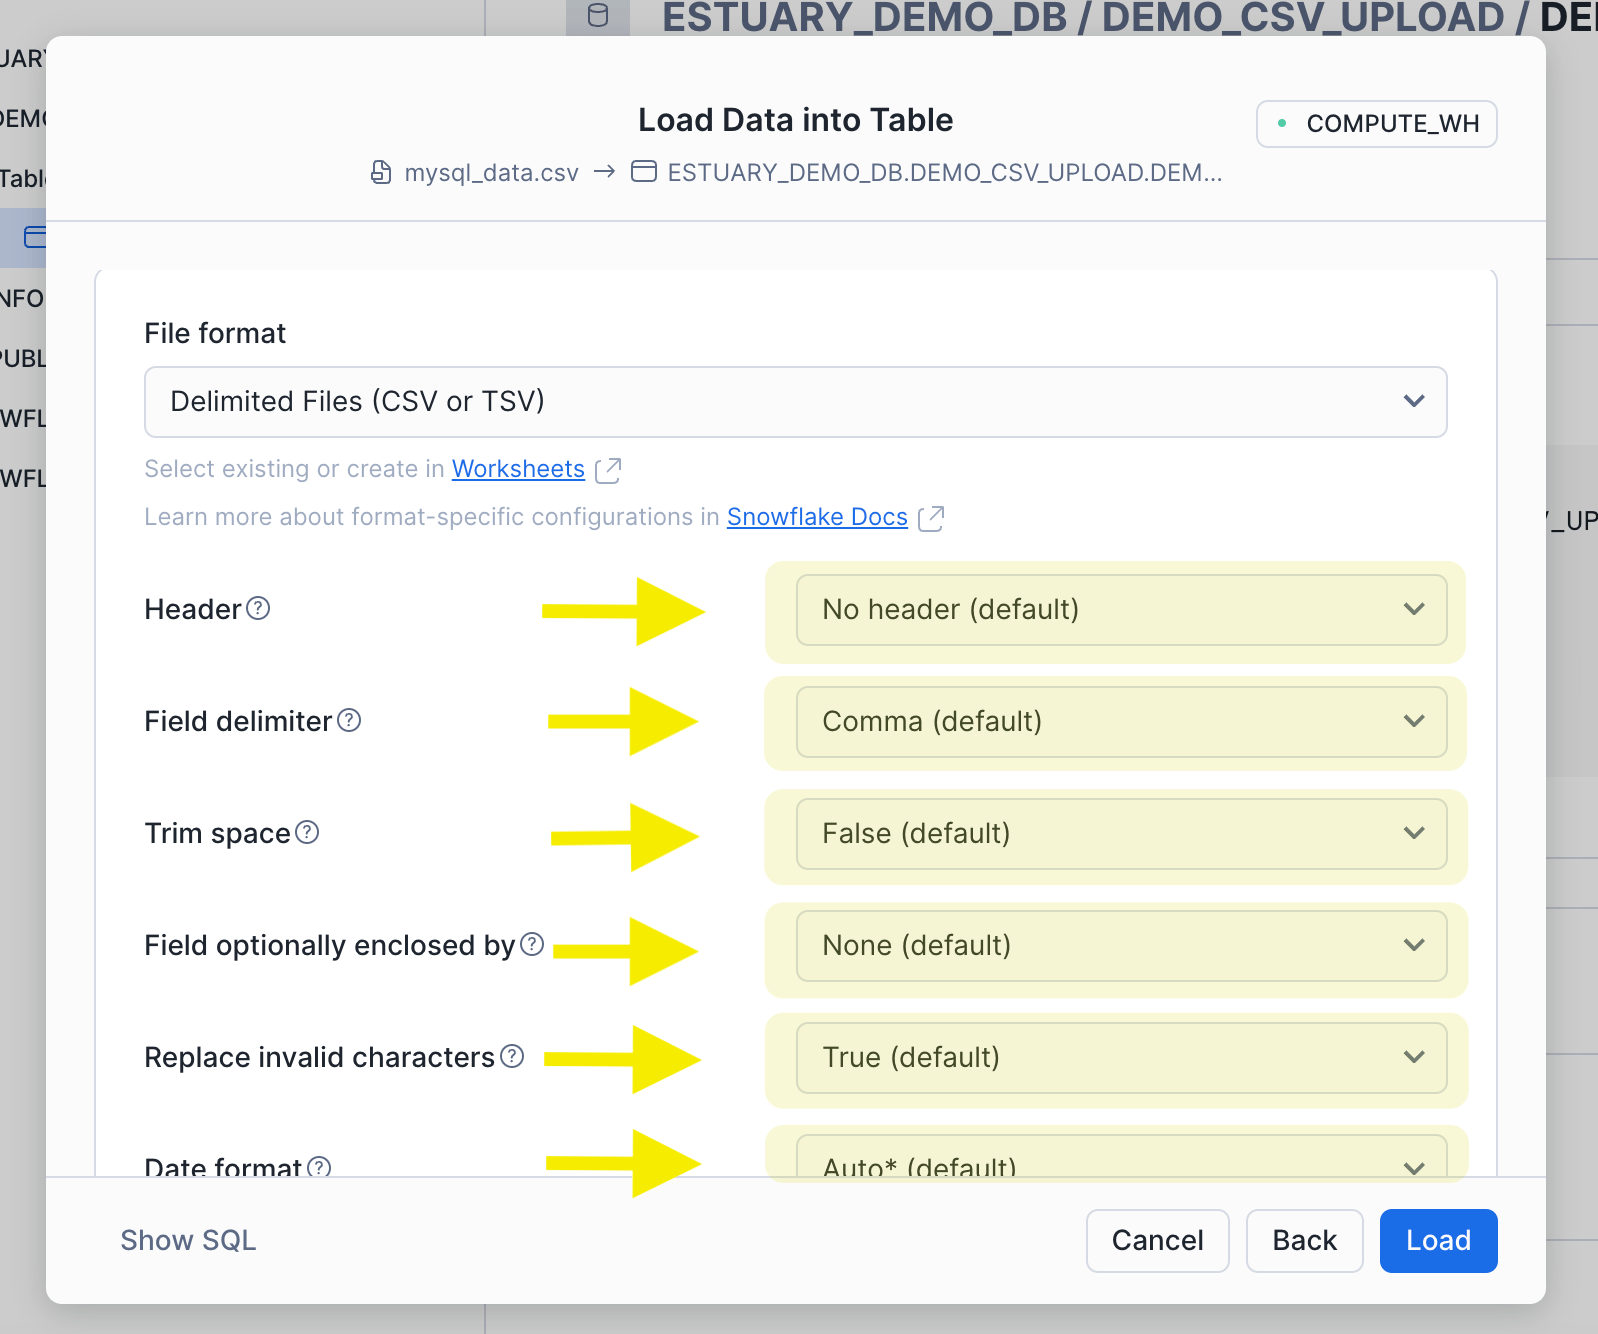
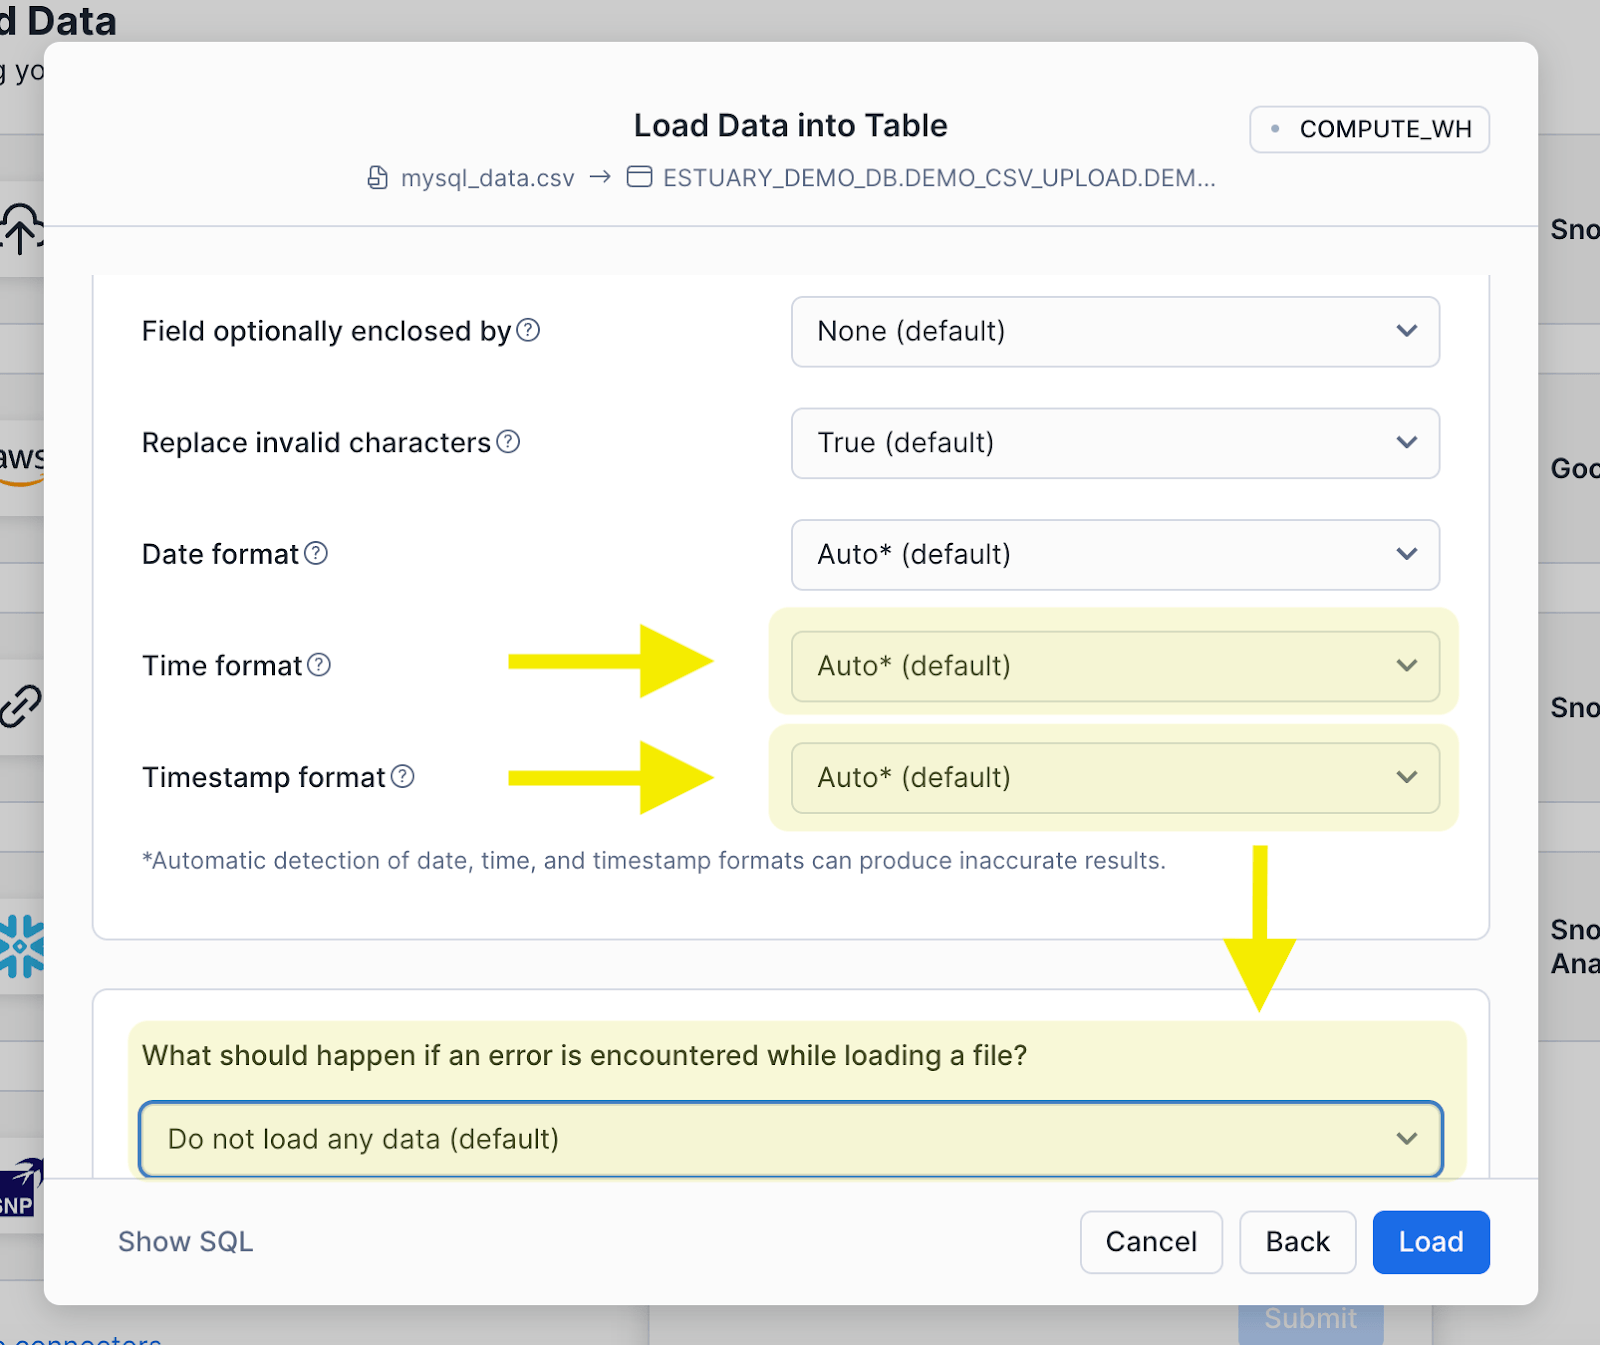
- Once you have your destination table ready inside your preferred schema and database, it’s time to wrap this up with one last finishing touch. You need to give Snowflake some extra details about how your file is structured, and these details are called metadata. The metadata you provide is then compiled into a snowflake object called a file format, which is like the blueprint for how your file (in this case CSV) is constructed.
- In the above screenshots, we can see the following data is collected:
- Header: Does your CSV have one or multiple lines preceding your actual data points? Note that column names are included in the header, and therefore a CSV without a header as seen above has no column names in the first line.
- Field Delimiter: What is the character that separates one column from another? In a CSV, the values are typically separated by a comma (hence the name, comma separated value); however, this could also be a tab (TSV), or a pipe like |. Tabs and pipes are common delimiters when there is a field that contains commas as part of the value. For example, a description field with a value like “This is a description, and that comma after the word description will be interpreted as a column delimiter by CSV processors.”
- Trim Space: Should white space adjacent to delimiters be automatically deleted?
- Field optionally enclosed by: Either a single quote or a double quote.
- Replace invalid characters: Whether or not any characters that are deemed invalid be replaced with the following symbol: �
- Date Format: How are dates represented in your file? It could be something like YYYY-MM-DD for a March 1st, 2024, which displays in your CSV as 2024-03-01.
- Time Format: How are times represented in your file? It could be something like HH24:MI:SS for 8:51pm and 22 seconds, which displays in your CSV as 20:51:22
- Timestamp Format: How are timestamps represented in your file? This is a field which combines date + time. This could be something like YYYY-MM-DD"T"HH24:MI:SS.FFTZH:TZM, in which the value March 1st, 2024 at 8:51pm and 22 seconds and 1 nanosecond in New York local time would be represented in your file as 2024-03-01T20:51:22.000000001-05:00
- What should happen if an error is encountered while loading a file?: If there is a problem during the upload (for example, incorrect file format, or an extra delimiter in one row), then there’s two ways to handle it. The first option is to have the upload automatically canceled, and nothing is loaded into the table. The second option is to continue with the upload and omit the specific records that are causing the errors.
- Header: Does your CSV have one or multiple lines preceding your actual data points? Note that column names are included in the header, and therefore a CSV without a header as seen above has no column names in the first line.
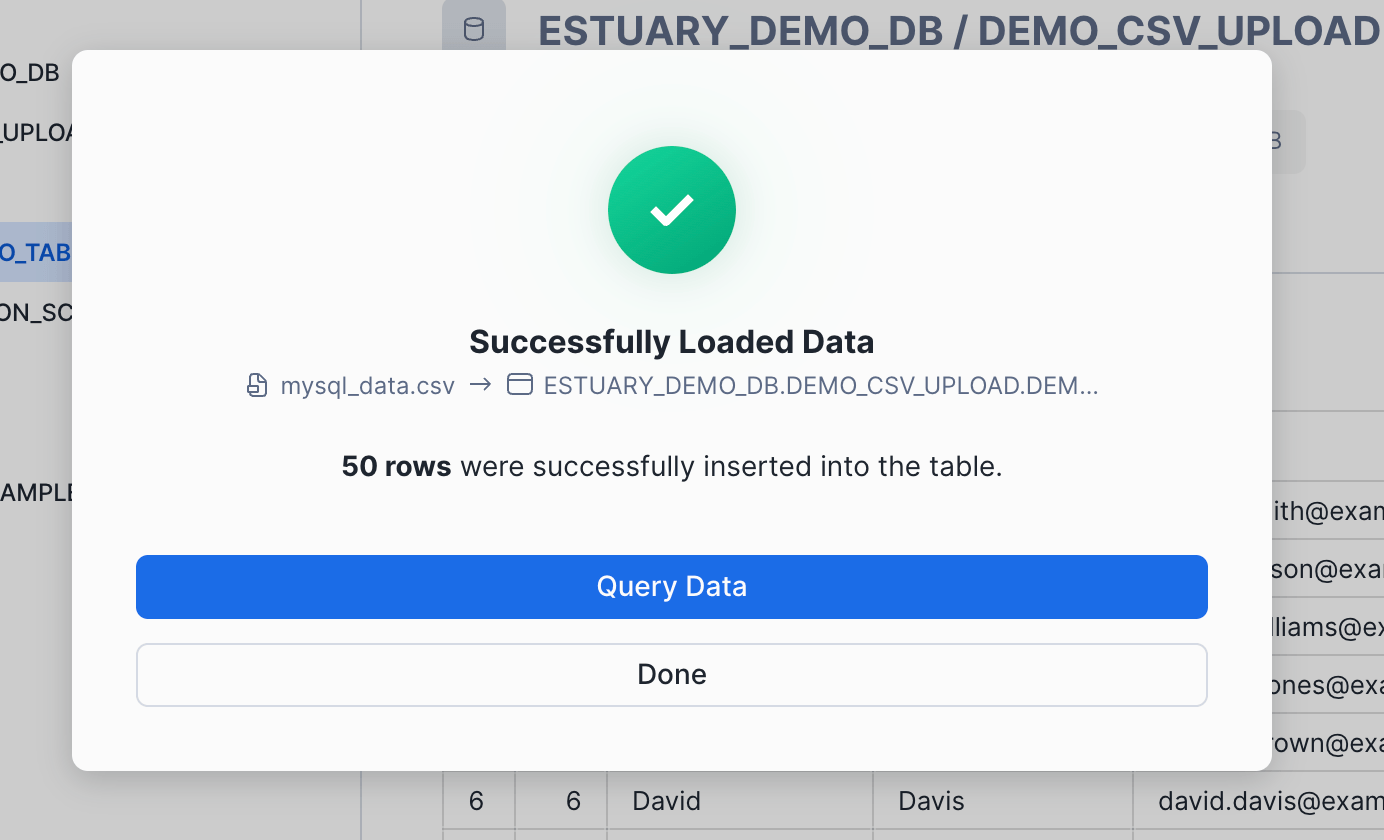
- Once you’ve filled in the metadata fields, just click the blue LOAD button, and voilà! You can preview your data in the destination object you selected!
- If you receive an error message, review the metadata configurations you selected and check for any faulty rows in your file; however, if you extracted your data directly from MySQL and didn’t modify it after, then it’s more likely to be an issue with your metadata configurations than an errant row.
Method 2b. Download the MySQL Data as a File and Then Upload Directly into a Stage Using the Snowsight Interface
Instead of uploading files directly into a table, it can be a good practice to first upload them into a stage. Think of a stage like a file store. Instead of rows and columns, a stage stores the raw file, whether it be a CSV, JSON, parquet, Avro, orc, or XML. You can then keep the files saved inside of Snowflake and then pull them into a table as needed.
Snowflake is also smart enough not to pull duplicate records from the stage. Therefore, you can upload files with overlapping records (for example, if you’re extracting the an entire MySQL table multiple times per week but only want to ingest updates), and Snowflake will only pull the newest record.
The instructions on how to create a stage as well as load files into it are outlined below:
Prerequisites
The same as 2a., with one addition. Your role must also have the grants CREATE STAGE in your schema (if not using an already existing stage) as well as USAGE on the stage that is to be used. Use the following queries to achieve this:
plaintext```
# Grant the ability to create a new stage
GRANT CREATE STAGE ON SCHEMA <your_database>.<your_schema> TO ROLE <your_role>;
# Grant the ability to use stage
GRANT USAGE ON STAGE <your_stage> IN SCHEMA <your_database>.<your_SCHEMA> TO ROLE <your_role>
# Create new stage if not exists
CREATE STAGE IF NOT EXISTS <your_database>.<your_schema>.<your_stage_name>
# To view metadata about your stage
DESC STAGE @<your_stage_name>
```
So you have your file and you have your stage. The steps are very similar to 2a., except this time instead of using the LOAD DATA INTO TABLE to upload a file, we will use LOAD FILES INTO STAGE
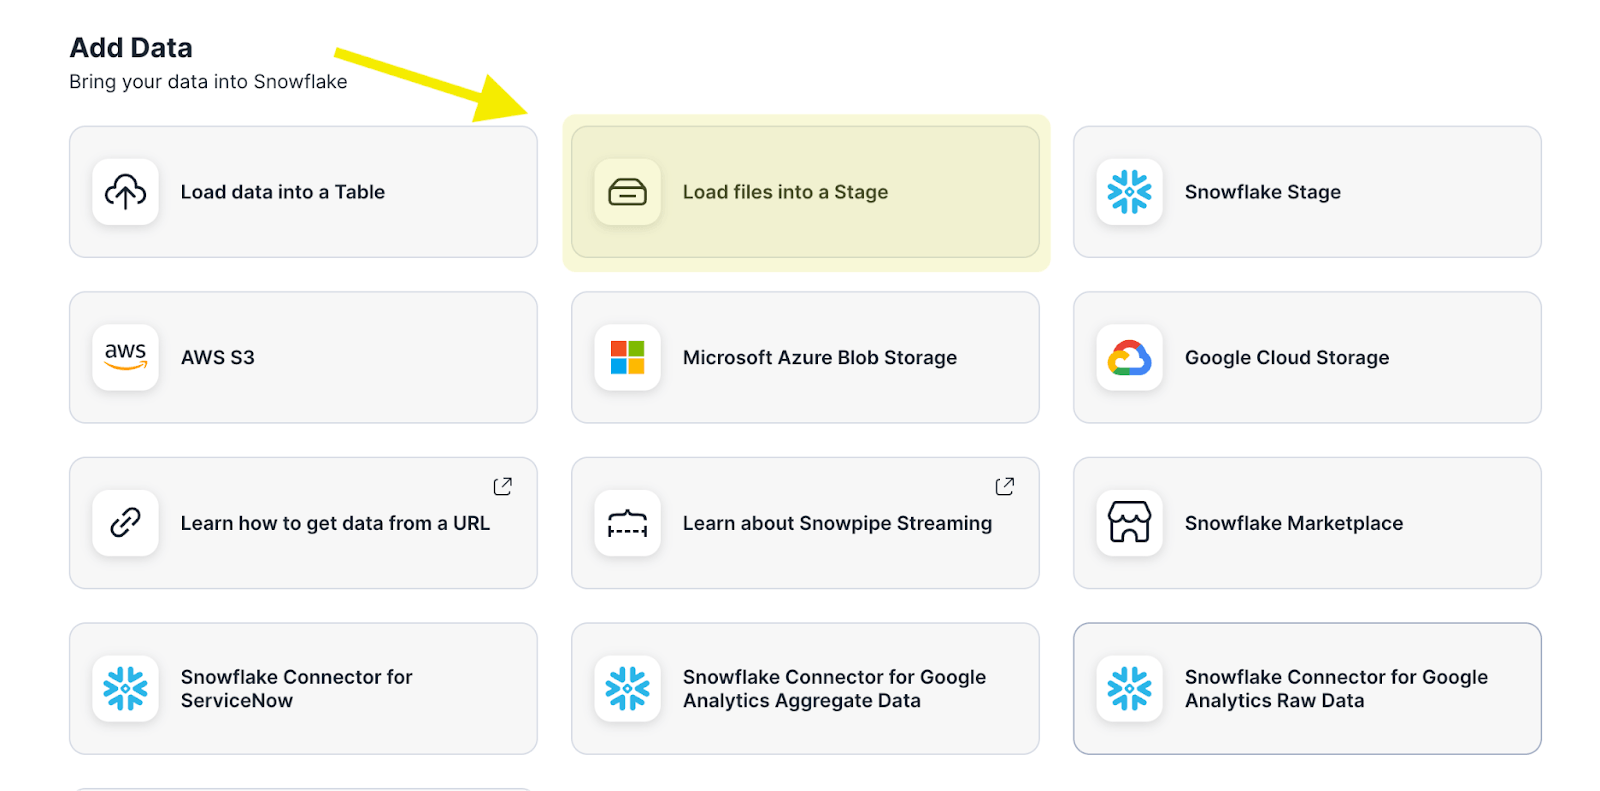
After selecting the DATA button from the sidebar and ADD DATA from the dropdown, select LOAD FILES INTO STAGE. Alternatively, if you haven’t made a stage yet you can select SNOWFLAKE STAGE which will let you create the stage first in the UI.
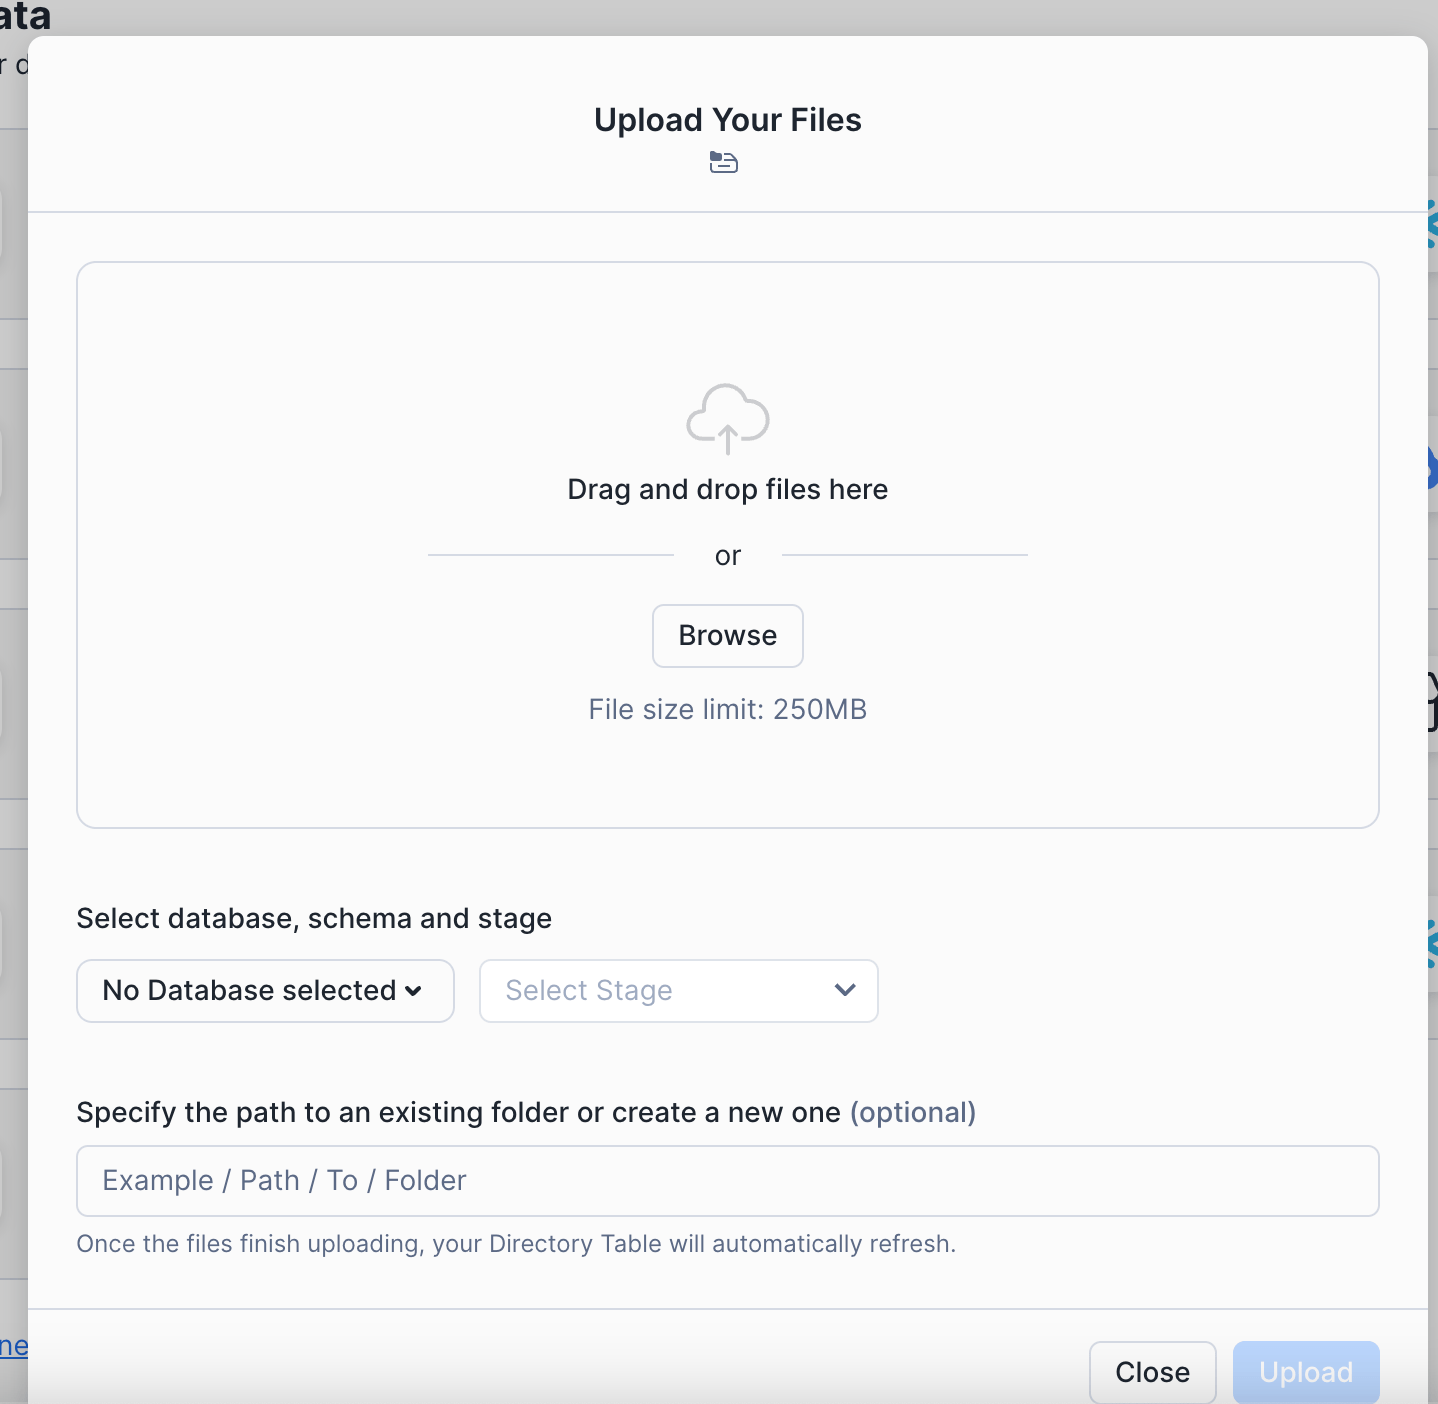
Select the database and schema where your stage was created along with your stage, and optionally include a path where you want the file to be stored inside the stage.
- Click BROWSE and select your file, and then click upload.
Boom. Your file is now in Snowflake’s filestore inside your stage. You can check on it with the following command:
plaintext```
LIST @<your_database>.<your_schema>.<your_stage_name>
```
Now all we need to do is get it into a table.
You can either go back to Method 2a. and instead of clicking the BROWSE button, you can opt to write the path your file in the stage using the notation @stage_name/filepath/filename.csv, or you can use the following code in a worksheet:
plaintext```
COPY INTO <your_database>.<your_schema>.<your_table>
FROM @<your_database>.<your_schema>.<your_stage>/filepath/filename.csv
FILE FORMAT = (
TYPE = ‘CSV’
SKIP_HEADER  = <number_of_lines_preceding_your_data>
)
```
For more information regarding the file format configurations, refer to the notes in Method 2a. Or Snowflake’s documentation on file format options.
You can now check that the data has been loaded in by running a simple select statement on your target table.
Limitations of the Manual Methods 2a. and 2b:
- Time-consuming and error-prone - While this method works in a pinch, it is not scalable and creates technical debt. Analysts and engineers should be working on building out new features and not monotonous and repetitive data upload processes. Could you imagine having to do this multiple times per day? Per hour? Oh, whoops, there was a file format error caused by an errant row, and now your entire morning is gone finding the needle in a haystack of a 100,000 row CSV file.
- Highly technical and demands meticulous planning - Manual uploads create a bottleneck where technical contributors are occupied with mundane tasks. Such a process diverts valuable resources away from strategic initiatives, and the process becomes wholly dependent on (usually) one individual. If they take PTO with nobody to backfill, then these data pipelines and the downstream decision-making are ground to a halt… and if you, dear reader, are the individual responsible for this download & upload pipeline, and you are the one on PTO… well… I hope you don’t get overwhelmed by a bombardment of Slack messages when you return from your vacation 😆
- High risk of compromising data quality and security - With any manual process that depends on human input, there is always a risk of human error. During the steps between the file extraction from MySQL and upload into Snowflake, there’s abundant opportunity for the data to be accidentally modified or distributed to unauthorized users with a high likelihood that nobody will ever realize it.
- Data gets stale, and it gets stale fast - By the time you’ve finished manually uploading your file, that data could very well now be stale. This manual process must be completed each and every time the data changes, unlike with Change Data Capture which automatically pushes inserts and updates in fractions of a second. You want to be making decisions and taking action with the most reliable and accurate information, and this manual method does not provide that.
- Not suitable for analytics requiring instant, real-time refreshes - You’ll be at a disadvantage with operational analytics, user-facing analytics, and highly personalized customer experiences. At least the kind that will really wow your customers and stakeholders. While technically possible with these manual processes, those use cases which thrive with low-latency, highly-refreshed data will be incredibly underwhelming experiences for everyone involved.
Conclusion
Connecting MySQL to Snowflake in a way that can withstand the demands of your business can be tricky. While manual migration techniques, such as exporting data to CSV files, offer a hands-on approach, they can be time-consuming and error-prone, requiring significant technical expertise. Managed pipeline services like Estuary can help take this burden off your engineering team. If you're working with another destination, like BigQuery or Redshift, check out our guides for MySQL to BigQuery and MySQL to Redshift.
With Estuary, establishing a reliable and efficient pipeline is simple: it backfills historical data from MySQL and then continuously streams new changes into Snowflake in real time.
To learn more about Estuary firsthand and explore how it can streamline your data integration, you can start your free trial or get in touch to discuss your specific needs.
FAQ:
- What is the difference between MySQL and Snowflake?
- MySQL is a transactional, relational database management system optimized for write operations. It is most typically used as a data store for the backend of web applications where records are inserted and updated at scale.
- Snowflake is a cloud-based data warehousing solution optimized for analytical processing and running complex queries over large datasets. Snowflake leverages columnar storage, massively parallel processing, and automatic clustering to ensure scalability with ease.
- MySQL is a transactional, relational database management system optimized for write operations. It is most typically used as a data store for the backend of web applications where records are inserted and updated at scale.
- How to transfer data from MySQL to Snowflake?
- The most efficient and cost-effective way to replicate data from MySQL into Snowflake is with Estuary. Estuary uses change data capture to ingest data with sub-second latency from MySQL into Snowflake for a fraction of the cost of other data ingestion tools.
- Beyond Estuary, you can load data manually from MySQL into Snowflake by manually exporting CSV files from MySQL to the local drive and then uploading the CSV into Snowflake via the Snowsight UI. Though this method works, it’s time-consuming, prone to errors, and does not empower organizations to capitalize on their data in real-time.
- The most efficient and cost-effective way to replicate data from MySQL into Snowflake is with Estuary. Estuary uses change data capture to ingest data with sub-second latency from MySQL into Snowflake for a fraction of the cost of other data ingestion tools.
- Is it possible to replicate specific MySQL tables to Snowflake?
Yes! With Estuary, you can select which tables you want materialized in Snowflake via the Estuary UI. Setting up a flow only takes a few minutes, and so why not sign up for a free trial to see for yourself!

About the author
With over 15 years in data engineering, a seasoned expert in driving growth for early-stage data companies, focusing on strategies that attract customers and users. Extensive writing provides insights to help companies scale efficiently and effectively in an evolving data landscape.


