If your organization uses Confluence and seeks to unlock invaluable insights into collaborative and operational data, consider integrating Confluence to BigQuery. This integration can allow you to leverage BigQuery’s powerful analytical capabilities for enhanced decision-making, optimized workflows, and improved collaboration.
Integrating Confluence to BigQuery comes with multiple benefits, including generating comprehensive reports on team performance analytics and project outcomes. The enhanced analytical capabilities of this connection can help your organization build a more collaborative and compliant work environment.
Let’s look at a quick overview of both platforms, followed by the different integration methods to load data from Confluence to BigQuery.
Confluence – The Source
Confluence, developed by Atlassian, serves as a team collaboration tool for connecting, sharing information, quick updates, and one-on-one communication. It is well-suited for teams working on the same project and helps bridge communication gaps in the Software Development Life Cycle (SDLC).
Confluence is available in two formats:
- Self-hosted: You can host Confluence on your in-house servers or data centers, giving you full control over the hosting environment.
- Subscription-based: The cloud-based option offers a subscription-based model. This eliminates the need for in-house servers and lets you access your data anywhere.
Key Features of Confluence
Some key features of Confluence include:
- Project Management: Confluence is a comprehensive project management platform suitable for organizations of all sizes. It lets you track project progress effectively with integrated Jira tickets, providing clear insights into project status and milestones.
- Centralized Work Environment: Confluence provides unlimited space, allowing you to allocate dedicated zones to each team to promote centralized workflow. It offers efficient work retrieval through a powerful search engine and a structured hierarchical system.
- User Management: Confluence adheres to industry-standard user management practices, allowing administrators to assign permissions to individual users and groups for viewing, commenting, and editing content.
- Security: Confluence maintains robust security measures, such as CAPTCHA verification during login, and security filters for actions such as commenting, page creation, and editing. It also offers controlled access to pages for additional privacy and security.
BigQuery – The Destination
BigQuery, a powerful data warehouse solution offered by Google Cloud, is designed for flexibility in business analytics. It operates on a serverless architecture that allows you to run SQL queries on massive datasets without requiring infrastructure management. BigQuery’s architecture is divided into two components:
- Storage Layer: It is responsible for data ingestion, storage, and optimization.
- Compute Layer: It provides the computational power for performing analytics.
The BigQuery interface consists of two primary components:
- Google Cloud Console: With the Google Cloud Console, you can create and manage BigQuery resources and execute SQL queries. New users signing up for Google Cloud get $300 in free credits, which they can use to explore, test, and deploy workloads.
- BigQuery Command-Line Tool: This is a Python-based command-line tool for managing BigQuery operations. You must first set up a project in the Google Cloud console to use this tool.
Key Features of Google BigQuery
Google BigQuery comprises some essential features like:
- Code Assistance: BigQuery comprises an embedded AI collaborator, DuetAI, which provides contextual code support for Python, SQL code composition, and auto-suggestions for code blocks, functions, and solutions. The chat assistance feature offers real-time guidance using natural language to accomplish specific tasks.
- Data Security: BigQuery provides powerful security measures that safeguard data throughout its lifecycle. It also ensures data access is aligned with organizational policies.
- Cost-effectiveness: BigQuery offers a flexible pricing model, offering both on-demand and flat-rate options. This allows you to choose the pricing plan that best fits your usage needs and budget.
How to Integrate Data From Confluence to BigQuery
Integrating Confluence with BigQuery can enhance your analytical capabilities, streamline team collaboration, and improve multi-channel experiences within your organization. Let’s look at how you can execute this integration.
Here are the two methods to connect Confluence to BigQuery:
- Method 1: Using Estuary Flow to Integrate Confluence to BigQuery
- Method 2: Using a Custom Data Pipeline for Confluence to BigQuery Integration
Method 1: Using Estuary Flow to Integrate Confluence to BigQuery
Estuary Flow is a real-time Extract, Transform, Load (ETL) tool designed to simplify data integration tasks. It offers a comprehensive platform for extracting data from sources, transforming it, and loading it into desired destinations.
With support for real-time data processing, schema inference, and multi-destination data delivery, you can efficiently manage data pipelines to drive actionable insights.
Benefits of Using Estuary Flow
- No-Code Platform: Estuary Flow offers an intuitive interface that allows you to migrate data from Confluence to BigQuery in just a few clicks. With no-code configuration and basic transformation support, the only time you’ll need to code is for any advanced transformation requirements.
- Built-in Connectors: With over 300+ readily available connectors for popular data sources and destinations, Estuary Flow simplifies the integration process for migrating data between platforms, significantly reducing the need for manual efforts.
- Scalability: As a fully integrated enterprise-grade solution, Estuary Flow seamlessly scales to accommodate varying data volumes, supporting data flows of 7 GB/s or more.
Let's go through the step-by-step process to move Confluence data to BigQuery.
Prerequisites
Step 1: Connect Confluence as Source
- Login to your Estuary Flow account.
- To set up the source connector, click the Sources option on the dashboard's left-side pane and click the + NEW CAPTURE button.
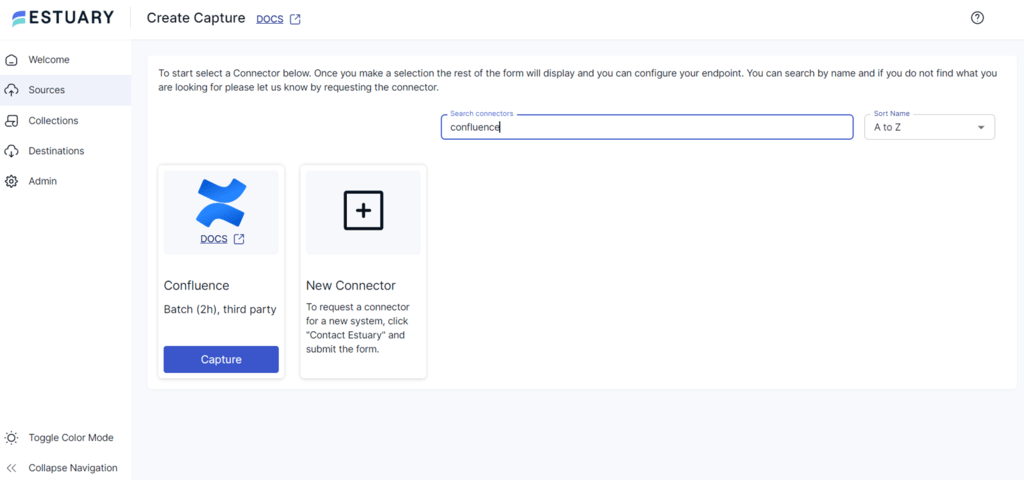
- Search for Confluence using the Search connectors field on the Create Capture page. Then click the connector’s Capture button to proceed.
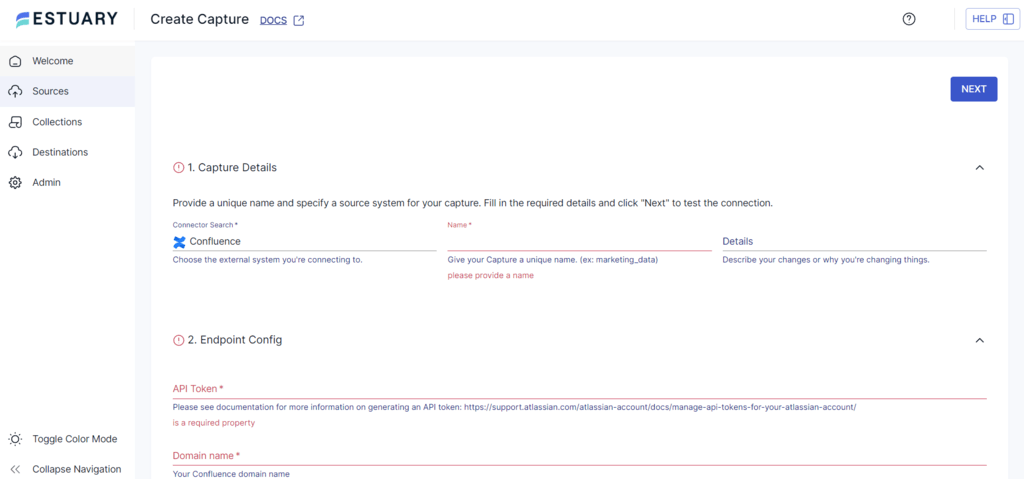
- On the Create Capture page, fill in the mandatory details, such as Name, API Token, Domain name, and Email.
- Click the NEXT button and then SAVE AND PUBLISH. The connector will capture your Confluence data and send it to Flow collections via the Confluence Cloud REST API.
Step 2: Connect BigQuery as Destination
- To configure BigQuery as the destination, click the Destinations option in the left-hand navigation pane of the Estuary Flow dashboard.
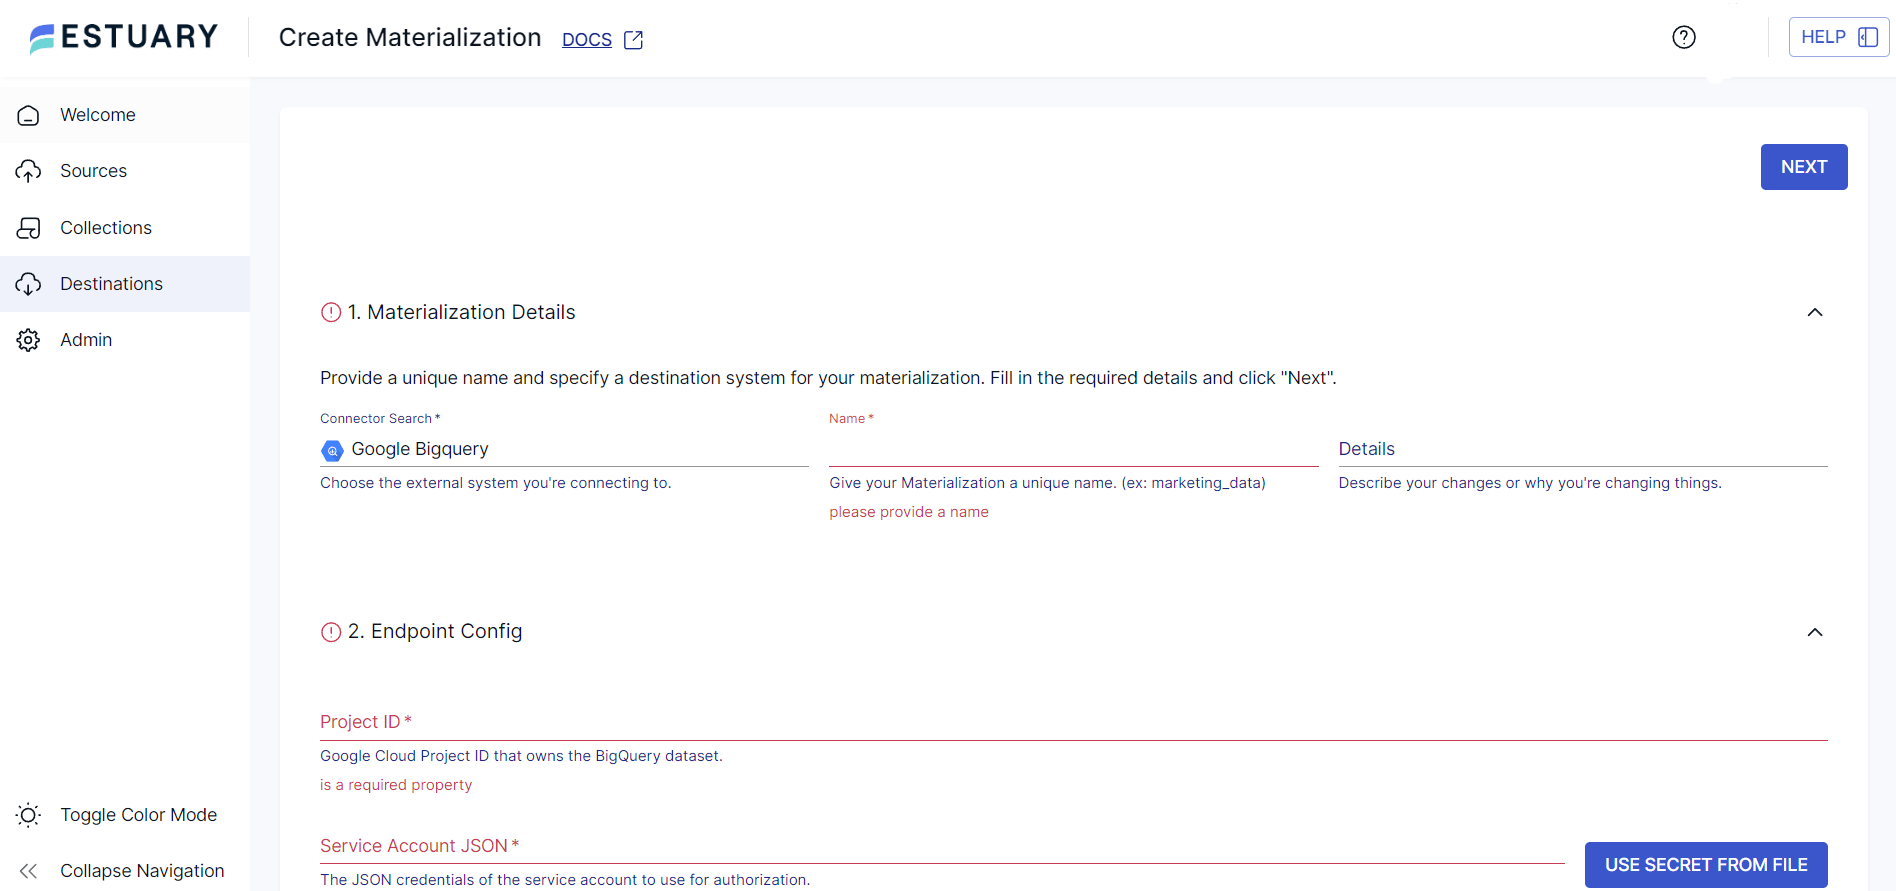
- On the Destinations page, Click the + NEW MATERIALIZATION button.
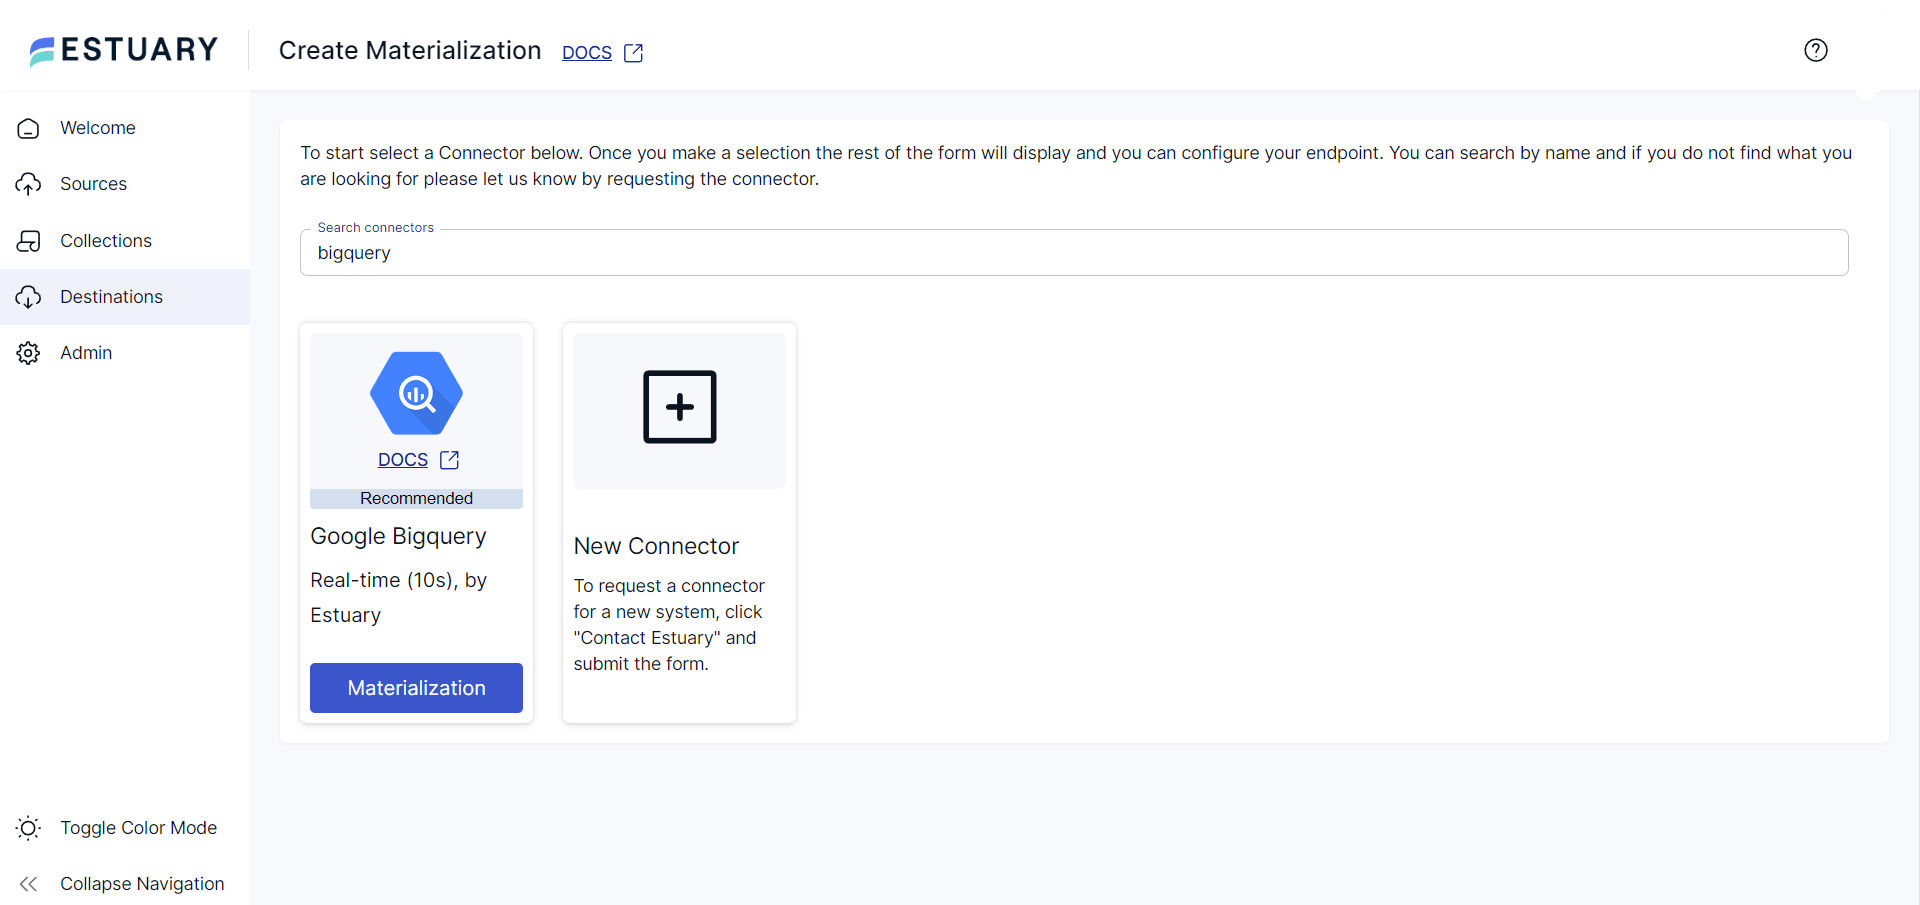
- Type BigQuery in the Search connectors field and click on the Materialization button of the Google BigQuery connector.
- On the BigQuery Create Materialization page, specify the necessary details, such as Name, Project ID, Service Account JSON, Region, Dataset, and Bucket.
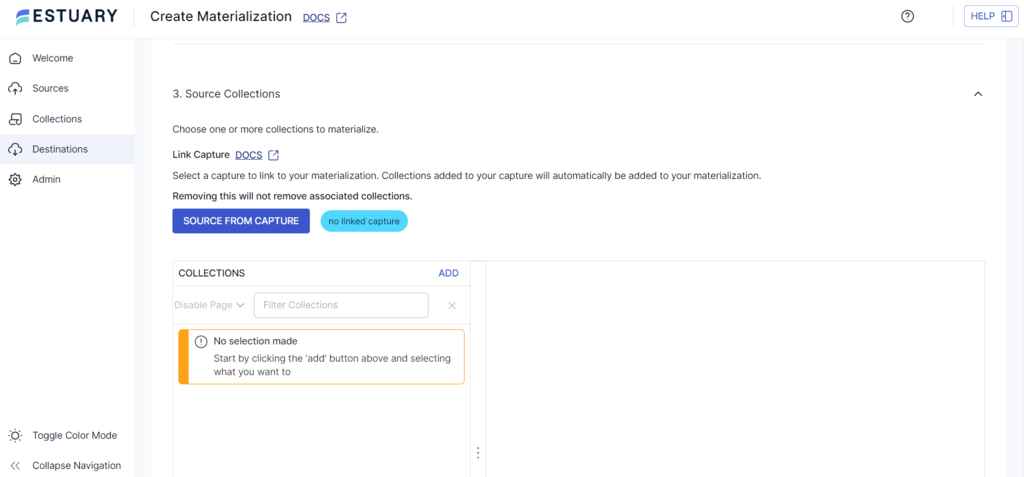
- Click the SOURCE FROM CAPTURE button in the Source Collections section to manually link a capture to your materialization.
- Finally, click the NEXT button and then SAVE AND PUBLISH to complete the configuration. The connector will materialize Flow collections of your Confluence data into BigQuery tables.
Method 2: Using a Custom Data Pipeline for Confluence to BigQuery Integration
To create a custom data pipeline for Confluence and BigQuery integration, follow the steps mentioned below:
Step 1: Export Confluence Data
Here’s how you can export Confluence data using the Confluence UI. Before you start with it, consider these prerequisites:
- An authorized Confluence Data Center License
- Global System Administrator permission to access necessary API endpoints
- Access the Data Pipeline
In Confluence, navigate Administration > General Configuration > Data Pipeline to access and configure the data pipeline settings.
- Schedule Exports
To schedule an export, follow these steps:
- Select Schedule settings in the Data Pipeline configuration.
- Click on the Schedule regular exports checkbox.
- Select a date and time to start the export, and choose if the export should be repeated.
- Select the Schema version.
- Save your schedule settings.
- Check the Status of the Export
To see the full details of the export, click the triple-dot button on the Data Pipeline screen and select the View details option. The details will include the status, export parameters, and any errors returned if the export has failed.
Alternative Step 1: Using REST API to Export Confluence Data
You can use the REST API to manage exports as an alternative to the Confluence UI.
- Execute a POST Request
plaintext<base-url>/rest/datapipeline/latest/exportFor example, you can make a POST request using cURL and an access token.
plaintextcurl -H "Authorization:Bearer Your_Access_Token" -H "X-Atlassian-Token: no-check"
-X POST Your_Confluence_Base_URL/rest/datapipeline/latest/
export?fromDate=YYYY-MM-DDTHH:MM:SSZ
This endpoint can also manage export data status checks, scheduling, and cancellations.
- Output Files
Every time the data is exported, a numerical job ID gets assigned to the task, which is used in the file name and location of exported data files.
The exported files are saved in the following directories.
- <shared-home>/data-pipeline/export/<job-id> if you run Confluence in a cluster
- <local-home>/data-pipeline/export/<job-id> you are using non-clustered Confluence
Note: By default, the data pipeline exports the files to the home directory. However, you can also set the custom export path using the REST API.
You need to understand the schema to load and transform the exported files. Learn more about the Data pipeline export schema here.
Step 2: Load CSV to BigQuery
Follow these steps to load the CSV file with Confluence data to BigQuery:
- In the Google Cloud Console, navigate to the BigQuery page.
- In the Explorer panel, expand your choice project and select a dataset.
- Click the vertical triple dot Actions option > Open.
- In the details panel, click on the Create table + button.
- In the Source section,
- Select Upload for Create table from.
- Click the Browse button from the Select File option.
- Browse the CSV file you want to upload and click Open.
- Select CSV for File format.
- On the Create table page’s Destination section,
- Choose the appropriate Project and Dataset in which you want to create a table.
- Enter the name of the table in the Table field.
- Set the Table type to Native table.
- Enter the schema definition in the Schema section.
- For CSV files, you can check the Auto-detect option to enable schema auto-detect.
- You can also manually enter the schema information.
- Click Create Table to load the CSV data into the BigQuery table you just created.
These steps will successfully load your Confluence data in CSV form into BigQuery tables.
Limitations of Creating a Custom Pipeline for Confluence to BigQuery Integration
- The manual methods may witness scalability challenges when dealing with increasing data volumes over time.
- The custom method requires ongoing maintenance to ensure compatibility with the changes in schema and evolving business requirements.
- BigQuery doesn't allow the use of wildcards when uploading multiple CSV files. You must upload each file separately unless you use Google Cloud Storage (GCS).
- When using the Google Cloud console to upload CSV, the file size cannot exceed 100 MB. It is recommended that larger files be stored in Google Cloud Storage.
The Takeaway
Data migration from Confluence to BigQuery offers several advantages, including data security, advanced data governance, compliance management, and ideal solutions for business growth with expanding Confluence data.
There are two approaches to migrating data from Confluence to BigQuery. One method is to use a custom data pipeline to transfer data from Confluence to BigQuery. However, this approach has certain limitations, such as cost-effectiveness, continuous monitoring, and time-consuming.
The other method to connect Confluence and BigQuery involves building data pipelines with Estuary Flow. Flow’s connectors are open-source, empowering users to customize connectors by adding custom objects or creating entirely new connectors from scratch without needing a local development environment. The no-code connector builder can help you complete the data integration process in just a few minutes.
Are you looking to transfer data from various sources to destinations? Estuary Flow offers an extensive solution for your various data integration needs. Get started by signing up for a free account today!
Frequently Asked Questions (FAQs)
- What data can I extract from Confluence for integration with BigQuery?
You can extract diverse types of data from Confluence, including pages, comments, attachments, user activity, logs, and more. The data you want to extract will depend on your use case and the insights you aim to derive. - What are the top five ETL tools for data migration from Confluence to BigQuery?
The top five ETL tools that can be used to transfer data from Confluence to BigQuery include Estuary, Informatica PowerCenter, Fivetran, Matilion, and Talend Data Integration.

About the author
With over 15 years in data engineering, a seasoned expert in driving growth for early-stage data companies, focusing on strategies that attract customers and users. Extensive writing provides insights to help companies scale efficiently and effectively in an evolving data landscape.


