Suppose you are using Debezium to capture data changes from PostgreSQL and push them to Snowflake. In that case, you already know the importance of CDC and the need to capture real-time changes, process them, and push them to other data stores like Snowflake, BigQuery, Redshift, etc.
Change Data Capture(CDC) is the process of capturing data changes made to a database as they occur and sending them to targets. Debezium was one of the first technologies to capture data changes and has been widely adopted. However, many tools have evolved in this domain over time, simplifying the CDC process.
Estuary is a powerful no-code tool that you can use to create an end-to-end pipeline capturing changes from databases like PostgreSQL and pushing them into different targets. Estuary has many benefits compared to Debezium-based pipeline, as can be seen in detail in this blog comparing Debezium and Estuary. This blog will detail how to migrate a PostgreSQL Debezium -> Snowflake pipeline onto Estuary.
Why Should You Consider Migrating from Debezium?
In case you are on Debezium and are wondering if the migration to Estuary is a step in the right direction, here are some of the points you should consider:
- Infrastructure Management: Debezium is an open-source tool that does not include built-in management support. You manage the Kafka Connect cluster and the various Debezium connectors. In contrast, Estuary is a fully managed solution. You only need to configure your Flow once, and the Estuary team ensures it runs smoothly. All responsibilities related to maintaining robust and reliable underlying infrastructure are wholly offloaded.
- Monitoring: Monitoring connectors in production is a critical task. With Debezium, you’re responsible for capturing emitted metrics, setting up appropriate alerts, and responding to incidents, often requiring on-call intervention to identify and resolve issues. In contrast, Estuary is a fully managed solution where the Estuary team handles all of this. You don’t need to worry about collecting metrics or dealing with alerts—the operational burden is entirely off your plate.
- Schema Evolution Handling: Estuary supports schema evolution handling on par with Debezium. Estuary can efficiently handle all the schema evolutions Debezium handles, among others.
- Networking and Security: Networking and security are critical components that the Estuary team manages when you choose Estuary. Estuary implements a range of security best practices, including using secure connections. These connections are established using SSL/TLS or VPC peering to ensure data protection and network integrity.
- Cost Implications: Estuary’s pricing is based on the number of connectors you publish and the data volume passed through the platform. However, it also eliminates the need to manage a real-time change data capture pipeline. When you compare the infrastructure and operational costs of running Debezium pipelines with Estuary’s fully managed service, you may find that choosing Estuary was a wise decision that saves you time, effort, and ongoing management headaches.
Before You Migrate: What to Expect
While migrating from Debezium to Estuary, we can ensure that we start Estuary exactly from where Debezium has left off. However, here are some points to consider:
- There will be a delay for the data to be reflected in Snowflake as we will be pausing the Debezium flow, noting down the point till which Debezium has read the changes, and starting Estuary from that point. This process is manual, and the data will be paused from being pushed into Snowflake during this time. You may consider it downtime from the perspective of the stakeholders of Snowflake data.
- The switch-over process is based on the log ID until Debezium has read. Debezium keeps track of the same. As the Estuary will start reading right after this log ID, the migration ensures no data loss. Also, it ensures that no data is consumed, avoiding duplication.
Get a tailored Debezium to Estuary migration plan
Share your current setup and we’ll help you map the switchover for no data loss and minimal downtime.
Step-by-Step Migration from Debezium to Estuary
Prerequisites
To follow the guide below, you’ll need:
- An Estuary account: Go to the Estuary web app on the dashboard.estuary.dev to sign up for the free tier.
- PostgreSQL database with a username and password. You can reuse the username and password you used to connect Debezium to PostgreSQL or create a new one.
- Snowflake account with a valid username and password.
Step 1: Setup PostgreSQL
- In case you want to create a new user for Estuary, you can do so with the following command:
plaintextCREATE USER flow_capture WITH PASSWORD '<password>' REPLICATION;- Assign the appropriate role using the appropriate username (`flow_capture` in this case).
i. If using PostgreSQL v14 or later:
plaintextGRANT pg_read_all_data TO flow_capture;ii. If using an earlier version:
plaintextALTER DEFAULT PRIVILEGES IN SCHEMA public GRANT SELECT ON TABLES to flow_capture;
GRANT SELECT ON ALL TABLES IN SCHEMA public, <other_schema> TO flow_capture;
GRANT SELECT ON ALL TABLES IN SCHEMA information_schema, pg_catalog TO flow_capture;
Where <other_schema> lists all schemas that will be captured from.
- Create the
watermarkstable, grant privileges, and create a publication:
plaintextCREATE TABLE IF NOT EXISTS public.flow_watermarks (slot TEXT PRIMARY KEY, watermark TEXT);
GRANT ALL PRIVILEGES ON TABLE public.flow_watermarks TO flow_capture;
CREATE PUBLICATION flow_publication;
ALTER PUBLICATION flow_publication SET (publish_via_partition_root = true);
ALTER PUBLICATION flow_publication ADD TABLE public.flow_watermarks, <other_tables>;
Where `<other_tables>` lists all tables that will be captured from. The `publish_via_partition_root` setting is recommended (because most users will want changes to a partitioned table to be captured under the name of the root table), but is not required.
- Given that you are already capturing the data from PostgreSQL using Debezium, you should already have logical replication enabled on your PostgreSQL instance. You can quickly check this using the command:
plaintextSHOW wal_level;It should return `logical`. In this case, this value is anything other than `logical`, run the following command to change it to `logical`:
plaintextALTER SYSTEM SET wal_level = logical;Restart PostgreSQL to allow the WAL level change to take effect.
Step 2: Stop Debezium and Note the Checkpoint
To migrate from Debezium to Estuary, you can stop the Debezium connector. On your PostgreSQL server, run the following SQL query:
plaintext> SELECT * FROM pg_replication_slots;Note down the value of catalog_xmin for the record with slot_name as debezium, and plugin equal to the plugin.name attribute in the Debezium connector configuration. We will be using these values later while setting up the Estuary.
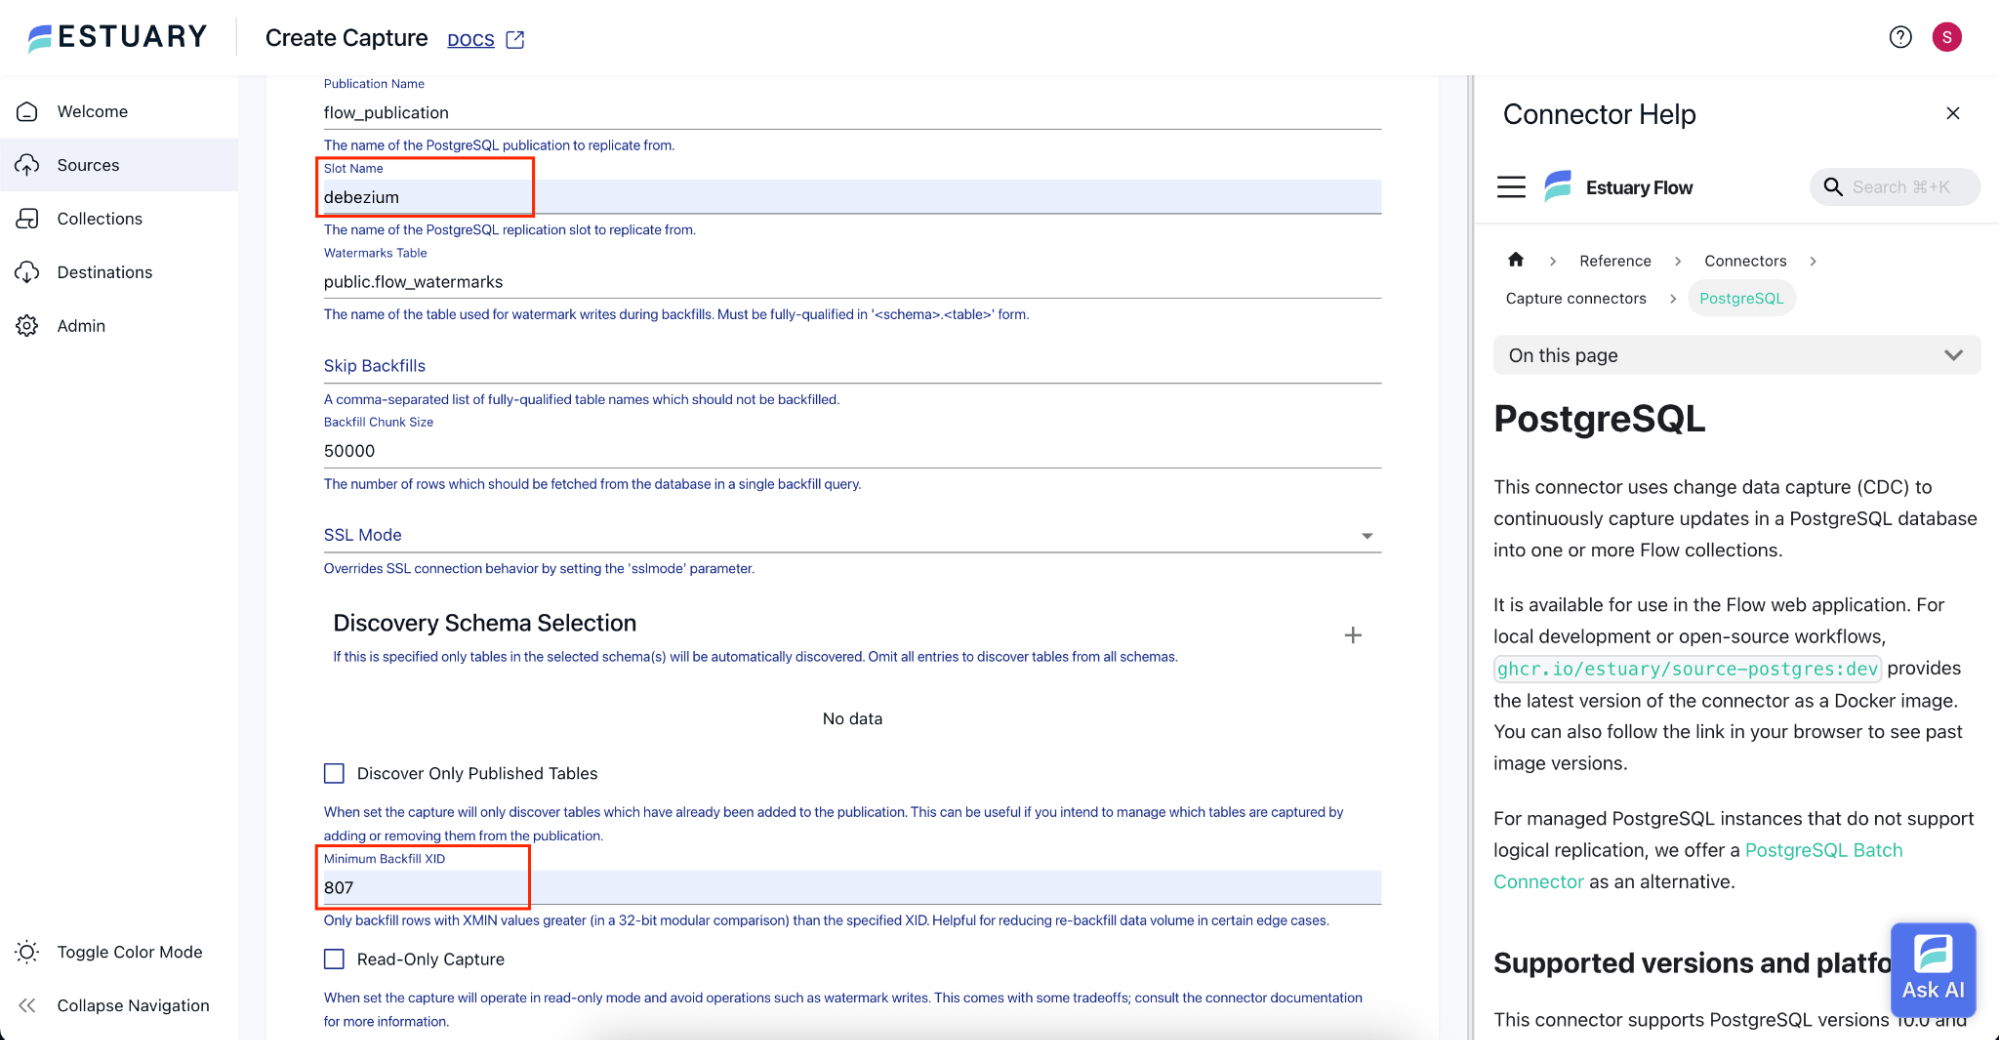
catalog_xmin represents the oldest transaction ID still needed by the replication slot. Using it as the Minimum Backfill XID helps Estuary start at the right point so you avoid re-reading old changes (duplication) and avoid skipping new ones (data loss).
Step 3: Create PostgreSQL Source in Estuary
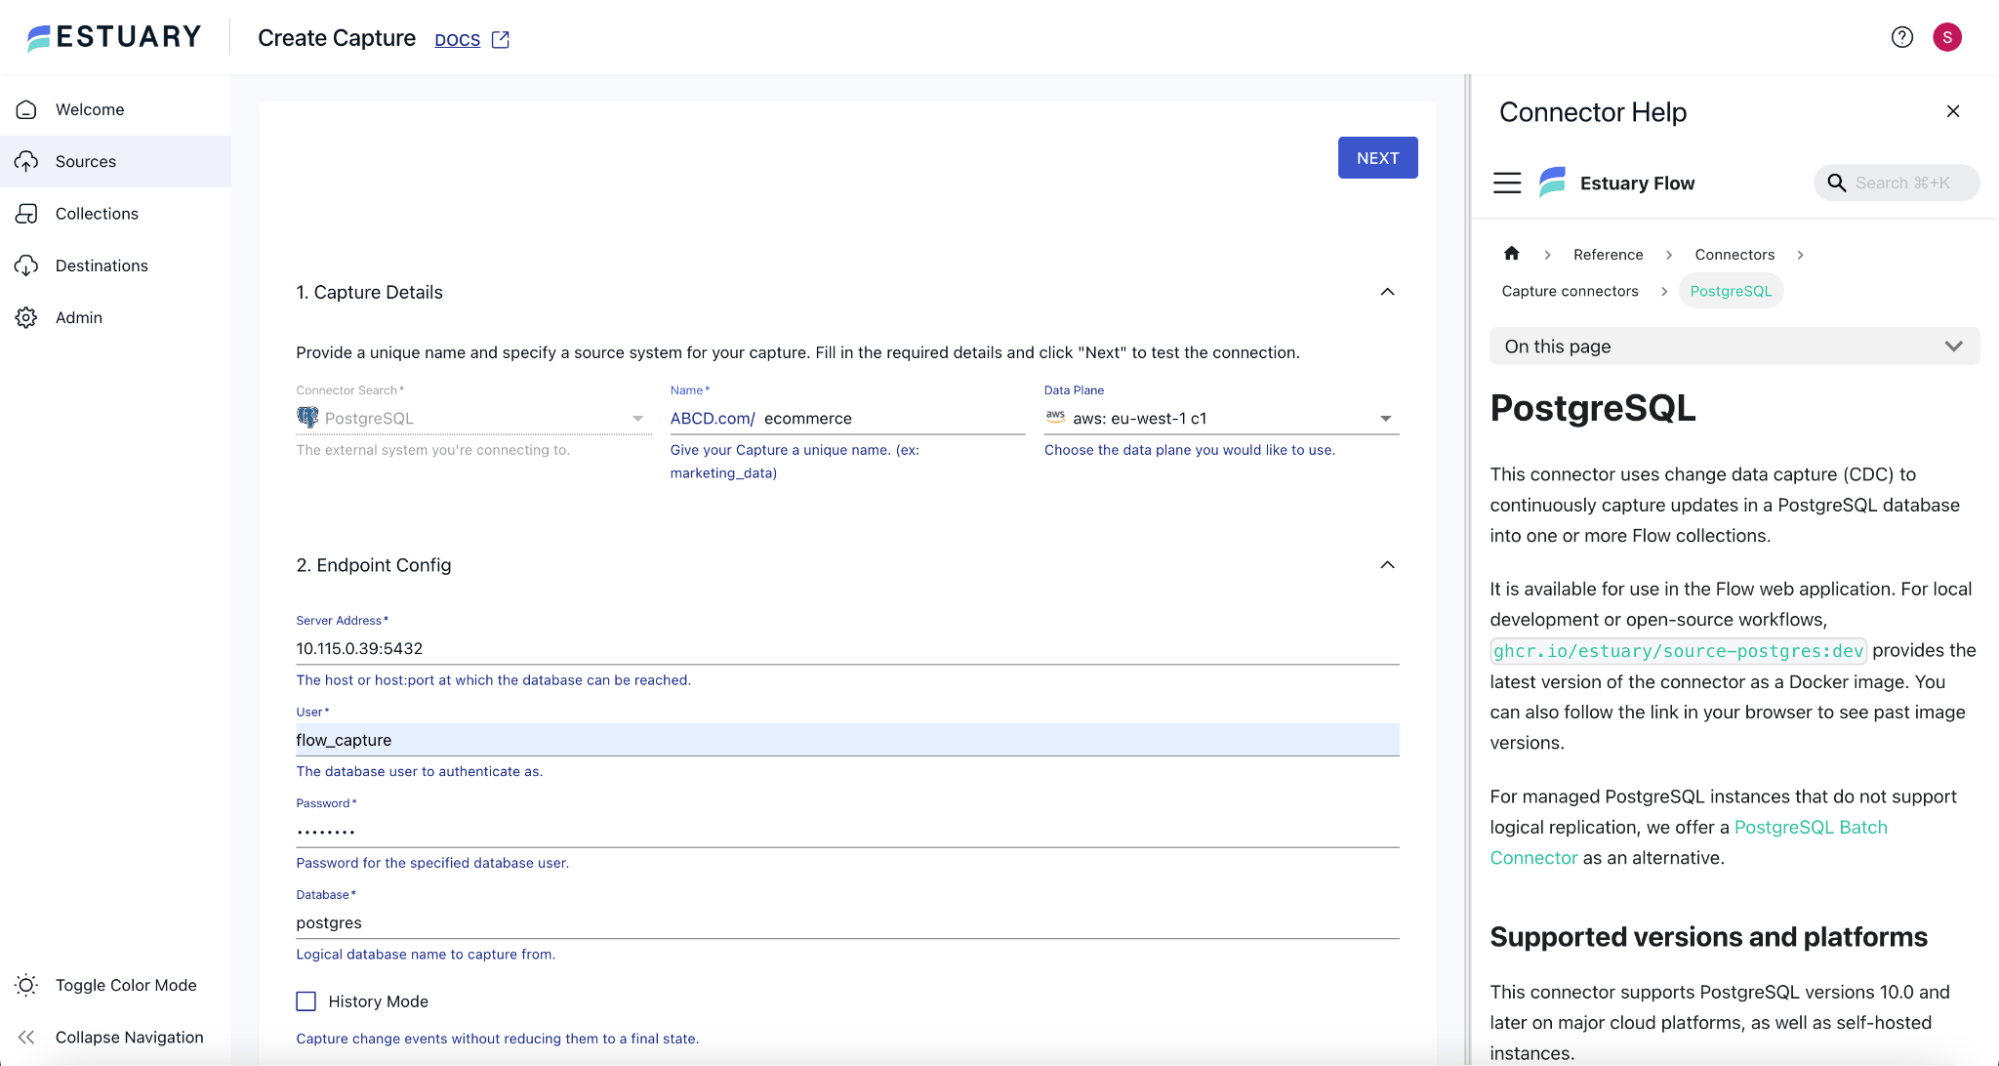
Log in to Estuary, and you will land on the Estuary Dashboard. From the left navigation menu, navigate to Sources, and click the New Capture button.
On the Create Capture page, search for “PostgreSQL” and click the Capture button on the PostgreSQL tile. On the PostgreSQL Create Capture page, put in the appropriate Name for the capture, and choose any Data Plane of your choice.
In the Endpoint Config section, put the host and port of the PostgreSQL server under the Server Address, and provide the username and password to connect to the PostgreSQL server under User and Password, respectively. Provide the appropriate database under Database.
Click on the Advanced Options section. Change the Slot Name to debezium. Most importantly, we put the value from the catalog_xmin column in the Minimum Backfill XID textbox. This ensures that Estuary starts capturing the changes from where it left off. This avoids having any duplicate information and avoids missing data.
If Estuary uses a different slot name than Debezium, PostgreSQL treats it as a new replication slot. That can lead to a backfill you didn’t intend and a longer cutover window. Reuse the existing slot only when you’re ready to fully switch.
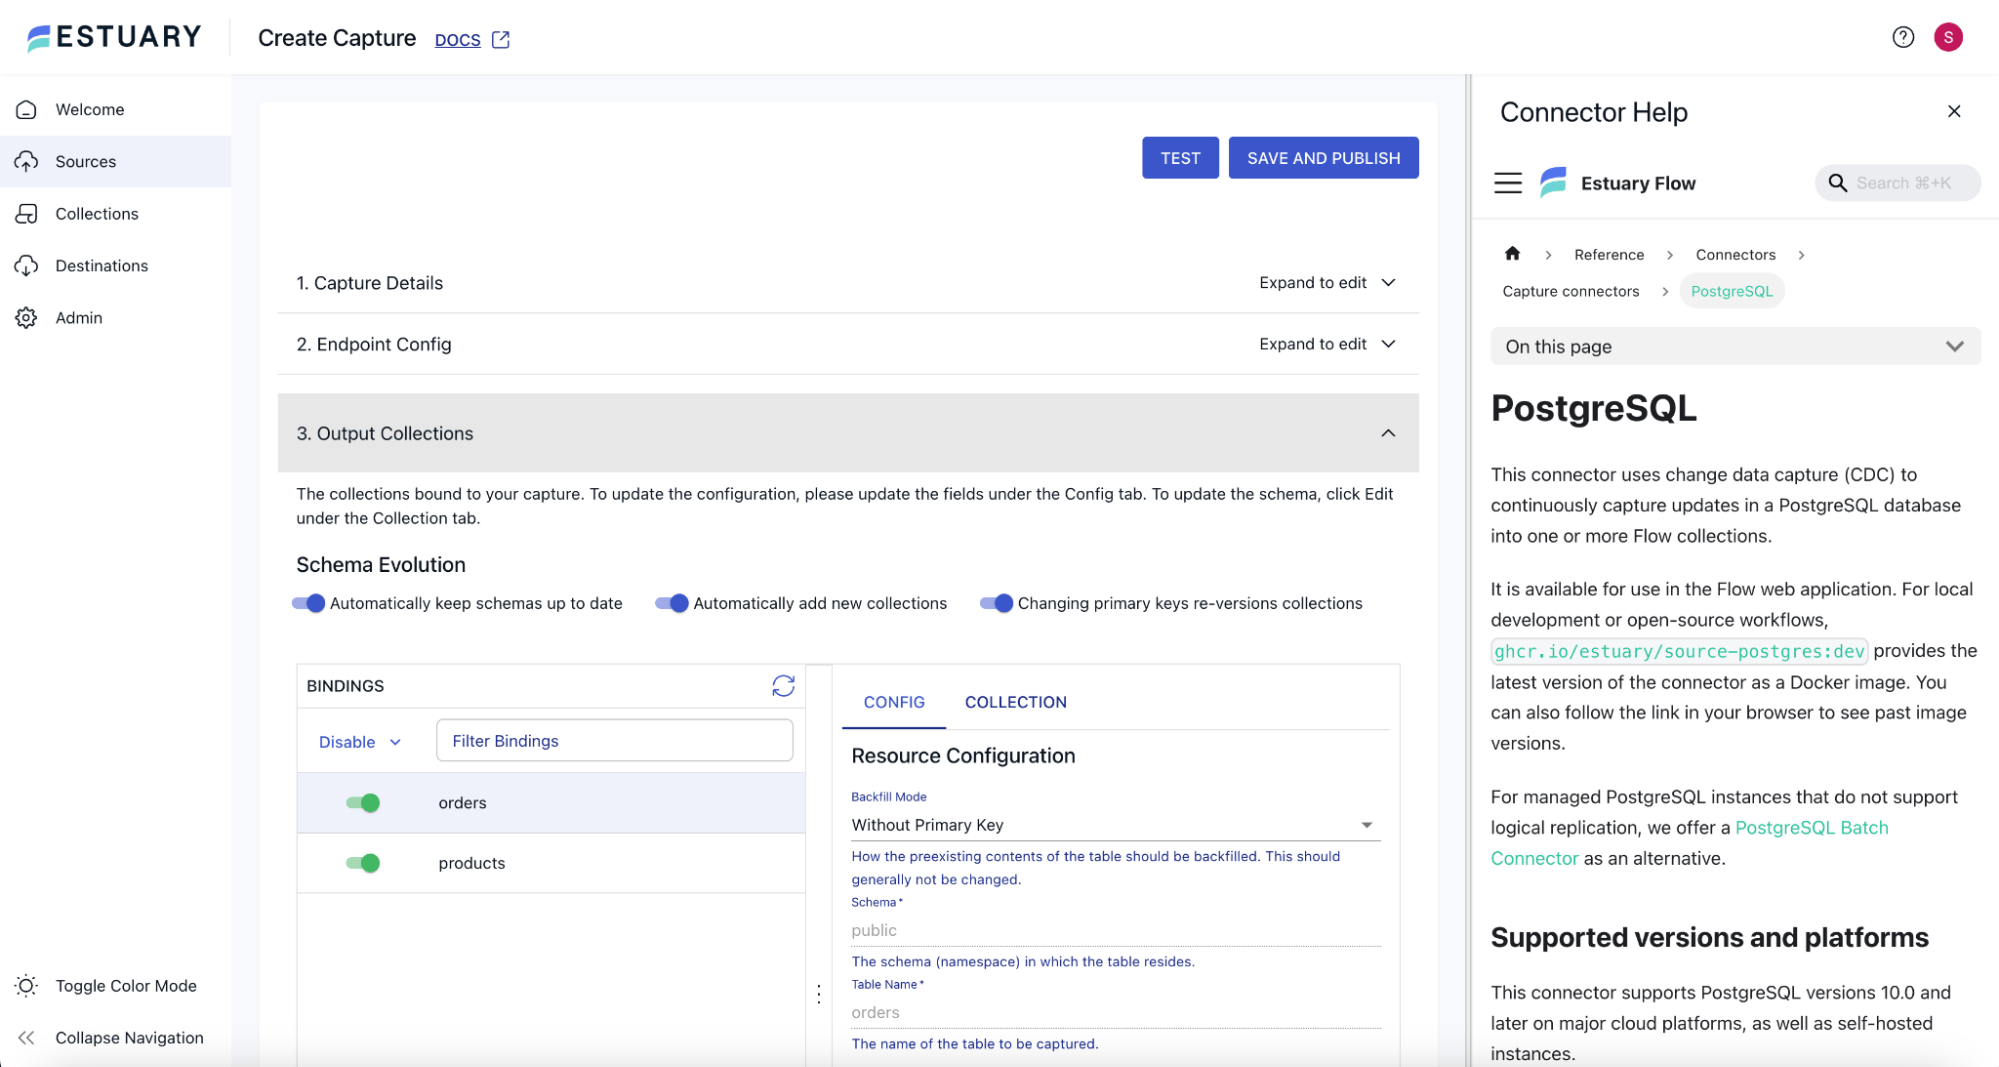
You can then click Next in the top right corner of the page.
Estuary will now establish the connection to the PostgreSQL server, fetch all the tables in the database, and show them under the Bindings section. You can unselect any tables in the bindings to avoid ingestion. Once you have the right tables turned on for ingesting, click the Test button at the top of the page. Once the testing is successful, click the Save and Publish button to save the capture.
In a few minutes, the capture will start capturing the data from PostgreSQL, and the collections corresponding to each table being captured from PostgreSQL will be created. Once the status turns green for the capture, you can navigate to Collections from the left navigation menu and check that the corresponding collections have been created.
Also note that all the records from the tables have been captured in the collections as indicated by the Docs In column. The incremental changes in PostgreSQL will also get captured as and when they happen.
Note the records in the collections. The collections do not bring in the complete data from the table, but only those changes that took place post the switchover (based on the catalog_xmin value).
Step 4: Setup Snowflake
Now that we have the collections ready, let us proceed to Snowflake.
Open the Snowflake console in the browser, and log in to Snowflake. To meet the prerequisites, copy and paste the following script into the Snowflake SQL editor, replacing the variable names in the first six lines.
Suppose you'd like to use an existing database, warehouse, and/or schema. Set database_name, warehouse_name, and estuary_schema accordingly. If you specify a new name, the script will create the item. You can set estuary_role, estuary_user, and `estuary_password` to whatever you'd like.
Check the All Queries check box, and click Run.
plaintextset database_name = 'ESTUARY_DB';
set warehouse_name = 'ESTUARY_WH';
set estuary_role = 'ESTUARY_ROLE';
set estuary_user = 'ESTUARY_USER';
set estuary_password = 'secret';
set estuary_schema = 'ESTUARY_SCHEMA';
-- create role and schema for Estuary
create role if not exists identifier($estuary_role);
grant role identifier($estuary_role) to role SYSADMIN;
-- Create snowflake DB
create database if not exists identifier($database_name);
use database identifier($database_name);
create schema if not exists identifier($estuary_schema);
-- create a user for Estuary
create user if not exists identifier($estuary_user)
password = $estuary_password
default_role = $estuary_role
default_warehouse = $warehouse_name;
grant role identifier($estuary_role) to user identifier($estuary_user);
grant all on schema identifier($estuary_schema) to identifier($estuary_role);
-- create a warehouse for estuary
create warehouse if not exists identifier($warehouse_name)
warehouse_size = xsmall
warehouse_type = standard
auto_suspend = 60
auto_resume = true
initially_suspended = true;
-- grant Estuary role access to warehouse
grant USAGE
on warehouse identifier($warehouse_name)
to role identifier($estuary_role);
-- grant Estuary access to database
grant CREATE SCHEMA, MONITOR, USAGE on database identifier($database_name) to role identifier($estuary_role);
-- change role to ACCOUNTADMIN for STORAGE INTEGRATION support to Estuary (only needed for Snowflake on GCP)
use role ACCOUNTADMIN;
grant CREATE INTEGRATION on account to role identifier($estuary_role);
use role sysadmin;
COMMIT;
Key-pair Authentication & Snowpipe
To enable Snowpipe for delta updates bindings, you need to authenticate using key-pair authentication, also known as JWT authentication.
To set up your user for key-pair authentication, first generate a key pair in your shell:
plaintext# generate a private key
openssl genrsa 2048 | openssl pkcs8 -topk8 -inform PEM -out rsa_key.p8 -nocrypt
# generate a public key
openssl rsa -in rsa_key.p8 -pubout -out rsa_key.pub
# read the public key and copy it to clipboard
cat rsa_key.pub
-----BEGIN PUBLIC KEY-----
MIIBIj...
-----END PUBLIC KEY-----
Then assign the public key to your Snowflake user using these SQL commands:
plaintextALTER USER $estuary_user SET RSA_PUBLIC_KEY='MIIBIjANBgkqh...'Verify the public key fingerprint in Snowflake matches the one you have locally:
plaintextDESC USER $estuary_user;
SELECT TRIM((SELECT "value" FROM TABLE(RESULT_SCAN(LAST_QUERY_ID()))
 WHERE "property" = 'RSA_PUBLIC_KEY_FP'), 'SHA256:');
Then compare with the local version:
plaintextopenssl rsa -pubin -in rsa_key.pub -outform DER | openssl dgst -sha256 -binary | openssl enc -base64Now you can use the generated private key to configure your Snowflake connector. Once key-pair authentication is enabled, delta updates bindings will use Snowpipe to load data.
Step 5: Create Snowflake Materialization in Estuary
Let us now proceed with creating the Snowflake materialization. Navigate to Destinations from the left navigation menu, and click the New Materialization button.
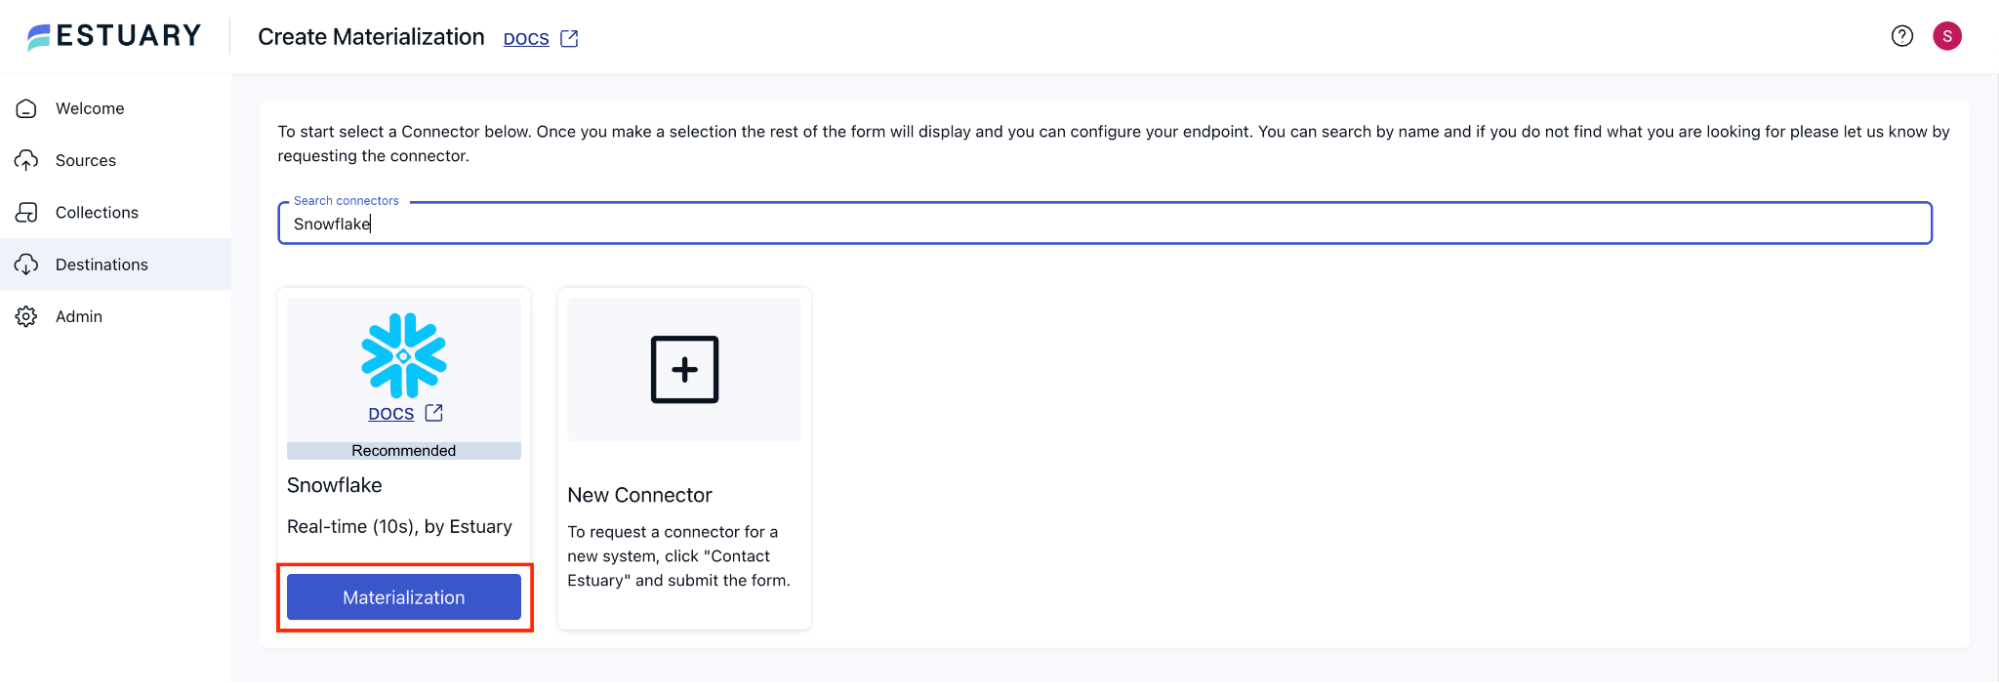
On the Create Materialization page, search for “Snowflake” and click the Materialization button on the Snowflake tile.
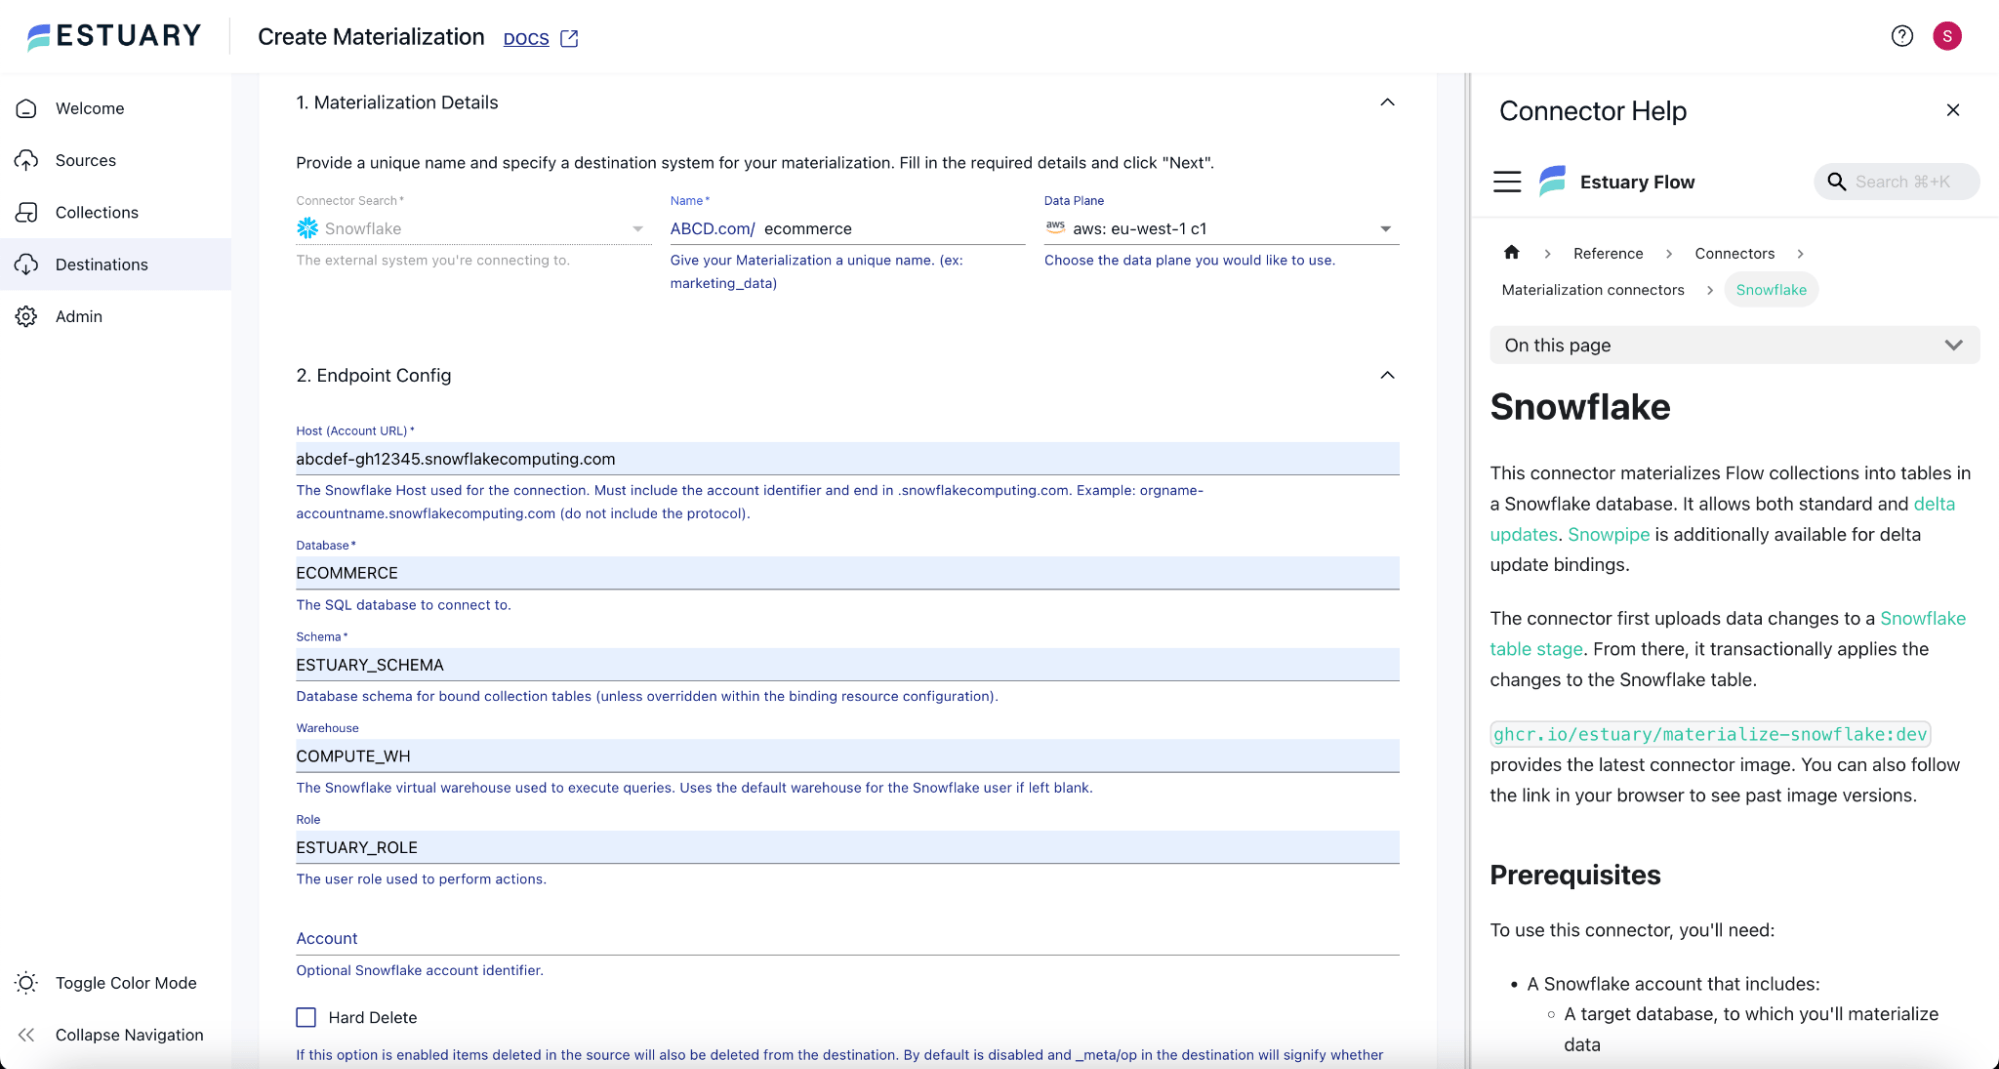
On the Snowflake Create Materialization page, provide an appropriate Name for the materialization, and you can choose any Data Plane of your choice.
Under the Endpoint Config section, provide the Snowflake Account URL, Database, Schema, Warehouse, and Role in the corresponding text boxes to connect to Snowflake.
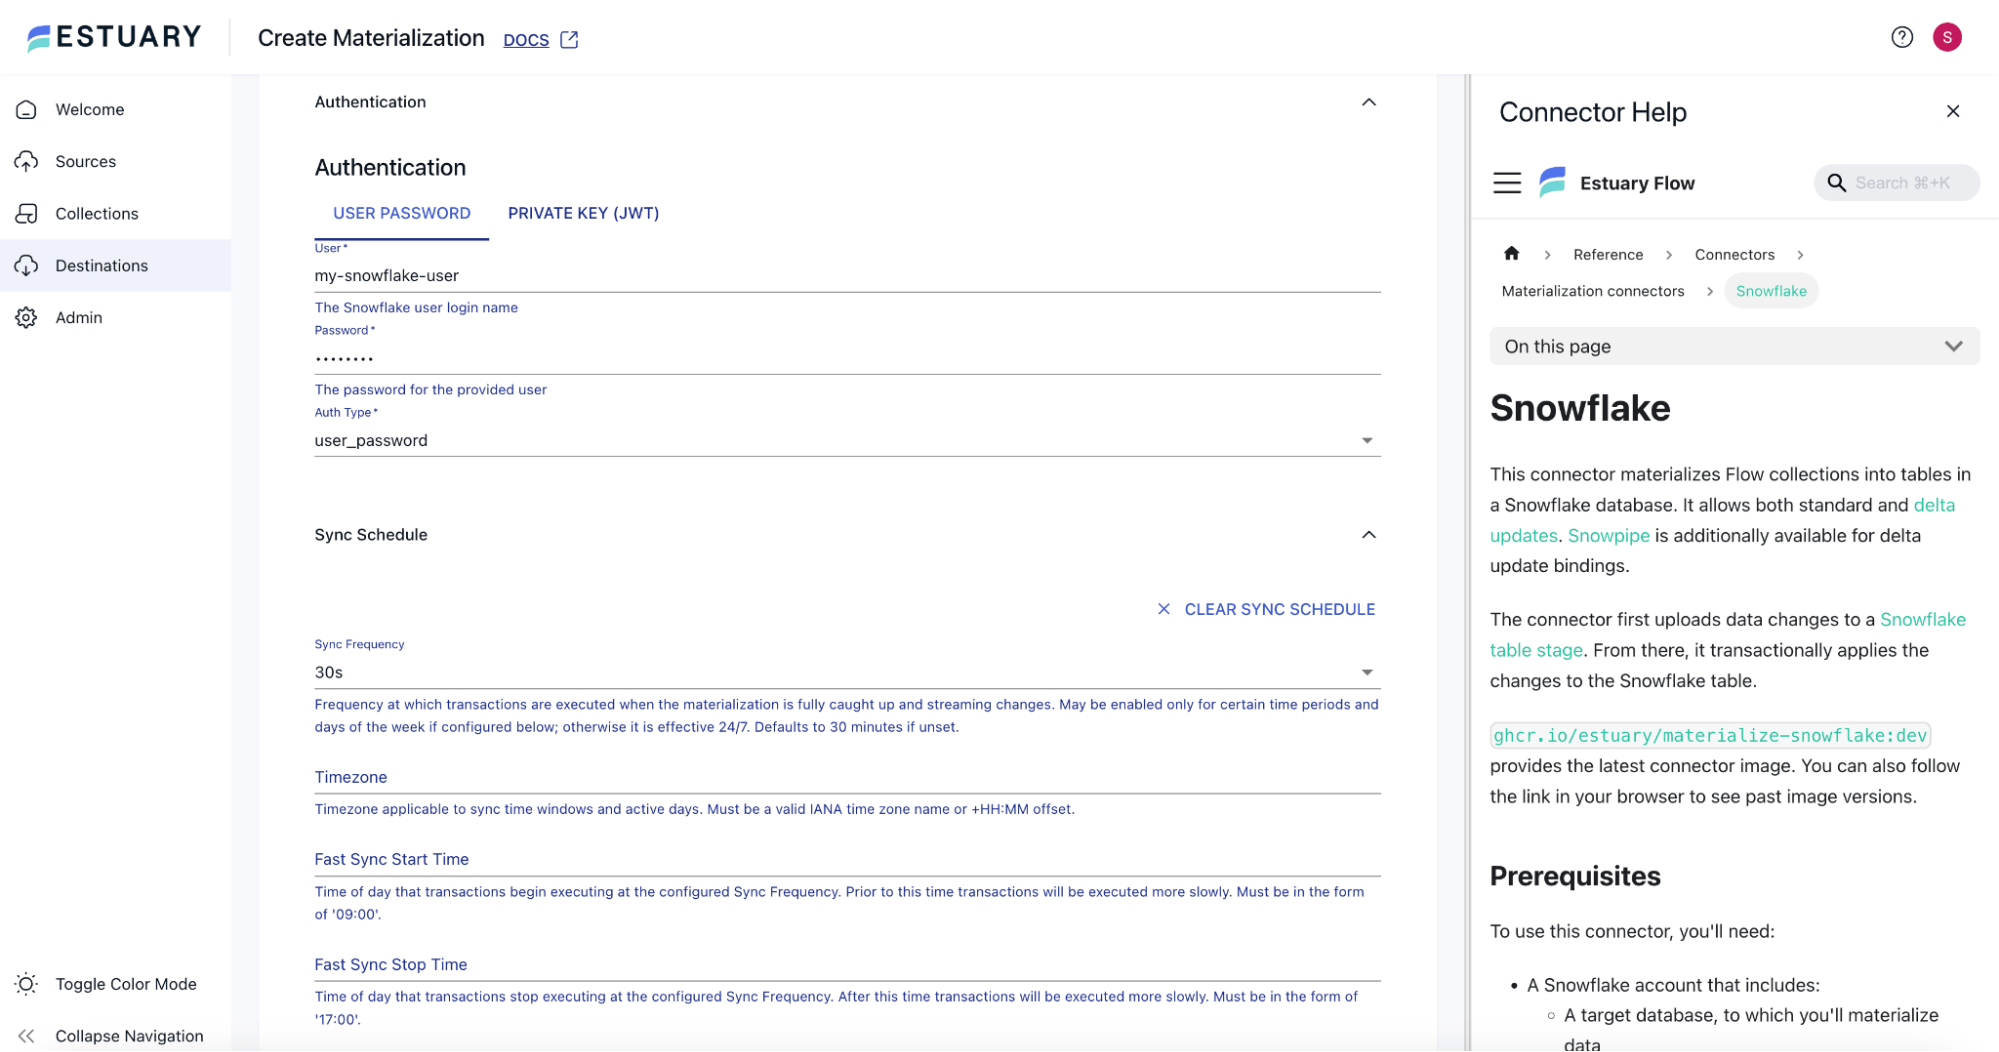
Under the Authentication section, choose User Password. Provide an appropriate Username and password to connect to Snowflake.
In the Sync Schedule section, set the Sync Frequency to a lower value, say 30s, so that the changes from collections are synced immediately to Snowflake.
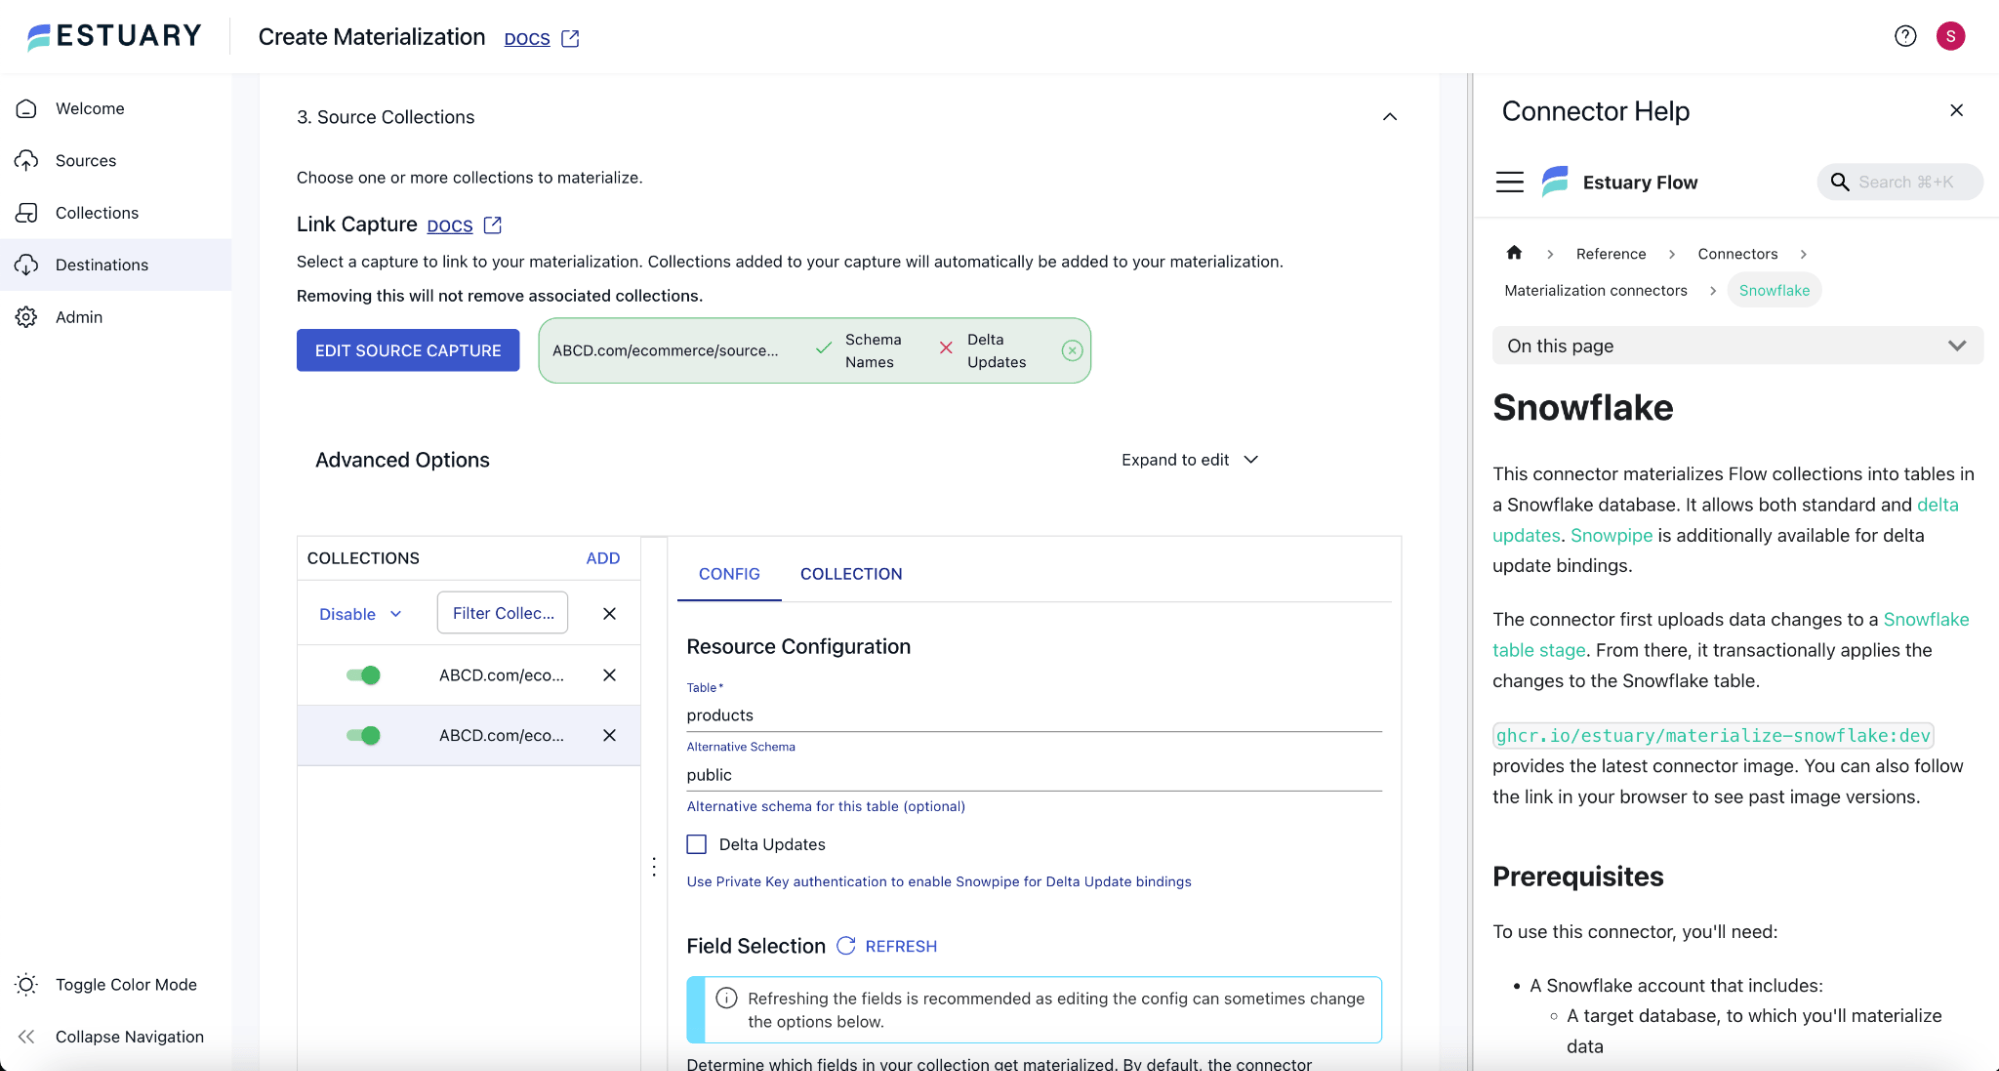
In the Source Collections section, click the Source from Capture button, and select the collections you want to materialize to Snowflake. All the collections from the capture should start appearing.
You can now click the Next button at the top of the page. This will try to connect to Snowflake. In connection errors, you will get a pop-up with details and a stacktrace about the error.
When the connection succeeds, you will get the Test, Save, and Publish buttons. Click on the Test button to ensure the materialization testing is successful. After that, you can click the Save and Publish button to create the Snowflake materialization.
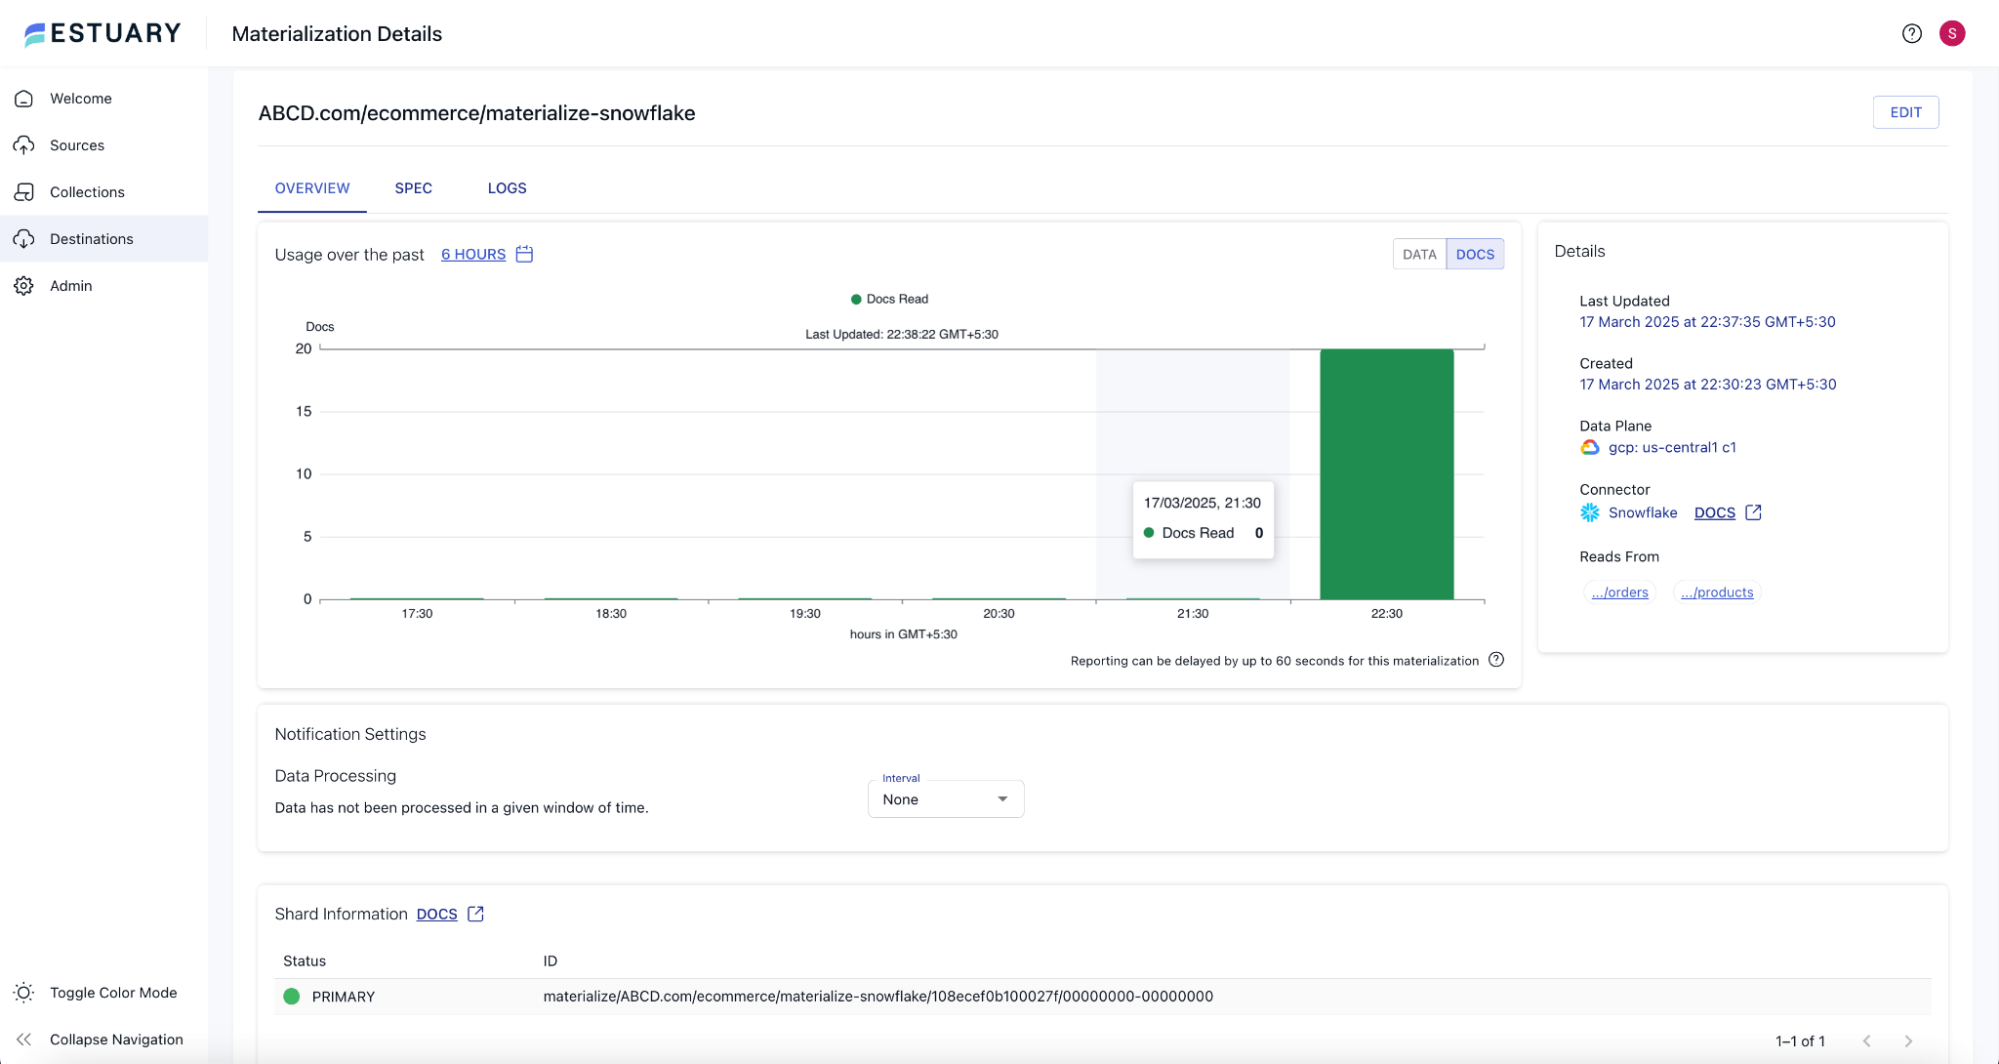
In a few minutes, you will also see an increase in the number of Docs Read on the Snowflake materialize page, indicating the records have been materialized onto Snowflake.
You can now check that the tables corresponding to the materialized collections are present in Snowflake. Also, you can verify that the data has materialized in those tables.
Conclusion
With this, we have successfully created an end-to-end Estuary capturing the changes from the PostgreSQL database and putting them onto Snowflake. Note that the complete flow has been created seamlessly in a no-code fashion. Estuary manages the complete infrastructure with no overhead of Kafka and Kafka Connect clusters and Debezium connectors. Estuary simplifies the development and maintenance of CDC pipelines with a completely managed solution.
You’re now ready to ditch Kafka Connect headaches. Try Estuary for free and build your PostgreSQL → Snowflake pipeline in minutes
FAQs
What infrastructure do I need to manage when using Estuary compared to Debezium?
How does Estuary handle schema changes in PostgreSQL?

About the author
Shruti is an accomplished Data Engineer with over a decade of experience, specializing in innovative data solutions. Her passion for exploring new technologies keeps her at the forefront of advancements in the field. As an active contributor to open-source projects and a technical blog writer, Shruti shares her knowledge with the wider community. She is also an Udemy author, with multiple courses in data engineering, helping others build expertise in this domain.


