WooCommerce is a popular e-commerce platform that empowers businesses to create and operate online stores efficiently. By moving data from WooCommerce to Snowflake, you can perform advanced analytics for enhanced decision-making.
Snowflake, a cutting-edge data warehousing solution, offers exceptional capabilities to store, process, and analyze vast amounts of data. It offers transformative insights into your WooCommerce data, leading to optimized business operations, improved marketing strategies, streamlined workflows, and enhanced inventory management.
Here’s your detailed guide for connecting WooCommerce to Snowflake.
WooCommerce: An Overview
WooCommerce is an open-source e-commerce plugin for WordPress, designed for small to large-sized online merchants using WordPress. Integrating WooCommerce with WordPress transforms your existing website into a fully functional e-commerce store.
If you want to create multiple online stores and e-commerce websites, WooCommerce is a great choice. With no restrictions on how you can run your business, you can add unlimited products, make unlimited sales, import and export product data, and more.
One of the main reasons why WooCommerce is popular with business owners is its extensibility. Its wide range of plugins and extensions expands functionality, such as payment gateways, advanced shipping options, and marketing tools. You can also use a variety of WordPress plugins to incorporate features like contact forms, data backup, call now buttons, galleries, and more into your website.
Snowflake: An Overview
Founded in July 2012 and publicly launched in October 2014, Snowflake is a cloud-based data warehousing platform that offers data-as-a-service (data storage and analytics service).
Snowflake’s architecture is designed with separate compute and storage layers, allowing you to scale resources independently. Its dynamic resource allocation ensures optimal performance without manual intervention, particularly beneficial for query processing and data storage. With this framework, you can use storage and computing separately and pay only for what you use.
In addition to its scalability, another impressive feature of Snowflake is its built-in support for Time Travel. This feature provides access to historical data, including changed or deleted records, within a specified period. With Time Travel, you can:
- Query updated or deleted data
- Restore tables, schemas, and databases
- Create clones of entire tables, schemas, and databases
After the defined time period elapses, the data is moved into Snowflake Fail-safe, which is Snowflakes’ data recovery service. It maintains historical data for up to seven days, providing a safety net in case of security breaches, system failures, or other unforeseen incidents.
Methods to Migrate Data from WooCommerce to Snowflake
To move your WooCommerce data into Snowflake, you can use one of the following methods:
- Method 1: Using CSV File Export/Import
- Method 2: Using SaaS Alternatives like Estuary Flow
Method 1: Using CSV File Export/Import to Load Data from WooCommerce to Snowflake
Migrating data from WooCommerce to Snowflake with this method involves exporting your WooCommerce data as CSV files and then loading these files to Snowflake.
Step 1: Export WooCommerce Data as CSV Files
You can use the WooCommerce Customer/Order/Coupon Export plugin to export data, such as orders, products, customers, and other relevant data from WooCommerce. Follow these steps using the built-in export feature:
- In your WordPress dashboard, navigate to WooCommerce → Products.
- Click Export at the top of your screen. This will redirect you to the Export products to a CSV file page.
- Select the columns, product types, and product categories you want to export.
- Click Generate CSV.
- After your export is done, download your file to your local system.
Alternatively, use the WP All Export plugin to export your WooCommerce data as CSV files by following these steps:
- In your WordPress dashboard, navigate to All Export → New Export.
- From the dropdown menu, select the type of data you want to export, such as WooCommerce Orders, Coupons, Customers, etc.
- Use the Add Filtering Options to add any filtering rule if needed.
- Click Customize Export File.
- Customize the format of your exported data with the Drag & Drop interface.
- For Export Type, choose Spreadsheet → CSV File.
- Click Continue, and then click Confirm & Run Export.
- When the export is complete, click Download → CSV. This downloads the CSV file to your local machine.
You can also use the WooCommerce Bulk Editor to export data. Primarily an editing tool, the Bulk Editor plugin also offers data export capabilities. You can filter and export specific sets of products and the associated data.
Step 2: Load the Data to Snowflake
Follow these steps to use the Classic Console in Snowflake’s web UI and upload your data into a Snowflake table:
- Click Databases and select a specific database and schema.
- Click Tables and locate the table where you want to load data.
- Select a table row and click Load Data. Alternatively, select a table name and then click Load Table.
- In the Load Data wizard, go to Source Files → Load files from your computer → Select Files.
- Browse the files you want to load, and then select Open. Click Next to complete the process.
The wizard simplifies the data-loading process by combining the staging and loading phases into a single operation. It also deletes all the staged files after the load completes. The wizard is recommended for loading files with sizes up to 50 MB.
If you want to load a large number of files or larger-sized files, use SnowSQL instead.
Method 2: Using SaaS Alternatives like Estuary Flow to Move Data from WooCommerce to Snowflake
Manually exporting WooCommerce data and loading it into Snowflake is time-consuming and effort-intensive. You can use SaaS tools like Estuary Flow to streamline the process.
Estuary Flow is a comprehensive DataOps platform equipped with a range of source connectors. It easily captures data from your systems, services, and SaaS applications into collections. Flow simplifies the task of materializing these data collections within other systems through its built-in destination connectors.
Here are some standout features of Estuary Flow:
- Many to many ETL: Estuary Flow supports many-to-many real-time or batch ETL, with multiple sources and targets in the same pipeline, and streaming transformations. It also supports E(T)LT mode, including dbt support.
- Connectors: With a wide support of pre-built source and destination connectors, Estuary provides robust solutions for various data integration requirements. Its sources and destination connectors cover popular data warehouses, SaaS applications, databases, and APIs.
- Scalability: It can handle massive datasets with a capacity of up to 7GB/s and 10TB+ tables. This enables seamless data transfer for operations from small data sets to enormous at terabyte-scale.
- Exactly-once Semantics: Estuary is built on Gazette, similar to Kafka, offering exactly-once processing semantics. This eliminates the necessity of de-duplicating real-time data.
- CDC: It uses CDC (Change Data Capture) to capture and deliver data changes in real-time. This allows you to have up-to-date and synchronized data across the system. CDC technique is especially valuable for applications that require real-time analytics, reporting, or synchronization between different data sources.
- Automatic Schema Handling: As an automated service, Flow takes care of data mapping and schema handling. It infers into the schema source changes and automatically maps them to the destination, allowing you to focus on other critical tasks.
To get started with data migration from WooCommerce to Snowflake using Flow, register for an Estuary account. If you already have one, sign in to your account, and follow these steps:
Step 1: Configure WooCommerce as Data Source
To use the WooCommerce connector, complete these prerequisites first.
- On the Estuary dashboard, click Sources on the left-side pane, and then click + NEW CAPTURE.
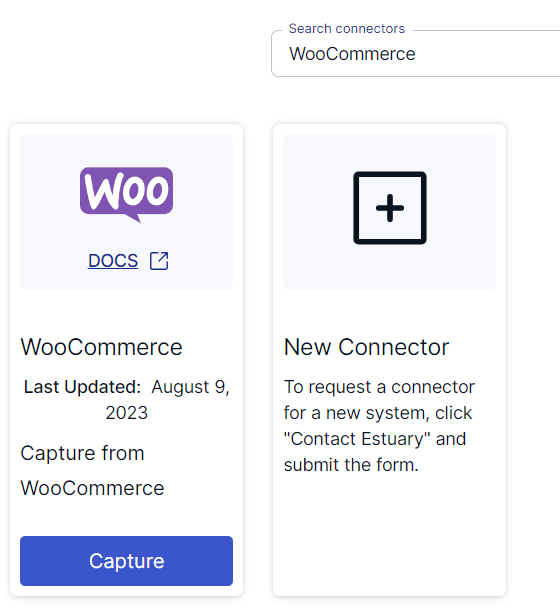
- On the Captures page, search for the WooCommerce option and click the Capture button to initiate the capture setup.
Image Source: Estuary
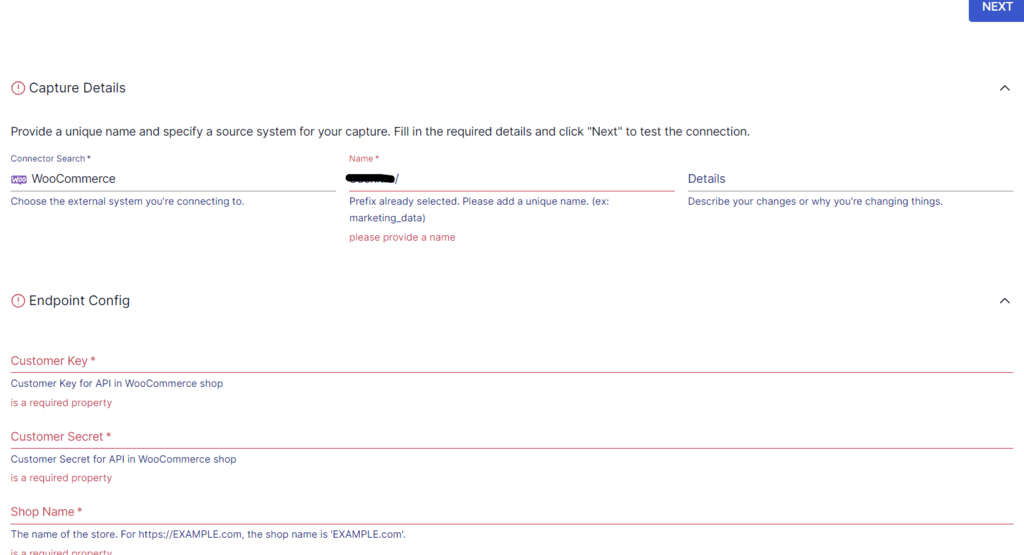
- On the WooCommerce connector page, fill in the required details, including the Customer Key and Customer Secret.
- Click the NEXT button, followed by SAVE AND PUBLISH.
Image Source: Estuary
The WooCommerce connector captures data from your WooCommerce account into Flow collections. This source connector supports different streams, including:
- Customers (Incremental)
- Orders (Incremental)
- Product categories
- Products (Incremental)
- Shipping methods
- Tax classes
Step 2: Configure Snowflake as Data Destination
To use the Snowflake connector, complete these prerequisites first.
Now that the source end of the pipeline is configured, the next step is to configure the pipeline’s destination end, which is Snowflake.
- Click Materialize Connections in the pop-up following a successful capture from WooCommerce. Alternatively, you can navigate to the Estuary dashboard and click Destinations, then click + NEW MATERIALIZATION.
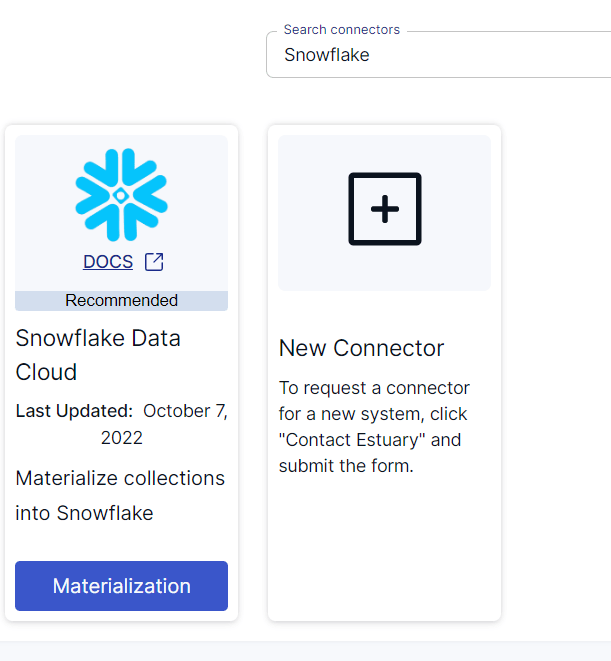
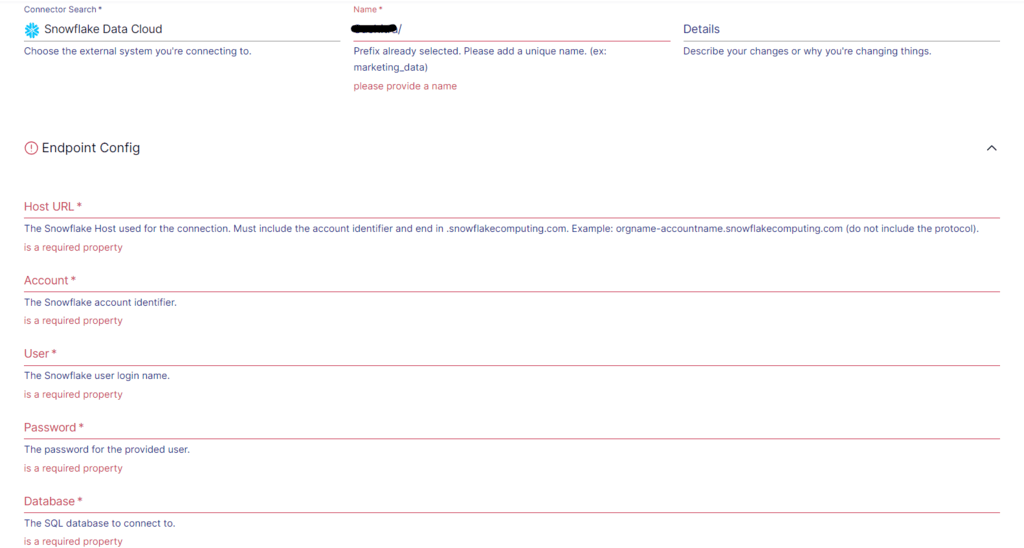
- Use the Search connectors box to look for Snowflake. When you see the Snowflake Data Cloud connector in the search results, click on its Materialization button.
Image Source: Estuary
- On the Snowflake connector page, fill in the required details, such as a Name for the materialization, Host URL, Account, User, and Database.
- If the data captured from WooCommerce wasn’t filled in automatically, use the Source Collections section to manually add the data.
- Click NEXT, followed by the SAVE AND PUBLISH button.
Image Source: Estuary
The Snowflake connector will materialize Flow collections into tables in a Snowflake database. First, the connector uploads data changes to a Snowflake table stage, and then it transactionally applies the changes to the Snowflake table.
To learn more about how to build data pipelines, refer to Estuary’s documentation:
Conclusion
Integrating WooCommerce to Snowflake offers businesses the opportunity to improve their e-commerce operations for efficiency and success. The advanced data analytics capabilities of Snowflake provide valuable insights into sales patterns, customer behavior, and market trends. This can help you create improved strategies that will resonate with target audiences, refine your product offerings, and ensure appropriate inventory management.
The two methods to move data from WooCommerce to Snowflake are CSV file export/import and SaaS tools like Estuary Flow. For an efficient, easy-to-use solution, SaaS tools are the preferred choice. They enable you to establish real-time or near-real-time data migration pipelines, ensuring that your data remains up-to-date. This is particularly beneficial for businesses that rely on time-critical data-driven decision-making.
Estuary Flow provides seamless connectivity between varied sources and destinations for batch-loading or streaming data. Extracting data from the source and loading it into the destination involves only a millisecond latency with a Flow pipeline. Register and get started with your first data migration pipeline.
For even more insights into moving your Woocommerce data, check out this in-depth tutorial:
- Comprehensive Guide for Connecting WooCommerce to BigQuery: Two Strategies Compared

About the author
With over 15 years in data engineering, a seasoned expert in driving growth for early-stage data companies, focusing on strategies that attract customers and users. Extensive writing provides insights to help companies scale efficiently and effectively in an evolving data landscape.


