Traditional databases like SQL Server provide a robust foundation for managing and storing structured data for many business applications. However, traditional databases aren't well-equipped and face severe limitations when it comes to storing data from modern applications. Some of these issues include scalability, schema rigidity, performance on large datasets, and more.
To address these challenges, businesses have turned toward modern cloud-based NoSQL databases such as Cosmos DB, which are better equipped to handle such tasks.
By migrating from SQL Server to Cosmos DB, your business can benefit from various features such as flexible data models, lightning-fast performance, automatic scaling, global data availability, etc.
These advantages translate to enhanced application performance, streamlined infrastructure management, and a superior user experience for global audiences. This tutorial will explore two reliable ways to migrate data from SQL Server to Cosmos DB.
SQL Server – The Source
Microsoft's SQL Server is a robust relational database management system (RDMS) designed to handle the demanding workloads of modern businesses. Since its release in 1989, SQL Server has evolved into a platform that provides a reliable, scalable, and secure foundation for data-driven applications and analytics workloads.
One of SQL Server's key features is its ability to efficiently handle large amounts of structured and unstructured data. It supports various data types, including graphs, JSON, and spatial data, while also providing advanced indexing and query optimization techniques for fast and efficient data retrieval. The platform primarily uses Transact-SQL (T-SQL), a specialized extension of the popular SQL language, for data manipulation and queries.
Here are some of the key features of SQL Server:
- Robust Transaction Support: SQL Server is renowned for its ACID Compliance (Atomicity, Consistency, Isolation, and Durability). This ensures that any changes to the database are either fully executed or not at all, maintaining data integrity even in cases of system failures and concurrent operations.
- Advanced Security Features: SQL Server offers a comprehensive suite of security features, such as data encryption (at rest and in motion), row-level security, and auditing capabilities. This ensures compliance with industry standards and minimizes the risk of data access.
- High Availability: SQL Server implements technologies like Always On Availability Groups and database mirroring to minimize downtime. These features ensure your applications remain operational even in the event of sudden hardware failures or other disruptions.
Cosmos DB – The Destination
Cosmos DB is a comprehensive database service offered by Microsoft that is fully managed, globally distributed, and supports multiple data models. It’s designed for modern applications that demand high performance, massive scalability, and flexibility. Cosmos DB goes beyond traditional relational databases by supporting multiple data models like key-value pairs, documents, graphs, and columnar formats. This versatility allows you to choose the data model for your specific application requirements, resulting in improved performance and simplified development.
One of Cosmos DB's standout features is its global distribution capabilities. This feature enables data to be replicated and distributed across multiple Azure regions, ensuring low-latency access for users from anywhere in the world. As a result, it provides blazing-fast response times for a more seamless and responsive user experience.
Let’s look into some key features of Cosmos DB.
- Guaranteed Speed at Any Scale: Cosmos DB guarantees single-digit millisecond latencies for both reads and writes at the 99th percentile, even as the database continues to scale. This ensures applications remain responsive even under heavy load.
- Turnkey Elasticity: The platform scales storage and throughput elastically and independently, allowing you to scale up or down based on demand effortlessly. This helps to optimize costs greatly, as you only need to pay for the resources used.
- Automatic Indexing: Cosmos DB indexes all data by default, enabling efficient querying without the need for manual index management. This simplifies development and ensures optimal query performance even as your data grows.
Best Ways to Migrate Data From SQL Server to Cosmos DB
There are two methods you can use to move your data from SQL Server to Cosmos DB:
- Method 1: Using Estuary Flow to load data from SQL Server to Cosmos DB
- Method 2: Using Azure Cosmos DB Data Migration Toolkit to connect SQL Server and Cosmos DB
Method 1: Using Estuary Flow to Load Data From SQL Server to Cosmos DB
If you're looking for an effortless and no-code solution for migrating from SQL Server to Cosmos DB, consider using a data pipeline tool like Estuary Flow. An added advantage of Flow is that you can achieve near real-time integration with mere millisecond latency.
Prerequisites
Before getting started with Estuary Flow to connect SQL Server to Cosmos DB, there are a few prerequisites to complete. Here’s what you’ll need:
Step 1: Configure SQL Server as the Source
- Log in to your Estuary Flow account and click Sources > + NEW CAPTURE.
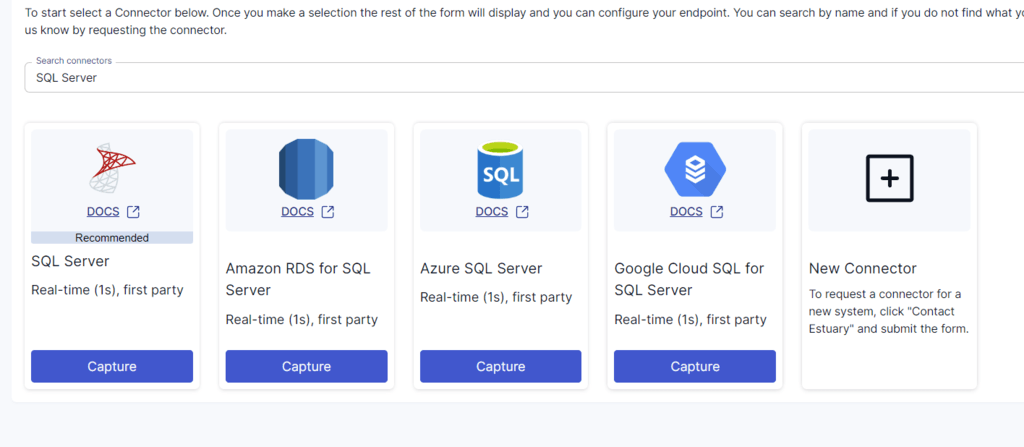
- Use the Search connectors field to find the SQL Server connector and click its Capture button to start configuring it as a data source.
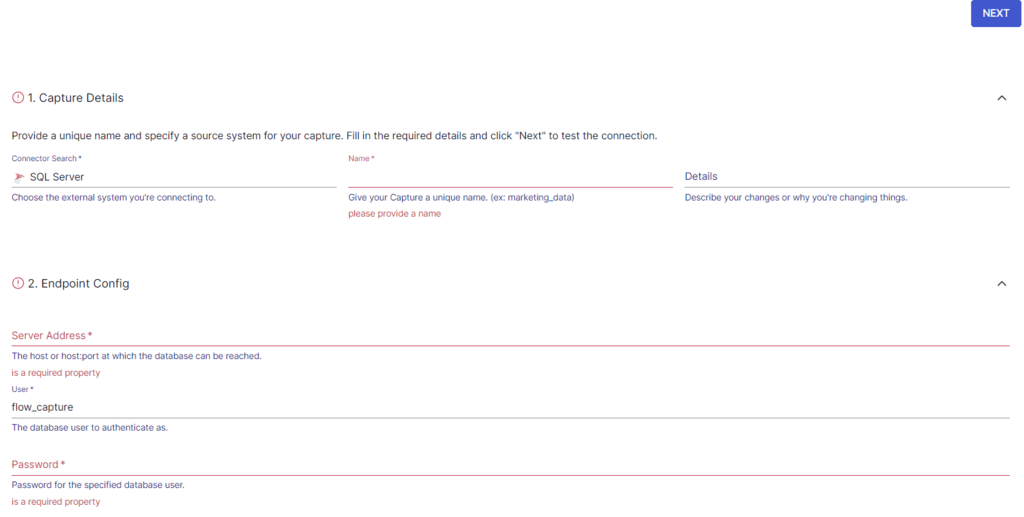
- On the Create Capture page, enter the specified details, such as Name, Server Address, and Password. Then click NEXT > SAVE AND PUBLISH to set SQL Server as the source. This will allow the CDC connector to capture updates from the SQL Server database into one or more Flow collections.
Step 2: Configure Cosmos DB as the Destination
- The next step is to configure the destination connector. Click on MATERIALIZE COLLECTIONS in the resulting pop-up window or the Destinations option on the dashboard.
- Click the + NEW MATERIALIZATION button on the Destinations page.
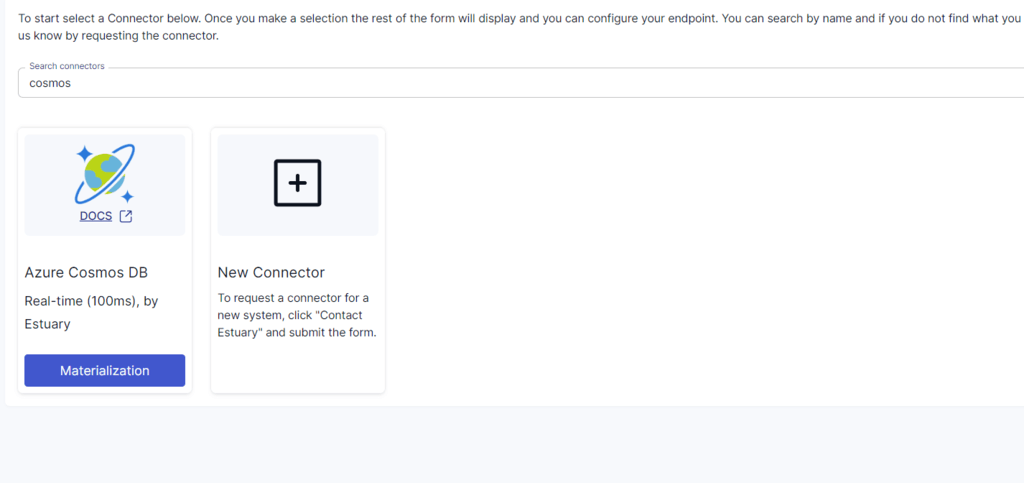
- Using the Search connectors box, search for Cosmos DB and click on the Materialization button of the connector.
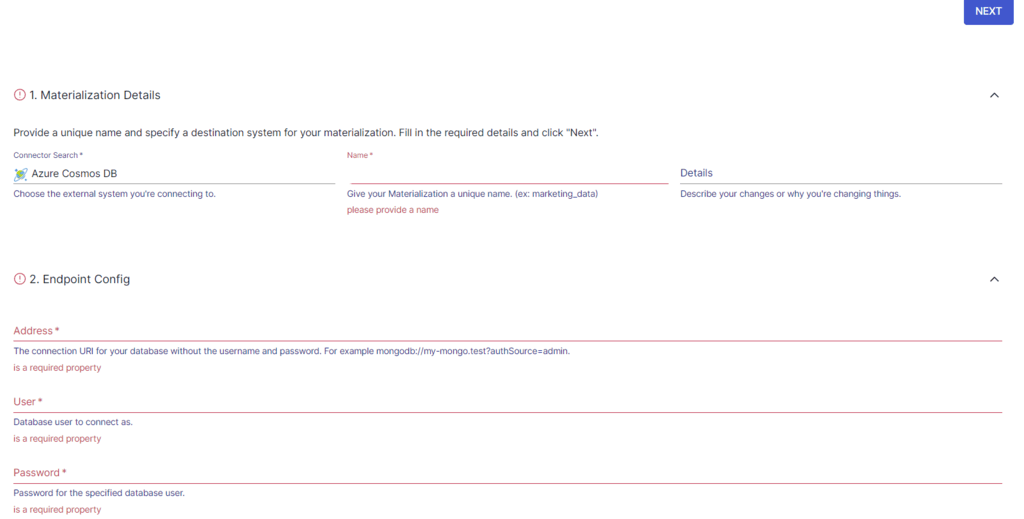
- On the Create Materialization page, enter details such as Name, Address, User, and more.
- In case your SQL Server data collection is not automatically included in your materialization, you have the option to add it manually. You can do so by clicking the SOURCE FROM CAPTURE button in the Source Collections section.
- Finally, click NEXT > SAVE AND PUBLISH. The connector will load your SQL Server data from Flow collections to Cosmos DB.
Benefits of Estuary Flow
Some of the key benefits of using Estuary Flow for data migration and integration include:
- High Scalability: Estuary Flow is built to accommodate increasing data volumes in modern enterprises. The platform can handle data throughput of up to 7 GB/s, ensuring seamless scalability for growing data usage without compromising performance.
- Real-time Processing Using CDC: It harnesses the power of Change Data Capture (CDC) to facilitate real-time data processing and replication, enabling data integrity and minimizing latency.
- Powerful Data Transformation Capabilities: Flow supports data transformations using TypeScript and SQL, providing you with the flexibility to reshape, filter, and join data in real-time. This enables you to adapt data to your specific needs while maintaining consistency and accuracy.
- User-Friendly Interface: The platform provides an intuitive interface that simplifies the setup and management of powerful data pipelines. Even users with minimal technical expertise can navigate and use the tool effectively.
Method 2: Using Azure Cosmos DB Data Migration Toolkit to Connect SQL Server and Cosmos DB
This manual method involves importing SQL Server data to Cosmos DB using the data migration toolkit. Here’s a rundown of the steps:
Prerequisites
- Install the Microsoft .NET Framework 4.5.1 or a later version.
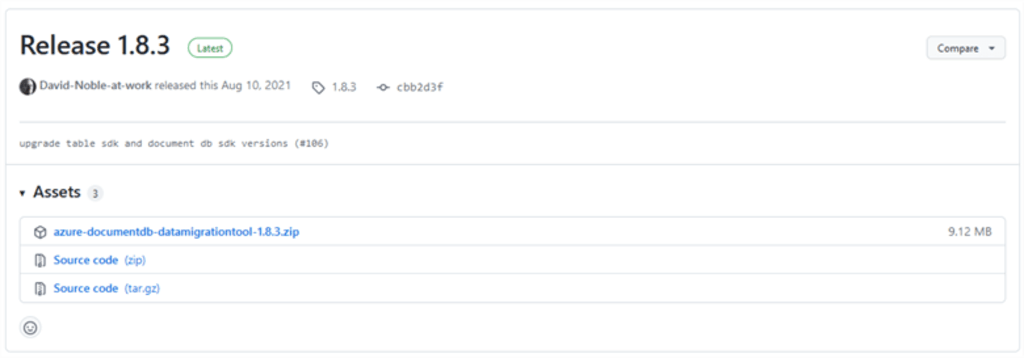
- Download the Azure Migration Tool for the provided Github link.
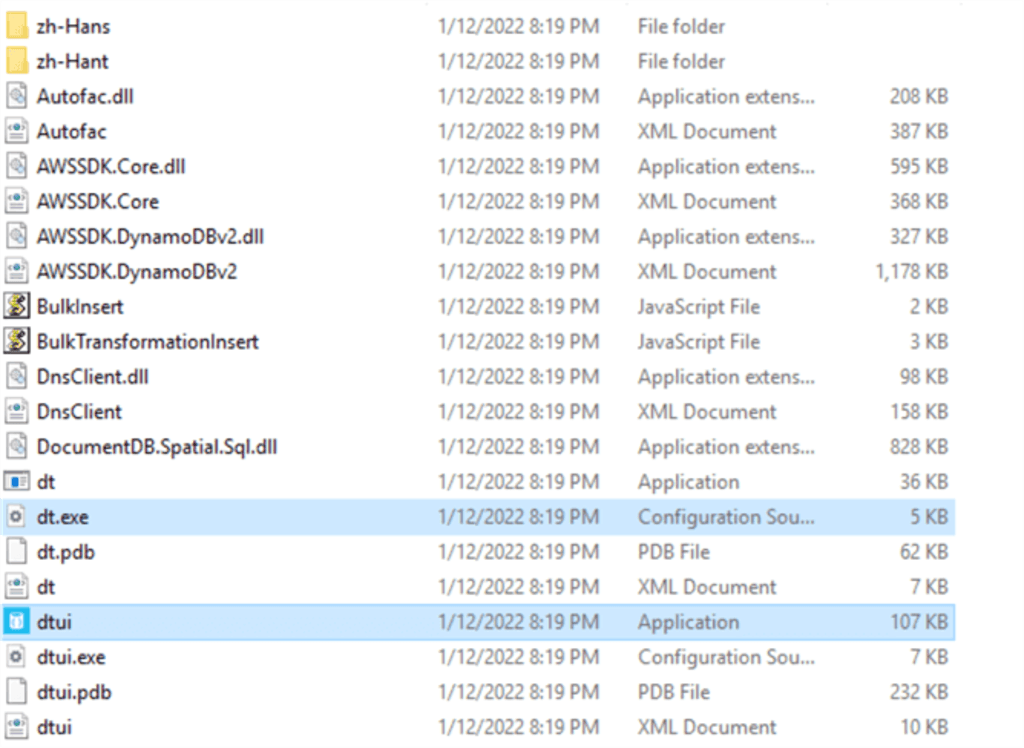
- After completing the download, extract the files and locate the two main files:
- Dtui.exe to run the graphical user interface. (For this tutorial, we will be using the graphical user interface.)
- Dt.exe to run the command-line version of the tool.
Step 1: Preparing the Data For Migration
- We will be using the sample database AdventureWorks2019 as our source data (SQL Relational Data).
Step 2: Launching the Migration Tool
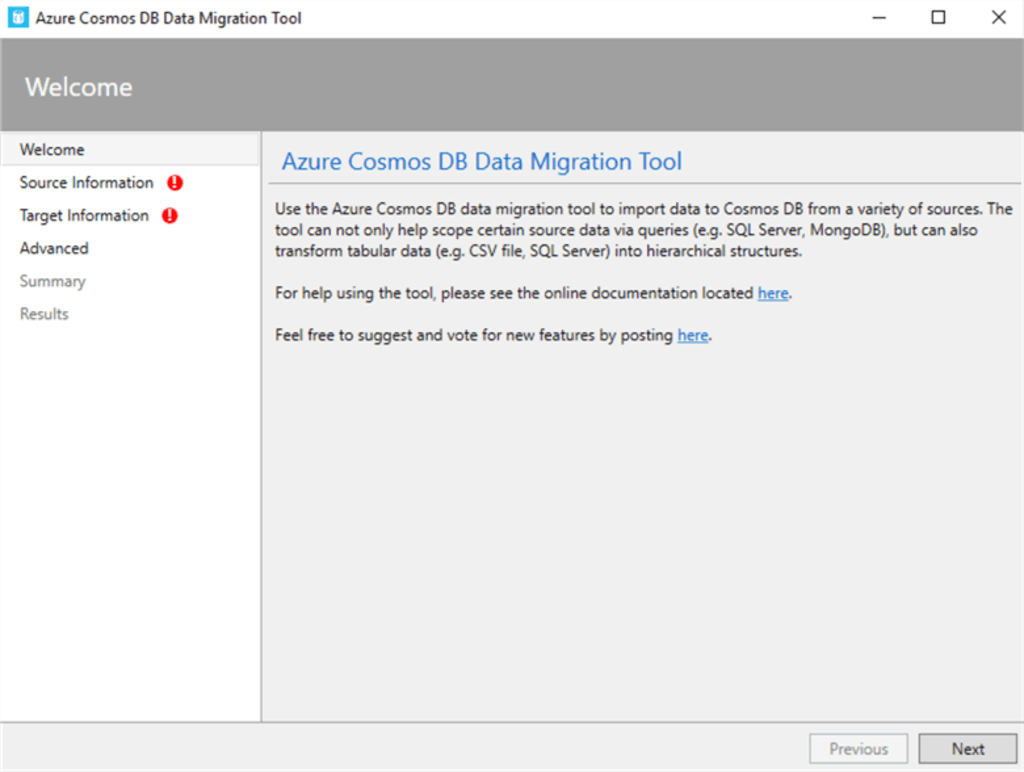
- Navigate to the extracted folder and double-click on dtui.exe to launch the Azure Cosmos DB Data Migration tool's graphical user interface. Click on Next to proceed to the next step.
Step 3: Configuring the Source Information
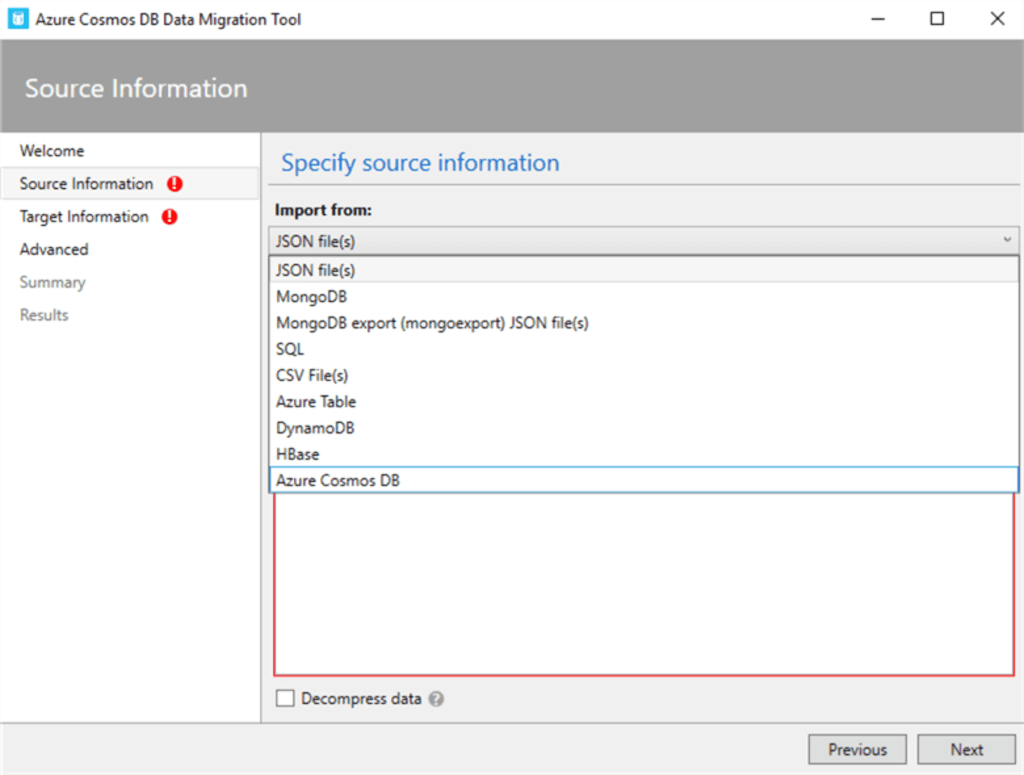
- In the tool, select ‘SQL’ as your data source.
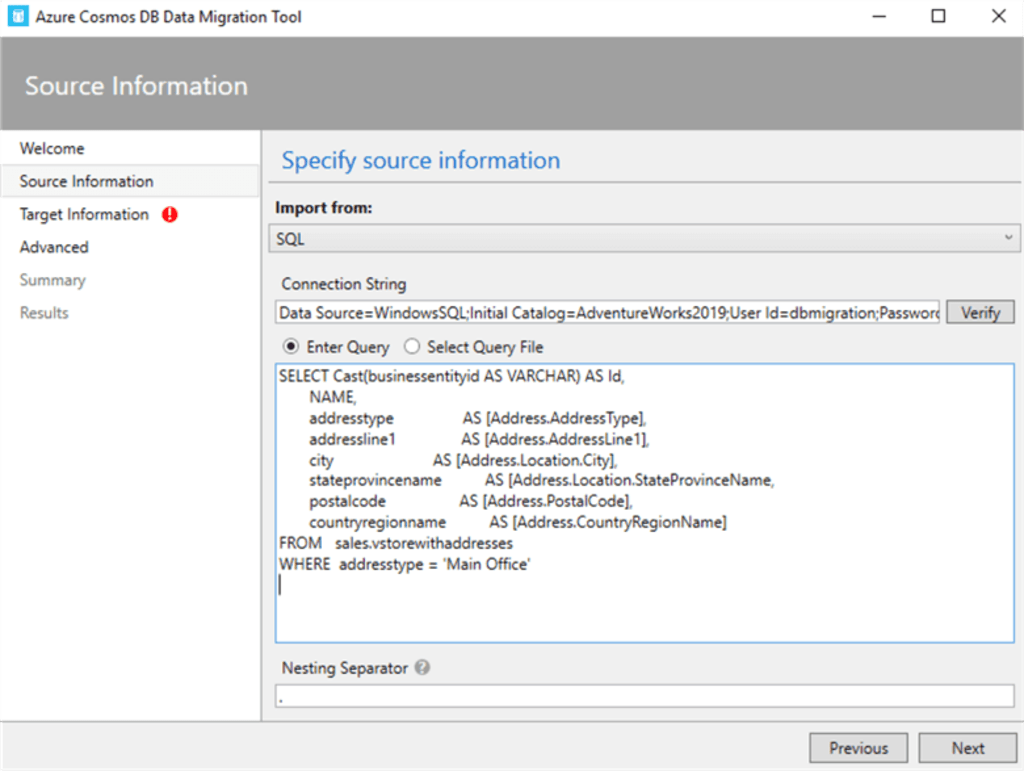
- Enter the connection string for your SQL database. This string should include the server name, database name, and authentication details.
| Data Source=myServerAddress;Inital Catalog=myDataBase;UserID=myUsername;Password=myPassword; |
- Click the Verify button to ensure the tool can access your SQL database.
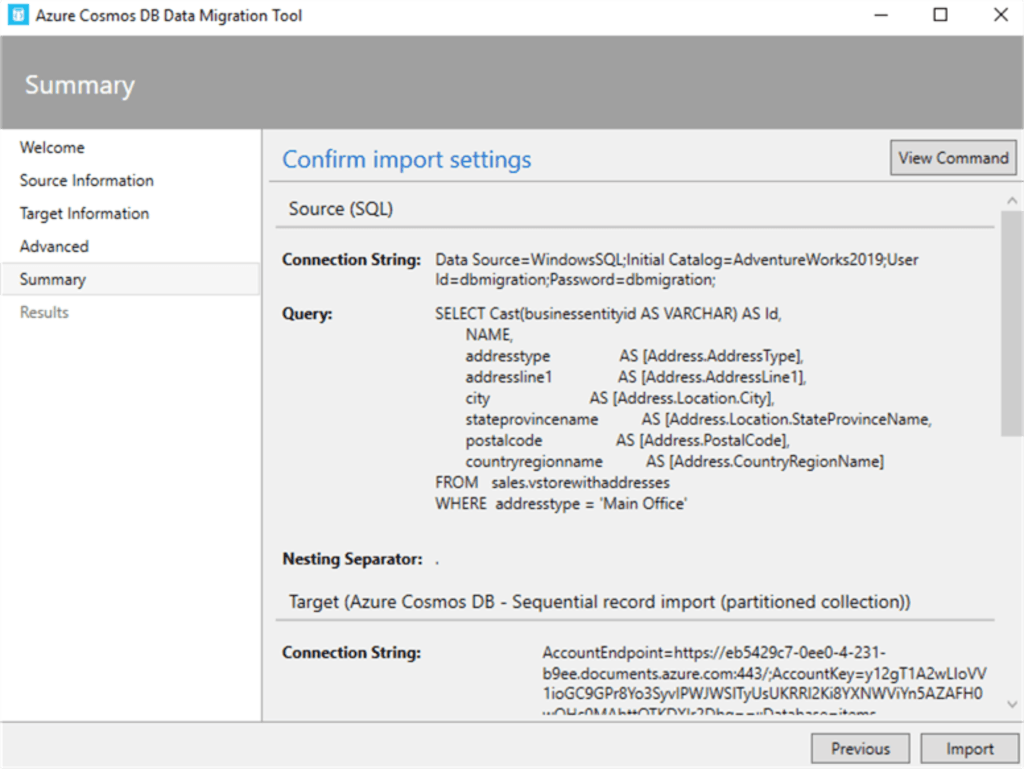
- In the Enter Query section, input the T-SQL query provided below to retrieve the sample database AdventureWorks2019 as our source data.
| SELECT CAST(businessentityid AS VARCHAR) AS Id, NAME, addresstype AS [Address.AddressType], addressline1 AS [Address.AddressLine1], city AS [Address.Location.City], stateprovincename AS [Address.Location.StateProvinceName, postalcode AS [Address.PostalCode], countryregionname AS [Address.CountryRegionName] FROM sales.vstorewithaddresses WHERE addresstype = 'Main Office' |
Alternatively, you can use an SQL file by selecting the "Select Query File" option. This will define the data that you want to migrate to Cosmos DB.
- Choose a nesting separator, such as a period (.), which will be used in the JSON output to create nested structures. This is important for representing hierarchical data in Cosmos DB.
- Then click on Next.
Step 4: Configure Target Information
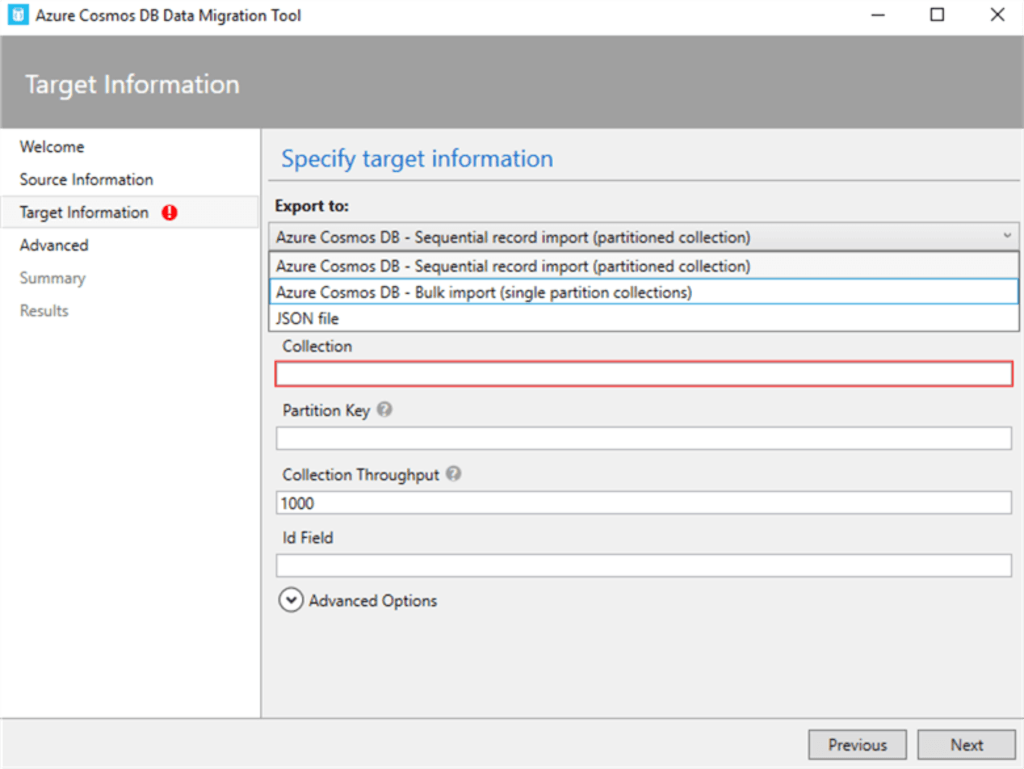
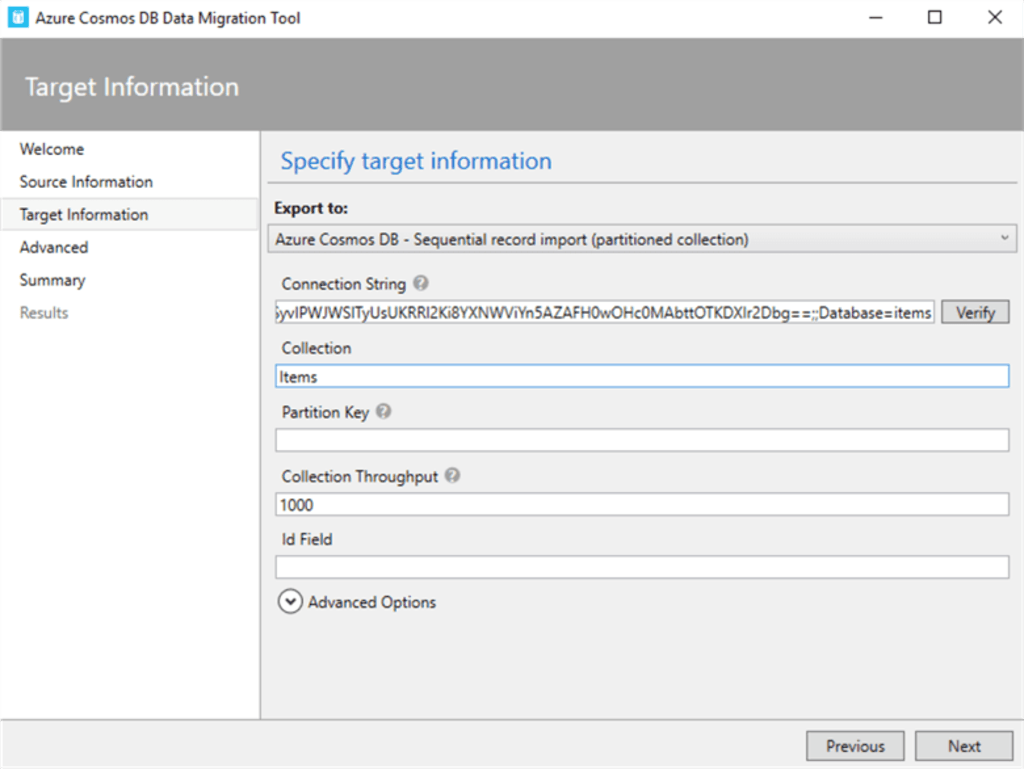
- Select the appropriate export mode. If you have a large amount of data, you might choose the bulk import method for efficiency.
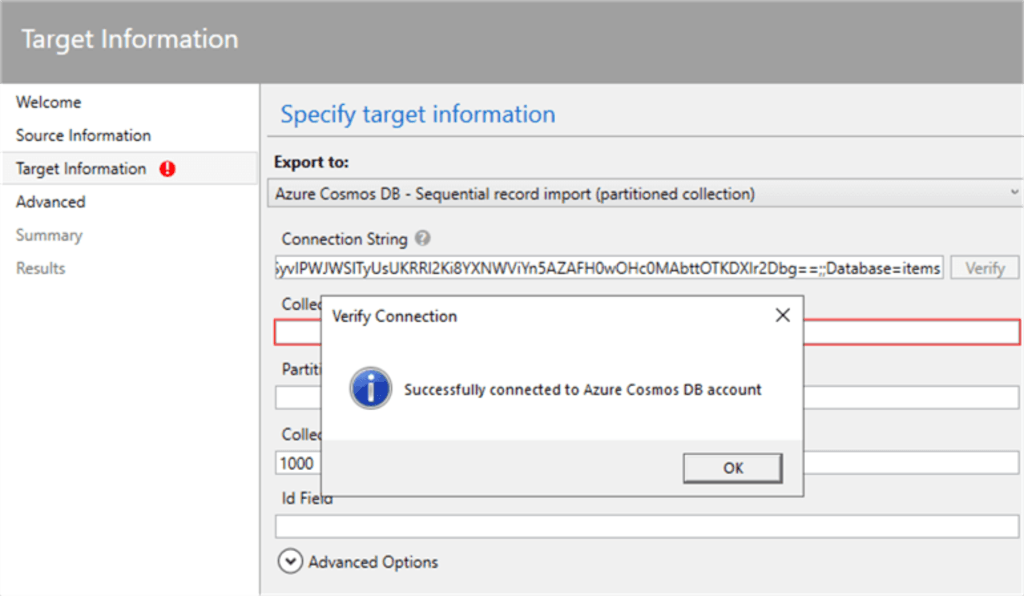
- Enter the connection string for your Azure Cosmos DB account. This will direct the migrated data to the correct location.
| AccountEndpoint=<CosmosDB Endpoint>;AccountKey=<CosmosDB Key>;Database=<CosmosDB Database>; |
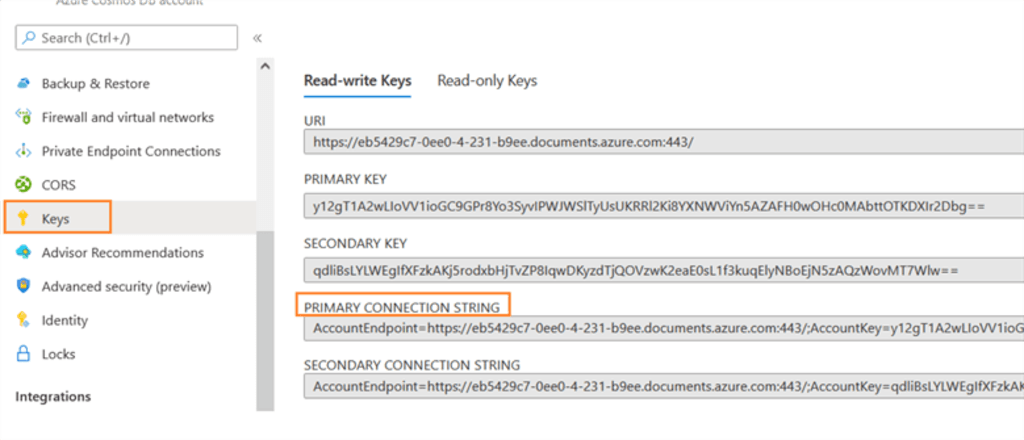
- Navigate to the Azure Migration Tool and copy the primary connection string from the key tab, as shown below.
- Confirm the connection to your Cosmos DB account by clicking Verify.
- Finally, specify the name of the container (similar to a table in SQL) where the data will be stored.
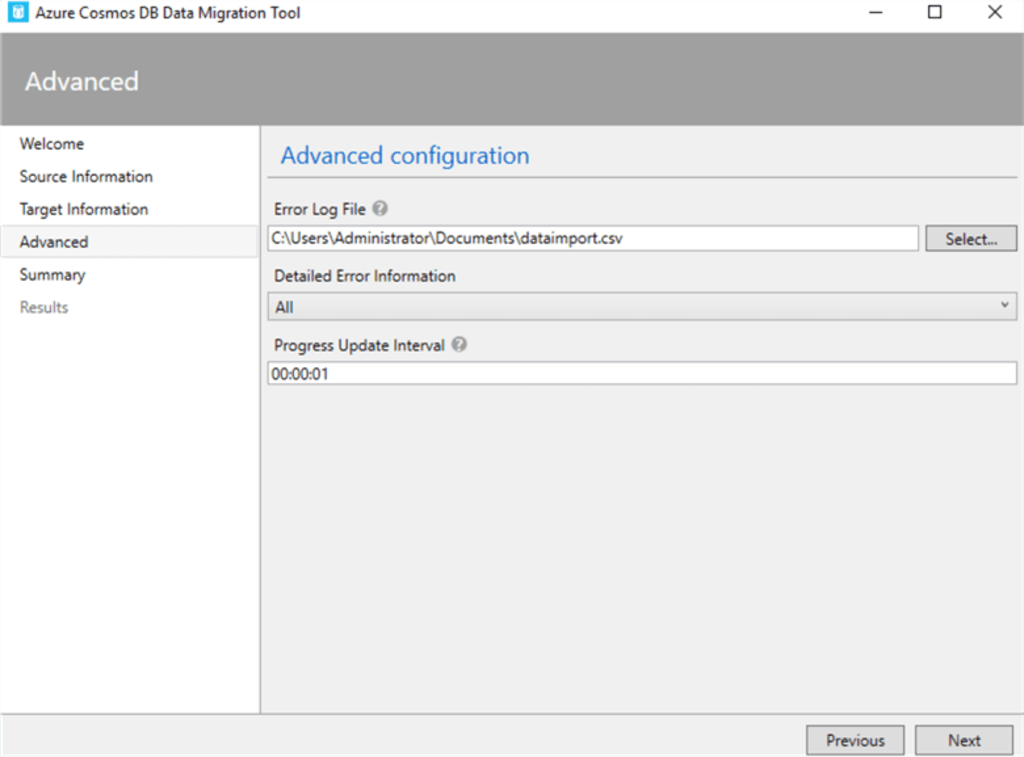
- In the Advanced Configuration Section, specify a path for the error log file. This file will record any issues encountered during the migration process.
Step 5: Review and Import
- Review all settings and configurations to ensure they are correct.
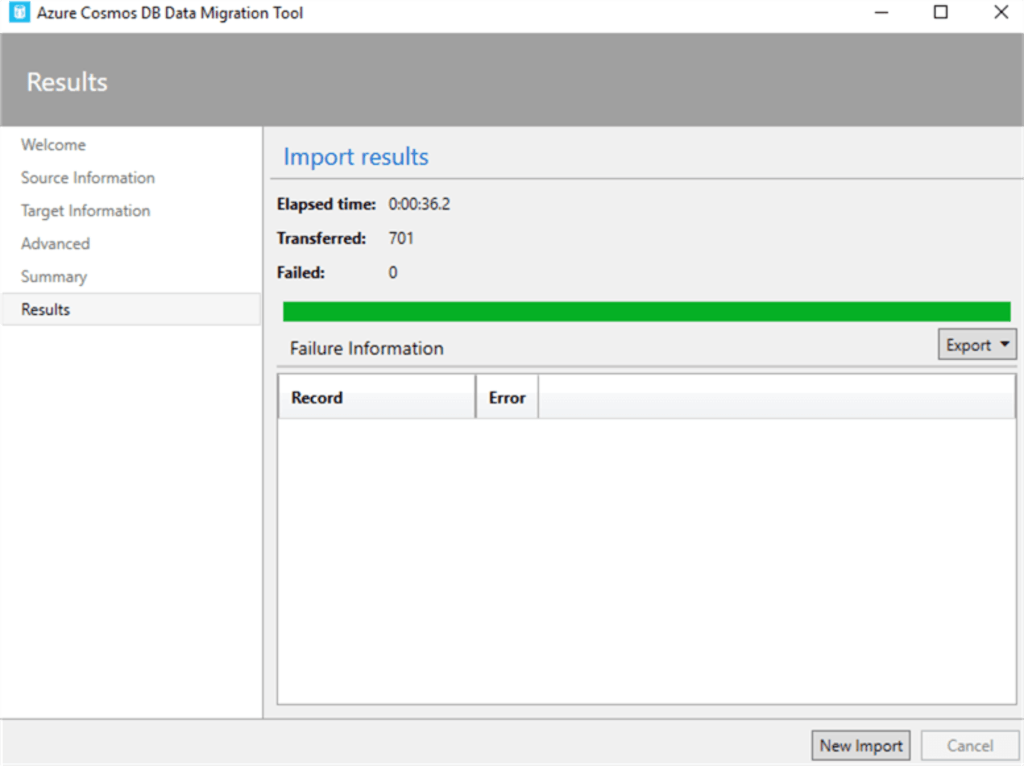
- Click the ‘Import’ button to start the migration. The tool will display the progress and notify you when it is complete.
Step 6: Verify Migration
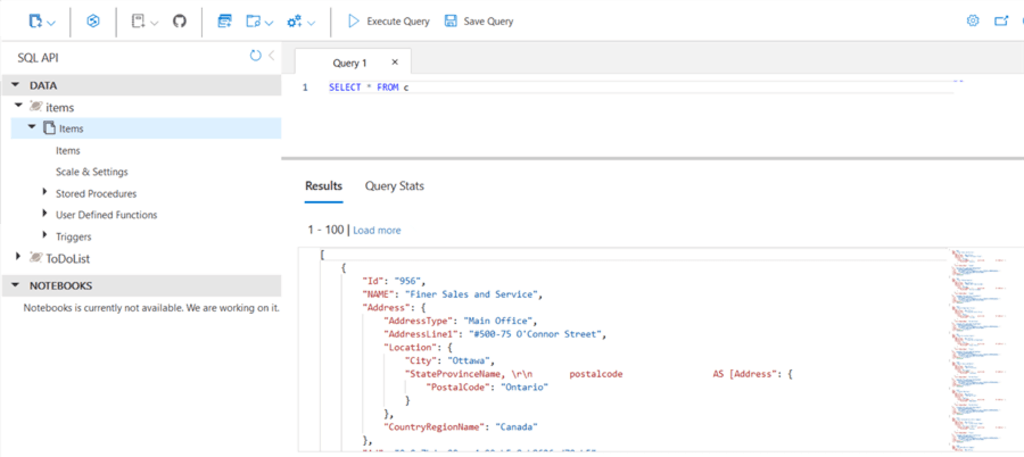
- After the migration is complete, use the Azure Cosmos DB Data Explorer to view the imported data. Run queries to ensure the data has been correctly formatted and imported into the specified container in Cosmos DB.
By following the above steps, you can easily migrate your data from SQL Server to Cosmos DB. However, the manual method has several limitations.
- Lack of Automation: Manual methods lack automation capabilities. Each task must be initiated manually, making it tedious and time-consuming.
- Absence of Data Validation and Quality Checks: Manual data processes usually lack built-in validation and quality checks. The absence of automated data validation makes verifying migrated data accuracy and integrity a manual and time-consuming process.
The Takeaway
By migrating data from SQL Server to Cosmos DB, you can easily handle large data volumes, scale on demand, and deliver a consistent user experience. While manual migration methods are feasible for limited data volumes, they are not feasible on a larger scale. These methods have significant downsides, such as lack of automation, time complexity, extensive skill requirements, etc.
No-code data migration tools like Estuary Flow address common shortcomings, providing real-time data updates, a simplified setup process, and the flexibility to connect with a wide range of data sources. This makes an impressively efficient solution for loading data from SQL Server to Cosmos DB.
Streamline your data integration process with Estuary Flow’s range of features and readily available connectors. Sign up today to simplify and automate data migration from SQL Server to Cosmos DB.
FAQs
- What are the key differences between SQL Server and Cosmos DB?
SQL Server is a relational database management system (RDMS) optimized for structured data. In contrast, Cosmos DB is a NoSQL database supporting multiple data models (structured and unstructured data).
- What are the potential challenges in migrating data to Cosmos DB?
Challenges include schema and query translation, handling complex data relationships, and potential downtime during migration.
- Why should I consider migrating from SQL Server to Cosmos DB?
Cosmos DB offers advantages in scalability, global distribution, guaranteed low latency, and flexible data models. It's ideal for applications that handle large amounts of data, have a global user base, or experience unpredictable traffic patterns.

About the author
With over 15 years in data engineering, a seasoned expert in driving growth for early-stage data companies, focusing on strategies that attract customers and users. Extensive writing provides insights to help companies scale efficiently and effectively in an evolving data landscape.


