The e-commerce market has evolved into an exceptionally competitive space where standing out requires more than just offering great products. As consumer expectations have risen, it has become evident that providing a hassle-free and intuitive shopping experience can greatly increase the likelihood of a successful sale. Customers are more likely to make a purchase when they feel their experience is effortless, personalized, and tailored to their preferences. This is where the concept of a personalized customer experience plays a pivotal role.
As customers navigate their shopping journey, understanding their intent and preferences is key to creating an experience that resonates with them. All this needs to be done in near real-time in order to provide the best customer experience.
This blog explores how real-time data integration enhances e-commerce experiences by optimizing pricing, delivering personalized recommendations, and managing inventory efficiently. Learn how you can leverage Estuary to create a real-time pipeline to deliver the best e-commerce customer experience.
Key Use Cases for Real-Time Data in E-Commerce
While there are multiple use cases where real-time pipelines can help boost the customer shopping experience, let us look at some of the key features that can play a vital role.
Dynamic Pricing
One of the key features to ensure a successful customer purchase conversion is to keep your prices in check. The prices should be competitive enough and can be dynamically controlled so that the interested customers get the product at a price low enough to be lucrative and high enough that it stays competitive.
Personalized Product Recommendations
The pre-computed list of similar and cross-selling products can be a good starting point for product recommendations. But to stay competitive, it is important to understand the present shopping journey of the customer as to what products he is clicking on and what he has added to the cart already so that we can understand the shopping intent of the customer and appropriately recommend the products.
Real-time Stock Alerts
This use case is helpful for the backend operations of an e-commerce platform. Getting the signals in real-time about the depleting stock inventory of a product can be used to place an immediate new order for the product, ensuring that the items get refilled quickly. This can provide a good experience for the customer, ensuring that the items never go out of stock.
How Estuary Flow Powers Real-time E-commerce Pipelines
With Estuary Flow, you can easily achieve real-time integrations in a no-code fashion. Estuary has a rich set of capture and materialization connectors. You can choose to bring in data from any data source, do some transformations on the data if required, and push the data into an appropriate sink in real time. In order to achieve real-time use cases in the e-commerce domain, you can perform real-time ingestion of user-activity logs, also known as clickstream data, inventory systems, marketing campaigns, etc. Putting this data in an appropriate data store can help in generating meaningful insights about the data.
Estuary Flows comes with advanced features like real-time deduplication and exactly-once guarantees. These are really powerful features and can be pretty helpful with some use cases. In the e-commerce domain, if you are dealing with orders data that is flowing in as a stream, ensuring deduplication becomes an important part in order to come up with correct calculations on the total number of orders placed, total price, taking all orders into account, etc. Without these features, all such calculations can go for a toss and lead to inconsistent ledgers and accounts.
Estuary Flows supports high throughput with low latency. You can ingest millions of events per second with Estuary, which provides a seamless experience. Estuary can easily handle different ecommerce pipelines like clickstream pipelines, inventory management pipelines, marketing campaign pipelines, etc.
How Estuary Flow and Tinybird Combine Efforts For Real-time Analytics
Real-time data analytics is critical for modern e-commerce businesses looking to drive sales, optimize pricing, and enhance customer experiences. However, achieving low-latency, high-throughput analytics at scale requires more than just data ingestion—it demands seamless data movement and lightning-fast querying. This is where Estuary Flow and Tinybird come together as a powerful joint solution.
A Unified Pipeline for Streaming and Querying
Estuary Flow acts as the real-time data integration backbone, enabling businesses to ingest, transform, and move data from multiple sources—such as MongoDB, Postgres, Google Analytics, or clickstream logs—into real-time analytics platforms like Tinybird. Instead of relying on traditional ETL tools that introduce lag, Estuary Flow captures data changes in real-time and ensures high reliability with exactly-once guarantees and built-in deduplication.
Tinybird, on the other hand, specializes in high-performance querying and API-driven analytics. It ingests real-time data streams from Estuary Flow and instantly makes them available for SQL querying. Tinybird’s engine is optimized for speed, allowing e-commerce businesses to build real-time dashboards, trigger automated actions, and power customer-facing experiences with sub-second latency.
Together, Estuary Flow and Tinybird form a complete, real-time analytics pipeline that delivers:
- Frictionless real-time data ingestion: Capture data from databases, event streams, and applications instantly with Estuary Flow.
- Optimized storage and querying: Tinybird structures the streaming data for ultra-fast analytics, ensuring instant insights.
- Scalability and performance: Handle millions of events per second with both platforms built for low-latency, high-throughput processing.
- Minimal operational overhead: No need to manage Kafka, batch jobs, or complex ETL workflows—just declarative pipelines and SQL-based analytics.
Clickstream Pipeline using Estuary - A Step-by-Step Guide
In this blog, we will be using the clickstream data to capture the user actions on the website / mobile application. Clickstream data refers to the data that captures user activity like page impressions, clicks, actions like add to cart, etc., as the user is performing it on the website or mobile application.
We will be using the clickstream data from the Kaggle datasets. We will only be using the click_stream.csv file from this dataset. The click_stream.csv file contains data about such user activities. The columns in the file are:
- session_id: The user’s session ID.
- event_name: Name of the event that the user performed, like SEARCH, SCROLL, ADD_TO_CART, etc.
- event_time: The time at which the event took place
- event_id: ID for the event
- traffic_source: Source of the event, e.g. MOBILE, WEB
- event_metadata: Metadata associated with the event
Building the pipeline:
Let us delve into the step-by-step instructions on how to build a real-time clickstream pipeline. You’ll learn how to:
- Spin up a MongoDB Atlas instance, stream emulated clickstream data into it, and prepare it for CDC capture.
- Configure a capture in the Estuary Flow dashboard to ingest change events from the MongoDB collection. This will land the documents from MongoDB into the Estuary Collection.
- Generate a token in Estuary to use Dekaf, Estuary’s Kafka-compatible layer.
- Stream data from Estuary Collection into Tinybird via Estuary Dekaf.
Prerequisites
- Estuary Flow account: if you haven’t registered yet, you can do so here for free!
- Docker: for convenience, we provide a Dockerized development environment so you can get started in just seconds!
- GitHub repository: Clone this repository as we will be using it in this project.
Step 1: Generate Fake Data in MongoDB
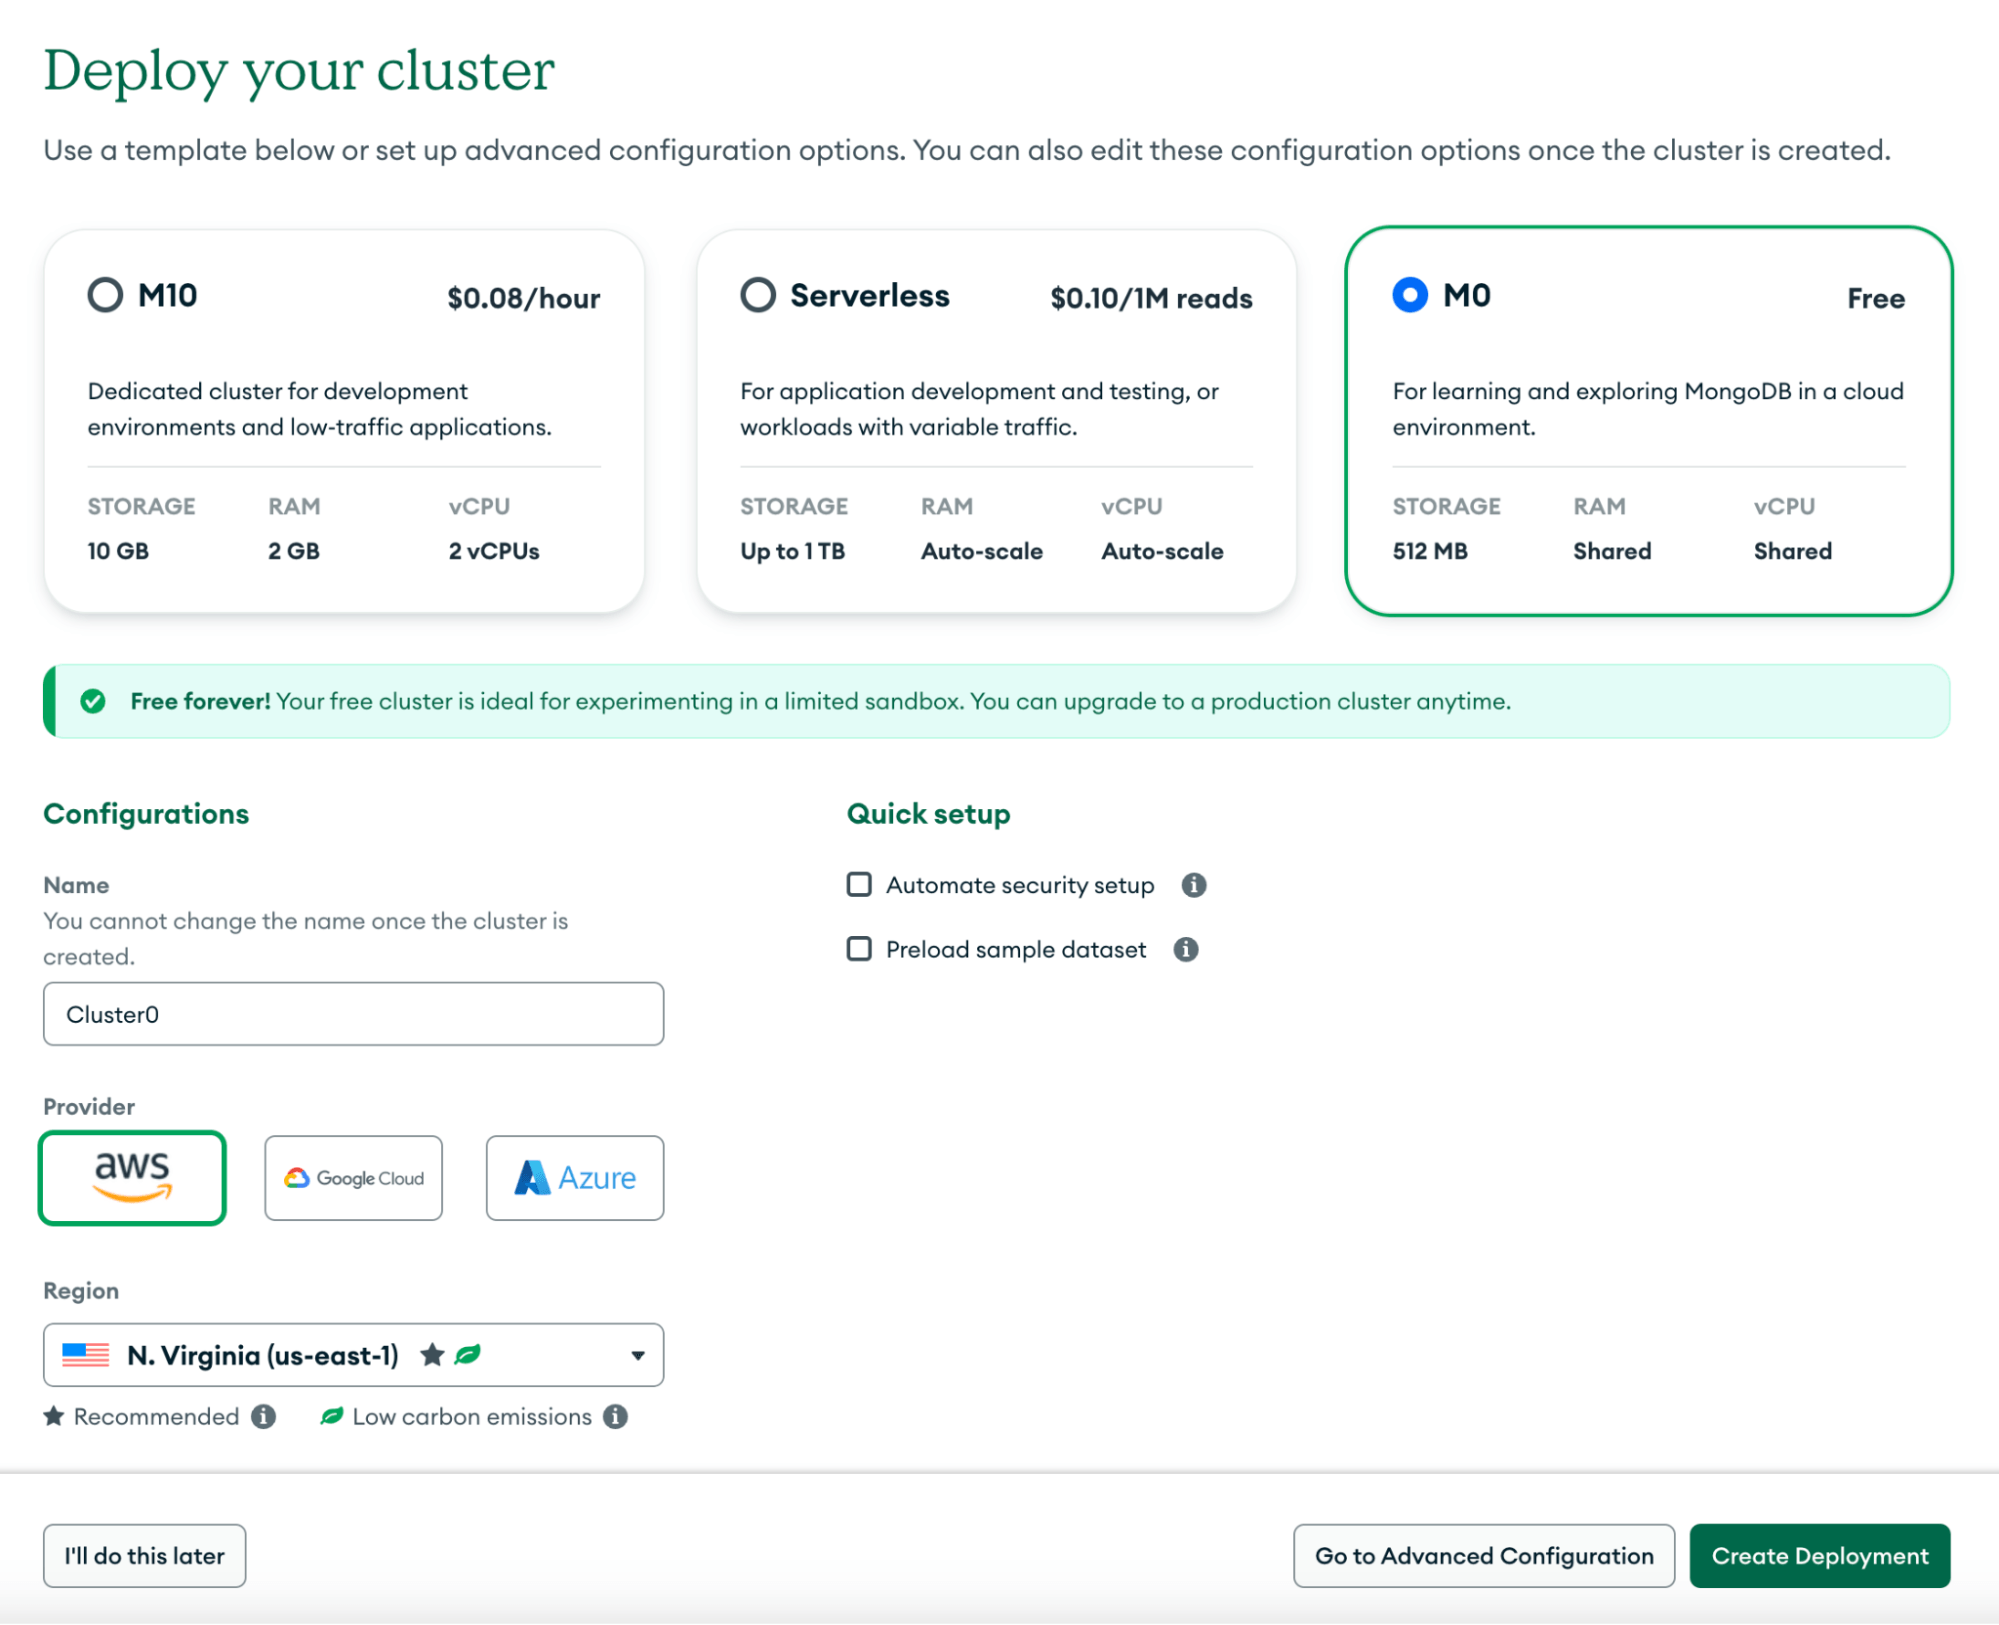
- Firstly, we will need a MongoDB server. We will be using the MongoDB Atlas instance. The free tier offering of the MongoDB Atlas will suffice for this blog. On the Atlas console, click on Create Cluster to create a new MongoDB cluster. If you are using Atlas on a fresh account, you get one free cluster. You can choose the M0 template, provide an appropriate name for the cluster, select an appropriate provider and region, and click on Create Deployment.
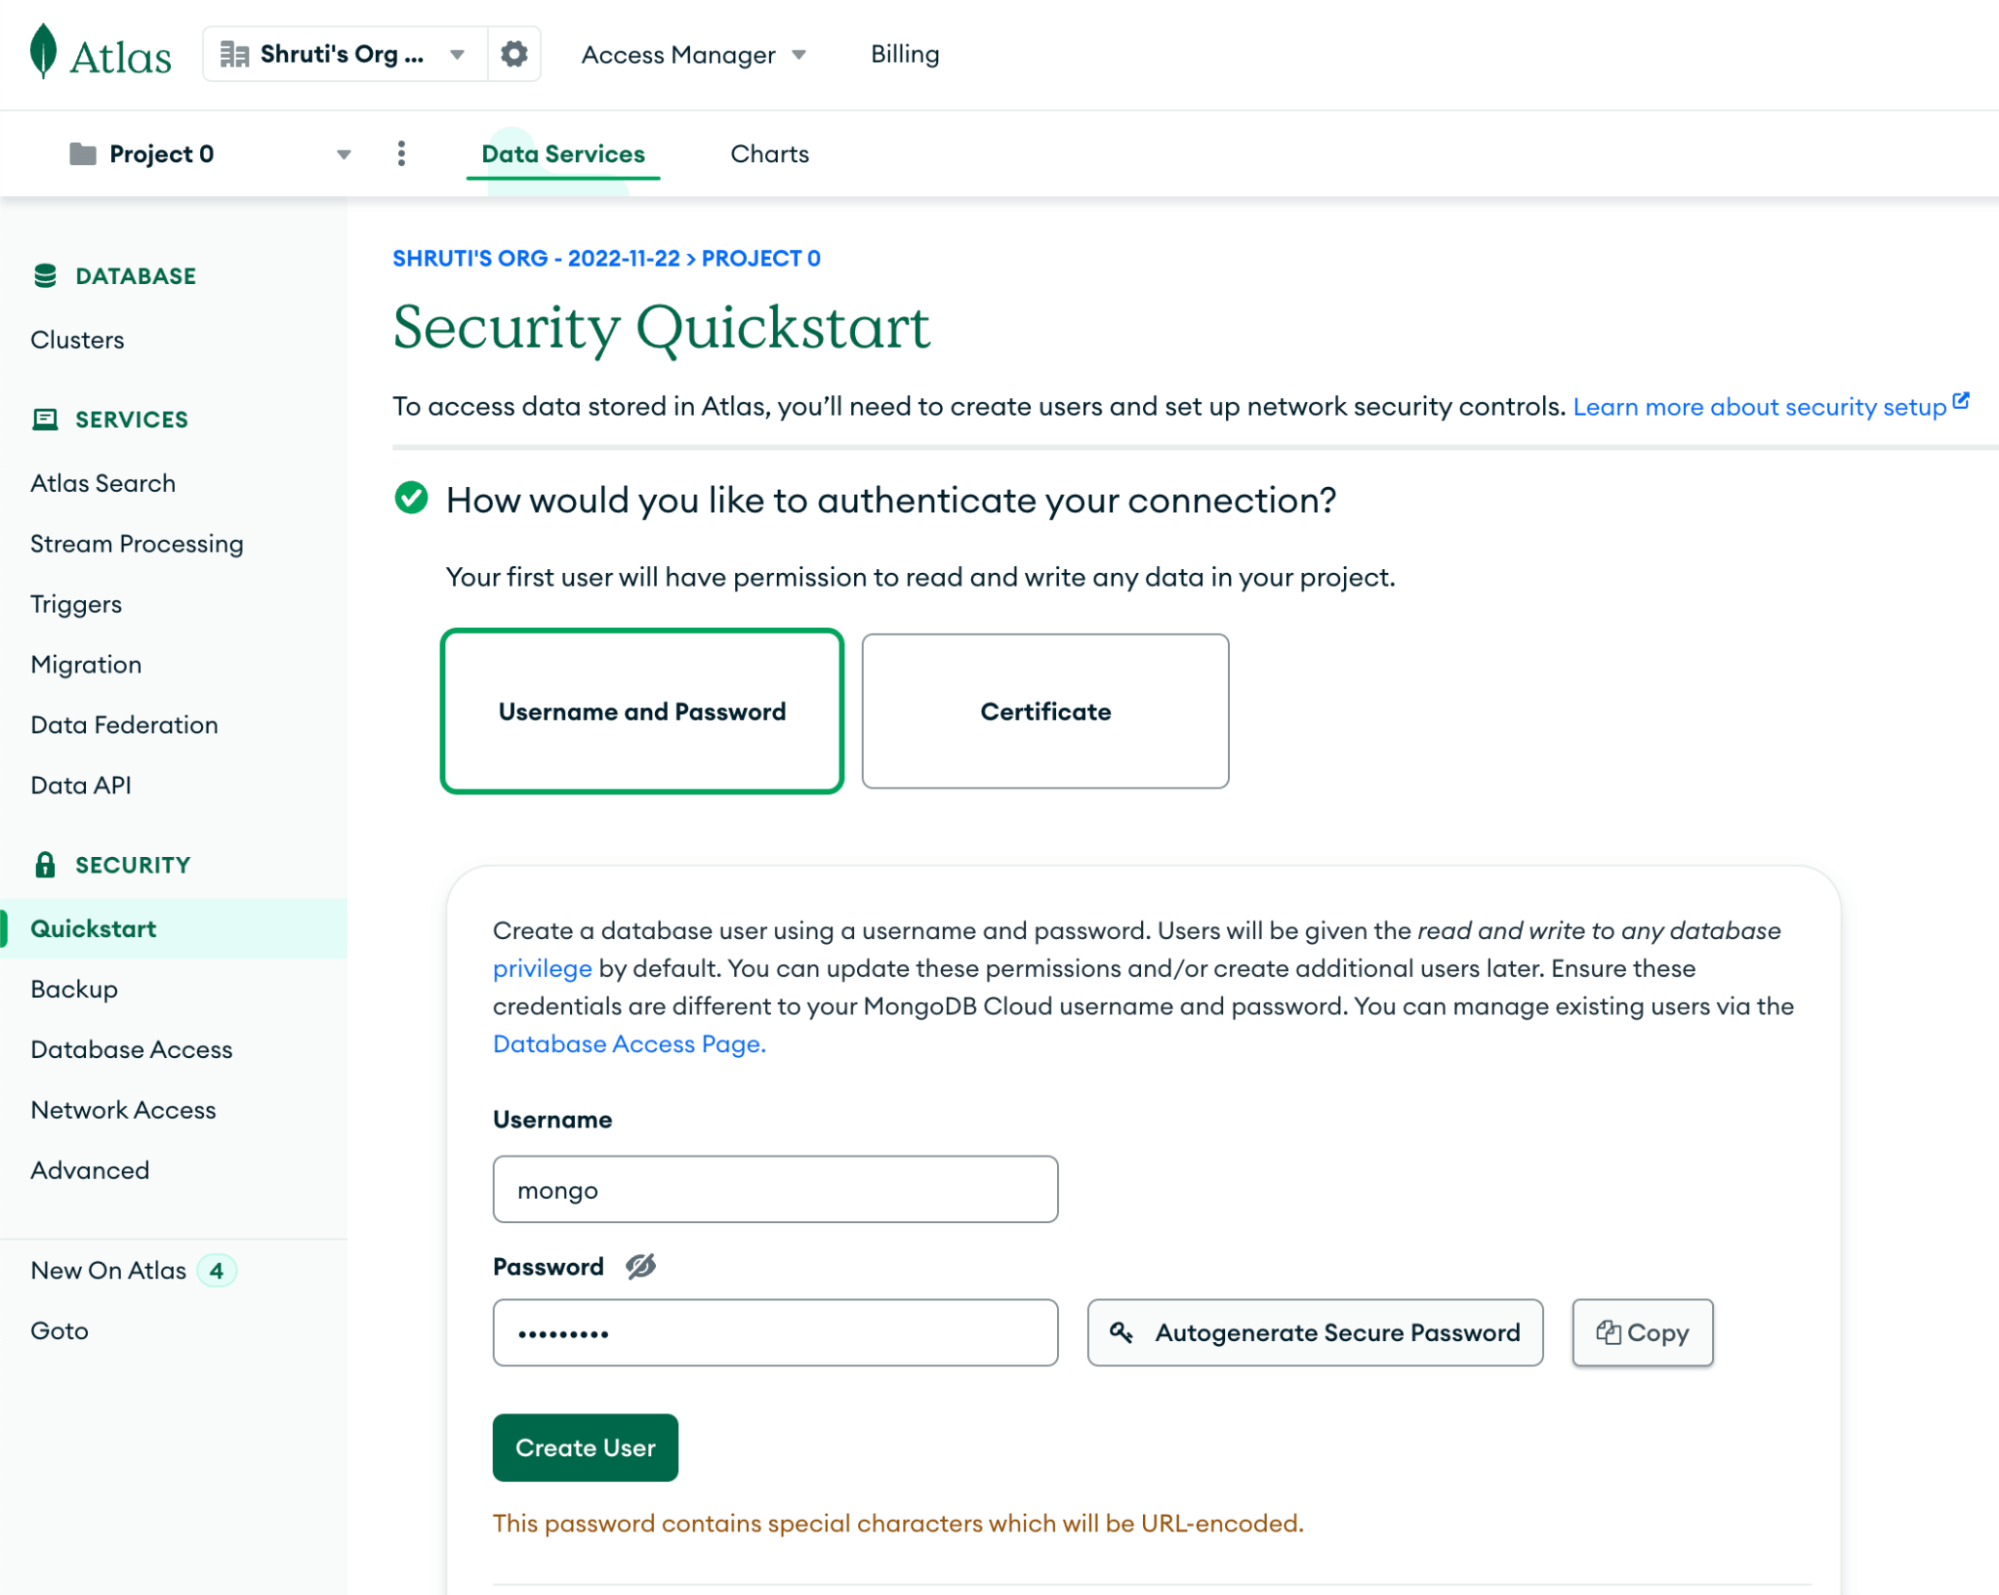
- On the Security Quickstart page that follows, select Username and Password as your authentication mechanism. Provide an appropriate Username and Password, and click on Create User.
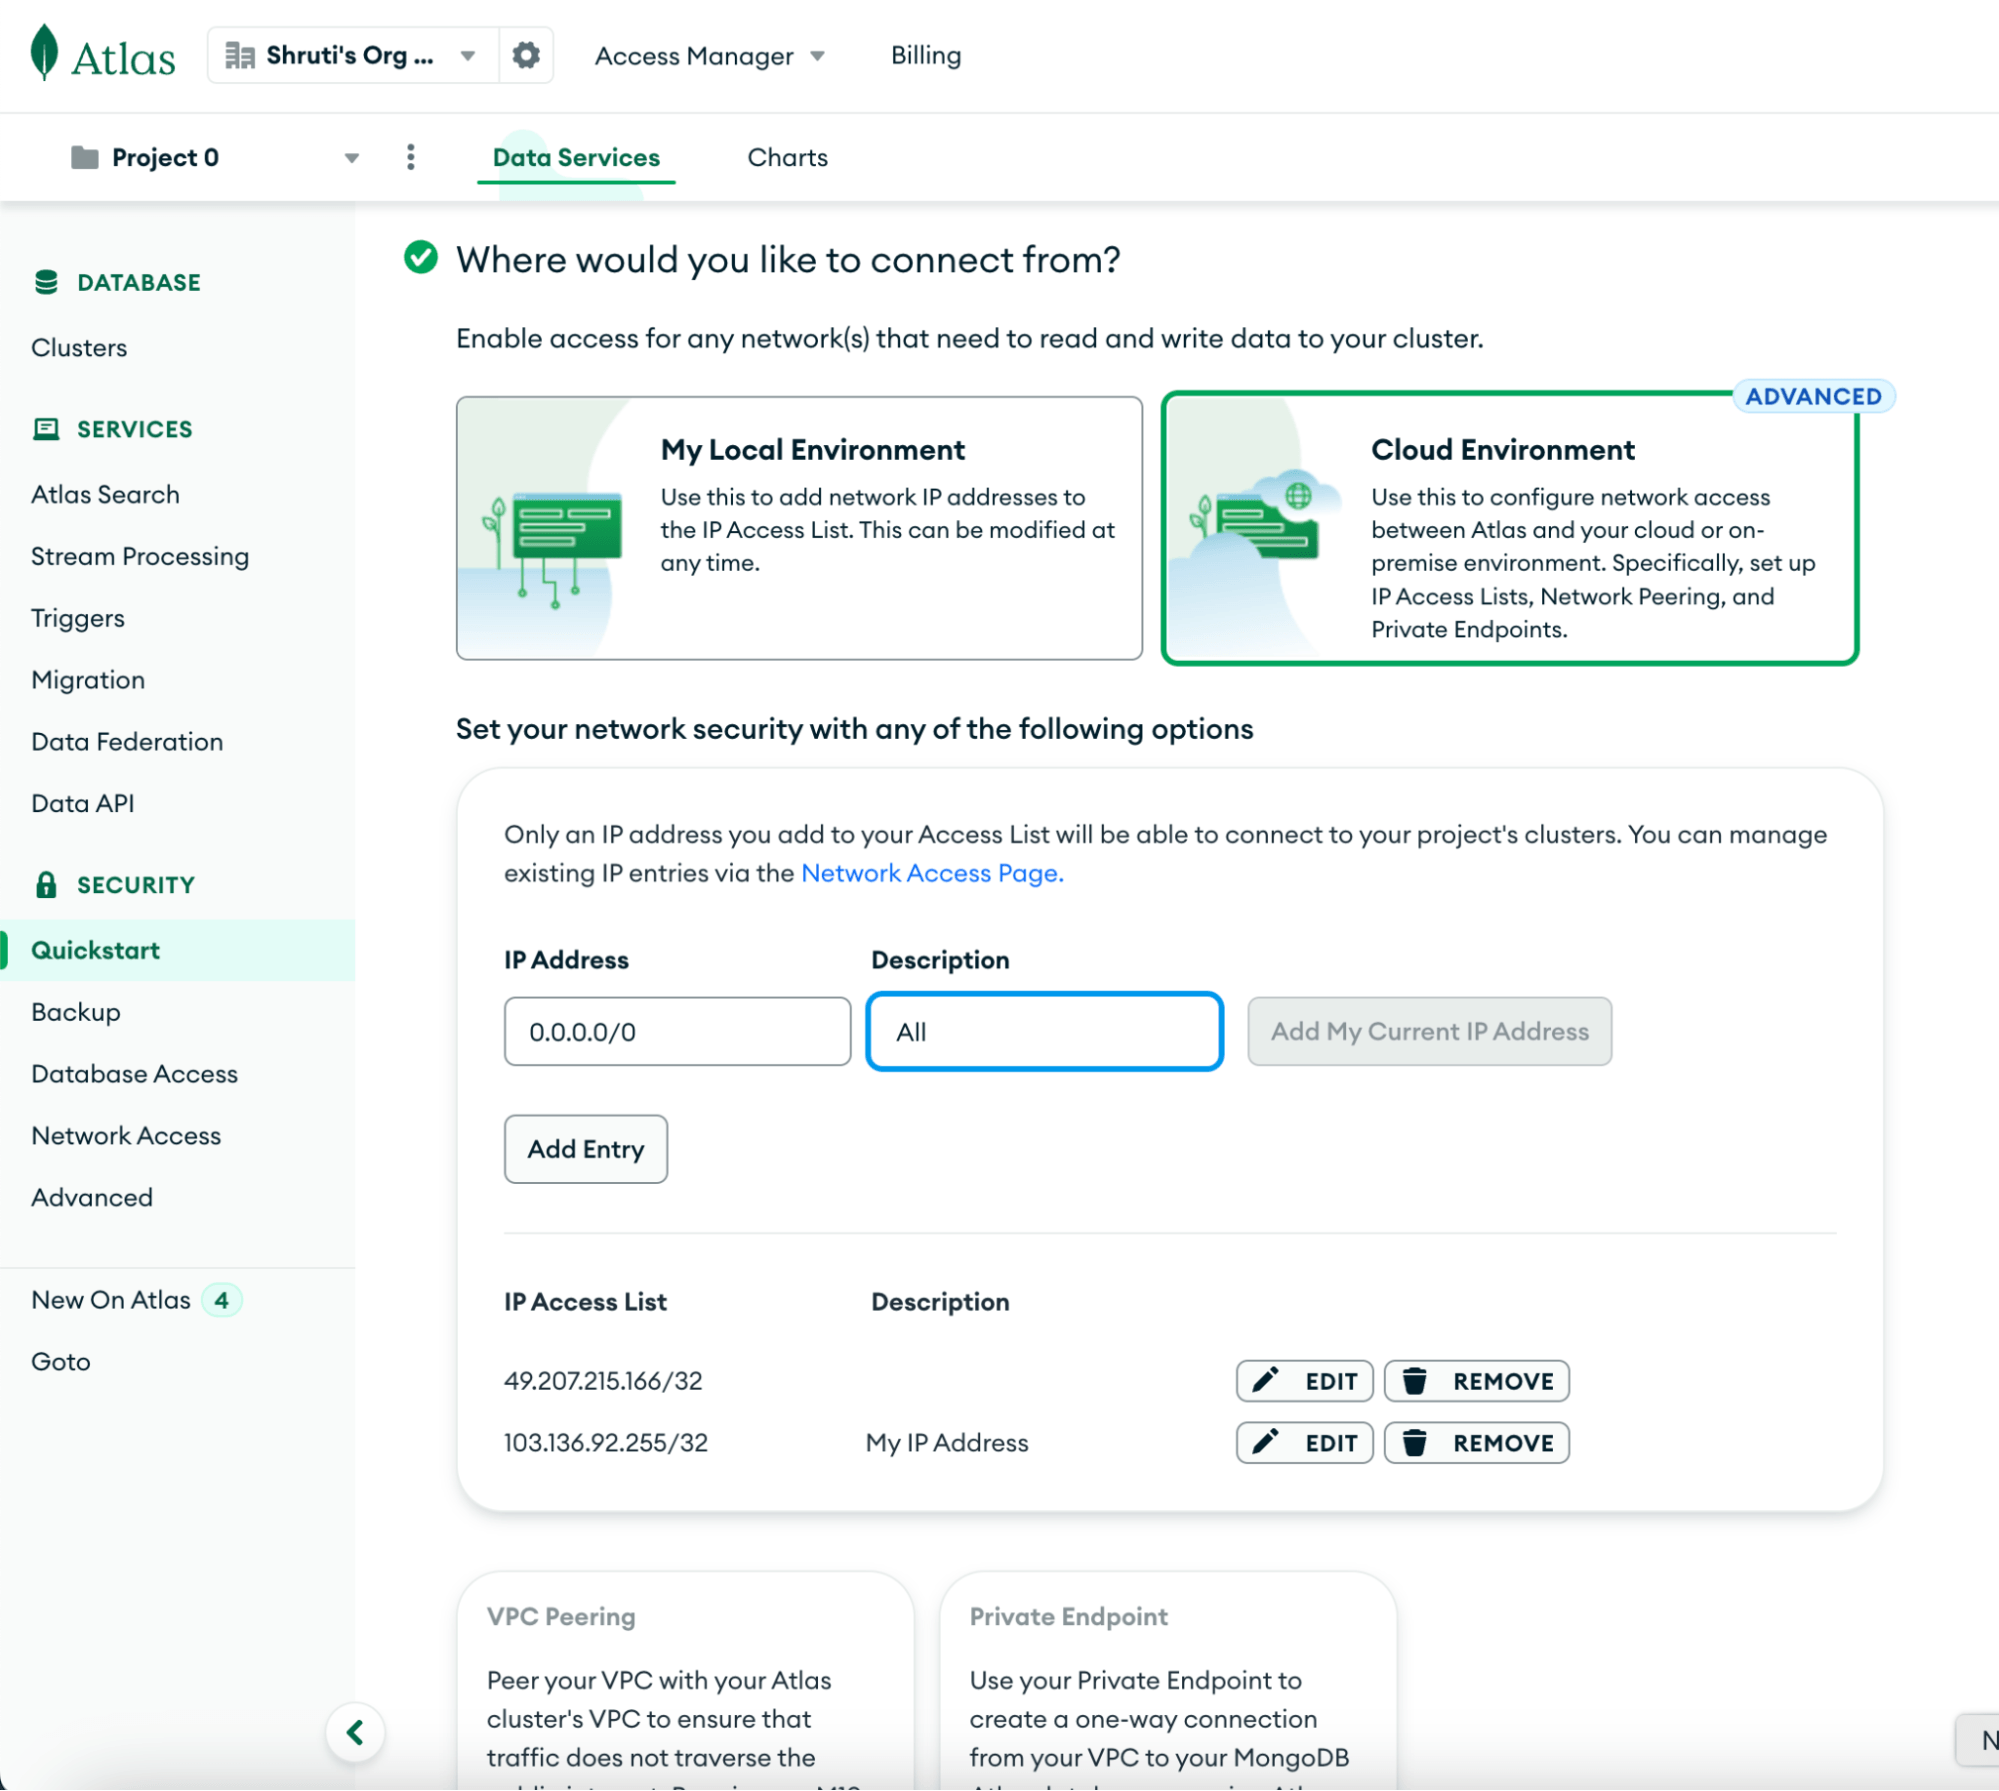
- In the Network section, select Cloud Environment to indicate where you would like to connect from. Ensure that the following IP addresses are allowlisted on both the source and destination systems that interact with Estuary Flow:
- 34.121.207.128
- 35.226.75.135
- 34.68.62.148
With this, we are all set to create the MongoDB cluster.
In order to connect to MongoDB, you can use any MongoDB client like MongoDB Compass.
- Next, we will put the data into the MongoDB collection in this cluster. For this, clone the estuary/examples repository and navigate to the `mongodb-tinybird-clickstream` folder of the estuary/examples repository. Open the docker-compose.yml file and provide appropriate values for MongoDB connection in the datagen service. Save the file. We will now generate the data into MongoDB using the following command that you can run from your terminal:
plaintextdocker compose up datagenThe database and collection will be created in case they do not exist. The data generator will insert a new record into the collection every 5 seconds.
Step 2: Create a MongoDB Capture in Estuary Flow
- Next, we will create the no-code CDC pipeline that will capture data from MongoDB using Estuary Flows. This will capture all the changes as and when they happen on MongoDB, like inserts, updates, and deletes on the collection.
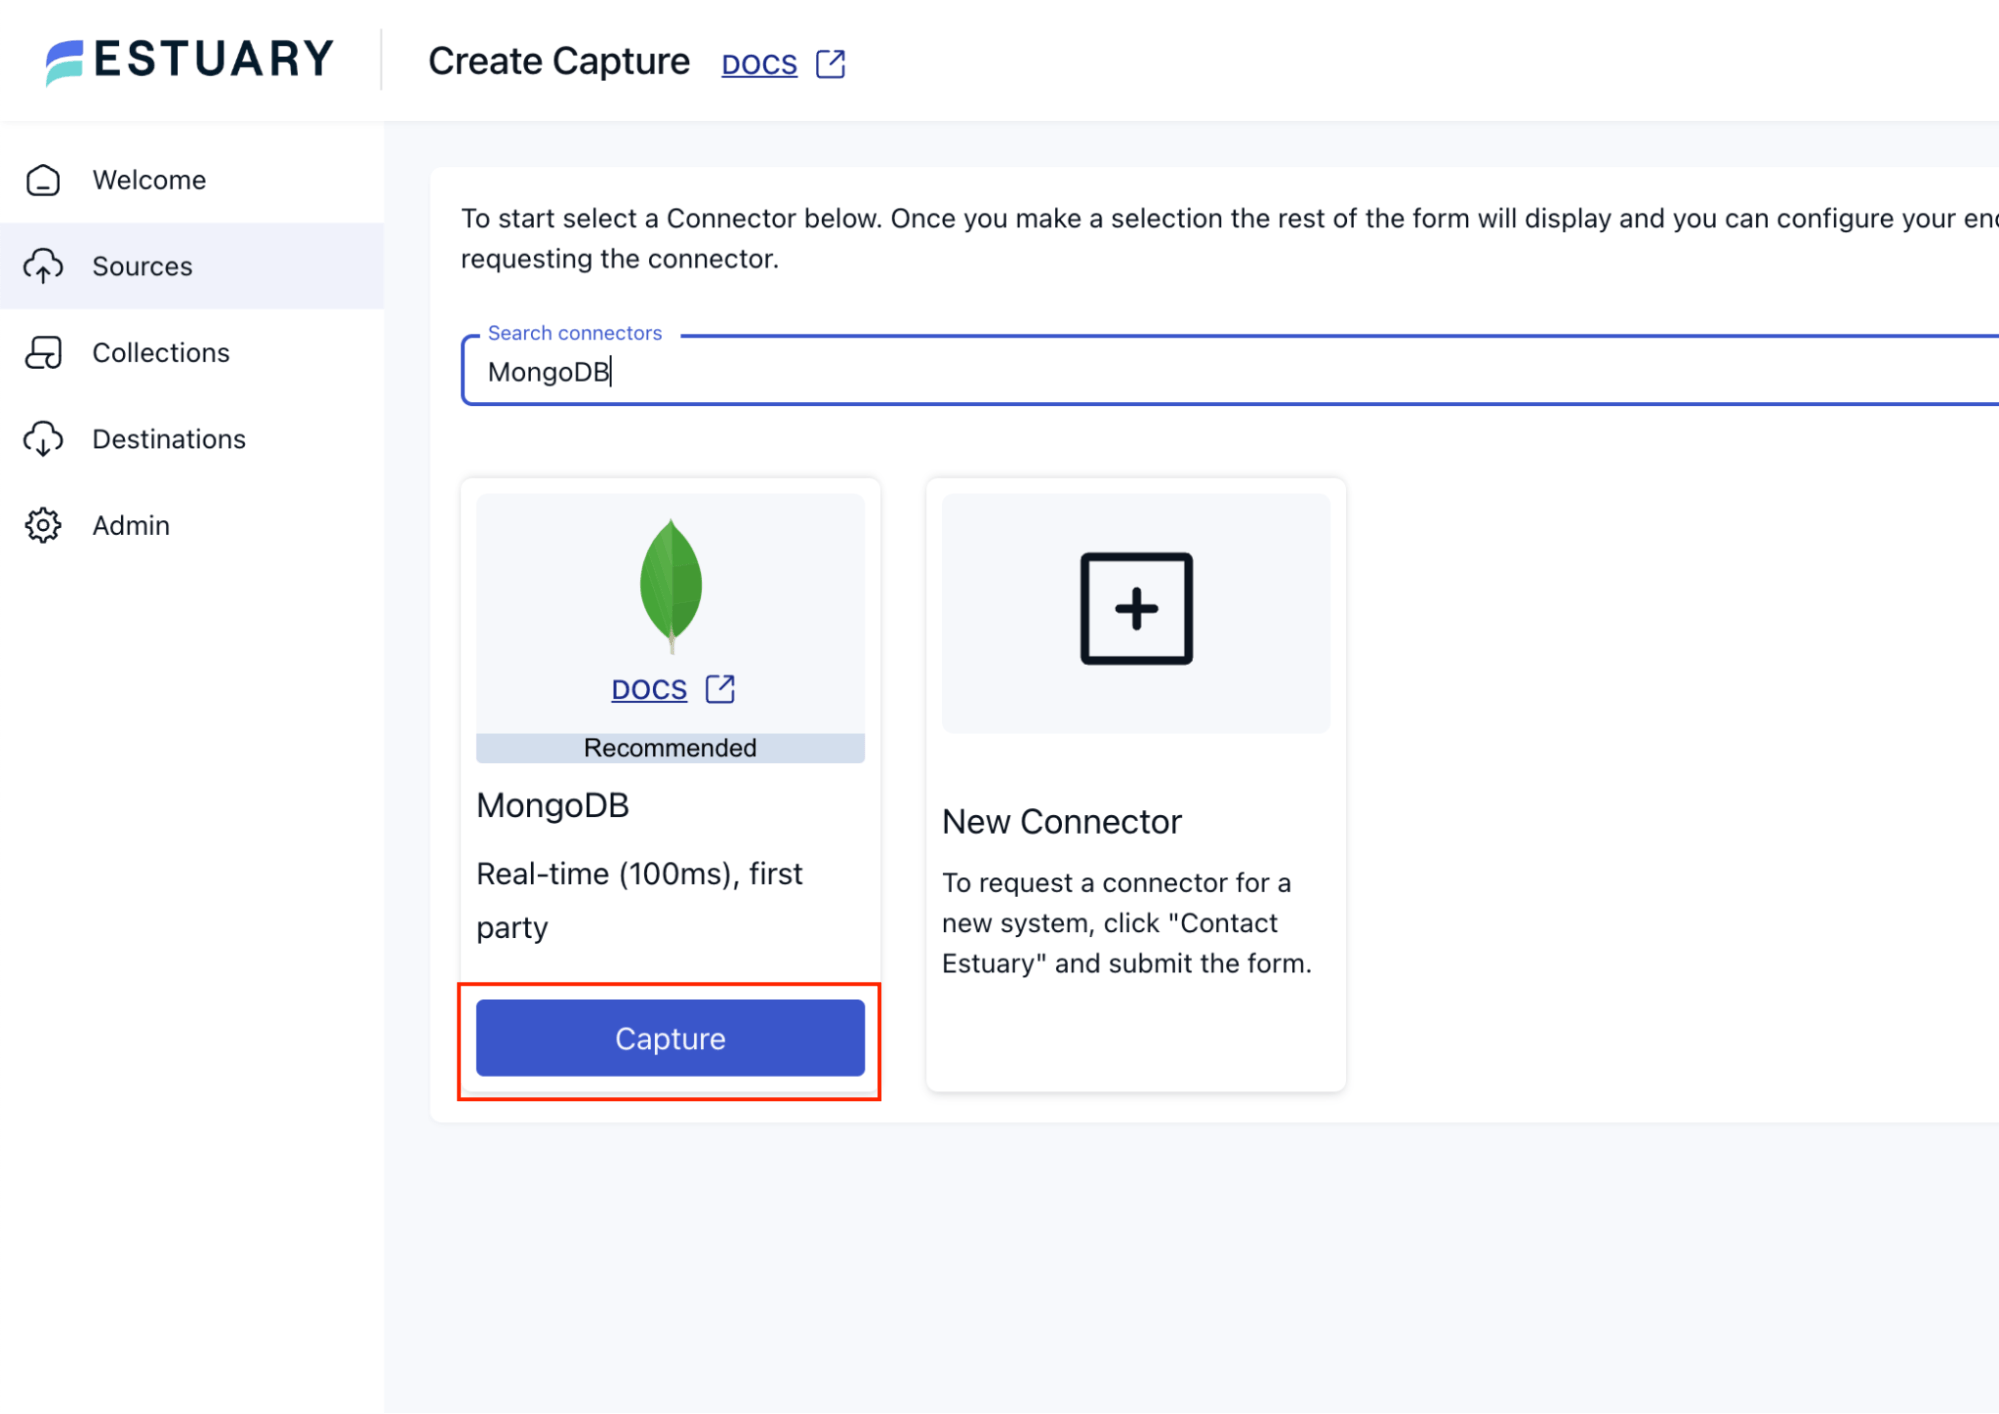
- Navigate to Estuary and click on Sources from the left navigation menu. Click on the New Capture button at the top. Search for “MongoDB” and click on the Capture button on the MongoDB tile.
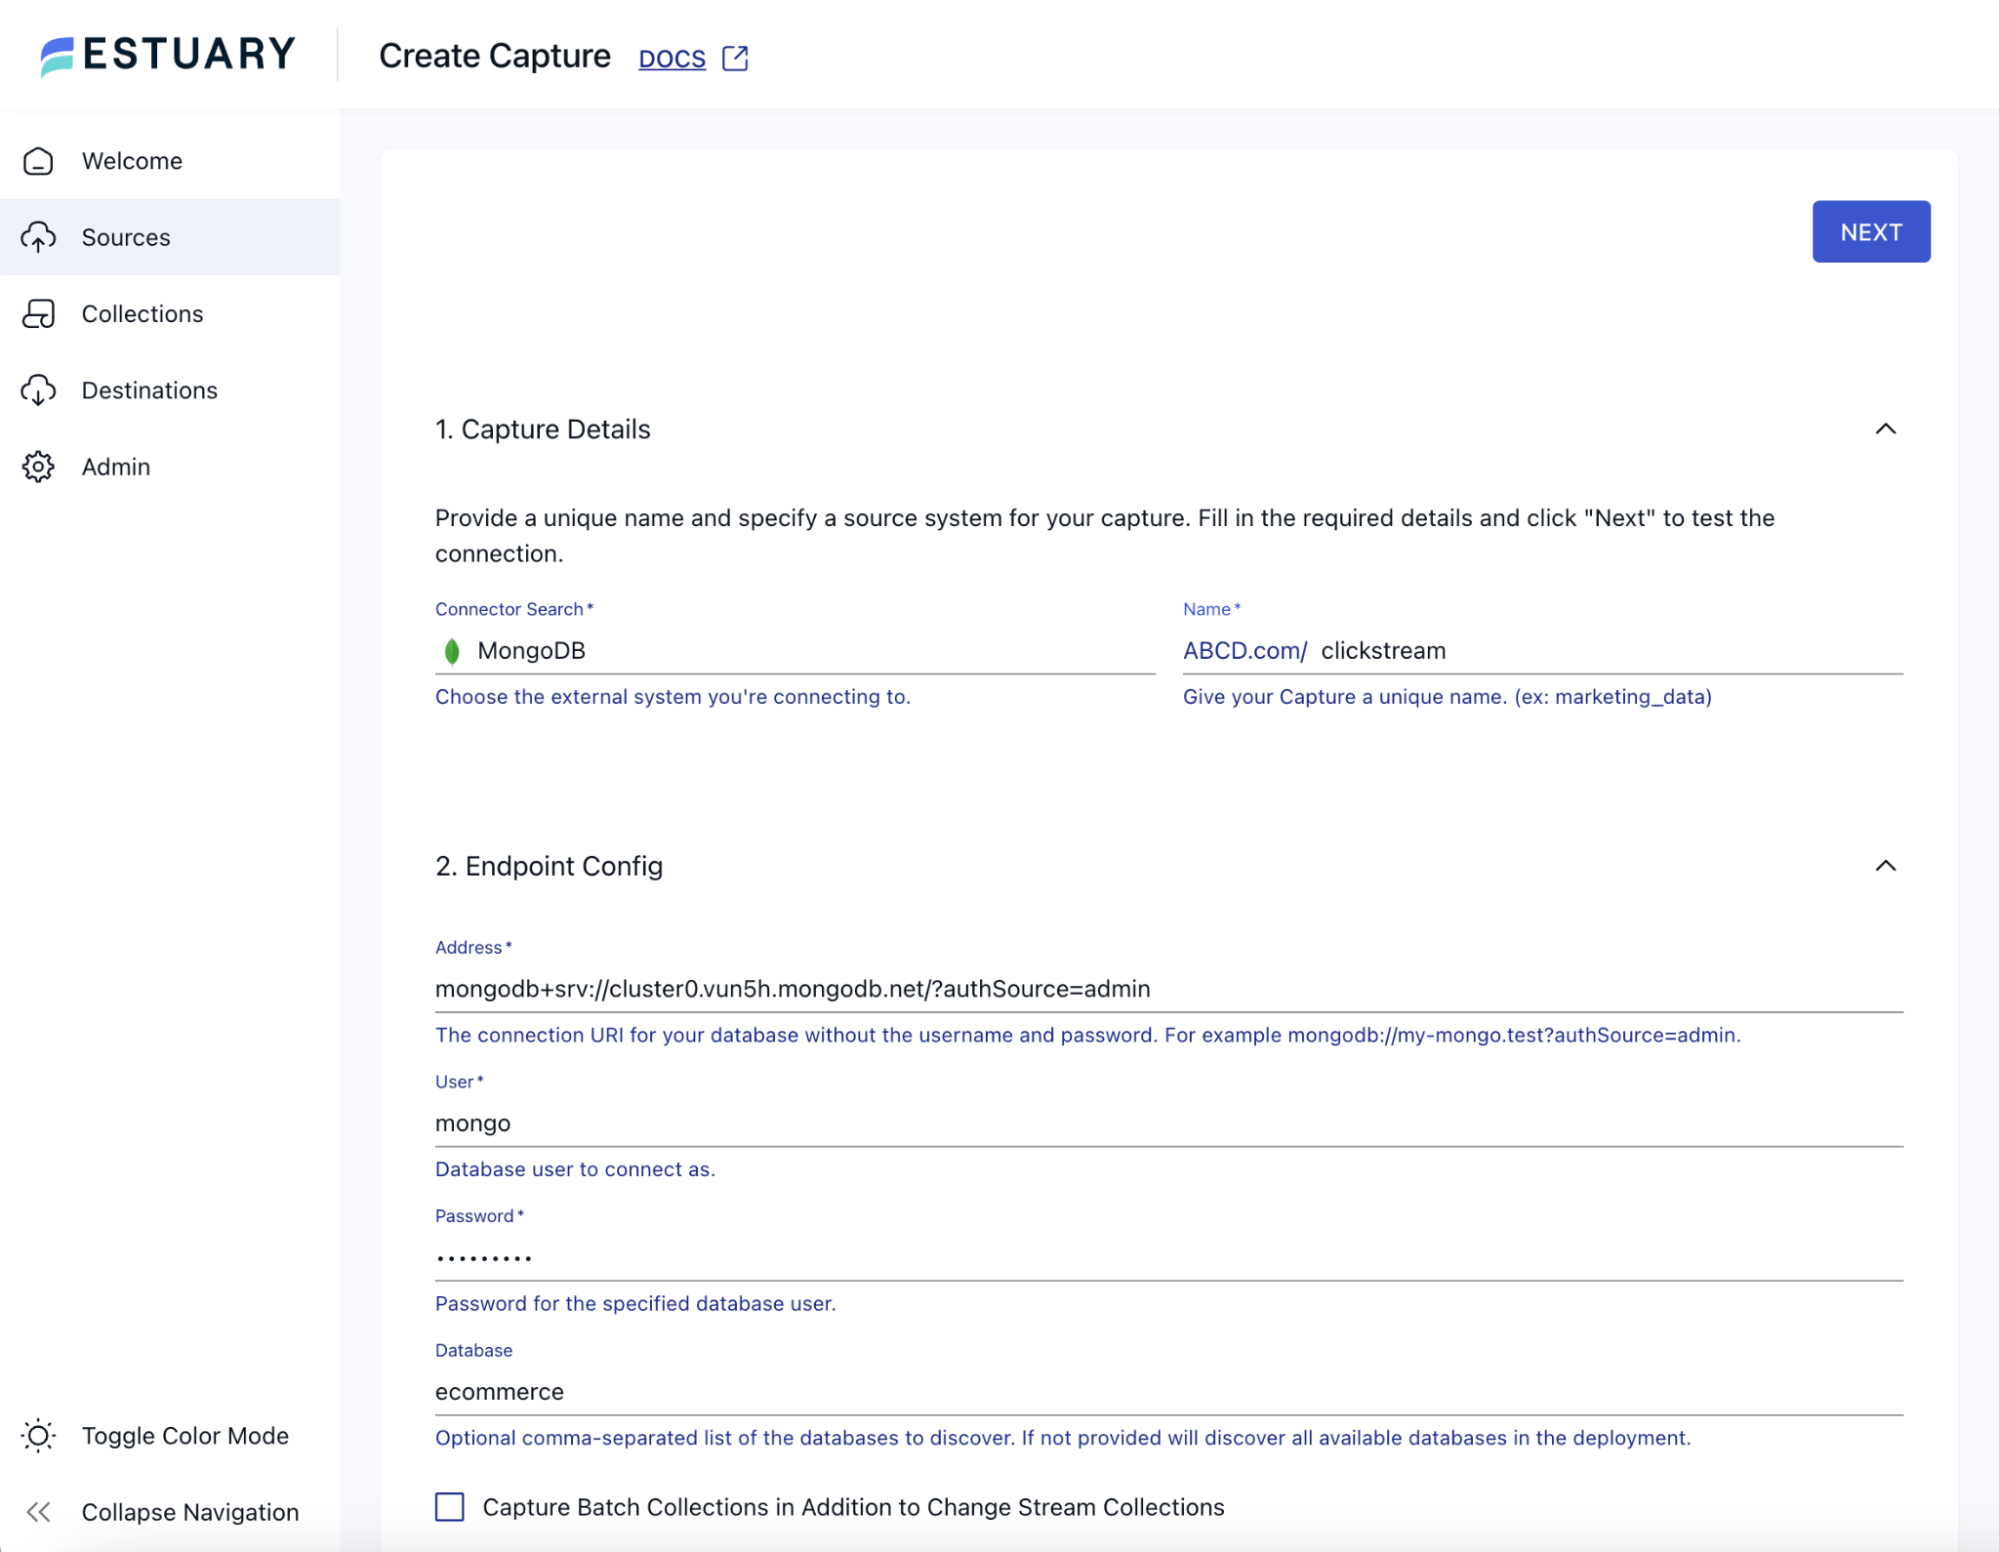
- On the Create Capture page, put an appropriate name in the Name field, say clickstream. In the Address field, put an appropriate address where the MongoDB server is hosted. Use the mongodb+srv://<cluster-host>/?authSource=admin URL notation for the Address.
- Provide appropriate values for the User, Password, and Database fields. Then click on the Next button at the top of the page.
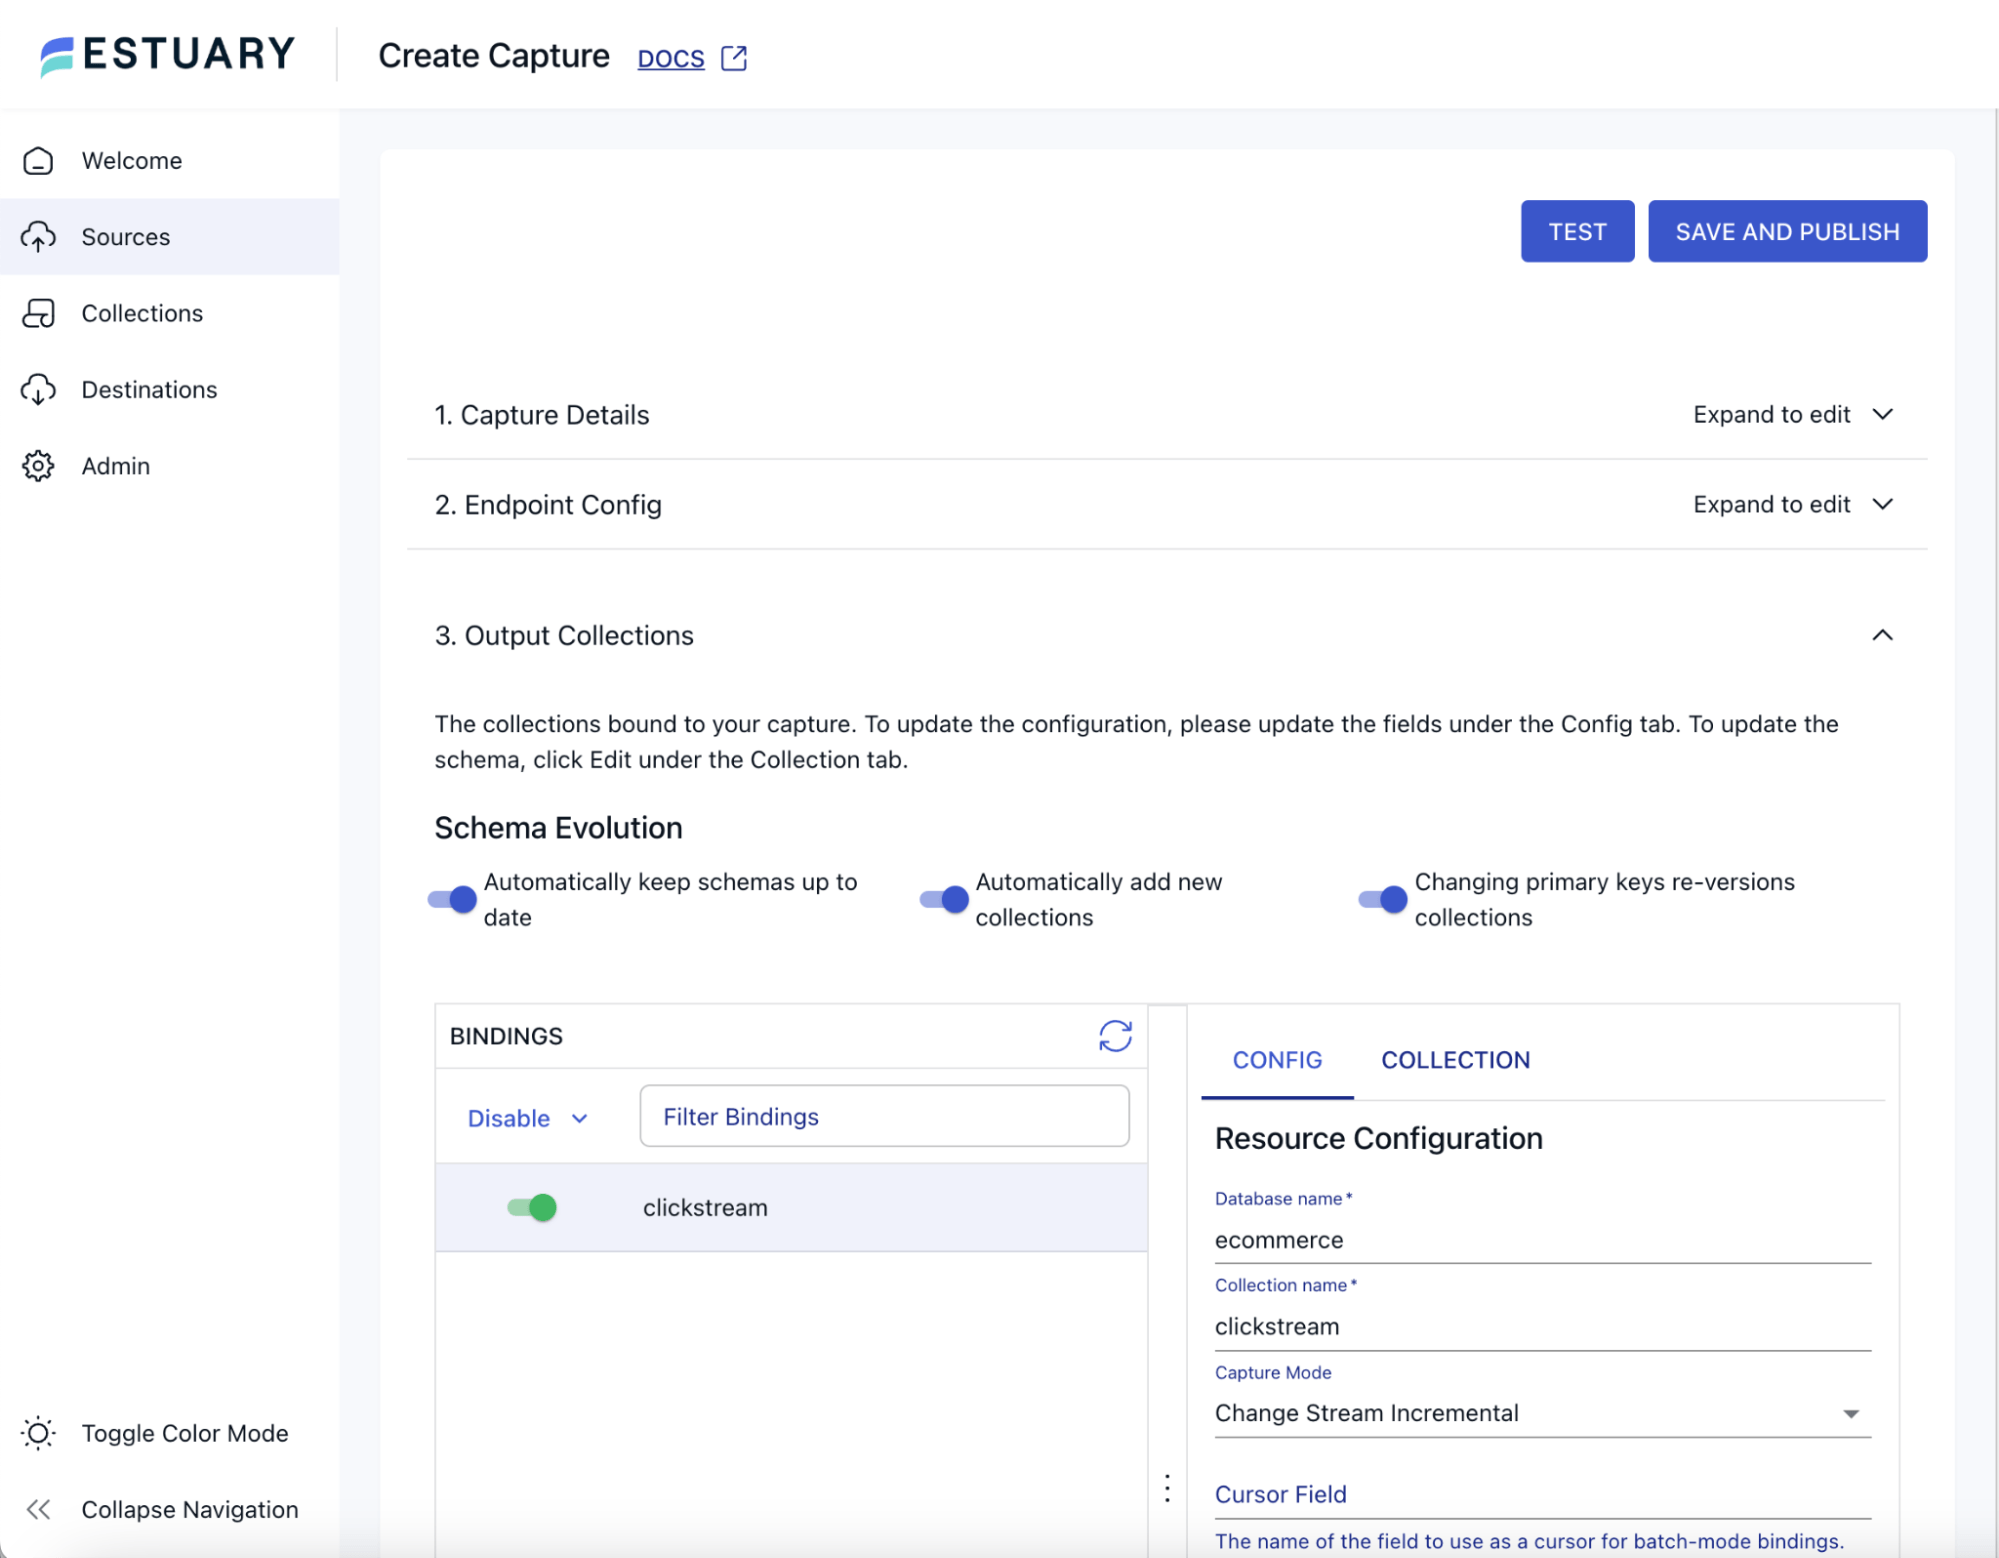
You should now see a page listing the collections being ingested from the MongoDB database.
- Ensure the clickstream collection is enabled. You can choose to reduce the Polling Schedule, say `1m`. You can click on the Test button at the top to ensure that it is successful. Next, click on Save and Publish at the top of the page.
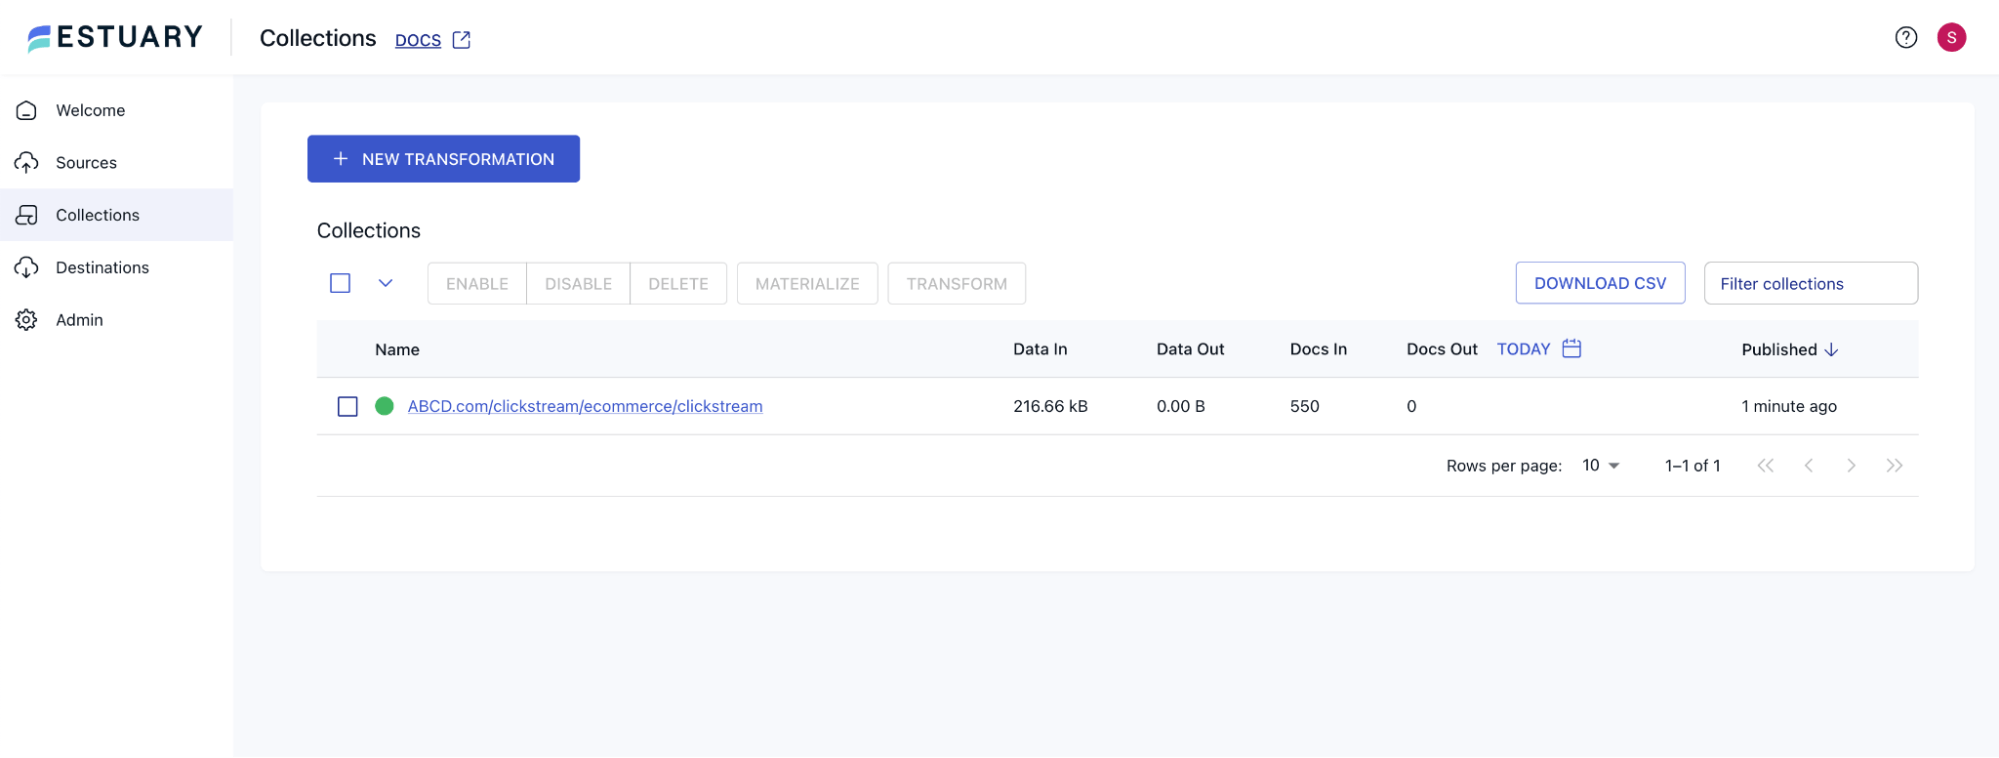
- Once the publish is successful, you should be able to see the newly created source on the Sources page. Soon, all the documents from MongoDB will be captured by the flow. The count will keep increasing over time.
- You can also navigate to Collections from the left navigation menu and notice the new collection corresponding to the `clickstream` capture.
Step 3: Using Dekaf: Estuary Flow’s Kafka-API Compatibility layer
- Dekaf is Estuary Flow's Kafka API compatibility layer, allowing consumers to read data from Estuary Flow collections as if they were Kafka topics. Additionally, Dekaf provides a schema registry API for managing schemas.
Dekaf requires no extra configuration; it is enabled by default.
- To use Dekaf, you need to generate a refresh token. On the Estuary dashboard, navigate to Admin from the left navigation menu and click on the CLI-API tab. Click on the Generate Token button.
- On the Generate Refresh Token popup that appears, provide an appropriate description for the token, and click on the Generate Token button. This will generate the token. Copy the generated token and keep it safe with you. You will not be able to retrieve this token afterward. Once you have saved the token with you, close the popup.
Step 4: Set up Tinybird for Real-time Analytics
Tinybird provides a free developer account that you can use for development use cases. You can find more about it here.
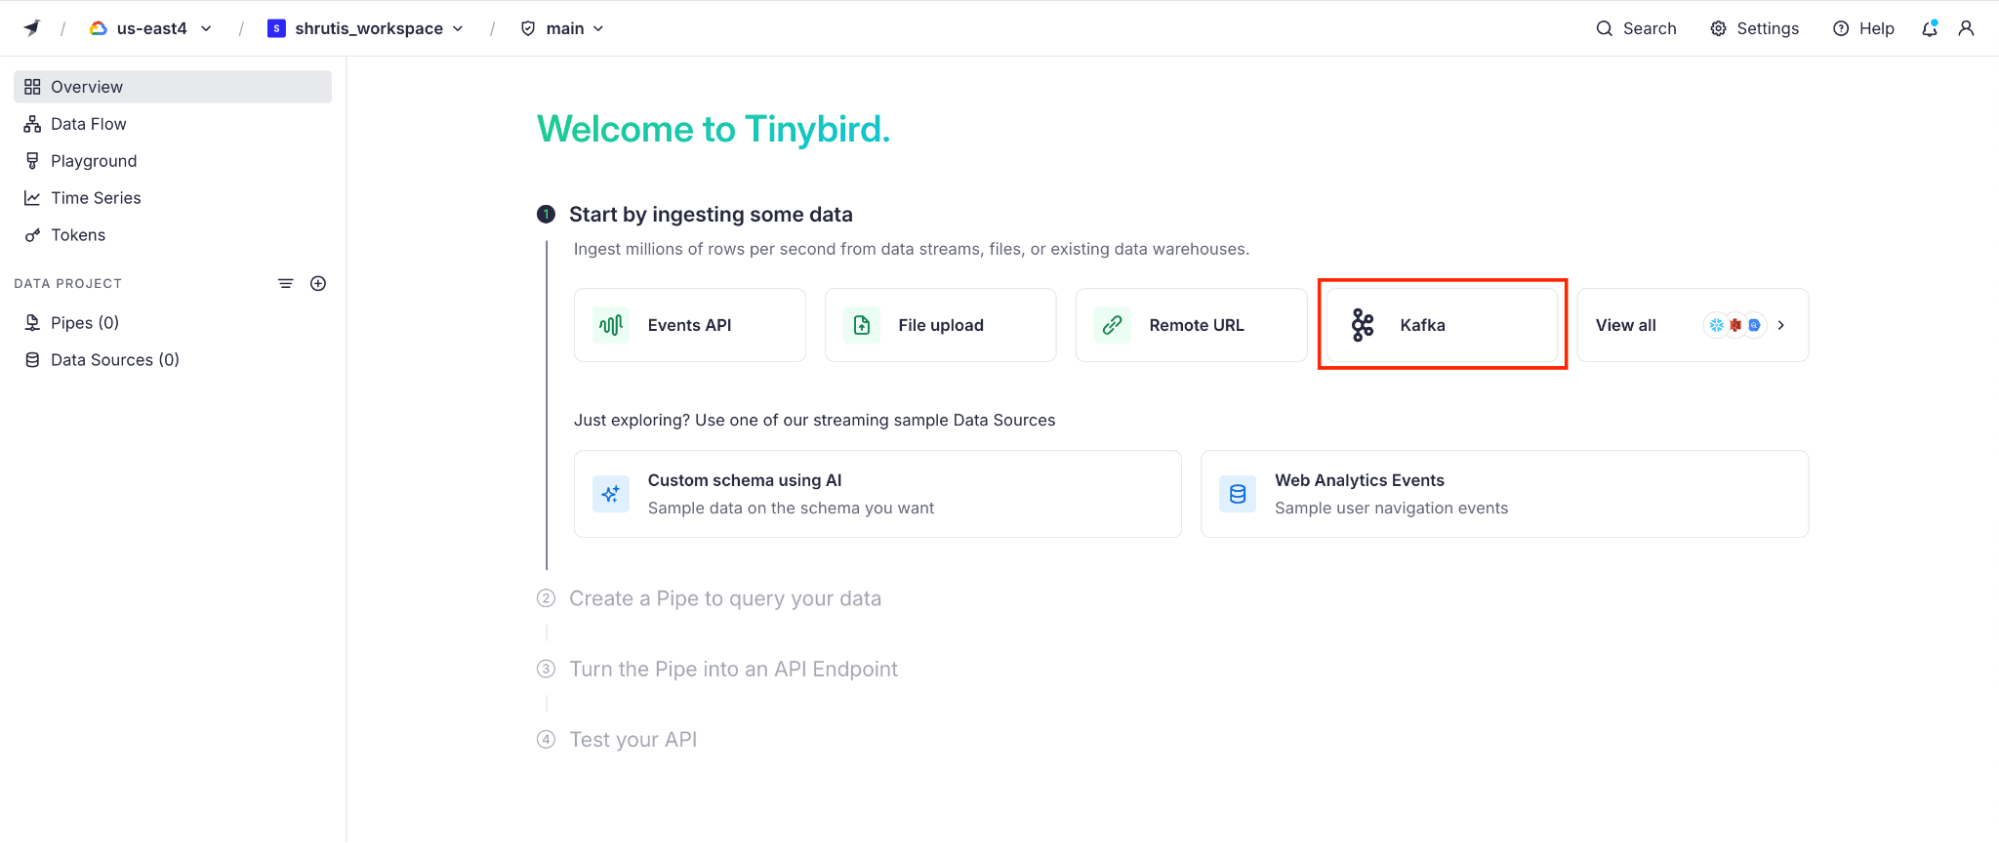
- On the Tinybird console, click on the Kafka button under Start by ingesting some data section.
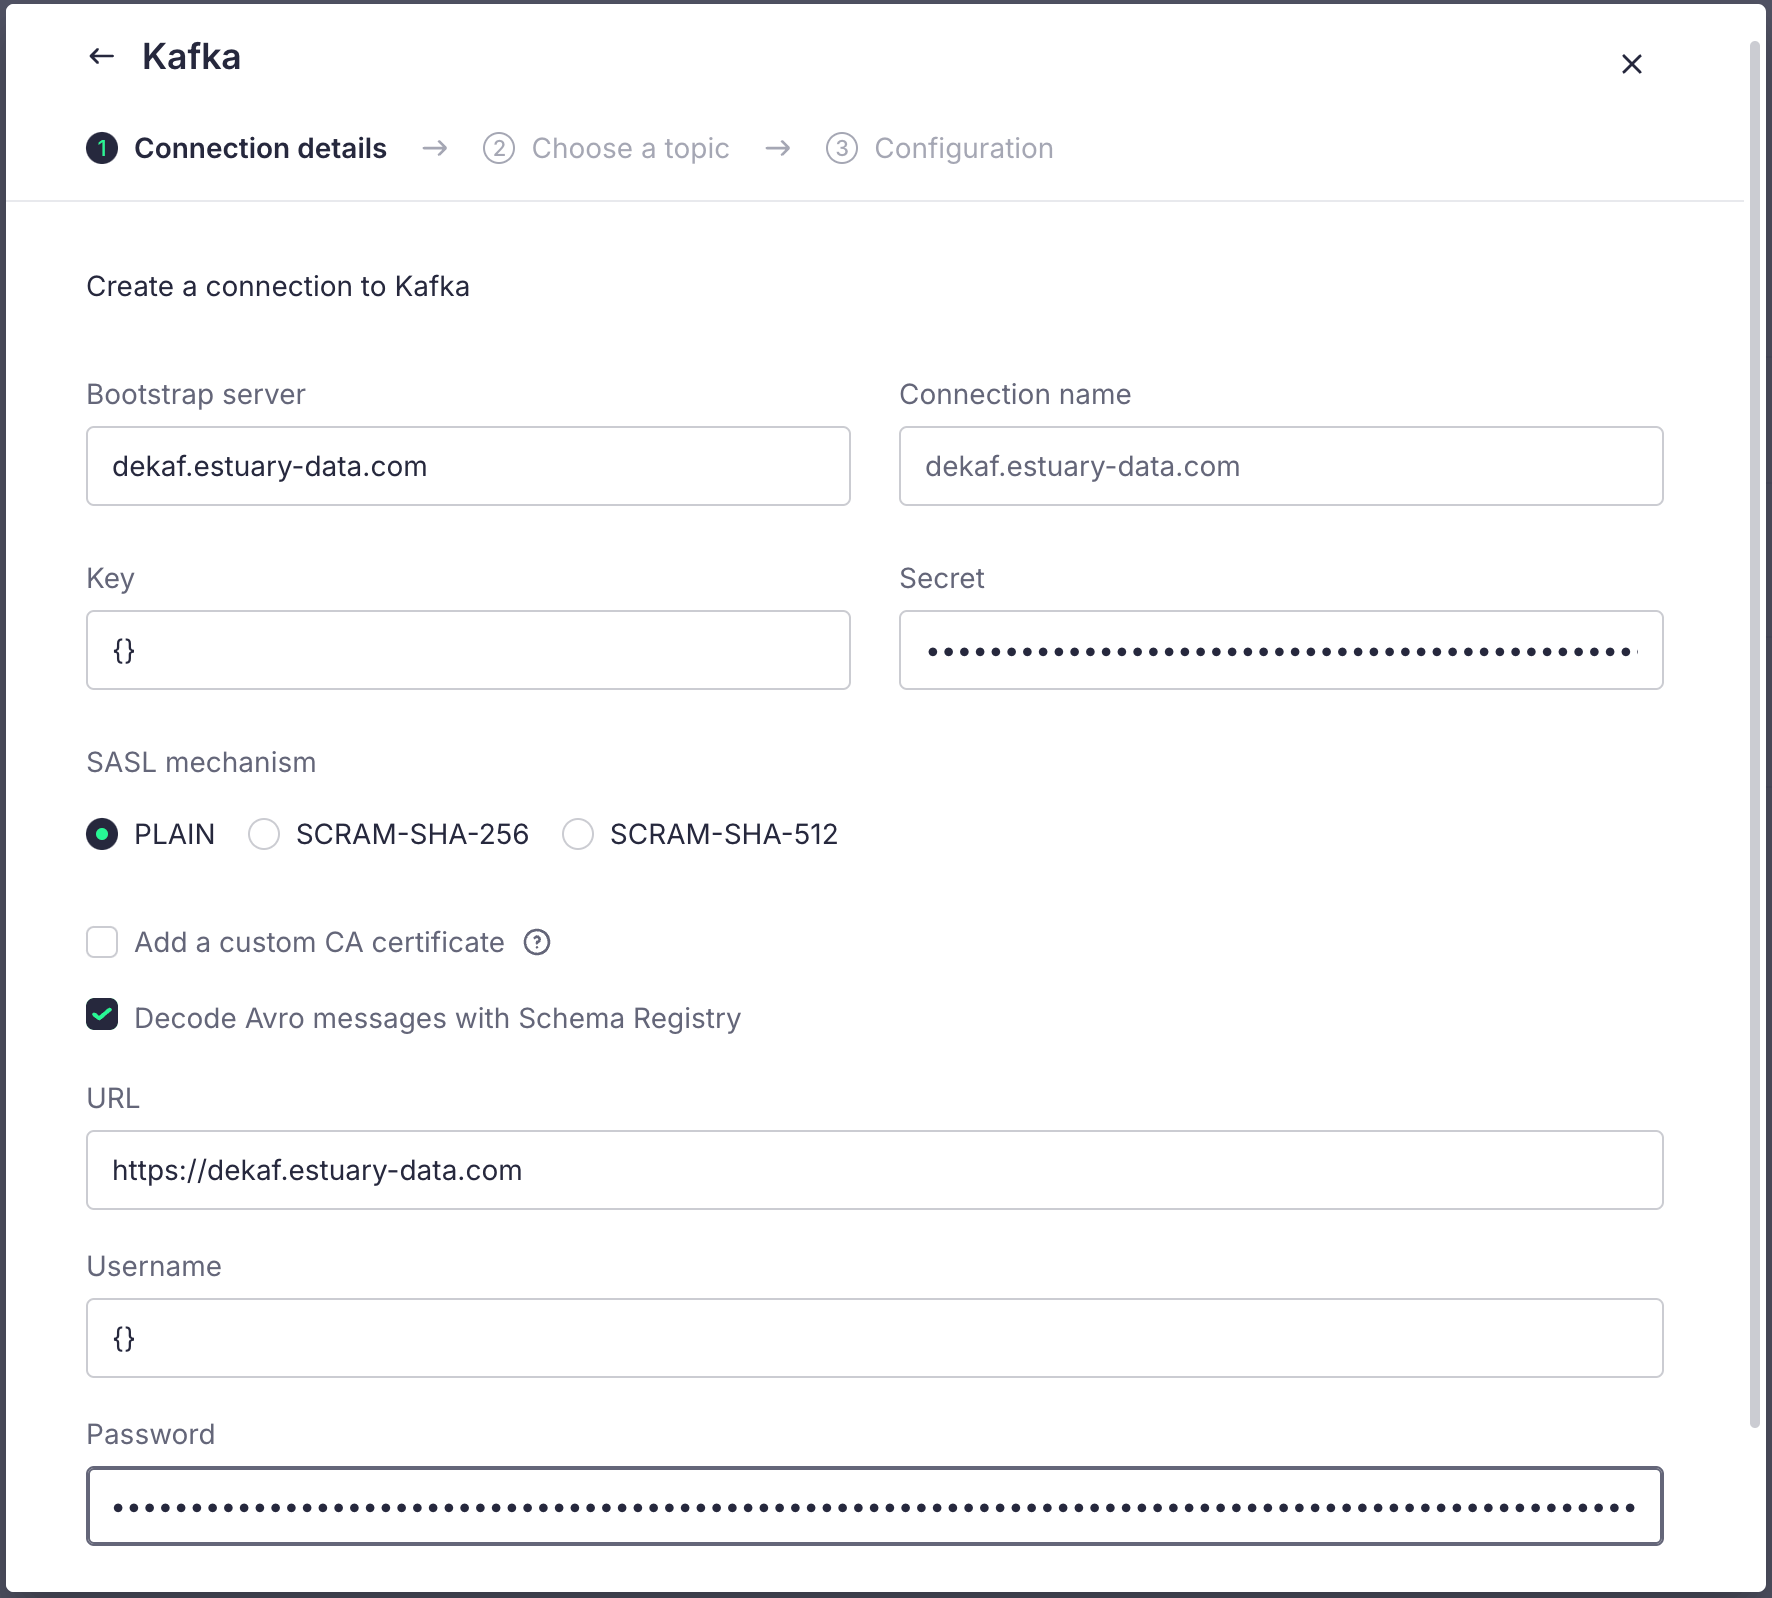
- On the popup that appears, you will land on the Connection details section. Provide the following values:
- Bootstrap server: dekaf.estuary-data.com
- Connection name: This will be auto-filled with the Bootstrap server name. You can choose to change it.
- Key: {}
- Secret: The token that we had generated in Estuary.
- SASL Mechanism: PLAIN
- Tick on Decode Avro messages with Schema Registry.
- URL: https://dekaf.estuary-data.com
- Username: {}
- Password: The token that we had generated in Estuary.
- Click on Next.
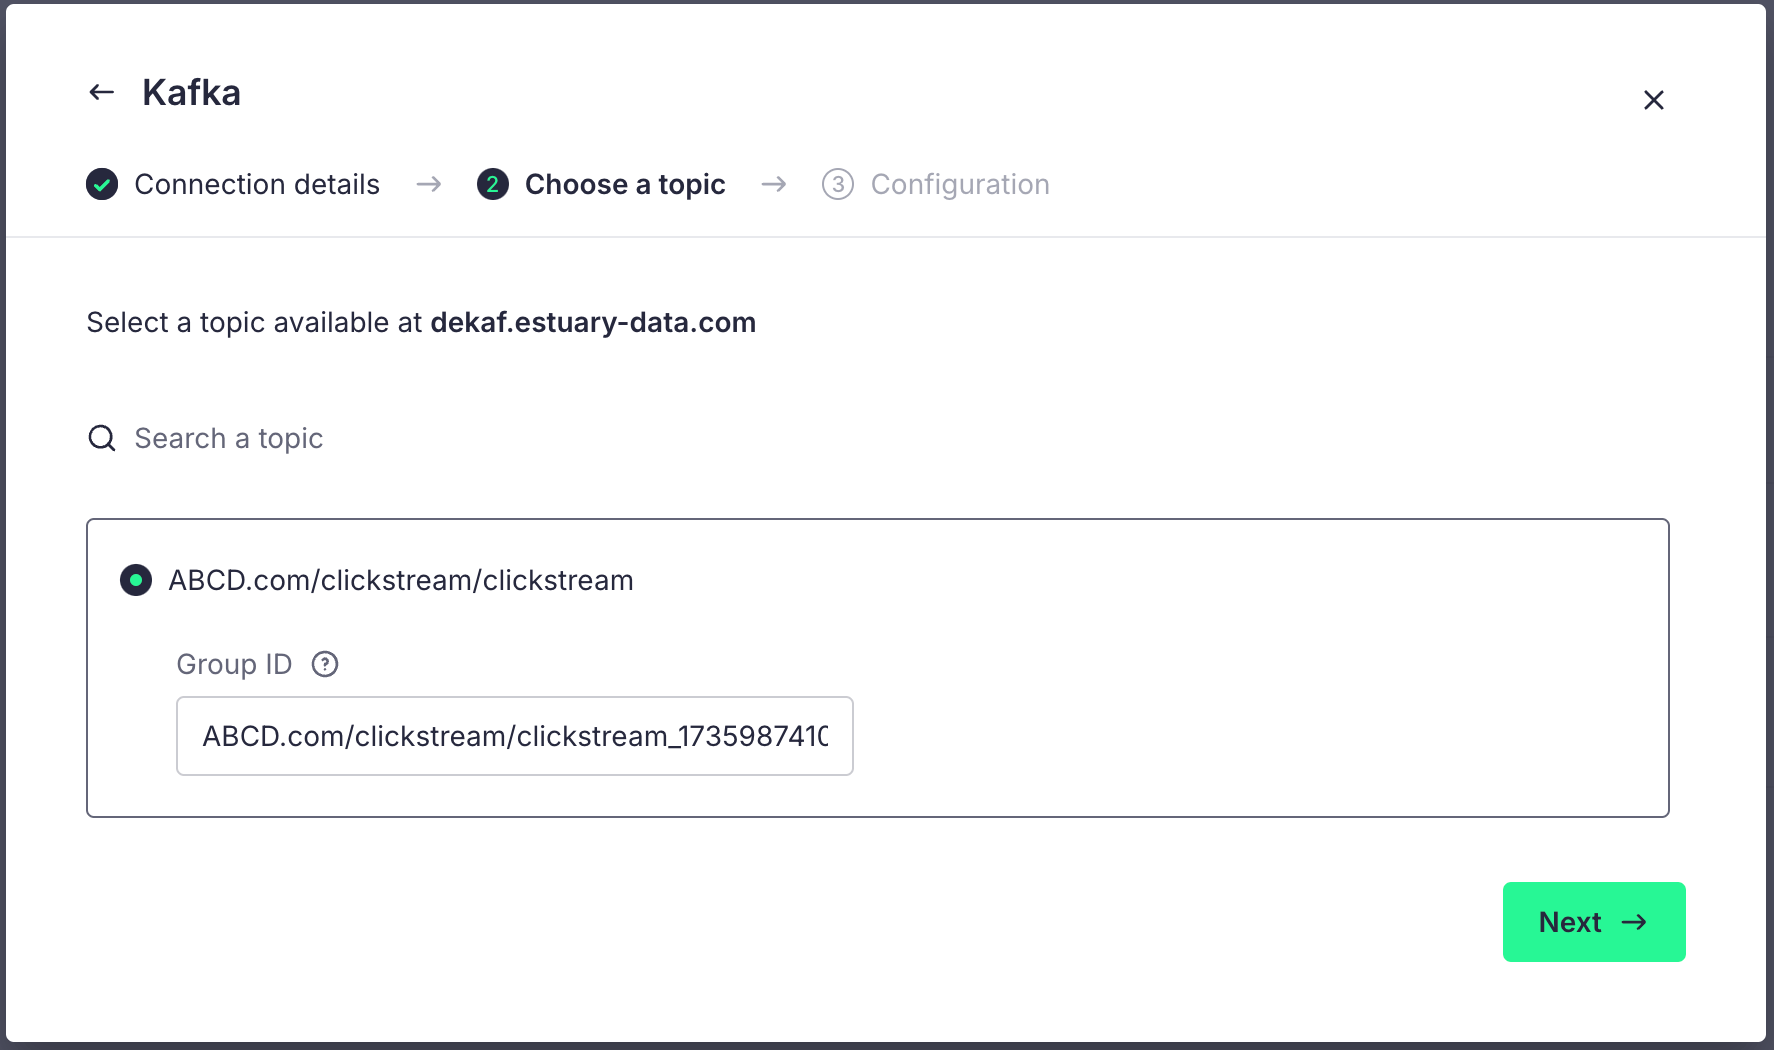
- You will land on the connection page with the new connection showing up. Click on next. In the Choose a topic section that appears, you will now see the clickstream topic appear. Ensure that it is selected. The Group ID field has an auto-generated Kafka consumer group ID, which can be left as default. Click on Next.
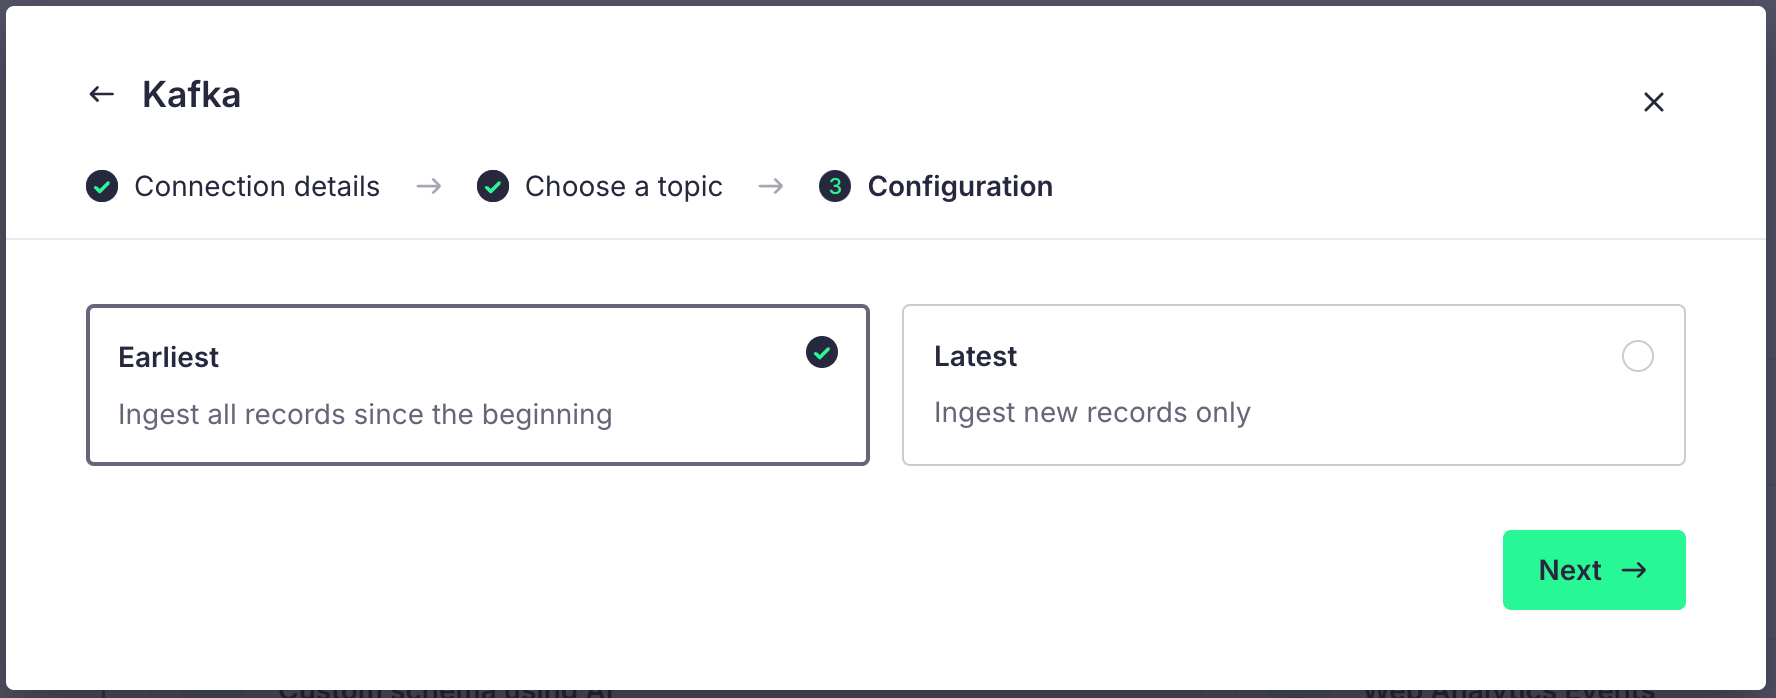
- In the Configuration section that appears, you can choose the offset to be the Earliest or Latest as per your requirement. We will select Earliest and click on Next.
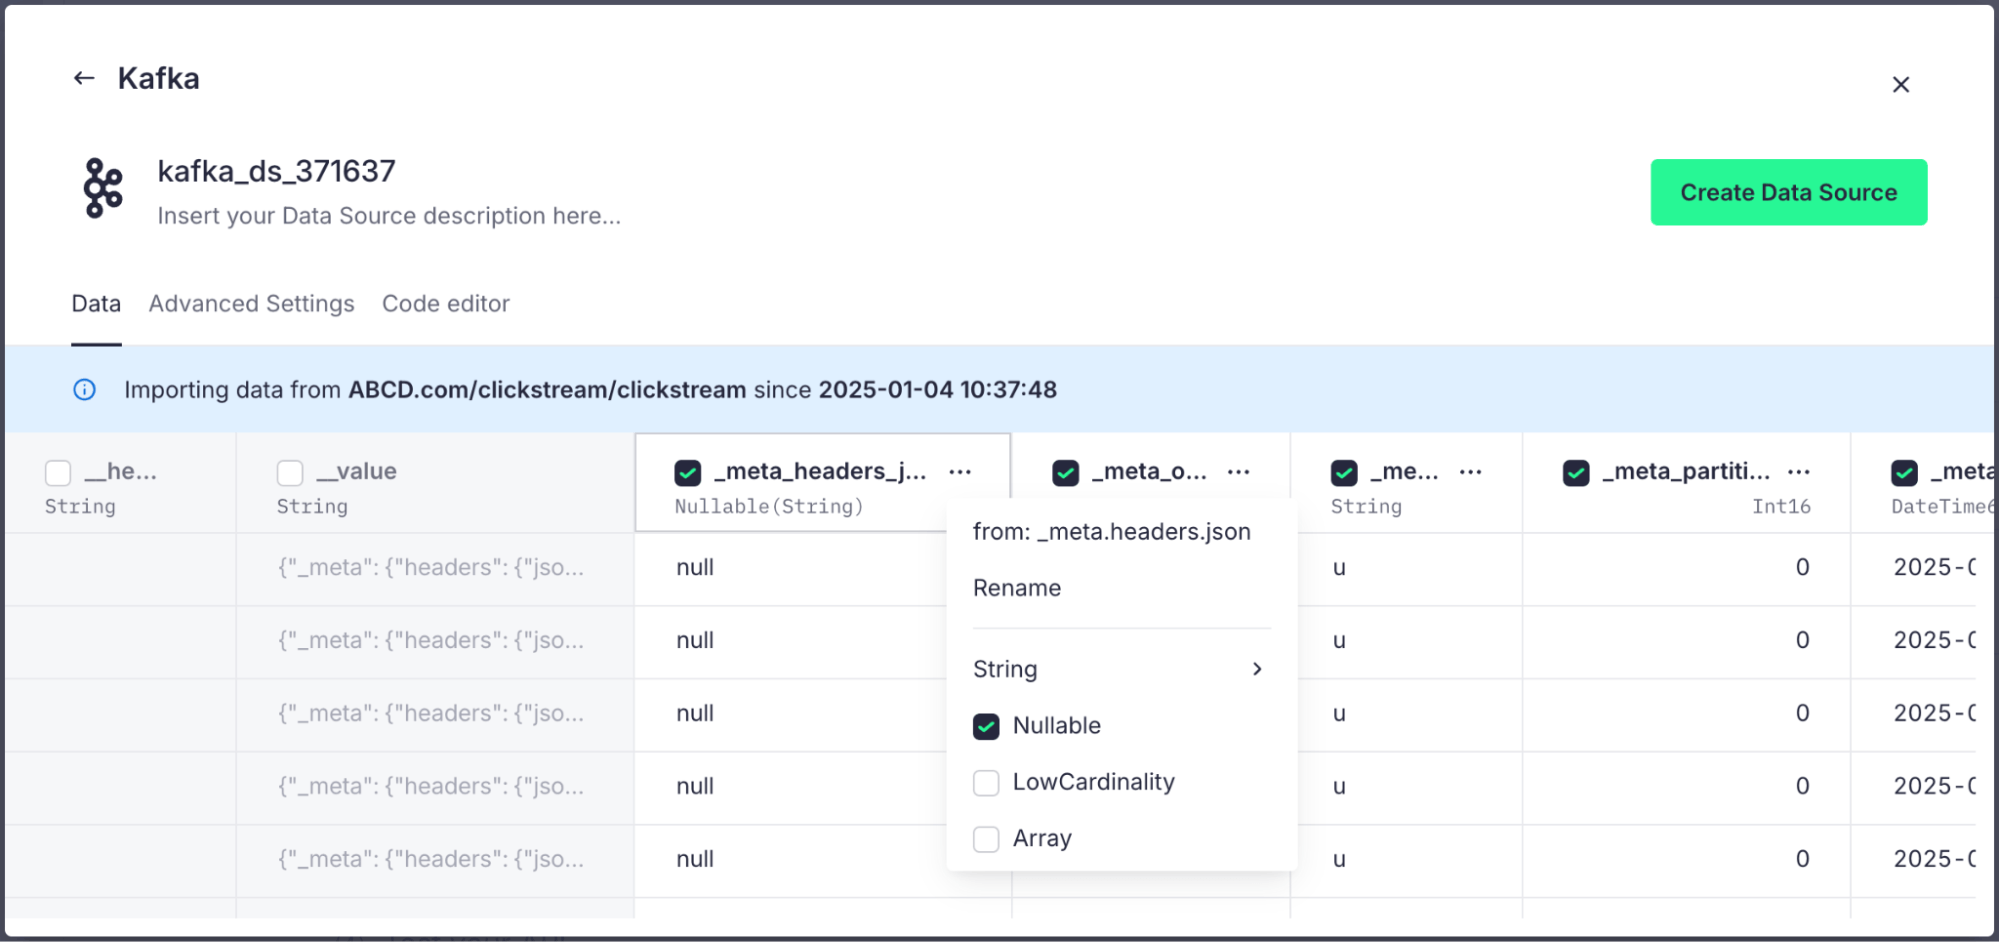
- Now, Tinybird will sample the records from the Dekaf Kafka topic and infer the schema. You will have headers and values columns, followed by multiple meta columns starting with _meta and then the actual clickstream data columns that we have ingested. Select all the columns starting with _meta (the metadata columns), click on the three dots beside them, and tick the Nullable checkbox. These columns can be null, and we should allow them to have null values. Then, you can click on the Create Data Source button.
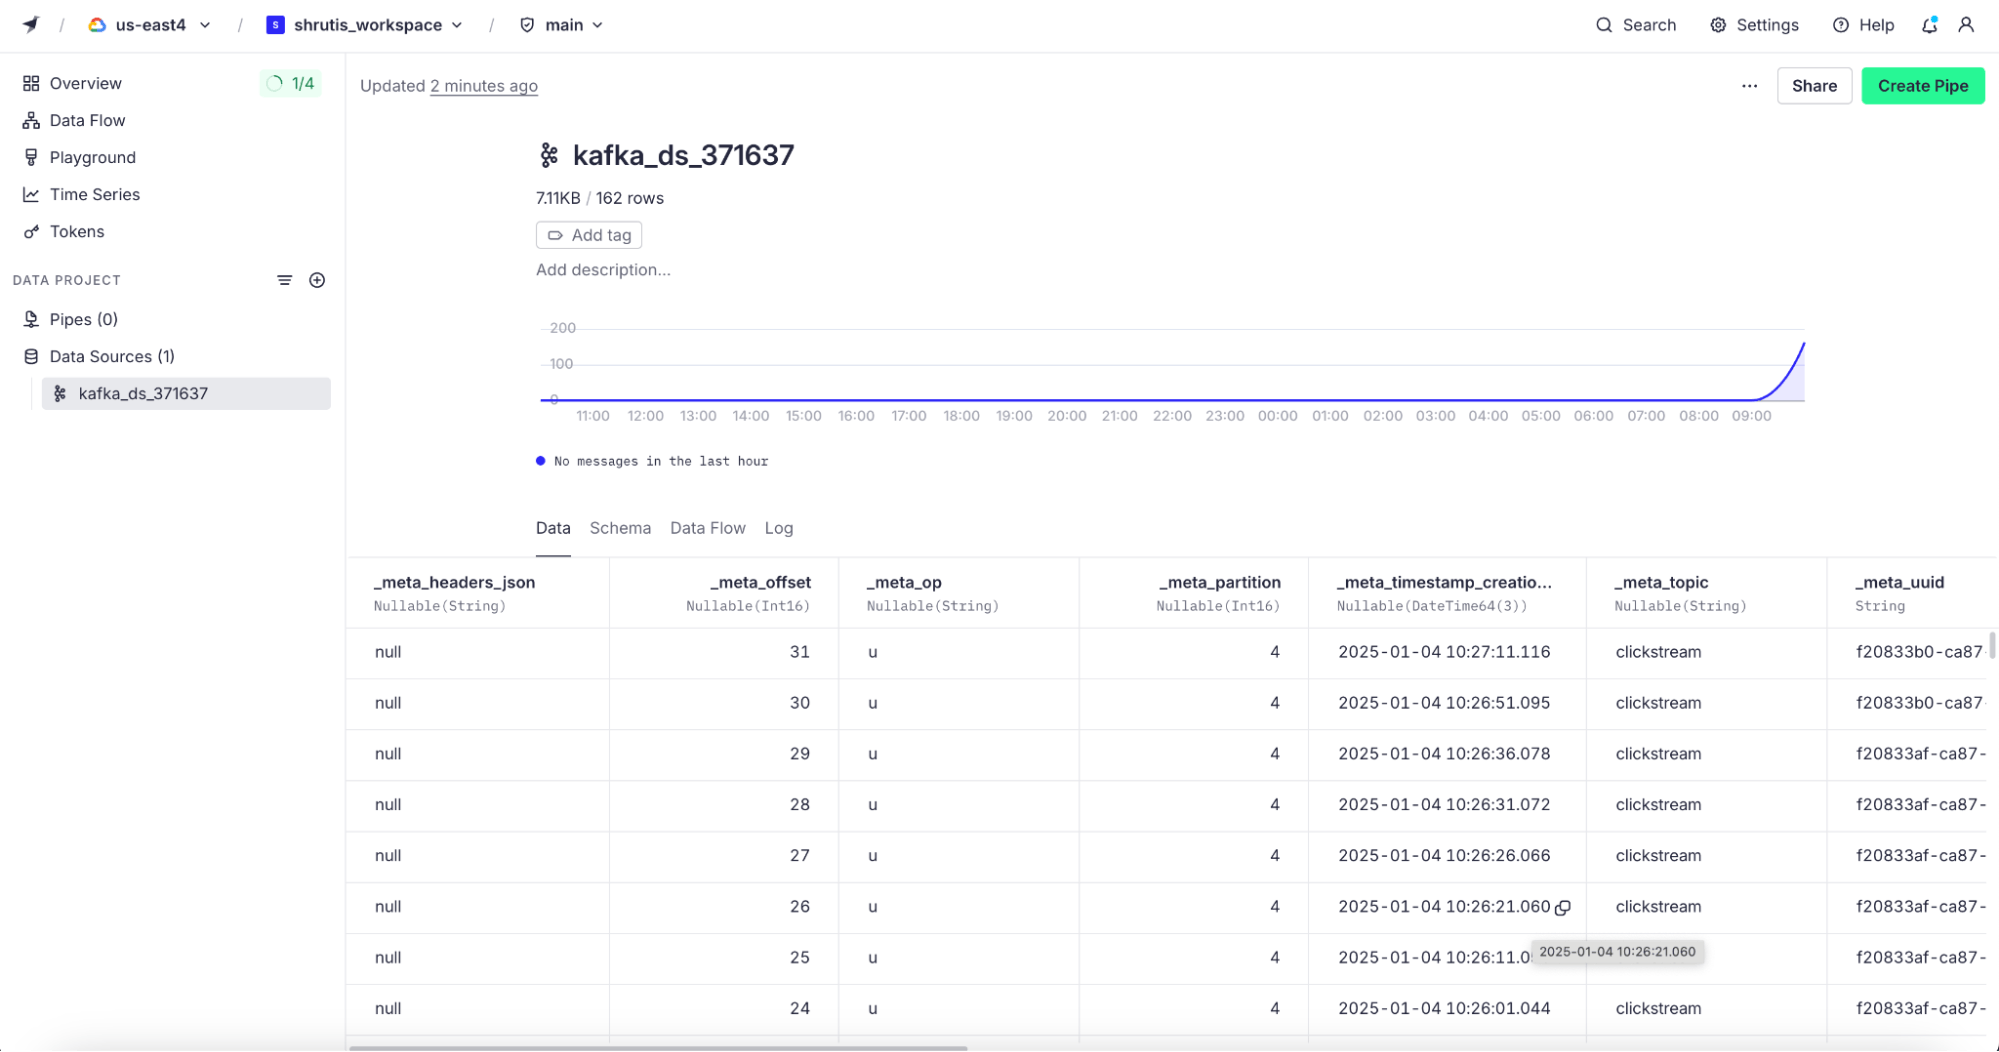
- The data source for clickstream will be created in Tinybird. Give it a couple of minutes, and you should start the data flowing in the Tinybird data source.
Thus, we have successfully established the Estuary flow, which captures data from MongoDB and pushes it into Tinybird.
Example: Using Clickstream Data to Boost Sales with Tinybird SQL
With clickstream data reflecting continuously on the Tinybird table, an e-commerce application can analyze customer behavior patterns in real-time and take automated actions to optimize conversions. Below are practical Tinybird SQL queries that help implement dynamic pricing, personalized recommendations, and customer engagement strategies.
1. Detecting High-Interest Products Without Purchases
This query identifies products that a user has viewed multiple times within an hour but has not added to the cart, signaling hesitation.
plaintextSELECT user_id, product_id, COUNT(*) AS views
FROM clickstream_data
WHERE event_name = 'PRODUCT_VIEW'
AND event_time > now() - interval 1 hour
GROUP BY user_id, product_id
HAVING views >= 5;
📌 Action: If a product appears in this list, you can dynamically lower the price for that user and send them a personalized discount notification.
2. Real-Time Personalized Discounts Based on Price Sensitivity
Once you detect hesitant buyers, you can adjust the price dynamically only for them.
plaintextSELECT user_id, product_id, MIN(price) AS min_price
FROM price_history
WHERE product_id IN (
    SELECT product_id FROM clickstream_data
    WHERE event_name = 'PRODUCT_VIEW'
    AND event_time > now() - interval 1 hour
    GROUP BY product_id
    HAVING COUNT(*) >= 5
)
GROUP BY user_id, product_id;
📌 Action: Offer a custom discount by lowering the price just for that customer and notifying them via push notification:
📢 "We noticed you love this item! Get an exclusive 10% discount for the next 30 minutes!"
3. Identifying Users for Cross-Sell & Upsell Recommendations
If a user has added an item to the cart, we can recommend related products based on what other customers have purchased.
plaintextWITH cart_items AS (
    SELECT DISTINCT user_id, product_id
    FROM clickstream_data
    WHERE event_name = 'ADD_TO_CART'
    AND event_time > now() - interval 1 day
)
SELECT p1.user_id, p2.product_id
FROM cart_items p1
JOIN purchase_history p2 ON p1.product_id = p2.previous_product
WHERE p1.user_id != p2.user_id
GROUP BY p1.user_id, p2.product_id
ORDER BY COUNT(*) DESC
LIMIT 5;
📌 Action: Display "Customers who bought this also bought..." recommendations in real-time.
4. Preventing Stockouts with Live Inventory Monitoring
Track fast-selling products and alert inventory teams before they go out of stock.
plaintextSELECT product_id, COUNT(*) AS sales_last_hour
FROM clickstream_data
WHERE event_name = 'PURCHASE'
AND event_time > now() - interval 1 hour
GROUP BY product_id
HAVING sales_last_hour > 50;
📌 Action: Trigger an automatic inventory restock request for products nearing depletion.
5. Real-Time Cart Abandonment Detection & Recovery
Identify users who added items to their cart but did not complete the purchase within 30 minutes.
plaintextSELECT user_id, product_id, MAX(event_time) AS last_action
FROM clickstream_data
WHERE event_name IN ('ADD_TO_CART', 'CHECKOUT')
GROUP BY user_id, product_id
HAVING MAX(event_time) < now() - interval 30 minutes;
📌 Action: Send a personalized cart reminder email or push notification:
🛒 "Oops! You left something in your cart. Complete your purchase now and get free shipping!"
Once real-time queries are running in Tinybird, the next step is to integrate the results directly into an e-commerce application. Tinybird makes this frictionless by allowing any SQL query to be exposed as a high-performance API endpoint. This enables dynamic pricing, personalized recommendations, and inventory updates to be instantly available to frontend applications, mobile apps, or internal systems.
Conclusion
The power of real-time analysis on clickstream data plays a vital role in keeping your e-commerce platform experience above the competing market players. It is vital that you leverage it to the best of your abilities.
Estuary can play a key role in establishing this real-time flow seamlessly without you investing a lot of developer effort in building and managing the pipeline. Estuary is powerful enough to get this flow created in a no-code fashion, making it easier for anyone to build the real-time pipeline quickly.
Get Started Today!
Sign up for a free Estuary Flow account and start building real-time data pipelines effortlessly. Have questions? Contact us

About the author
Shruti is an accomplished Data Engineer with over a decade of experience, specializing in innovative data solutions. Her passion for exploring new technologies keeps her at the forefront of advancements in the field. As an active contributor to open-source projects and a technical blog writer, Shruti shares her knowledge with the wider community. She is also an Udemy author, with multiple courses in data engineering, helping others build expertise in this domain.


