Migrating data from Oracle to Amazon Redshift doesn’t have to be complicated. Whether you’re looking to leverage Redshift’s powerful analytics capabilities or transition to a more scalable, cloud-based data warehouse, having a clear migration strategy is key to success.
In this article, we’ll break down two straightforward methods to help you transfer your data seamlessly:
- Using Estuary Flow, a tool designed for effortless, automated data replication.
- A manual migration method, ideal for hands-on control and customization.
No matter the size of your dataset or your technical expertise, this guide will provide step-by-step instructions to make your Oracle to Redshift migration process smooth and efficient. Let’s get started!
Overview of Oracle
Oracle Database is a widely used relational database management system (RDBMS) that serves as a cornerstone for many enterprise applications. It is known for its ability to handle large volumes of data and support complex transactional and analytical workloads. With decades of development and innovation, Oracle has become a trusted choice for businesses seeking reliability and performance in data storage and management.
Despite its strengths, many organizations are shifting to cloud-native solutions like Amazon Redshift to leverage the benefits of modern, scalable, and cost-effective data warehousing.
Overview of Redshift
Amazon Redshift is a fast, scalable, and fully managed cloud data warehouse designed to handle large-scale data analytics. Built on Amazon Web Services (AWS), Redshift enables businesses to analyze vast amounts of data quickly and cost-effectively. With its columnar storage and parallel processing architecture, Redshift excels at running complex queries and delivering insights in real time.
Redshift’s seamless integration with the AWS ecosystem, along with its ability to process structured and semi-structured data, makes it a popular choice for businesses migrating from traditional databases like Oracle. By transitioning to Redshift, organizations can unlock greater scalability, enhanced performance, and significant cost savings for their analytics workloads.
Why Migrate Data From Oracle to Redshift - Key Benefits
Migrating data from Oracle to Amazon Redshift is a strategic move for businesses looking to modernize their data infrastructure. Redshift offers numerous advantages over traditional on-premises databases like Oracle, particularly for organizations focused on scalability, cost efficiency, and advanced analytics. Here are the key benefits of making the switch:
- Cost Savings: Redshift’s pay-as-you-go model eliminates expensive Oracle licensing and maintenance costs.
- Scalability: Designed to handle petabytes of data, Redshift scales dynamically to meet workload demands.
- Fully Managed: Redshift automates provisioning, backups, and maintenance, reducing operational overhead.
- Optimized for Analytics: With columnar storage and advanced query optimization, Redshift delivers faster insights.
- Seamless Integration: Integrates easily with AWS services, BI tools, and semi-structured data formats like JSON.
By transitioning to Redshift, businesses can modernize their infrastructure while unlocking powerful analytics and cost efficiencies.
2 Best Methods to Move Data from Oracle to Redshift
- Method 1: Using Estuary Flow to Move Data from Oracle to Redshift
- Method 2: Manual Method to Migrate Data from Oracle to Redshift
Method 1: Using Estuary Flow to Move Data from Oracle to Redshift
Estuary Flow is a powerful, user-friendly platform designed to simplify data integration and replication. It enables seamless, real-time, or batch data transfers between various sources and destinations, including Oracle and Amazon Redshift. With its intuitive interface and automation features, Estuary Flow eliminates the complexity of manual data migration, allowing businesses to focus on analytics and decision-making rather than operational overhead.
Using Estuary Flow, you can easily set up data pipelines that capture and materialize data with minimal configuration, making it an ideal solution for efficient and scalable migrations.
Prerequisites
- An Estuary Flow account.
- OracleDB 11g or higher.
- Enable connectivity between Estuary Flow and the Oracle database.
- A read-only Oracle user with access to all necessary tables for replication.
- An Amazon Redshift account with the required database and user credentials.
- At least one Estuary Flow collection.
Step 1: Configure Oracle Database as the Source Connector
- Log in to your Estuary Flow account.
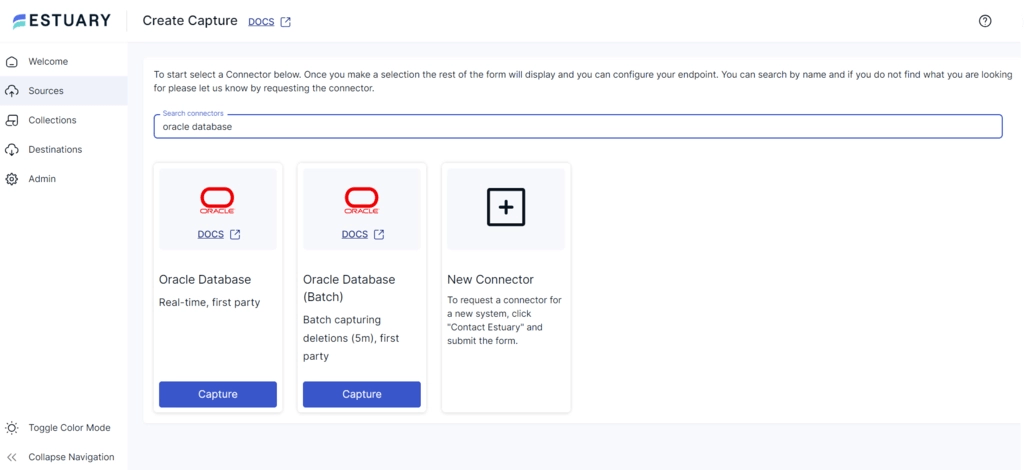
- Navigate to the Sources section from the left-hand menu, which will take you to the Sources page.
- Click the + NEW CAPTURE button to start setting up a new capture.
- Use the Search connectors field to locate the connector for Oracle Database.
- You will find two Oracle Database connector options: Real-time and Batch. Select the appropriate connector based on your requirements and click its Capture button.
For this tutorial, we’ll proceed with the Real-time connector. - On the connector configuration page, fill in the required details:
- Name: Enter a unique name for the capture.
- Server Address: Provide the host and port of your Oracle database (format: host:port).
- User: Enter the Oracle database username.
- Password: Provide the password for the specified user.
- After entering the details, click NEXT, followed by SAVE AND PUBLISH.
Your Oracle Database source configuration is now complete, and the connector will start capturing OracleDB data into your Flow collection.
Step 2: Configure Amazon Redshift as the Destination
- Upon successfully creating the capture, you’ll see a pop-up with the option to MATERIALIZE COLLECTIONS. Click this button.
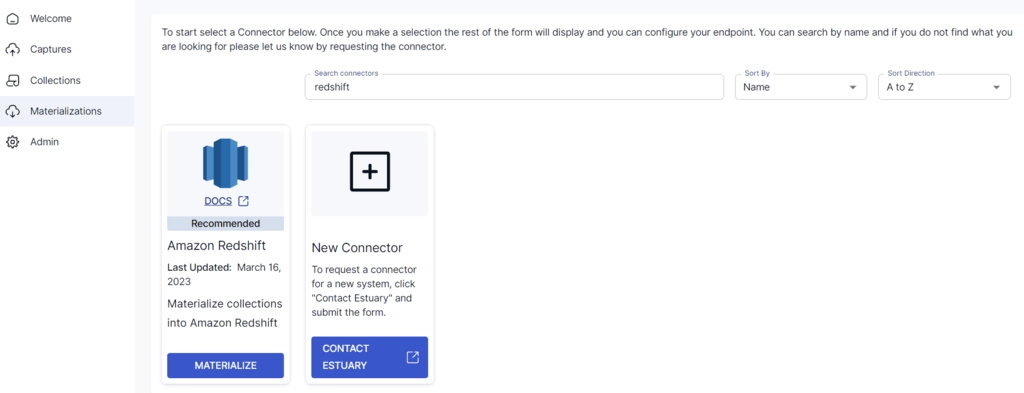
Alternatively, you can go to the Destinations section of the dashboard and click + NEW MATERIALIZATION. - Use the Search connectors field to find the Amazon Redshift connector.
- Click the Materialization button for the Redshift connector in the search results.
- On the configuration page, provide the necessary details:
- Name: Assign a unique name to the materialization.
- Cluster Endpoint: Specify the host and port of your Redshift cluster. The default port is 5439 if none is provided.
- Database Name: Enter the name of your Redshift database.
- User: Provide the username for connecting to Redshift.
- Password: Enter the password for the user.
- In the Source Collections section, you can connect the Oracle capture to this materialization by clicking SOURCE FROM CAPTURE.
- Once all details are filled in, click NEXT, then SAVE AND PUBLISH to finalize the setup.
The connector will now materialize the Oracle data captured in your Flow collection into Amazon Redshift tables.
Method 2: Manual Method to Migrate Data from Oracle to Redshift
For users who prefer more granular control over the migration process, a manual method involves exporting data from Oracle, transforming it as needed, and then loading it into Redshift. This method is ideal for one-time migrations or scenarios where customization is necessary. Below are the detailed steps to manually migrate data from Oracle to Redshift:
Prerequisites
- Access to an Oracle Database with the necessary credentials and permissions.
- Amazon Redshift account and cluster credentials.
- A tool to extract data from Oracle (e.g., SQL*Plus, Oracle SQL Developer, or expdp/impdp utilities).
- Amazon S3 bucket for staging data before loading it into Redshift.
- AWS CLI installed and configured on your system for S3 interaction.
- Redshift-compatible data transformation tools, if required (e.g., Python, Pandas, or ETL pipelines).
Step 1: Export Data from Oracle
- Use Oracle’s expdp (Data Pump Export) utility to export data into a flat file format (CSV, Parquet, or JSON) for compatibility with Redshift.
Example command to export data in CSV format:
plaintextsqlplus username/password@database
spool export_data.csv
SELECT * FROM table_name;
spool off;
exit;- Alternatively, use Oracle SQL Developer to export data via the Export Wizard:
- Connect to your Oracle database.
- Right-click on the required table or schema and select Export.
- Choose CSV as the file format and specify the destination.
Step 2: Transfer Data to Amazon S3
- Use the AWS CLI to upload the exported data to an Amazon S3 bucket.
plaintextaws s3 cp /path/to/export_data.csv s3://your-bucket-name/folder-name/- Ensure the S3 bucket and objects have the appropriate permissions for Redshift to access them.
Step 3: Prepare Amazon Redshift for Data Loading
- Create the target tables in Redshift to match the schema of the exported data from Oracle. Use SQL commands in the Redshift query editor or a SQL client connected to your Redshift cluster.
Example:
plaintextCREATE TABLE target_table (
    column1 datatype,
    column2 datatype,
    ...
);- Adjust data types as necessary to ensure compatibility between Oracle and Redshift. For example:
- Oracle NUMBER → Redshift DECIMAL or BIGINT
- Oracle VARCHAR2 → Redshift VARCHAR
- Oracle DATE → Redshift TIMESTAMP
Step 4: Load Data into Redshift
- Use the Redshift COPY command to load data directly from Amazon S3 into the target table.
Example:
plaintextCOPY target_table
FROM 's3://your-bucket-name/folder-name/export_data.csv'
IAM_ROLE 'arn:aws:iam::your-account-id:role/RedshiftRole'
FORMAT AS CSV
DELIMITER ','
IGNOREHEADER 1;- Ensure the IAM role specified in the COPY command has the necessary permissions to access the S3 bucket.
Step 5: Verify the Data
- Query the Redshift table to verify that the data was loaded correctly.
SELECT * FROM target_table LIMIT 10;
- Perform data validation checks to ensure the integrity and accuracy of the migration.
This manual method provides flexibility and control but requires careful handling of schema design, data types, and validation to ensure a successful migration.
Limitations of the Manual Method
The manual method for migrating data from Oracle to Redshift offers flexibility but comes with notable drawbacks:
- Time-Consuming: Exporting, transforming, and loading large datasets requires significant effort and time.
- Error-Prone: Manual handling increases the risk of schema mismatches, data formatting issues, and loading errors.
- Limited Automation: Lacks real-time updates or incremental sync, requiring repetitive scripting for ongoing tasks.
- Scalability Challenges: Managing large-scale migrations manually can strain resources and lead to performance issues.
- Expertise Required: Requires technical knowledge of Oracle, Redshift, and scripting tools, making it less accessible for non-experts.
This method is better suited for one-time migrations or small datasets, while automated tools provide faster, more reliable alternatives.
Best Practices for Oracle to Redshift Migration
Ensure a smooth and efficient Oracle to Redshift migration by following these best practices:
1. Plan Ahead
- Identify critical datasets and define migration goals (e.g., performance, cost savings).
- Decide between one-time migration or ongoing replication based on needs.
2. Optimize Schema and Data Types
- Adjust schemas to leverage Redshift’s columnar storage and distribution keys.
- Convert Oracle data types to Redshift equivalents (e.g., NUMBER to DECIMAL).
3. Validate Data Integrity
- Compare row counts and checksum values between Oracle and Redshift.
- Test for duplicates and ensure incremental updates are consistent.
4. Boost Performance
- Use proper distribution and sort keys to optimize queries.
- Compress data and run VACUUM and ANALYZE commands regularly.
5. Use Staging and Automation Tools
- Transfer data via S3 for efficient parallel loading using the COPY command.
- Automate ETL and replication processes with tools like Estuary Flow, which simplifies real-time and batch data transfers from Oracle to Redshift.
6. Test and Monitor
- Conduct test migrations and monitor Redshift cluster performance.
- Set up alerts to identify and address issues proactively.
7. Secure and Optimize
- Encrypt data and follow access control best practices.
- Train teams on Redshift features and optimize workloads post-migration.
By implementing these practices, you can ensure a reliable and scalable migration that fully utilizes Redshift’s capabilities.
Conclusion
Migrating from Oracle to Amazon Redshift is a strategic move toward modernizing your data infrastructure and unlocking the full potential of cloud-based analytics. Whether you opt for the automated efficiency of Estuary Flow or the manual method’s granular control, both approaches can help you achieve a seamless transition.
With Redshift’s scalability, cost efficiency, and high-performance analytics, businesses can gain faster insights and streamline decision-making. By following best practices like schema optimization and data validation, you can ensure a successful and reliable migration.
Register for a free Estuary account and create your real-time Oracle-to-Redshift pipeline in no time. Need assistance? Join us on Slack for support!
FAQs
1. What is the best way to migrate data from Oracle to Amazon Redshift?
The best method depends on your needs. For automation and real-time replication, tools like Estuary Flow simplify the process with minimal manual effort. For more control, the manual method allows customization but requires technical expertise and time.
2. How do I handle schema and data type differences between Oracle and Redshift?
During migration, ensure to map Oracle data types to Redshift-compatible formats (e.g., NUMBER to DECIMAL, VARCHAR2 to VARCHAR). Review your schema design and leverage Redshift’s features like distribution and sort keys for optimized performance.
3. Can I automate ongoing data synchronization between Oracle and Redshift?
Yes, tools like Estuary Flow allow real-time and incremental updates, making it easy to keep Redshift in sync with Oracle.
Related Sync with Oracle

About the author
Dani is a data professional with a rich background in data engineering and real-time data platforms. At Estuary, Daniel focuses on promoting cutting-edge streaming solutions, helping to bridge the gap between technical innovation and developer adoption. With deep expertise in cloud-native and streaming technologies, Dani has successfully supported startups and enterprises in building robust data solutions.


