Today’s businesses no longer thrive on stale, batch-processed data. They flourish on the edge of now, on the precipice of real-time decision-making. The urgency is visible; the stakes are undeniable. In response to this need, MySQL to Kafka data streaming can set your data strategy ablaze.
While the idea of streaming data from MySQL to Kafka sounds like a match made in tech heaven, it's not all sunshine and rainbows. Both MySQL and Kafka have substantial market shares of 42.79% and 41.36% respectively but their harmony doesn't come effortlessly. They have different paradigms, data models, and use cases which cause compatibility issues and data transformation complexities.
To help navigate these challenges, we have put together this guide where we will discuss three effective strategies for data streaming from MySQL to Kafka: using Debezium, the JDBC connector, and the Confluent Cloud Console.
What Is MySQL?
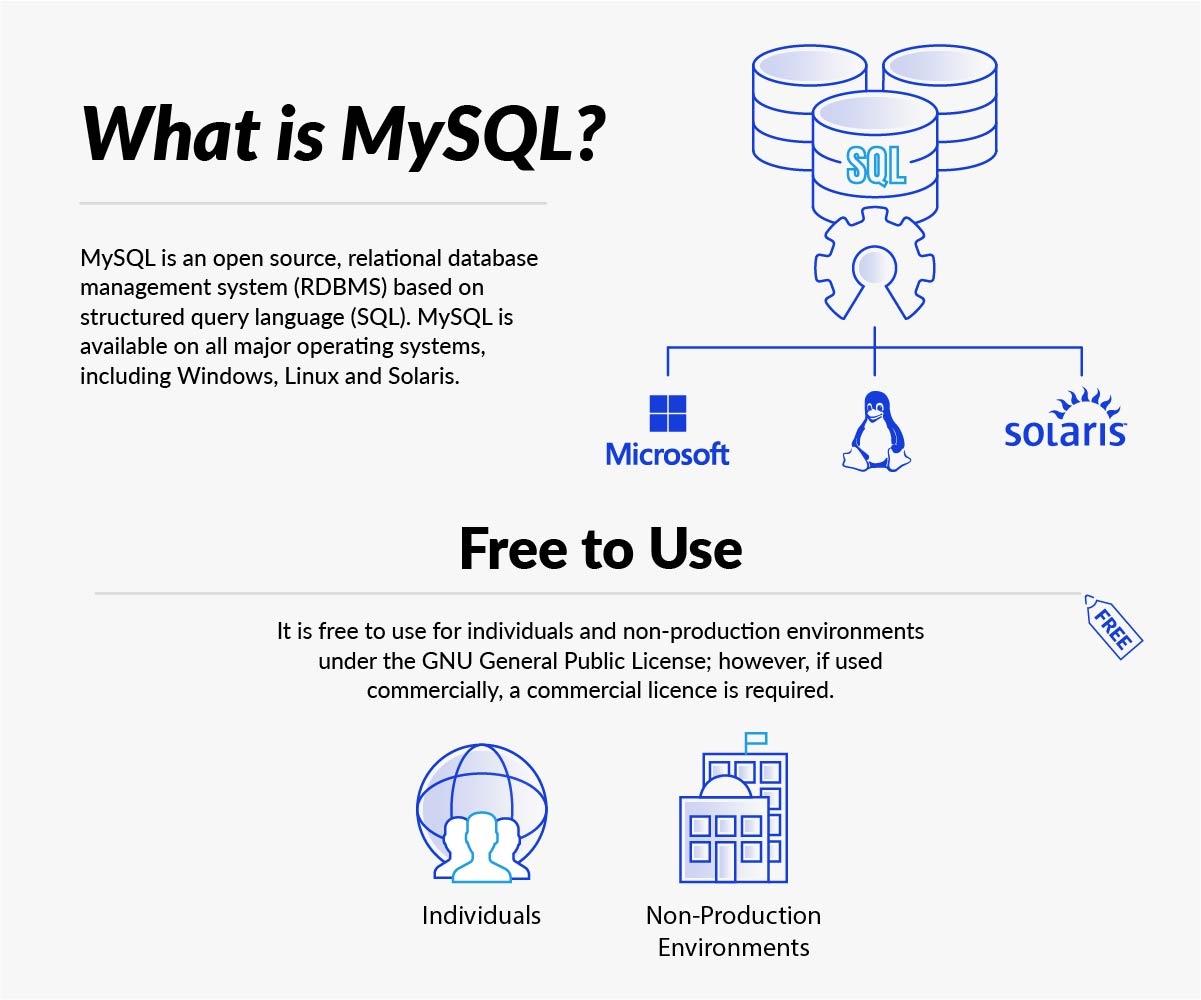
MySQL is a renowned relational database management system (RDBMS) that stores different types of data in table form with rows and columns. It uses SQL (Structured Query Language) to process user requests and provides referential integrity between different tables' rows and columns.
MySQL server is a favorite among businesses that work with databases and cloud-based data warehouse solutions because of its scalability, reliability, and user-friendliness. An additional benefit of MySQL is its cross-platform functionality that lets you run MySQL on multiple operating systems, including Linux and Windows, and restore backups from other platforms.
What Is Apache Kafka?
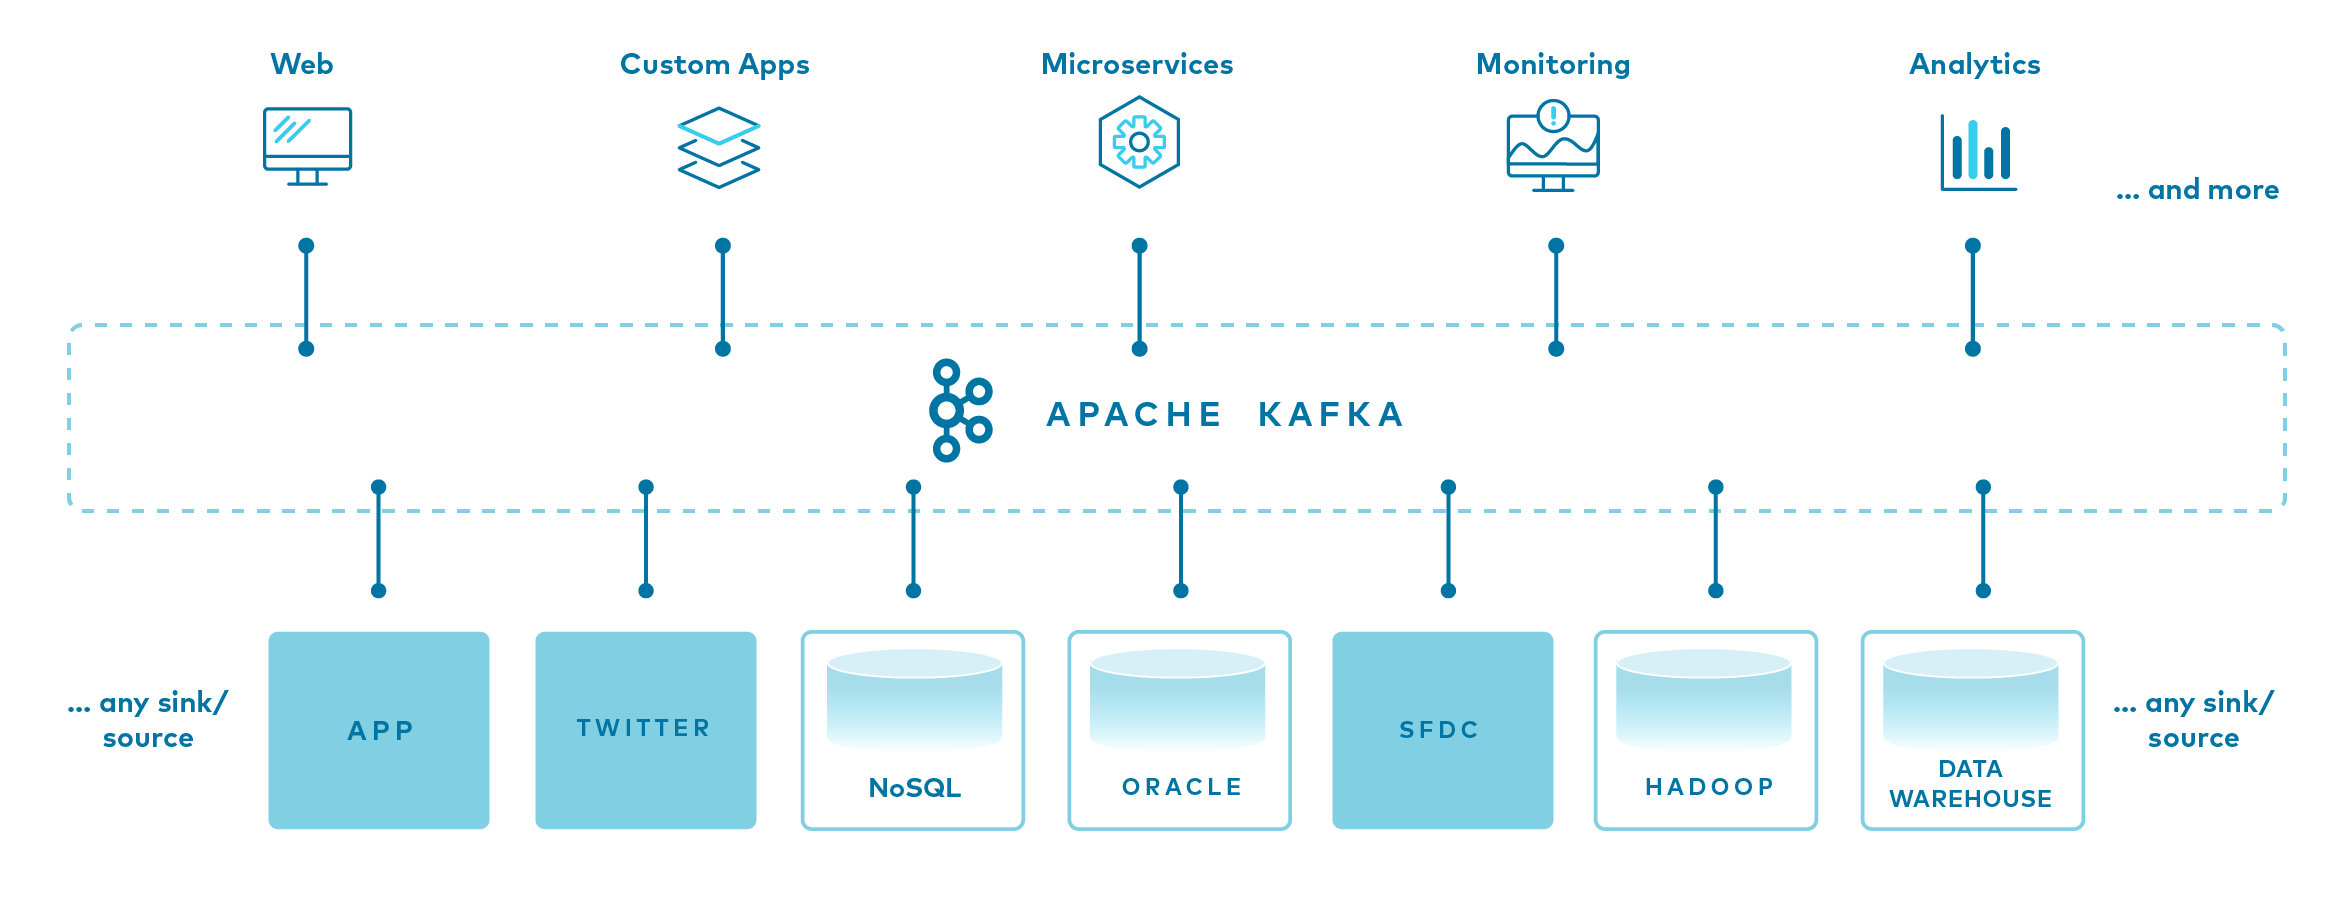
Apache Kafka is an open-source, distributed streaming platform designed for developing real-time, event-driven applications. It helps create applications that can consistently produce and consume streams of data records.
Apache Kafka relies on a message broker that conveys messages from the "publishers" (systems that load data into the required format from data producers) to the "subscribers" (systems that manipulate or analyze data to derive alerts and insights for data consumers).
Apache Kafka's standout feature is its speed, combined with a high level of accuracy for all data records. The platform maintains data records in the sequence of their occurrence inside "clusters" that can span across multiple servers or even data centers. It also replicates these records and partitions them to accommodate a high volume of simultaneous users.
3 Methods to Stream Data From MySQL to Kafka
Let’s look at three ways that you can use to stream data from MySQL to Kafka:
Streaming Data From MySQL to Kafka Using Debezium
Before we start, we need to set up an environment that includes Kafka, Kafka Connect, and MySQL. Closely monitor the connector status to guarantee the smooth operation of this setup. Also, make sure the database timezone is set right to prevent any inconsistencies in time-related data.
ZooKeeper Setup
Apache ZooKeeper is a centralized service for distributed systems to synchronize data and maintain coordination. Kafka uses it to manage its cluster state and configurations.
The following Docker command sets up a ZooKeeper instance:
plaintextdocker run -it --rm --name zookeeper -p 2181:2181 -p 2888:2888 -p 3888:3888 quay.io/debezium/zookeeper:1.9Kafka Setup
Now we’ll set up Kafka. The following Docker command sets up a Kafka instance and links it with the ZooKeeper instance:
plaintextdocker run -it --rm --name kafka -p 9092:9092 --link zookeeper:zookeeper quay.io/debezium/kafka:1.9MySQL Setup
Use this Docker command to set up a MySQL instance:
plaintextdocker run -it --rm --name mysql -p 3306:3306 -e MYSQL_ROOT_PASSWORD=debezium -e MYSQL_USER=mysqluser -e MYSQL_PASSWORD=mysqlpw quay.io/debezium/example-mysql:1.9Run MySQL Command Line Client
To interact with the MySQL database, we use the MySQL command line client. Here’s the Docker command that runs the MySQL command line client:
plaintextdocker run -it --rm --name mysqlterm --link mysql --rm mysql:8.0 sh -c 'exec mysql -h"$MYSQL_PORT_3306_TCP_ADDR" -P"$MYSQL_PORT_3306_TCP_PORT" -uroot -p"$MYSQL_ENV_MYSQL_ROOT_PASSWORD"'Kafka Connect Setup
Kafka Connect is a tool for scalably and reliably streaming data between Apache Kafka and other systems. Use the following Docker command to set up a Kafka Connect instance and link it with the Kafka and MySQL instances:
plaintextdocker run -it --rm --name connect -p 8083:8083 -e GROUP_ID=1 -e CONFIG_STORAGE_TOPIC=my_connect_configs -e OFFSET_STORAGE_TOPIC=my_connect_offsets -e STATUS_STORAGE_TOPIC=my_connect_statuses –
link kafka:kafka --link mysql:mysql quay.io/debezium/connect:1.9
Creating A Debezium Connector
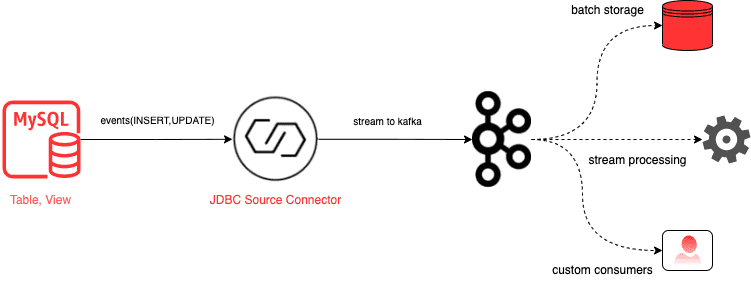
After setting up the environment, create a Debezium connector. The Debezium connector is a Kafka Connect source connector that captures row-level changes in your databases so you can see those changes in Kafka topics. It communicates with the MySQL database to monitor changes and push these changes to Kafka topics.
The connector configuration properties include details like:
- Port
- Server id
- Server name
- Maximum tasks
- User and password
- Database hostname
- Included database list and other Kafka-related configurations
It can be created using the Kafka Connect API with an HTTP POST request to the /connectors endpoint. Here’s the command to create a Debezium MySQL connector:
plaintextcurl -i -X POST -H "Accept:application/json" -H "Content-Type:application/json" localhost:8083/connectors/ -d '{ "name": "inventory-connector", "config": { "connector.class": "io.debezium.connector.mysql.MySqlConnector", "tasks.max": "1", "database.hostname": "mysql", "database.port": "3306", "database.user": "debezium", "database.password": "dbz", "database.server.id": "184054", "database.server.name": "dbserver1", "database.include.list": "inventory", "database.history.kafka.bootstrap.servers": "kafka:9092", "database.history.kafka.topic": "dbhistory.inventory" } }’List Connectors
You can verify the connector creation and list all the available connectors using the following command:
plaintextcurl -H "Accept:application/json" localhost:8083/connectors/Checking Change Events
Once the Debezium connector is in place, it captures any changes in the MySQL database and publishes them as events to the Kafka topic.
In the Kafka topic, each data change in the MySQL database is recorded as a message event. These messages contain the details of the data change including the schema of the data and the new value.
Making Changes From MySQL Command Line
To see the connector in action, make some changes in the MySQL database and then check the Kafka topic for the respective events.
Update A Customer Record
You can use the MySQL command line client to execute an UPDATE command:
plaintextmysql> UPDATE customers SET first_name='Anne Marie' WHERE id=1004;This command updates the first_name of the customer with id 1004 to 'Anne Marie'.
Delete A Customer Record
Similarly, you can execute a DELETE command:
plaintextmysql> DELETE FROM addresses WHERE customer_id=1004;This command deletes the address of the customer with id 1004.
Clean Up
Once you are done with your operations, you can clean up your environment and stop the services that you started at the beginning.
The following command stops all the running Docker services:
plaintextdocker stop mysqlterm watcher connect mysql kafka zookeeperThis way, you can use Debezium to stream data changes from MySQL to Kafka in real time and build real-time data pipelines and streaming applications.
Stream Data From MySQL to Kafka Using JDBC Source Connector
The JDBC Source Connector is an open-source Kafka Connector developed by Confluent. It loads data from JDBC-compatible databases to Kafka using JDBC drivers and periodically sends SQL queries to specified tables. The connector guarantees at least one delivery and stores the latest offsets where the connector begins in each cycle in the Kafka Connect OFFSET topic.
Deployment
To deploy MySQL and Kafka Connect to your local environment, you can use the shared Docker-compose files in this GitHub repository. Once MySQL is ready, a Kafka Cluster is built using Confluent Cloud. A Kafka Connect Cluster is deployed to connect the MySQL tables and Kafka Topics separately to capture transactions on the tables.
You need to manually download the MySQL Driver as the JDBC connector only comes with JDBC drivers for a few database systems like SQL Server and PostgreSQL. Once the environment setup is complete, the Kafka Connect worker is launched. Here’s the command for it.
plaintext# Download and launch the Kafka Connect worker
docker-compose up -d
The Docker-compose file also contains many important worker configurations. If your worker doesn’t function as expected, it’s likely that the config values were set improperly.
Installing JDBC Source Connector Plugin and Driver
You can either manually install the desired plugins to the plugin path or automate this in your Docker-compose file.
plaintext# Install the JDBC Source Connector Plugin
confluent-hub install confluentinc/kafka-connect-jdbc:latest

# Install the MySQL JDBC Driver
wget https://dev.mysql.com/get/Downloads/Connector-J/mysql-connector-java-5.1.47.tar.gz
tar xvfz mysql-connector-java-5.1.47.tar.gz
cp mysql-connector-java-5.1.47/mysql-connector-java-5.1.47-bin.jar /usr/share/java/kafka-connect-jdbc/
Once the plugin and driver are installed, the worker can be launched.
Kafka Connect Rest API & Schema Registry
Kafka Connect provides an API for managing connectors and the Schema Registry serves as a serving layer for our metadata. Confluent Cloud is used for both Kafka cluster deployment and Schema Registry.
Connector Implementation
After the successful deployment of clusters, connectors are created using the following command. One reads from a Table with timestamp + incrementing mode and the other reads from a View with incrementing mode.
plaintext# Creating a connector
curl -X POST -H "Content-Type: application/json" -d @jdbc-source-config.json http://localhost:8083/connectors
Before pushing this connector to Kafka Connect, the target topic should be created. The topic name is <topic.prefix> + <table name>.
plaintext# Create the topic
kafka-topics.sh --create --topic JDBC.test_db.Product --bootstrap-server localhost:9092
After the connector is pushed to Kafka Connect and is running, Kafka Connect starts flushing new messages and commits offsets. At this point, you can insert new records and check if they appear in the Kafka topic near real-time.
Streaming From a View With Incrementing Mode
In certain cases, you need to stream only INSERT events like audit logs or transactions. If the tables or views do not have a timestamp column at all, the incrementing mode can be used. This uses a unique id column to take new rows only.
Stream Data From MySQL to Kafka Using Confluent Cloud Console
Before you start connecting your MySQL database to Kafka Topics, you should meet certain conditions:
- Authorized access: Confluent Cloud Cluster can be hosted on platforms like AWS, Azure, or GCP. Access to this cluster helps in the seamless exchange of data.
- Confluent CLI: You need the Confluent CLI (Command Line Interface) installed and properly configured for your Confluent Cloud Cluster.
- Public access: It’s necessary that your MySQL database allows public access so that it is accessible remotely to let Kafka Connector interact with it.
- Schema registry: Activate a schema registry. Schema registries let you use various data formats such as Avro, JSON_SR (JSON Schema), and Protobuf.
- Credentials: The Kafka Cluster requires certain credentials for creating a new MySQL to Kafka connection. Keep this information ready to avoid any disruptions.
Here are detailed steps to configure your MySQL Kafka Connector:
Launch Confluent Cloud Cluster
Ensure that the MySQL database has been correctly set up and is ready for data transfer. Let’s take a look at the steps.
- Creating a new Kafka cluster: Navigate to the 'Add cluster' section and select 'Create cluster'. You'll see 3 types of clusters: Basic, Standard, and Dedicated. Pick one based on your needs and available resources. Each type of cluster comes with different capabilities and costs.
- Creating a new Kafka Topic: In the Confluent Cloud dashboard, go to the Topics section located on the left panel. Click on 'Topics' then 'Create Topics'. You'll be prompted to input a Topic name and the number of partitions you want for your topic.
- Advanced settings: If you want to alter any default settings, you can click on 'Show advanced settings'. Here, you can specify various properties like cleanup policies for different entities, like a customer's changing phone number or email address.
Add MySQL Kafka Connector
The next step involves adding the MySQL Kafka Connector:
- Navigating to the connector: From the left navigation menu, go to the Connectors section where you’ll find the MySQL Source connector card.
- Connector configuration page: After clicking on the connector card, you'll be redirected to the MySQL Kafka Connector configuration page. Here, you'll input the details to set up the connector.
Set Up MySQL to Kafka Connection
Now add these details:
- Connector details: Specify the name of the connector and provide the Kafka Cluster credentials using a JSON file.
- Topic prefix: Define the topic prefix. The MySQL Kafka Connector will automatically create Kafka Topics following the format: <topic.prefix><tableName>.
- Connection and database details: These include details for host address, SSL connection mode, timestamp column name, incrementing column name, and schema pattern.
- Output record and task details: Define the Kafka output record value to handle data from multiple formats. Also, specify the number of tasks that MySQL Kafka Connector will use.
- Transforms and predicates: These support Single Message Transforms (SMTs).
Verify & Launch MySQL Kafka Connector
It’s time to cross-check and launch the connection.
- Verification: From the preview page, review all the details you provided.
- Launch: Once you’re sure of all the details, click on 'Launch' and your MySQL to Kafka connection will start. Wait a few minutes for it to be provisioned.
- Connection status: To monitor the connection status, go to the Connectors tab. You'll notice the status change from 'Provisioning' to 'Running'.
Validate Your Kafka Topic
Now validate your messages to make sure that the correct data entries from the MySQL database are getting synced to your Kafka Topics. Validation is crucial as it verifies that the data transfer is happening correctly and without any issues.
Streaming Data Using Estuary Flow
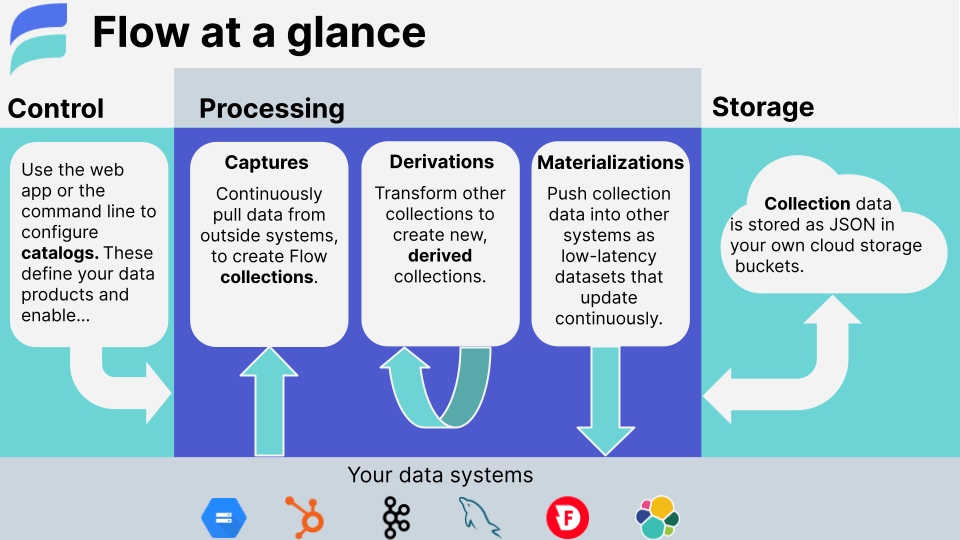
Estuary's Flow offers a powerful alternative to Kafka for streaming data from MySQL. It's an opinionated framework for working with real-time data and bundles several important features that make it shine over Kafka.
Estuary Flow, built on Gazette – a highly scalable streaming broker similar to log-oriented pub/sub systems – provides a higher-level interface over groups of journals, called collections. Its architectural components and tasks are structured for seamless transactional state management. It provides capabilities for automatic logical and physical partitioning and zero-downtime splitting of shards for turnkey scaling.
If you’re considering stream processing solutions for real-time data management, check out this quick start guide:
Create a Capture
- Sign in to the Estuary Flow web application at the dashboard.estuary.dev with your Estuary account manager-provided credentials.
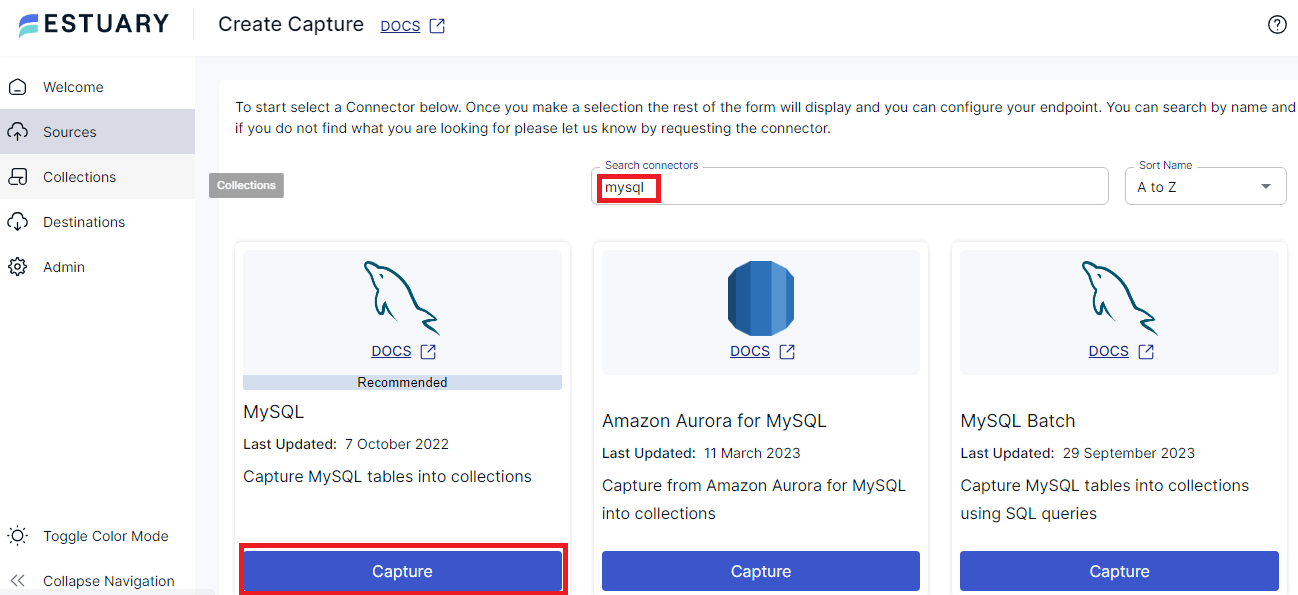
- Navigate to the Sources tab and choose New Capture.
- Select the appropriate Connector for MySQL.
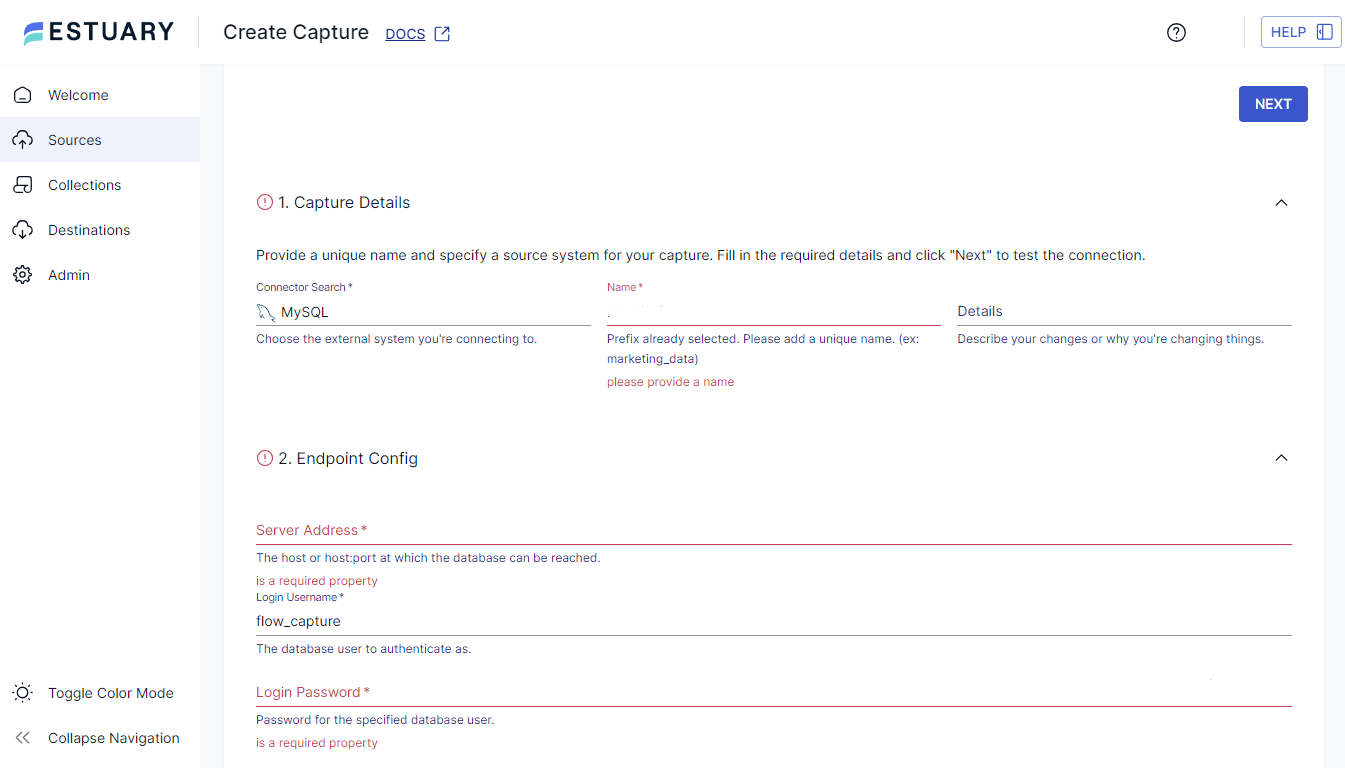
- Fill out the required capture details and properties. Then, click Next.
- Flow identifies data resources from MySQL and maps each to a collection.
- Save and publish your capture.
Create a Materialization
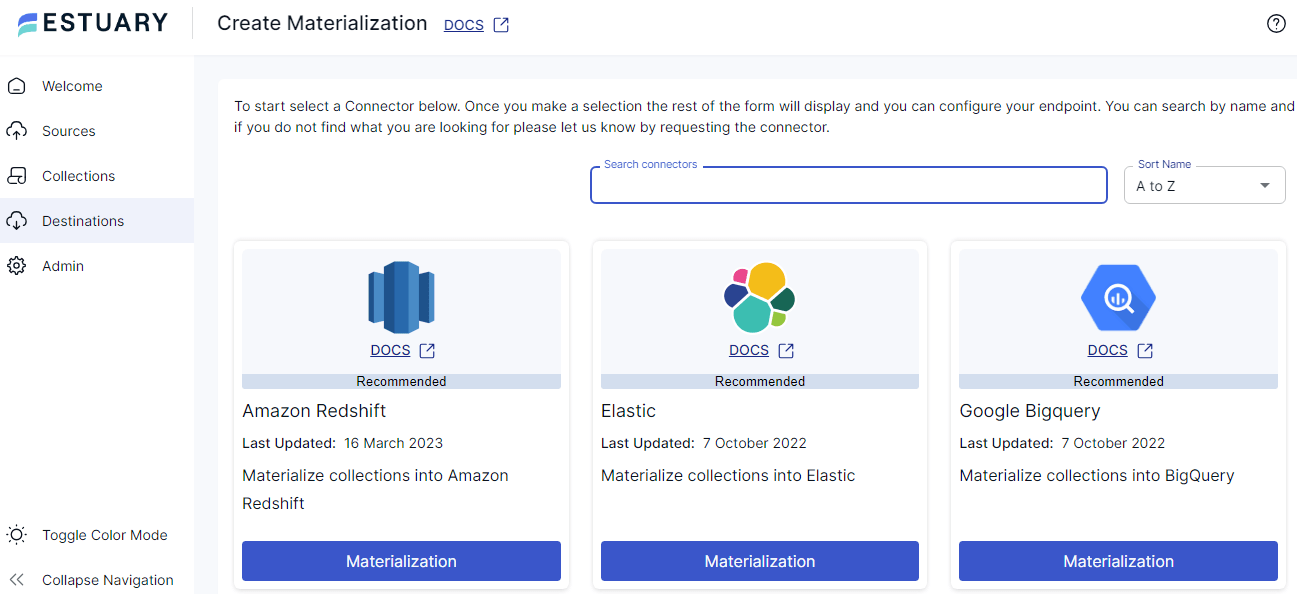
Now that your data is captured into collections, it’s time to materialize it to a destination. With Estuary, you can connect directly to just about any destination, You don’t have to stream it to Kafka first and then build a connector.
- Select the Connector for your desired data destination.
- Provide a unique name for your materialization and fill out the required properties in the Endpoint Configuration.
- The collections you captured are automatically mapped to a resource in the destination.
- Adjust the collections as needed before you materialize them. This could involve removing some collections or adding additional ones.
- Optionally, apply a stricter schema to each collection to use for the materialization.
- Use the Schema Inference window to apply an inferred schema to a collection.
- Save and publish your materialization.
Conclusion
As we bid farewell to traditional batch processing and embrace real-time streaming, remember that the clock never stops ticking. Every passing moment is a potential window to innovation and when you master MySQL to Kafka data streaming, you're not just keeping pace, you're surging ahead. The era of waiting for insights is over; the era of seizing insights as they happen is now.
Estuary Flow offers a simpler alternative to stream MySQL data. With automatic partitioning, scaling, and schema management, robust ETL tools like Flow reduce the operational burden. Its managed service and intuitive interface make it easy to stream MySQL data to destinations for analysis and applications.
Give Flow a try and sign up for free or connect with our team to see how Flow can meet your real-time streaming needs.
Check out these related blogs for even more insights on optimizing your MySQL data:

About the author
With over 15 years in data engineering, a seasoned expert in driving growth for early-stage data companies, focusing on strategies that attract customers and users. Extensive writing provides insights to help companies scale efficiently and effectively in an evolving data landscape.


