Instagram, a visually dynamic platform, generates an abundance of user engagement data that holds untapped potential for businesses and marketers. However, accessing actionable insights from this data requires moving it to an analysis-ready environment like Google BigQuery. By integrating Instagram to BigQuery, you can consolidate data for deeper audience insights, performance tracking, and content optimization.
This guide explains two methods to transfer Instagram data to BigQuery: manual migration using the Instagram Graph API or automated integration via Estuary Flow, streamlining real-time data synchronization effortlessly.
Instagram Overview
Instagram, a social media platform launched in 2010, has gained immense popularity for its visually appealing and user-friendly interface. This platform empowers users to share a variety of content, including photos, videos, and stories, with their followers. Instagram’s main feed curates and displays your posts alongside those from other users, fostering a dynamic environment where you can like, comment on, and engage with a diverse array of posts.
In addition to offering personal accounts, Instagram also provides a business account option. A business account provides access to comprehensive insights, including audience demographics, engagement metrics, reach, and the performance of posts and stories. This data is invaluable for refining marketing strategies, gaining a deeper understanding of your audience, and customizing your content to align with your brand’s objectives.
BigQuery Overview
Developed by Google, BigQuery is a robust cloud-based data warehousing and analytics platform. BigQuery enables efficient storage, management, and analysis of vast amounts of structured and semi-structured data. To expedite the analytics processes, BigQuery supports columnar storage and parallel processing. While columnar storage assists in quickly scanning the required data, parallel processing helps with the distributed computation of big data. It automatically scales to handle varying workloads, ensuring you can analyze data of any size without worrying about resource limitations.
BigQuery is not limited to descriptive and diagnostic analytics. You can also use its built-in artificial intelligence and machine learning capabilities to gain deeper insights into your data. This versatility is enhanced by the ability to use SQL in BigQuery for creating machine-learning models, offering more advanced data analysis.
How to Move Instagram Data to BigQuery: 2 Reliable Methods
- Method 1: Using SaaS Tools like Estuary Flow
- Method 2: Manual Data Migration from Instagram to BigQuery
Method 1: Using Estuary Flow for Automated Instagram to BigQuery Integration
For a faster, scalable, and error-free solution, use Estuary Flow to automate the transfer of data from Instagram to BigQuery.
Estuary Flow is a low-code real-time change data capture and streaming ETL SaaS platform that is designed to streamline the data integration process, enabling faster setup and deployment. This feature is especially useful for time-sensitive data replication. With a cloud-native architecture, Flow guarantees both scalability and optimal performance.
Here are some features of Estuary Flow:
- Many to many ETL: Estuary Flow supports many-to-many real-time or batch ETL, with multiple sources and targets in the same pipeline, and streaming transformations. It also supports E(T)LT mode, including dbt support.
- Connectors: With a wide support of pre-built source and destination connectors, Estuary provides robust solutions for various data integration requirements. Its sources and destination connectors cover popular data warehouses, SaaS applications, databases, and APIs.
- Scalability: It can handle massive datasets with a capacity of up to 7GB/s and 10TB+ tables. This enables seamless data transfer for operations from small data sets to enormous at terabyte-scale.
- Exactly-once Semantics: Estuary is built on Gazette, similar to Kafka, offering exactly-once processing semantics. This eliminates the necessity of de-duplicating real-time data.
- CDC: It uses CDC (Change Data Capture) to capture and deliver data changes in real-time. This allows you to have up-to-date and synchronized data across the system. CDC technique is especially valuable for applications that require real-time analytics, reporting, or synchronization between different data sources.
- Automatic Schema Handling: As an automated service, Flow takes care of data mapping and schema handling. It infers into the schema source changes and automatically maps them to the destination, allowing you to focus on other critical tasks.
Here is the step-by-step guide for connecting Instagram to BigQuery using Estuary Flow:
Prerequisites
Before you connect Instagram to Google BigQuery, complete these requirements:
Step1: Log in or Register
Step 2: Establish and Setup Instagram as a Data Source
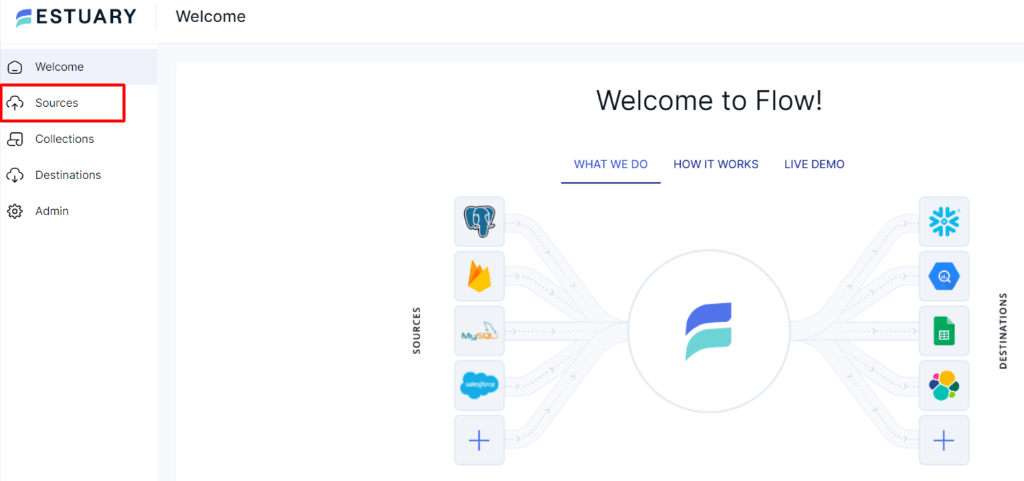
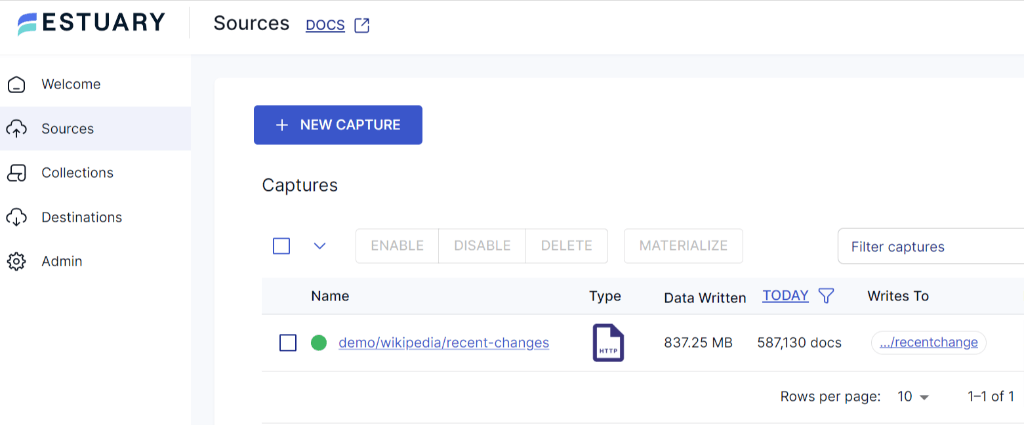
- After successful login, you’ll be directed to the Estuary dashboard. Select Sources, located on the left side of the Estuary dashboard, to begin setting up your data pipeline.
- You’ll be navigated to the Sources page. Click the + NEW CAPTURE button.
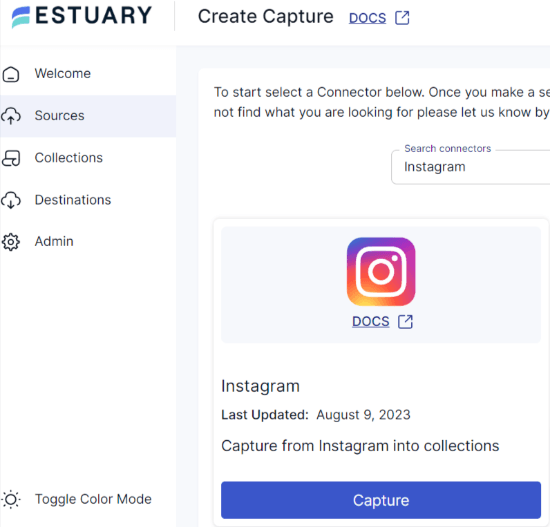
- On the Create Capture page, use the Search connectors box to find Instagram from the available connectors. Click the Capture button to continue.
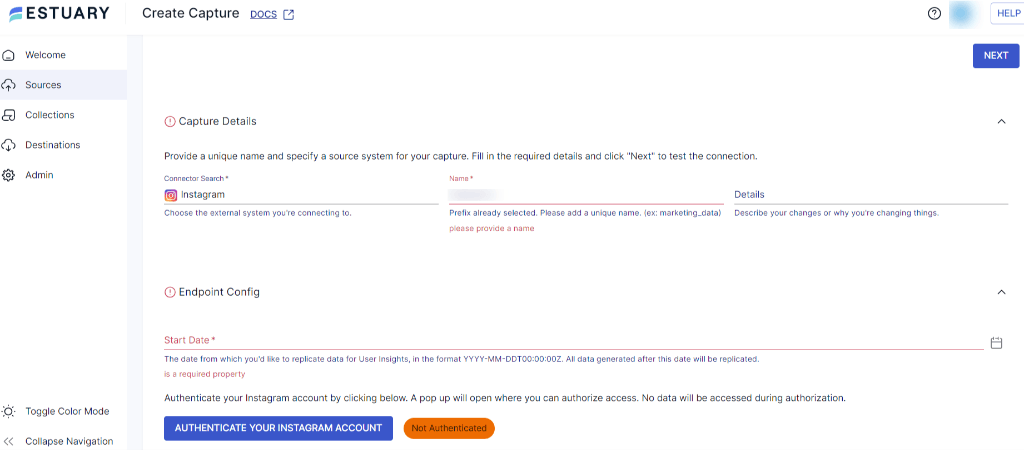
- On the Instagram Create Capture page, fill in the required fields, including the connector Name and Start Date for data replication. Then, authenticate your Instagram account.
- Once all the required fields are filled, click NEXT, followed by SAVE AND PUBLISH.
Step 3: Establish and Setup BigQuery as Destination
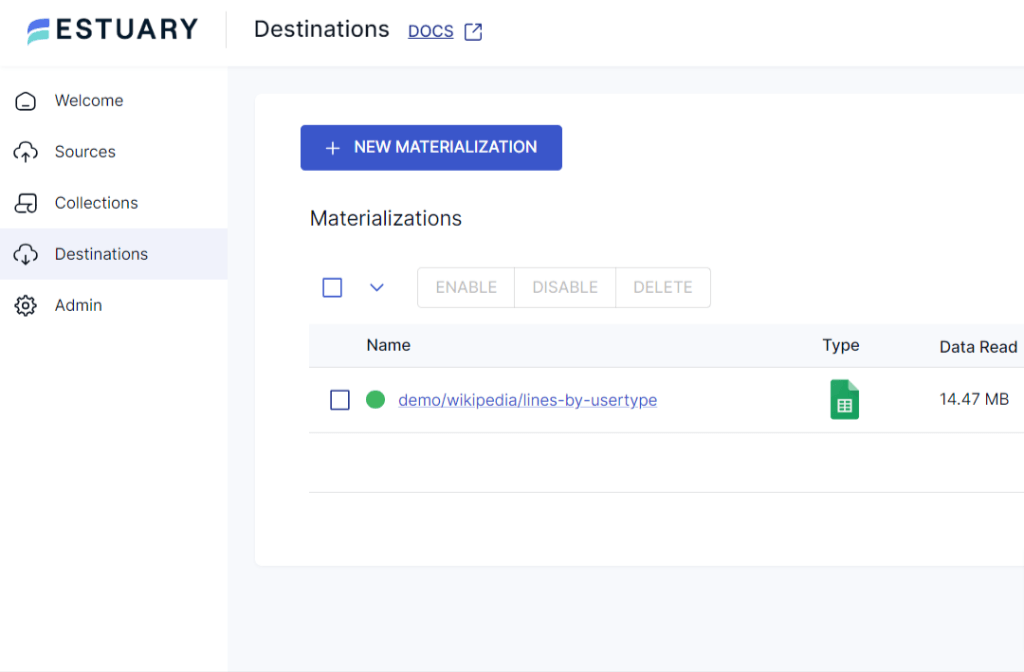
- Now that you’ve configured BigQuery as your destination, navigate to Estuary’s dashboard and select Destinations from the left-side pane.
- On the Destinations page, click + NEW MATERIALIZATION.
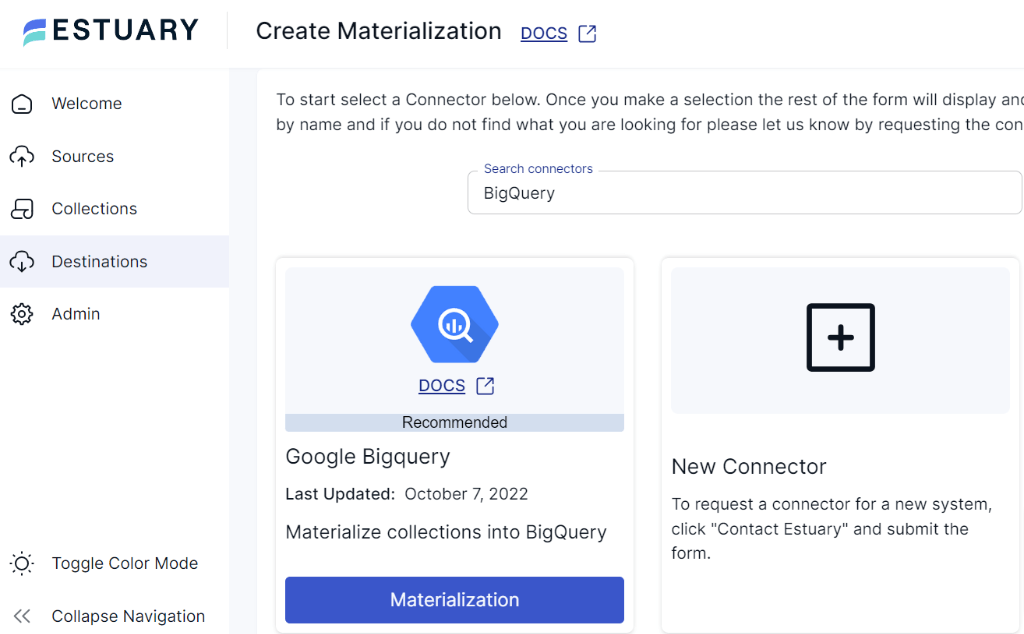
- You’ll be directed to the Create Materialization page. Enter BigQuery in the Search connector box and click the Materialization button to continue.
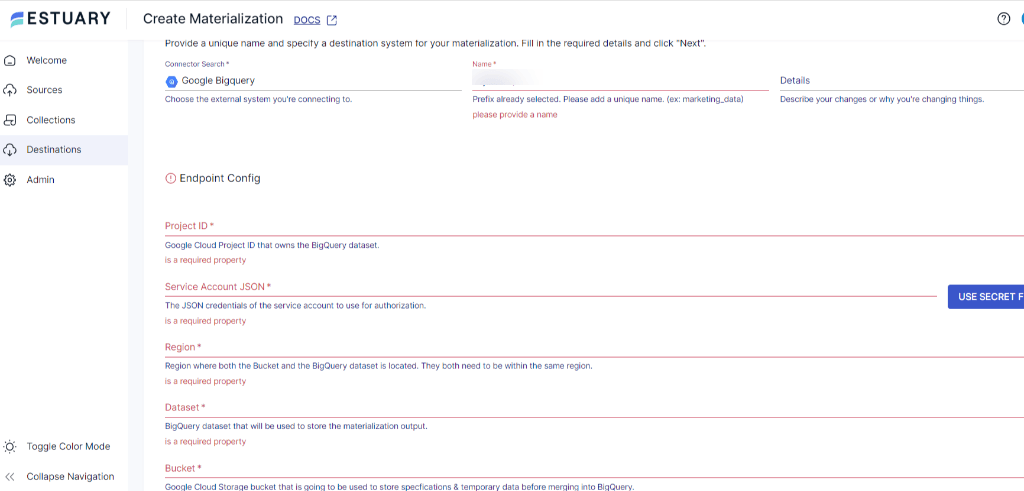
- On the BigQuery Create Materialization page, provide a unique connector Name. Fill in the required Endpoint Config fields, such as Project ID, Region, Dataset, and Bucket details.
- If the data captured from Instagram wasn’t filled in automatically, you can add the data from the Source Collection section.
- After filling in all the details, click NEXT and then SAVE AND PUBLISH. Estuary Flow will now continuously replicate your Instagram data in the BigQuery data warehouse in real-time.
For more detailed instructions, refer to the Estuary Flow documentation:
Register & Start your Instagram to BigQuery integration today with Estuary Flow and unlock the full potential of your data.
Method 2: Manual Data Migration from Instagram to BigQuery
In this method, you’ll be using the Instagram Graph API to retrieve data from your Instagram account. The Instagram Graph API is an interface provided by Facebook that allows you to access and interact with data on Instagram programmatically. You can use this API to fetch various types of data from Instagram, including user data, media (photos and videos), comments, likes, insights, hashtags, locations, and mentions. The API enables you to fetch data from both creator and business accounts.
Prerequisites
- Facebook Developer Account: Create a new Facebook developer account or use an existing one.
- Instagram Account: Log in to your Instagram business account and connect it to a Facebook page to access the Instagram Graph API.
- API Access: Generate the Instagram Graph API access token with the required permissions to access the data you need.
- Google Cloud Account: Sign in or create a new Google Cloud account to utilize BigQuery and create a new project.
Step-by-Step Process: Manual Instagram to BigQuery Data Migration
Step 1: Set up the Instagram App for Data Export
- Log in to your Facebook developer account.
- Create a new Instagram app within your developer account.
- Record the app’s
Client IDandClient Secret - Generate an access token using OAuth with the necessary permissions.
- The access token will serve as an authentication token for API requests.
Step 2: Retrieve Instagram Data Using the Graph API
- Identify the Instagram Graph API endpoint for the data you wish to retrieve.
- Use a programming language like Python or JavaScript to make API requests.
- Include the access token in the headers of your API request.
Example in Python: Fetching Instagram Data
pythonimport requests
access_token = "YOUR_ACCESS_TOKEN"
endpoint = "https://graph.instagram.com/v12.0/{user-id}/userdata”
headers = {
“Authorization": “{access token}”
}
response = requests.get(endpoint, headers=headers)
data = response.json()- Parse the JSON response to access and format the retrieved data.
- Transform the data as needed to make it compatible with BigQuery's schema requirements.
Step 3: Create a BigQuery Dataset and Table
- Log in to your Google Cloud Console.
- Create a new dataset within your BigQuery project to store Instagram data.
- Follow this Google guide to create a dataset.
- Create a new table within the dataset:
- Navigate to the newly created dataset.
- Click on Create table and provide a Table ID and Name.
Step 4: Load Data into BigQuery
- Go to the BigQuery console and select the table you created in Step 3.
- Choose the Upload method to manually upload data from a file.
- Click Select file and choose your JSON files for upload.
- Select JSON as the file format.
- Define the Schema for your table:
- Auto-detect schema or provide a custom schema definition.
- For a custom schema:
- Ensure it matches your JSON data structure.
- Define each column’s name, data type, and any attributes.
- Use Add nested field for nested structures if needed.
- Click Start Upload to begin data migration to the BigQuery table.
These steps complete the manual data migration process from Instagram to BigQuery.
Limitations of Manual Instagram to BigQuery Migration
While the manual approach is straightforward for specific scenarios like occasional backups or transfers, it comes with certain limitations:
- Human Errors: Manual data transfers are susceptible to human error during data preparation, transformation, and loading. This can lead to inconsistencies, inaccuracies, and incorrect data uploads.
- Programming Experience: The manual method involves writing custom scripts to extract data from Instagram to BigQuery. This requires a strong understanding of programming languages, APIs, data formats, and data manipulation techniques.
Conclusion
Connecting the Instagram Graph API to Google BigQuery is an effective way to harness social media insights for data-driven decision-making. Methods for connecting Instagram to Google BigQuery include using the Instagram Graph API and SaaS alternatives like Estuary Flow. While the manual approach offers control and customization, it comes with limitations such as time-consuming processes and potential data latency.
On the other hand, Estuary Flow streamlines the entire data integration process. You can automate the data replication process with just three steps without extensive coding. By opting for automation, you can sidestep the challenges of manual integration, significantly reduce the margin for errors, and harness the power of Instagram data within BigQuery in real-time.
Integrate your Instagram data into BigQuery with Estuary’s real-time synchronization—build your first pipeline today!
Interested in integrating other data sources with BigQuery? Check out these insightful guides:

About the author
With over 15 years in data engineering, a seasoned expert in driving growth for early-stage data companies, focusing on strategies that attract customers and users. Extensive writing provides insights to help companies scale efficiently and effectively in an evolving data landscape.


