Migrating data across environments is a complex yet essential process for ensuring data integrity, business continuity, and optimized system performance.
One critical migration occurs when organizations migrate a MySQL database to another server. Companies might opt to perform such a migration when they need to change hosting providers, upgrade hardware or software, or enhance performance. Some use cases requiring a migration like this include cloning a database for testing, using a separate database to run reports, or consolidating data centers.
While it may seem like a daunting task to perform a MySQL database migration, the better you understand how to migrate a MySQL database between two servers, the easier the process will be. With that in mind, let’s take a look at the different methods you can use to migrate a MySQL database between servers.
What Is MySQL? An Overview
MySQL is an open source relational database management system (RDBMS) that utilizes Structured Query Language (SQL) to access, add, and manage content in a database. Originally developed by a Swedish company called MySQL AB, it was acquired by Sun Microsystems, which was later bought by Oracle Corporation.
The replication capabilities of MySQL allow companies to configure multiple servers for data distribution, backup, and load balancing. It supports multiple programming languages, including Python, Perl, Java, PHP, and C++. MySQL also provides cross-platform support and can run on various operating systems, including Windows, UNIX, Linux, and macOS, ensuring flexible deployment options.
Another impressive feature of MySQL is its fast performance. MySQL employs a storage-engine architecture that allows users to choose the option that is most effective for a particular table’s needs, optimizing performance.
How to Migrate MySQL Database Between Two Servers
There are two different methods to migrate a MySQL database between two servers:
- Method 1: Using a No-Code Tool like Estuary Flow
- Method 2: Using an SQL Dump Export/Import
Traditional SQL dump migration works… but it’s slow, error-prone, and outdated. Modern teams use Estuary Flow — a no-code platform to move MySQL databases in real-time without downtime or data loss.
Method 1: Using a No-Code Tool like Estuary Flow to Migrate a MySQL Database to a New Server
No-code tools are an efficient way to migrate data between two platforms. Most no-code tools support real-time integration, which helps maintain data integrity. With a user-friendly interface, scalability, and support for multiple data sources, it only takes a few minutes to build and deploy an integration pipeline using Flow. Among the different no-code tools on the market today, Estuary Flow is a suitable choice for migrating a MySQL database between two servers.
To use Estuary Flow for this migration, sign in to your Estuary account. If you don’t already have one, register for a free account. Once you’ve done that, follow these steps to complete the migration.
Step 1: Configure MySQL as the Data Source
Note: Make sure you meet these prerequisites before you use Estuary’s MySQL source connector.
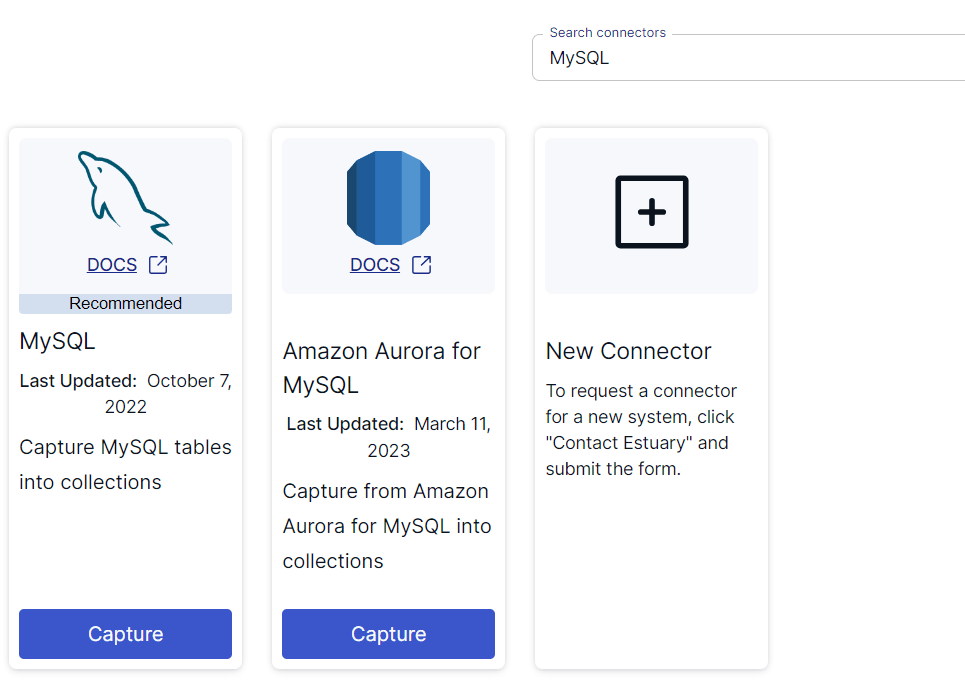
On the Estuary dashboard, click Sources on the left-hand side panel. Then, click the + NEW CAPTURE button and search for MySQL using the Search connectors box. When you see the connector in the search results, click the Capture button.
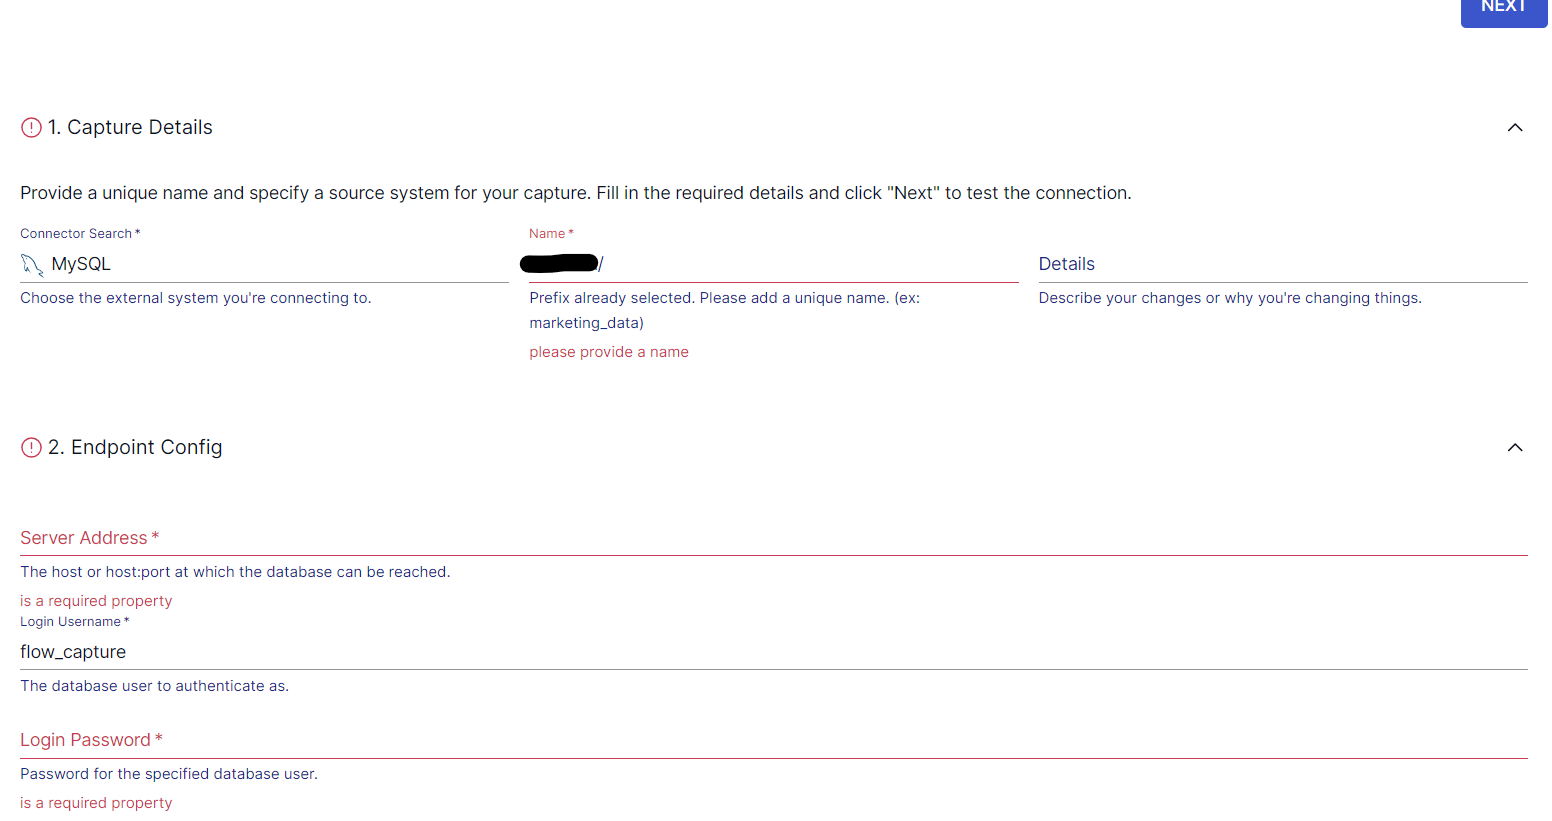
This will redirect you to the MySQL source connector page where you must specify the required details, including a Name for the capture, Server Address, and Login Password. To proceed, click NEXT > SAVE AND PUBLISH.
The MySQL source connector is a change data capture (CDC) connector that captures change events from a MySQL database via the Binary Log.
Step 2: Configure MySQL as the Data Destination
To use Estuary’s MySQL materialization connector, ensure you meet the prerequisites first.
The next step is to set up the destination end of the data migration pipeline. You can click the MATERIALIZE COLLECTIONS option on the pop-up that appears after a successful capture. Alternatively, you can navigate to Destinations on the Estuary dashboard and click + NEW MATERIALIZATION.
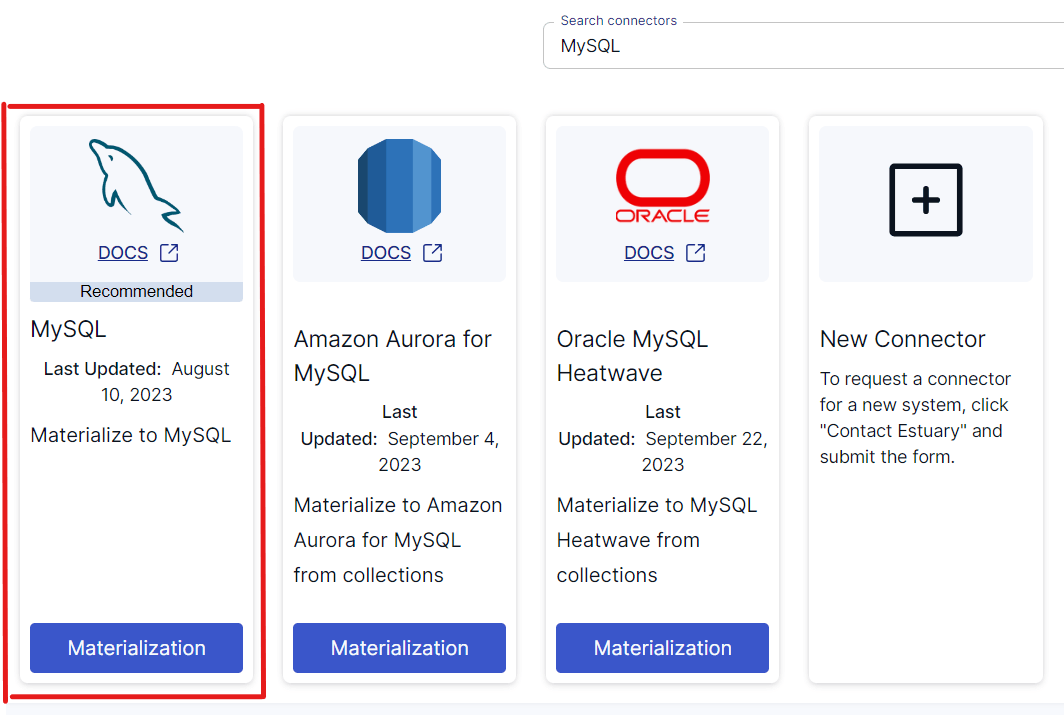
In the Search connectors box, type MySQL and click on the connector’s Materialization button.
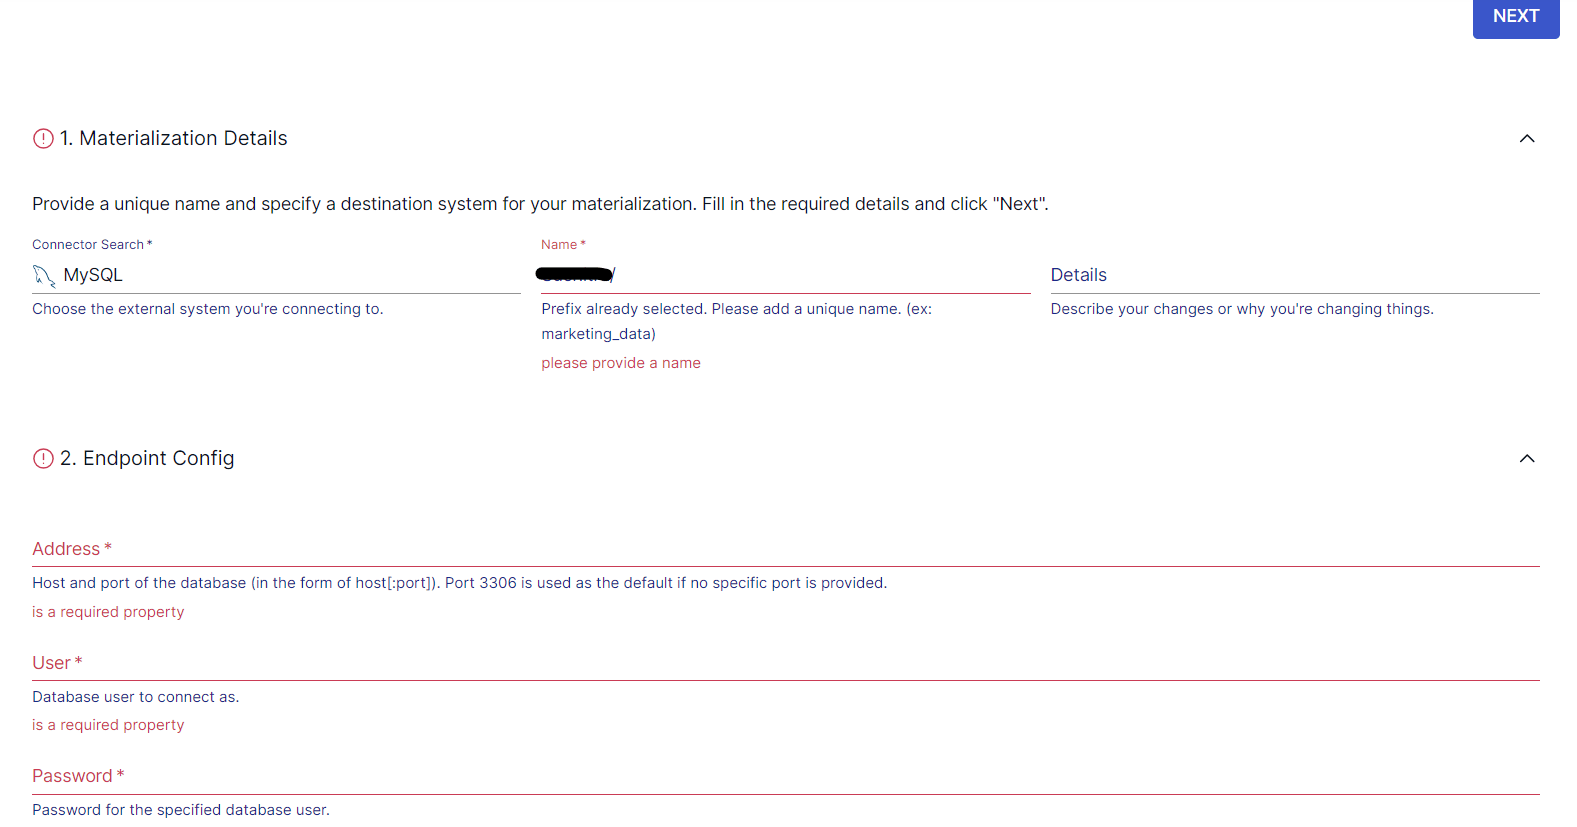
You’ll be redirected to the MySQL materialization connector page where you must fill in the required fields, including a Name for the materialization, Address, and Database. If the data captured from the MySQL source database wasn’t filled in automatically, use the Source Collections section to manually add the collections. Now, click NEXT > SAVE AND PUBLISH.
The connector will materialize Flow collections of MySQL data into tables in the destination MySQL database. That’s it!
Method 2: Using SQL Dump Export/Import to Migrate a MySQL Database Between Two Servers
The second method involves exporting data from the MySQL database to a dump file, copying the database dump to the destination server, and importing the database into MySQL.
If you’re keen on taking this route, follow these detailed steps.
Step 1: Export MySQL Database to a Dump File
The first step to migrating a MySQL database is to back up the data you want to transfer. To do this, use the mysqldump command to back it up on the original virtual server.
For a database that is on a remote server, log in to the system using SSH or use the following command syntax:
plaintextmysqldump -P [port] -h [host] -u [username] -p [database] > dump.sqlBased on the use case, here’s a list of how you can use the mysqldump command:
- To backup a single database:
plaintextmysqldump -u [username] -p [database] > dump.sql- To backup multiple databases:
plaintextmysqldump -u [username] -p --databases [database1] [database2] > dump.sql- To backup all databases on the instance:
plaintextmysqldump -u [username] -p --all-databases > dump.sql- To backup specific tables:
plaintextmysqldump -u [username] -p [database] [table1] [table2] > dump.sql- To backup data using some custom query:
plaintextmysqldump -u [username] -p [database] [table1] --where="WHERE CLAUSE" > dump.sqlExample:
plaintextmysqldump -u root -p testdb table1 --where="mycolumn = myvalue" > dump.sql- To copy only the schema but not the data:
plaintextmysqldump -u [username] -p [database] --no-data > dump.sql- To restore data without deleting previous data (incremental backups):
plaintextmysqldump -u [username] -p [database] --no-create-info > dump.sqlStep 2: Copy the Database Dump to the Destination Server
After creating the dump based on your specifications, the next step is to move the MySQL database to the destination server using the data dump file.
Use SCP, a file transfer program installed on Linux, to copy the database. The syntax for the SCP command is as follows:
- For all databases:
plaintextscp all_databases.sql user@example.com:~/- For a single database:
plaintextscp database_name.sql user@example.com:~/Here’s an example command:
plaintextscp dump.sql root@130.243.18.62:/var/data/mysql scp -P 3306 dump.sql root@130.243.18.62:/var/data/mysqlStep 3: Import Database in MySQL
The last step is to import MySQL database’s dump file into the new server. To do this, use the MySQL command.
- For all databases:
plaintextmysql -u [user] -p --all-databases < all_databases.sql- For a single database:
plaintextmysql -u [user] -p newdatabase < database_name.sql- For multiple databases:
plaintextmysql -u root -p < dump.sqlThese steps will successfully migrate a MySQL database between two servers. However, there are some limitations associated with this method:
- It’s time-consuming. Depending on the database size and network speed, creating a dump file, transferring it, and importing it can take a lot of time. Additionally, for bigger databases, the SQL dump file can be quite large, slowing down the transfer process.
- There’s potential for error. This method has a higher risk of human error, including overlooking certain steps, misconfiguring settings, or using the wrong parameters with the mysqldump command.
- There are potential data integrity issues. If there’s an activity on the source database during the dump process, it can result in data inconsistencies in the exported SQL dump. To avoid this, you can put the database in read-only mode or lock tables. However, this further impacts application availability.
- There are memory limitations. If you’re importing a massive SQL dump file, there might be memory constraints. This may require adjusting the MySQL server configurations on the destination machine.
Benefits of Using Estuary Flow for MySQL Database Migration Between Two Servers
Estuary Flow can help you overcome these limitations while simplifying the process of database migration. Here are some key benefits that come from using Flow:
- Real-time processing. Estuary Flow can handle both batch and streaming data, making it suitable for a wide range of monitoring, data processing, control, and reporting tasks.
- Reduced human errors. Automated processes and built-in connectors reduce the chances of mistakes or human errors that are usually common in manual migrations.
- Built-in connectors. With 100+ connectors for popular data sources and destinations, it’s easier to integrate any two platforms for data migration with Flow. This significantly reduces the manual efforts required for the process.
- Scalability. A fully managed enterprise-grade system, Estuary Flow can seamlessly scale for varying data volumes, supporting flows of 7GB/s+.
Don’t risk hours of manual work and potential errors. Migrate Your MySQL DB in Real Time with Estuary Flow – Try Free
Migrating a MySQL Database: Final Thoughts
Migrating a MySQL database between two servers plays a critical role when it comes to ensuring data integrity, optimizing infrastructure, and accelerating business growth. By completing such a migration, organizations benefit from increased adaptability while speeding up digital transformation.
When it comes time to migrate a MySQL database between two servers, you have two choices. One method uses SQL dump export/import and the other uses SaaS tools like Estuary Flow, an efficient no-code platform.
Due to the limitations of using SQL dump export/import — a time-consuming method filled with memory limitations, data integrity issues, and the potential for error — Flow is the better option.
Estuary Flow helps you overcome the limitations associated with the manual method thanks to its scalability, real-time processing capabilities, and robust library of built-in connectors. With powerful automation features, Flow also helps reduce the errors that are unavoidable when you attempt to complete the migration manually.
Flow offers an intuitive interface, readily available connectors, and automation capabilities that enable you to effortlessly set up ETL pipelines. With Flow, it only takes a few minutes to start the data migration process. Register for a free Estuary account and start building your first pipeline today!

About the author
With over 15 years in data engineering, a seasoned expert in driving growth for early-stage data companies, focusing on strategies that attract customers and users. Extensive writing provides insights to help companies scale efficiently and effectively in an evolving data landscape.


