Key Takeaways
Transferring data from Google Cloud Storage (GCS) to Snowflake enables scalable analytics, real-time reporting, and centralized cloud-based insights. Whether you're performing a one-time migration or setting up a recurring pipeline, there are multiple ways to move data between the two platforms.
Integration Methods:
- Estuary Flow
A no-code, real-time data integration platform that connects GCS to Snowflake in minutes using pre-built connectors. Ideal for ongoing syncs and fast setup without scripting. - CREATE STORAGE INTEGRATION
SQL-based method requiring IAM roles, external stages, and manual setup in Snowflake and GCP. - COPY INTO Command
Suitable for loading data using file paths and patterns, but lacks real-time capabilities and requires validation steps.
Estuary Flow eliminates manual overhead, supports real-time streaming, and provides a scalable, low-latency solution—making it the fastest and most flexible option for GCS to Snowflake data pipelines.
Introduction
Google Cloud Storage and Snowflake are both leading cloud-based data warehouses. If you’re looking to leverage Snowflake data warehousing or data exchange capabilities, you may need to move your data from Google Cloud Storage to Snowflake.
In this article, we will explore three effective methods to transfer your data from Google Cloud Storage to Snowflake. To begin, here’s a brief overview of the platforms:
Google Cloud Storage: An Overview
Google Cloud Storage (GCS) is a robust cloud-based storage service provided by Google Cloud. Its scalable infrastructure ensures optimal performance for businesses of all sizes. One of the standout features of GCS is its multi-regional storage; it allows you to store your data in multiple regions, ensuring improved availability.
In addition to its multi-regional storage, GCS offers advanced access controls, allowing you to define granular permissions and manage data security effortlessly. This ensures that sensitive data remains protected, aligning with industry standards. Google Cloud Storage stands as a cornerstone for organizations seeking a dynamic and secure storage solution in the cloud.
Snowflake: An Overview
Snowflake is a fully managed cloud data platform It revolutionizes data warehousing with its active and adaptive architecture. Its instant elasticity enables seamless scaling, letting you pay only for the resources you utilize. This scalability helps ensure optimal performance and cost-efficiency, making it an ideal solution for diverse business needs.
Apart from its scalability, Snowflake has unique data-sharing capabilities, allowing organizations to securely share real-time data with external partners or across different departments. This feature fosters collaboration and can help accelerate decision-making.
Three Methods to Transfer Data from Google Cloud Storage to Snowflake
Here are three ways to transfer your data from Google Cloud Storage to Snowflake:
- Method 1: Using Estuary Flow to connect Google Cloud Storage to Snowflake
- Method 2: Using the CREATE STORAGE INTEGRATION command to transfer data from Google Cloud Storage to Snowflake.
- Method 3: Using the COPY INTO command to transfer data from Google Cloud Storage to Snowflake.
Method 1: Using Estuary Flow to Connect Google Cloud Storage to Snowflake
Estuary Flow is a no-code real-time CDC and ETL platform as a service that offers a variety of built-in connectors for seamless data migration and integration across various platforms. Here's a step-by-step guide to transfer your data from Google Cloud Storage to Snowflake.
Prerequisites
Step 1: Configure Google Cloud Storage as the Source Connector
- Log in to Estuary Flow or sign up for a new account to start configuring Google Cloud Storage as the source
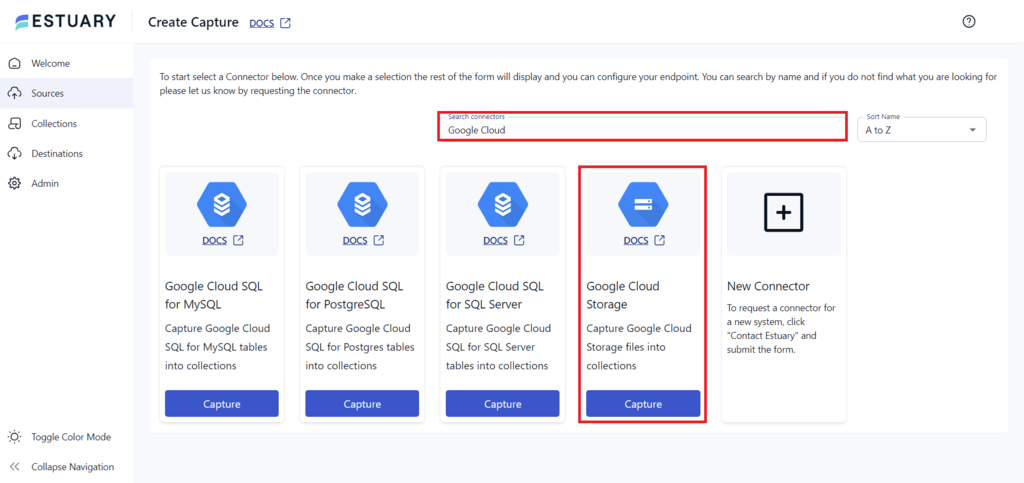
- On the dashboard, select Sources on the left-side pane and click + NEW CAPTURE.
- Search for Google Cloud in the Search connectors box. Find Google Cloud Storage in the search results and click its Capture button.
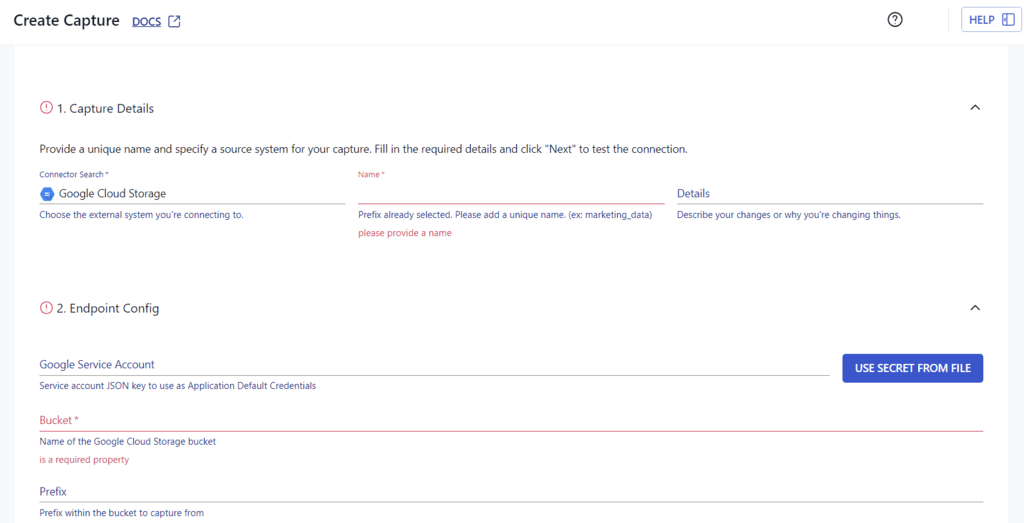
- On the Create Capture page, enter the required details like Name and Bucket.
- Click on NEXT > SAVE AND PUBLISH. This will capture your data into Estuary Flow collections.
Step 2: Configure Snowflake as the Destination Connector
- To start configuring the destination end of your data pipeline, click Destinations on the left-side pane of the Estuary Flow dashboard.
- Select + NEW MATERIALIZATION on the Destinations page.
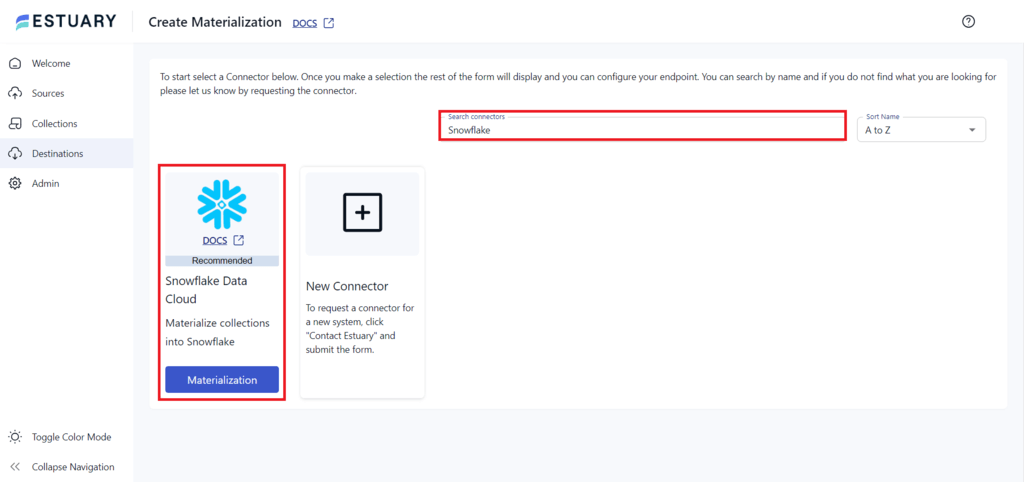
- Search for Snowflake in the Search Connectors box and click the Materialization button of the Snowflake Data Cloud connector.
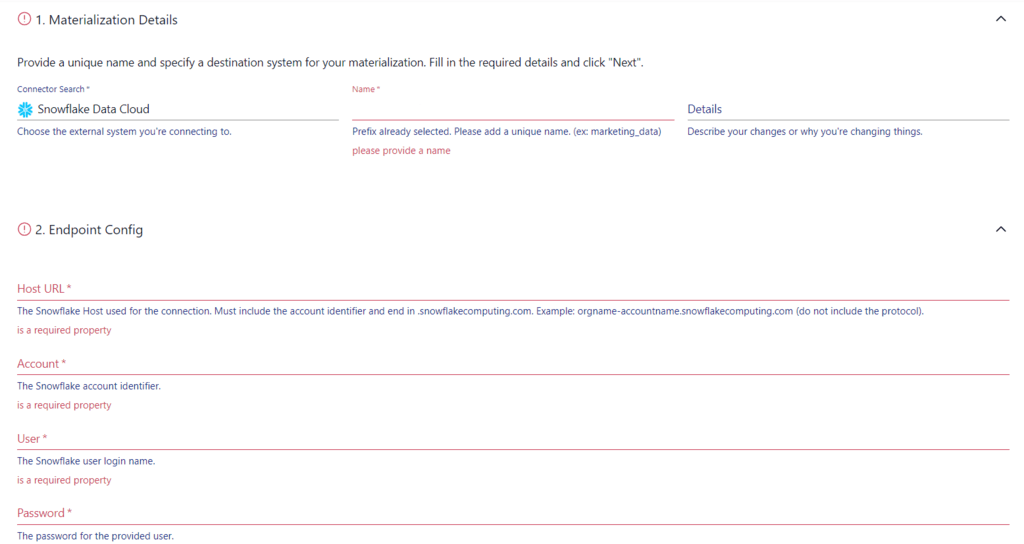
- On the Create Materialization page, enter the required information like Name, Host URL, Account, and Password.
- If the data from GCS doesn’t fill automatically, you can manually add the data using the Source Collections feature.
- Click on NEXT > SAVE AND PUBLISH to complete the integration process and load the data from Estuary Flow collections into Snowflake.
Benefits of Using Estuary Flow
- No Code Platform: Estuary Flow offers a no-code UI that lets users easily integrate data using 150+ native real-time and batch connectors - as well as support for 500+ 3rd party connectors from Airbyte, Meltano, and Stitch - across many sources and destinations. With just a few clicks, you can use Estuary Flow to connect any source and destination.
- Real-Time Processing: Estuary Flow supports real-time data streaming and migration. It can continuously capture and replicate data across platforms with minimal latency, ensuring immediate data availability.
- Scalability: Estuary Flow supports horizontal scaling to handle large data volumes. This makes Estuary Flow ideal for both large and small-scale enterprises.
Method 2: Using the CREATE STORAGE INTEGRATION Command to Transfer Data from Google Cloud Storage to Snowflake
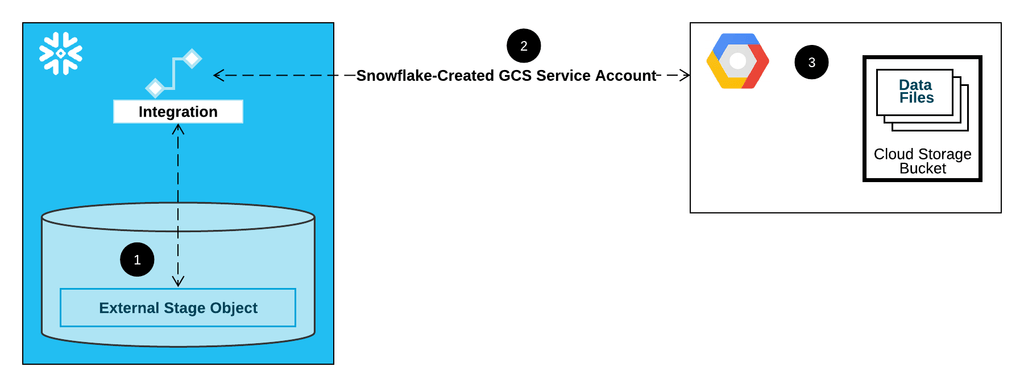
You can use this method to create a new storage integration in the Snowflake environment. Storage integration is an object that stores an IAM for external storage.
Here are the steps to connect Google Cloud Storage to Snowflake:
Step 1: Create a Google Cloud Integration in Snowflake
- Enter the following SQL command to create an integration in Snowflake:
plaintextCREATE STORAGE INTEGRATION gcs_int
  TYPE = EXTERNAL_STAGE
  STORAGE_PROVIDER = 'GCS'
  ENABLED = TRUE
  STORAGE_ALLOWED_LOCATIONS = ('*')
STORAGE_BLOCKED_LOCATIONS = ('gcs://mybucket3/path3/', ‘gcs://mybucket4/path4/');- Enter the following command to retrieve Google Cloud Storage for Snowflake:
plaintextDESC STORAGE INTEGRATION <integration_name>;Step 2: Allow Service Account to Access Bucket Objects
- Log in to Google Cloud Platform and select IAM and admin > Roles.
- Select Create role, enter the name and description for the custom role, and click Add Permissions.
- Add the following permissions for loading and unloading data and click Create:
- storage.buckets.get
- storage.objects.create
- storage.objects.delete
- storage.objects.list
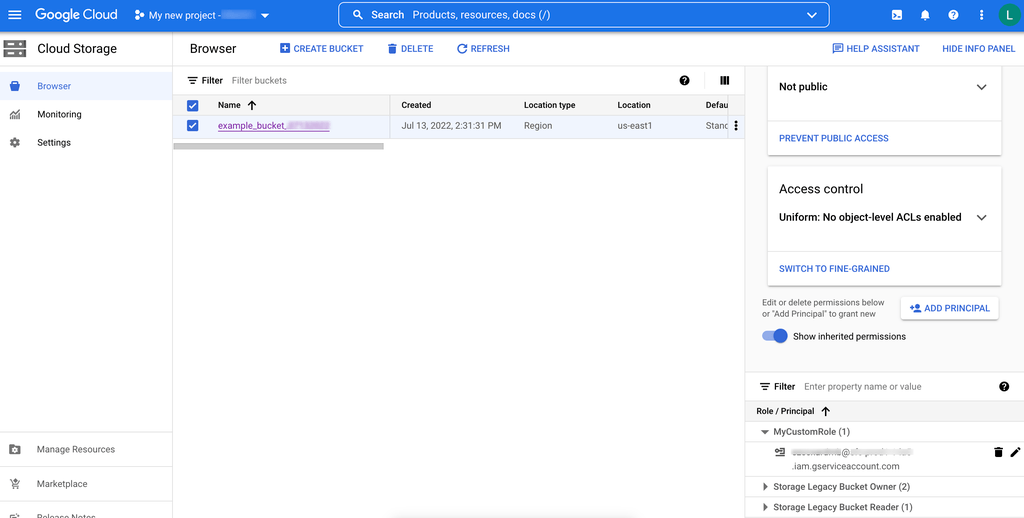
- To assign the custom role to the Cloud Service Account, select Storage > Browser in GCP.
- Choose a bucket and click SHOW INFO PANEL. From the Select a Role dropdown menu, select Storage > Custom > Role.
- Click Save. The service account name will be added to the Storage Object Viewer.
Step 3: Create an External Stage with SQL
- To create a stage that uses storage integration, establish necessary privileges with the following SQL query:
plaintextGRANT USAGE ON DATABASE mydb TO ROLE myrole;
GRANT USAGE ON SCHEMA mydb.stages TO ROLE myrole;
GRANT CREATE STAGE ON SCHEMA mydb.stages TO ROLE myrole;
GRANT USAGE ON INTEGRATION gcs_int TO ROLE myrole;- You can use the CREATE STAGE command to create an external stage. For example:
plaintextUSE SCHEMA mydb.stages;
CREATE STAGE my_gcs_stage
  URL = 'gcs://mybucket1/path1'
  STORAGE_INTEGRATION = gcs_int
  FILE_FORMAT = my_csv_format;
Once an external stage is created, you can upload data from your Google Cloud Storage account to Snowflake.
Method 3: Using the COPY INTO Command to Transfer Data from Google Cloud Storage to Snowflake
If you use buckets to store and manage data on your GCS account, you can use the COPY INTO <table> command to load data from Google Cloud Storage. Here are the steps:
Step 1: Validate Your Data
First, you need to validate the data to ensure accurate uploading of your files. You can do this using VALIDATION_MODE as mentioned below:
- Execute the COPY INTO <table> command in validation mode using the VALIDATION_MODE parameter.
- Modify your data to fix the errors returned by the VALIDATION_MODE parameter.
The COPY INTO <table> provides an ON_ERROR copy action to deal with errors while loading data.
Step 2: Load the Data
You can use the COPY INTO command to load data from Google Cloud Storage to Snowflake using Pattern Matching, Path/Prefix, or ad hoc File Format Options.
- Using Pattern Matching
Use the following SQL query to transfer data from the files:
plaintextCOPY INTO mytable
  FROM @my_gcs_stage
  PATTERN='.*sales.*.csv';
This pattern-matching command can only load data from file names starting with sales.
- Using a Path/Prefix
Use the following example to load files with a path in your Cloud Storage bucket. You can combine this with pattern matching.
plaintextCOPY INTO mytable
  FROM @my_gcs_stage/mybucket/data/files
FILE_FORMAT = (FORMAT_NAME = my_csv_format);- Using Ad Hoc File Format Options
You can use the following ad hoc example to load data from all the files present in the Cloud Storage bucket.
plaintextCOPY INTO mytable
  FROM 'gcs://mybucket/data/files'
  STORAGE_INTEGRATION = myint
  FILE_FORMAT = (TYPE = CSV FIELD_DELIMITER = '|' SKIP_HEADER = 1);
Step 3: Monitor Data Loads
Snowflake maintains data for COPY INTO commands executed in the last 14 days. You can use the following steps to manage and monitor the loading process with this metadata.
- Check the status of each COPY INTO <table> command on the History page.
- Use the LOAD_HISTORY information schema to check the data history loaded using the COPY INTO <table> command.
Want to understand when to use COPY INTO versus Snowpipe Streaming? Read our in-depth comparison of COPY INTO vs Snowpipe Streaming to choose the best approach for your Snowflake pipeline.
Limitations of Using the Manual Methods
The two manual methods for connecting Google Cloud Storage to Snowflake have the following limitations:
- Lack of Real-Time Data Access: The manual methods don’t support automatic refresh of data or real-time data access.
- Technical Expertise: A detailed understanding of SQL scripts and cloud platforms is required to achieve accurate migration.
- Manual errors: The number of steps and amount of code required can lead to mistakes and extra time troubleshooting and fixing data.
Conclusion
Transferring data from Google Cloud Storage to Snowflake offers enhanced query performance, analytics, and data sharing. This article explored using Estuary Flow and SQL queries for three methods to load data from GCS to Snowflake.
While using SQL queries can be effective, it often requires professional expertise and may become time-consuming and complex, especially for large databases. On the other hand, Estuary Flow provides seamless migration between Google Cloud Storage and Snowflake with just a few clicks. With over 200+ built-in connectors, Estuary Flow simplifies the migration process.
Ready to optimize your data management? Explore simplistic migration from Google Cloud Storage to Snowflake using Estuary Flow. Sign up today!
FAQs
What file formats can I load from GCS into Snowflake?
What’s the difference between COPY INTO and Snowpipe Streaming in Snowflake?

About the author
With over 15 years in data engineering, a seasoned expert in driving growth for early-stage data companies, focusing on strategies that attract customers and users. Extensive writing provides insights to help companies scale efficiently and effectively in an evolving data landscape.


