Key Takeaways
- Moving Freshdesk data into Snowflake unlocks richer analytics on customer interactions, support performance, and retention trends.
- There are two main ways to integrate Freshdesk with Snowflake:
(1) Automated method with Estuary, which streams data in real time using CDC, schema evolution, and exactly-once delivery.
(2) Manual CSV export/import, which relies on Freshdesk reports and Snowflake COPY commands. - Estuary is the preferred approach for reliable, scalable, right-time data movement, removing the overhead of manual workflows and ensuring constantly refreshed data.
- CSV-based pipelines are slow and error-prone, making them suitable only for simple or occasional transfers.
- Automated Freshdesk-to-Snowflake pipelines enable faster insights, better decision-making, and more responsive customer support operations.
Introduction
Customer support is crucial for driving business success. Providing timely and effective responses to customer inquiries ensures a positive experience, which directly influences customer satisfaction, retention, and loyalty.
Freshdesk is a cloud-based customer support software that helps manage and streamline customer service operations. However, while Freshdesk excels in managing day-to-day customer support activities, integrating it with a robust data warehouse like Snowflake can significantly enhance your ability to perform advanced analytics on customer interactions and behaviors.
Connecting Freshdesk to Snowflake allows for deeper insights into customer support data, enabling you to improve decision-making, optimize operations, and offer a more data-driven approach to retaining customers and reducing churn.
This article outlines two effective strategies for integrating Freshdesk with Snowflake.
Let’s begin with a quick overview of both platforms, or feel free to skip ahead to the methods if you’re ready to get started.
What is Freshdesk?
Freshdesk, developed by Freshworks, is a cloud-based customer service platform designed to streamline and enhance customer support operations.
The platform consolidates customer queries and data from multiple channels, including emails, phone calls, live chats, social media, and web forms, into a unified interface. This centralization facilitates efficient management of customer data, such as interactions and ticketing, enabling rapid responses to inquiries which improve metrics in response times and customer satisfaction.
For data engineers and ETL developers, Freshdesk provides robust API access and supports Change Data Capture (CDC), enabling integration with data warehouses like Snowflake. The support for CDC facilitates real-time ETL processes, ensuring that customer support data is continuously synchronized as it is updated, and the freshest data is always readily available for advanced analytics and reporting.
What is Snowflake?
Snowflake is a cloud-based Software-as-a-Service (SaaS) application powered by an advanced SQL query engine capable of handling large datasets and complex workloads with ease.
The platform handles all of the routine maintenance tasks such as hardware management, software updates, and performance tuning, taking it off of your plate and letting you focus on delivering insights rather than managing infrastructure.
Key Features of Snowflake
- Decoupled Compute and Storage: Snowflake separates compute resources from storage, letting you scale them independently of each other. This is a key feature that lets you manage your costs effectively when you have variable workloads. By scaling compute and storage independently, you can allocate more compute power during high-demand periods without increasing storage costs, and vice versa. This flexibility allows for better cost management, as you're only paying for the exact resources you need at any given time.
- Low Maintenance: Low Maintenance: Snowflake is designed to be low maintenance, with features like automatic scaling, performance tuning, and updates handled behind the scenes. This eliminates the need for manual infrastructure management, allowing teams to focus on data-driven tasks rather than system upkeep. Snowflake's fully managed platform simplifies operations, ensuring high performance and availability without the need for constant monitoring or intervention.
- Data Security: Snowflake implements robust security protocols, including IP whitelisting to restrict unauthorized data access. Additionally, it’s possible to enable two-factor authentication (2FA), and data is encrypted both at rest and in transit.
- Secure Data Sharing: Snowflake enables secure and real-time data sharing across different departments or external partners without the need for data duplication. This feature facilitates seamless collaboration and ensures that all stakeholders have access to the most up-to-date information without adding a ton of overhead through additional ETL pipelines.
Benefits for Data Engineers and Data Analysts
- Ease of Use: Snowflake's intuitive interface and comprehensive documentation make it accessible for data engineers and data analysts alike to design and manage complex data pipelines without deep expertise in infrastructure management or distributed computing.
- Performance Optimization: Automated performance tuning and intelligent caching mechanisms ensure that queries run efficiently, reducing latency and lowering your compute costs.
- Cost Efficiency: Pay-as-you-go pricing model allows organizations to scale resources based on actual usage, preventing over-provisioning and optimizing cost management.
Why Integrate Freshdesk to Snowflake?
Integrating Snowflake with Freshdesk unlocks a multitude of advanced analytics capabilities that can drive your business forward. By leveraging Snowflake’s powerful data warehousing and analytics features, you can transform your Freshdesk data into actionable insights, enhancing various aspects of your customer support and overall business strategy.
Snowflake’s robust data warehousing capabilities allow you to execute complex queries on your Freshdesk data seamlessly. This integration facilitates:
- Comprehensive Customer Insights: Analyze customer interactions, ticket trends, and support performance to identify patterns and areas for improvement.
- Advanced Segmentation: Segment customers based on behavior, support history, and satisfaction metrics to tailor your support strategies effectively.
- Predictive Analytics: Leverage machine learning models to predict customer issues, anticipate support volume, and proactively address potential problems.
Methods to Integrate Freshdesk to Snowflake
- The Easy, Automated Way: Using Estuary to Load Data from Freshdesk to Snowflake
- The Manual Way: Using CSV Export/Import to Move Data from Freshdesk to Snowflake
Method 1: Using Estuary to Load Data from Freshdesk to Snowflake
Estuary is a real-time ETL (Extract, Transform, Load) platform designed with a user-friendly interface and robust automation capabilities. It offers 200+ pre-built connectors, enabling effortless data capture from databases, cloud services, and SaaS applications. This extensive connector library allows you to create an exact replica of your data, powering both analytics and operational workflows without the need for extensive manual configuration.
Estuary ensures sub-100ms latencies for real-time data synchronization. This helps you access the most current data at your destination systems for efficient decision-making.
Let’s look into the process of using Estuary for connecting Freshdesk to Snowflake.
Prerequisites
Sign Up and Access Estuary:
- Visit the Estuary website and sign up for the free tier or initiate a 30-day trial on the paid tier.
- Once registered, access the Estuary dashboard to begin configuring your data pipelines.
Step 1: Configure Freshdesk as Your Source
- Sign in to your Estuary account.
- Select the Sources option from the side menu of the dashboard.
- Click the + NEW CAPTURE button on the Sources page.
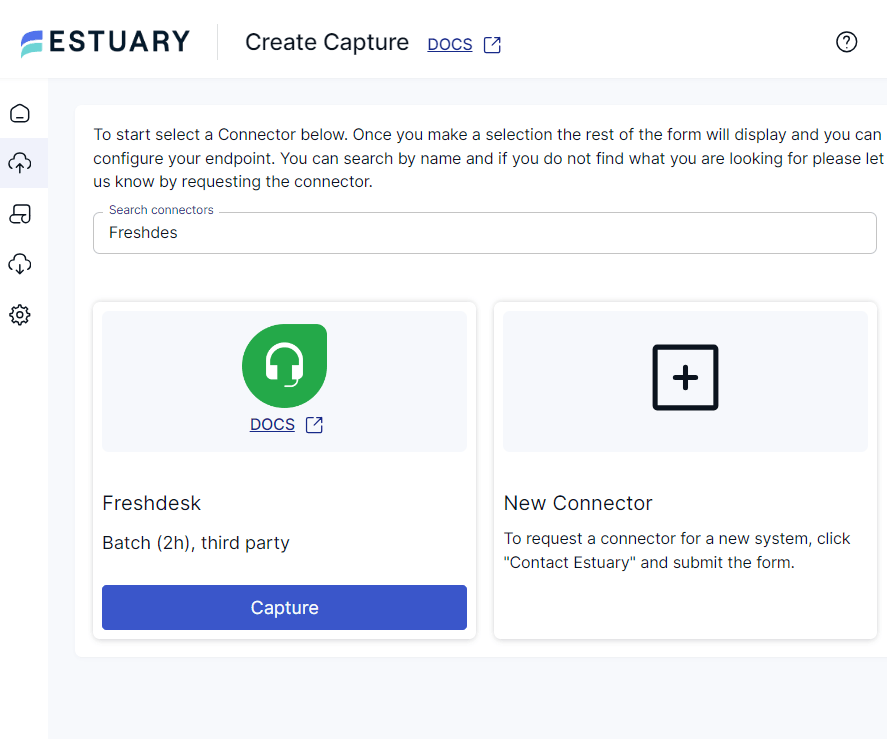
- Search for Freshdesk using the Search connectors field on the Create Capture page.
- Click the Freshdesk connector’s Capture button to proceed with its configuration. This will redirect you to the Freshdesk Create Capture page.
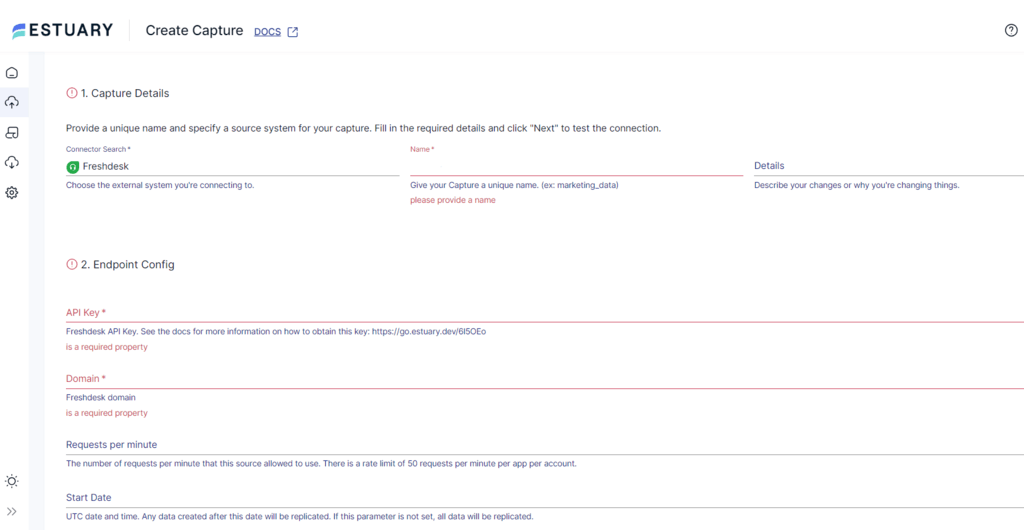
- To configure the connector, specify the following details:
- Name: Enter a unique name for your source capture.
- API Key: Provide your Freshdesk API key.
- Domain: Specify the Freshdesk domain.
- Requests per minute (Optional): This is the number of requests per minute that this source is allowed to use.
- Start Date (Optional): Mention the date from which you want to replicate the data.
- After providing all the required details, click NEXT. Then, click SAVE AND PUBLISH.
The connector will capture your Freshdesk data via the Freshdesk API into a Flow collection.
Step 2: Configure Snowflake as Your Destination
- After a successful capture, you will see a pop-up window summarizing the capture details. Click on MATERIALIZE COLLECTIONS in this pop-up to proceed setting the destination end of your pipeline.
Another way to proceed is to navigate to the dashboard and click on Destinations > + NEW MATERIALIZATION.
- The Create Materialization page has a Search connectors field that you can use to search for the Snowflake connector.
- When you see the Snowflake connector in the results, click its Materialization button.
- On the Snowflake Create Materialization page, fill in the necessary fields, including:
- Name: Enter a unique name for your materialization.
- Host (Account URL): Mention the Snowflake host used for connection.
- Database: Specify the SQL database in Snowflake you want to connect to.
- Schema: This is the associated database schema.
- In the Authentication section, you can select between USER PASSWORD or PRIVATE KEY (JWT).
NOTE: You can use the Source Collections section to manually link the capture of your Freshdesk data to your materialization.
- Finally, click NEXT > SAVE AND PUBLISH to complete the Snowflake destination connector configuration.
The connector will materialize the Flow collection of your Freshdesk data into your Snowflake database table.
- Change Data Capture (CDC): Estuary supports Change Data Capture (CDC), enabling the tracking and replication of changes in source data to the destination in real-time. This capability ensures millisecond-level latency for data synchronization between Freshdesk and Snowflake, significantly enhancing the efficiency and responsiveness of your data workflows.
- Time Travel: With Estuary’s Time Travel functionality, you can define specific date ranges to restrict the data materialization process. When applied to an existing materialization, Time Travel allows new data within the specified timeframe to be materialized without altering existing records. This feature simplifies data management by ensuring efficient updates while maintaining data integrity over time.
- Stream Store: As data is ingested from Freshdesk and undergoes transformation, Estuary’s Stream Store securely stores the processed data in your designated cloud storage. This guarantees transactionally exactly-once delivery, ensuring that data is neither duplicated nor lost. Additionally, Stream Store provides the flexibility to add new destinations to your pipeline seamlessly and automatically backfill data to these targets as needed.
Method 2: Using CSV Export/Import to Move Data from Freshdesk to Snowflake
This method involves extracting data from Freshdesk as a CSV and then loading this into Snowflake.
Step 1: Export Freshdesk Data as a CSV
You can use Freshdesk’s Export option to extract data reports and widgets. The platform allows you to download tabular and graph data in CSV format.
- Log in to your Freshdesk account and navigate to the Analytics section from the dashboard.
- Select the report you want to extract from the Analytics page.
- You can opt to export a full report or just selective widgets:
- Full Report: To export the entire report, click the export icon at the top right of the navigation bar. Then click Select All > Export. This will send the data report in PDF format to the email address registered with Freshdesk. You can download the PDF file and then convert it into CSV format.
- Specific Widget: To export a specific widget, click the expand icon next to it. Now, click on the export option at the top right and select CSV of graph data or CSV of tabular data. This will send the report in CSV format to the registered email address.
Step 2: Import Data to Snowflake
You can use the Snowflake COPY command to copy the CSV file of your Freshdesk data from your local computer into Snowflake tables.
Prerequisites:
- Your Snowflake account must have the necessary permissions to create databases, tables, and file formats.
- Install and configure SnowSQL.
Here are the steps to copy data from your local system to target tables in Snowflake.
1. Create a CSV File Format Object
Define a file format in Snowflake to specify how your CSV files are structured. This configuration ensures that Snowflake correctly interprets the incoming data.
sql
Copy code
plaintextCREATE OR REPLACE FILE FORMAT freshdesk_csv_format
  TYPE = 'CSV'
  FIELD_DELIMITER = '|'
SKIP_HEADER = 1;- Parameters:
- freshdesk_csv_format: A descriptive name for the file format.
- TYPE = 'CSV': Specifies the file type.
- FIELD_DELIMITER = '|': Sets the delimiter used in the CSV files.
- SKIP_HEADER = 1: Instructs Snowflake to skip the header row in each CSV file.
2. Create a Stage Object
Establish a staging area in Snowflake where your CSV files will be temporarily stored before loading them into the target table.
sql
Copy code
plaintextCREATE OR REPLACE STAGE freshdesk_stage
FILE_FORMAT = freshdesk_csv_format;- Parameters:
- freshdesk_stage: A meaningful name for the stage.
- FILE_FORMAT = freshdesk_csv_format: Associates the previously created file format with this stage.
3. Upload Your CSV Files to the Stage
Transfer your local CSV files to the Snowflake stage using the PUT command. Ensure you adjust the file path based on your operating system.
For Linux or macOS:
bash
Copy code
plaintextPUT file:///path/to/load/contacts*.csv @freshdesk_stage AUTO_COMPRESS=TRUE;For Windows:
bash
Copy code
plaintextPUT file://C:/path/to/load/contacts*.csv @freshdesk_stage AUTO_COMPRESS=TRUE;- Parameters:
- file:///path/to/load/contacts*.csv or file://C:/path/to/load/contacts*.csv: The path to your local CSV files. The asterisk (*) allows for multiple files matching the pattern.
- @freshdesk_stage: The target stage in Snowflake where files are uploaded.
- AUTO_COMPRESS=TRUE: Automatically compresses the files during upload, reducing storage space and improving load performance.
- file:///path/to/load/contacts*.csv or file://C:/path/to/load/contacts*.csv: The path to your local CSV files. The asterisk (*) allows for multiple files matching the pattern.
4. Copy Data into the Target Table
Load the data from the staged CSV files into your Snowflake table using the COPY INTO command.
Copy code
plaintextCOPY INTO freshdesk_contacts
  FROM @freshdesk_stage/contacts*.csv.gz
  FILE_FORMAT = (FORMAT_NAME = freshdesk_csv_format)
ON_ERROR = 'skip_file';- Parameters:
- freshdesk_contacts: The target table in Snowflake where data will be loaded.
- @freshdesk_stage/contacts*.csv.gz: Specifies the staged and compressed CSV files to load.
- FILE_FORMAT = (FORMAT_NAME = freshdesk_csv_format): References the file format defined earlier.
- ON_ERROR = 'skip_file': Instructs Snowflake to skip any file that encounters an error during the load process, ensuring that the pipeline continues without interruption.
- freshdesk_contacts: The target table in Snowflake where data will be loaded.
5. Clean Up the Stage
After successfully loading the data, remove the staged files to maintain a clean staging environment and free up storage space.
Copy code
plaintextREMOVE @freshdesk_stage;- Parameters:
- @freshdesk_stage: The stage from which files will be removed. This command deletes all files within the specified stage.
Limitations of Using CSV Export/Import to Load Data from Freshdesk to Snowflake
- Time-consuming/Effort-intensive: Exporting data from Freshdesk as CSV files and subsequently importing them into Snowflake requires significant manual effort. This repetitive process not only consumes valuable time but also diverts your data engineering resources away from more strategic tasks.
- Lack of Real-time Capabilities: CSV export/import methods lack real-time data integration capabilities, resulting in delays between data generation in Freshdesk and its availability in Snowflake. This lag can impede timely decision-making, as your analytics rely on outdated information. For businesses that depend on up-to-the-second data to monitor customer interactions, track support performance, or respond to emerging trends, these delays can negatively impact customer satisfaction and competitive responsiveness.
- Data Integrity Issues: Manual CSV handling often leads to data integrity challenges, such as mismatched schemas, incomplete data transfers, or inconsistent data updates. These issues can compromise the accuracy and reliability of your data warehouse, leading to flawed analytics and misguided business strategies. Inaccurate data can result in poor customer insights, misguided resource allocation, and ineffective support strategies, ultimately affecting customer retention and business growth.
Wrapping It Up
Integrating Freshdesk with Snowflake empowers businesses to elevate their customer support operations and make data-driven decisions. By leveraging advanced analytics, organizations can uncover deep insights into customer interactions, enabling them to enhance service quality, boost customer satisfaction, and drive retention and loyalty.
While the CSV export/import method offers a basic solution for data migration and work in a pinch, it is labor-intensive, time-consuming, and lacks real-time synchronization. These limitations can delay critical decision-making, hinder your ability to respond swiftly to customer needs, and ultimately impede business growth. The bottom line is that this process does not scale as your organization matures and your analytics needs become more complex and dependent on high quality, highly-refreshed data.
In contrast, an automated ETL tool like Estuary provides a scalable solution to effortlessly ingest your Freshdesk data into Snowflake. Estuary not only simplifies the data pipeline setup but also synchronizes data in real-time, guaranteeing that your team has access to the most up-to-date information at all times. This real-time capability facilitates proactive decision-making, enhances operational efficiency, and supports scalable growth without the overhead of managing manual data processes.
By choosing Estuary, your business can focus on leveraging actionable insights to refine customer service strategies, optimize resource allocation, and drive sustainable growth. This integration positions your organization to respond dynamically to market demands, improve customer experiences, and maintain a competitive edge in today’s data-driven landscape.
Sign up for an Estuary account to start automating your data workflows and experience seamless data integration between varied sources and destinations apart from Freshdesk to Snowflake.
FAQs
How does Estuary ensure data consistency and reliability when integrating Freshdesk with Snowflake?
Estuary employs robust mechanisms to guarantee data consistency and reliability throughout the integration process between Freshdesk and Snowflake:
- Change Data Capture (CDC): Estuary continuously monitors Freshdesk for any data changes, capturing inserts, updates, and deletions in real-time. This ensures that Snowflake is always synchronized with the latest data without discrepancies.
- Transactional Guarantees: Utilizing exactly-once delivery semantics, Estuary ensures that each data record is processed only once, eliminating the risk of duplicates or data loss during transmission.
- Schema Evolution Support: As Freshdesk evolves, Estuary supports schema evolution to account for schema changes, ensuring that Snowflake's data structure remains consistent and up-to-date without manual intervention.
What advantages does Estuary offer over traditional ETL methods for real-time analytics with Freshdesk and Snowflake?
- Real-Time Data Ingestion: Unlike traditional ETL processes that operate on batch schedules, Estuary facilitates continuous data streaming. This real-time ingestion ensures that Snowflake always contains the most current Freshdesk data, enabling up-to-the-minute analytics and decision-making.
- Scalability and Performance: Built on Clickhouse, Estuary scales effortlessly to handle large volumes of data and high-frequency updates without compromising performance. This scalability ensures that your analytics infrastructure can grow alongside your business needs.
- Automation and Ease of Use: Estuary automates the entire data pipeline setup, from data capture to transformation and loading. With its user-friendly interface and 200+ pre-built connectors, data engineers can quickly establish and manage data flows without extensive manual coding or configuration.
- Cost Efficiency: Estuary provides a highly competitive pricing model, offering cost savings of up to 5x compared to alternatives like Fivetran and Kafka Confluent. This cost-effectiveness allows businesses to implement robust real-time ETL solutions without significant financial overhead.
- Enhanced Data Quality and Integrity: Automated data validation and error handling mechanisms in Estuary ensure that only clean and accurate data is loaded into Snowflake. This reduces the likelihood of data quality issues that can arise from manual ETL processes.

About the author
With over 15 years in data engineering, a seasoned expert in driving growth for early-stage data companies, focusing on strategies that attract customers and users. Extensive writing provides insights to help companies scale efficiently and effectively in an evolving data landscape.


