With an exponential increase in data volumes generated by business operations, there is a growing demand for efficient data management platforms. SQL Server is a robust platform that caters to such needs with features like dynamic data masking, flexibility, and seamless data integration. However, integrating your data from SQL Server to Databricks can offer high performance, enhanced scalability, and advanced analytical capabilities. It also supports various data structures, including structured, semi-structured, and unstructured data, serving as an impressive destination for several databases.
This blog will explore two methods to connect SQL Server to Databricks, helping you choose the right approach for your business needs.
If you're looking to dive straight into the detailed methods for connecting SQL Server to Databricks, you can skip ahead here to go directly to the implementation steps.
Overview of SQL Server
SQL Server, developed by Microsoft, is a versatile relational database management system (RDBMS) designed for effective data storage and management.
The core component of SQL Server is its Database Engine. SQL Server allows the flexibility to keep up to 50 database engine instances on a single system. The primary function of this engine is to store, process, and securely manage your data. It also supports instant transaction processing to cater to the requirements of applications with massive data consumption.
Overview of Databricks
Databricks is an analytics platform that allows you to build and deploy data-driven solutions for different applications. Its distributed computing architecture, along with enhanced scalability, makes it efficient in handling large-scale data with ease.
Databricks provides you with its collaborative workspace, which facilitates enhanced team interaction. It allows different teams to collaborate on common projects in a shared space, promoting the interchange of knowledge, ideas, and skills. The team members can share important information as comments and code in multiple programming languages according to their preferences.
Let's discuss some of Databricks' abilities and features:
- Cluster Scaling: Databricks automatically scales the size of your compute cluster based on workload demands. This helps you optimize your resource utilization to suit your requirements.
- Multi-Cloud Support: Databricks supports multi-cloud environments, providing flexibility to operate across different cloud providers. This allows you to choose the cloud service that best suits your organizational needs.
Why Migrate Data from SQL Server to Databricks?
Here are some of the reasons to connect SQL Server with Databricks.
- Better Performance: Databricks has a distributed computing architecture with in-memory processing. This results in faster query performance than SQL Server, especially when handling large datasets.
- Machine Learning Integration: Databricks supports several machine learning libraries, such as TensorFlow and PyTorch. This enables you to build advanced analytics models to gain data-driven insights.
Methods to Connect SQL Server to Databricks
Here are two effective methods to establish a SQL Server to Databricks connection:
- Method 1: Using Estuary Flow to Load Your Data from SQL Server to Databricks
- Method 2: Using CSV Export/Import to Load Your Data from SQL Server to Databricks
Method 1: Using Estuary Flow for SQL Server to Databricks Integration
Estuary Flow is a low-code ETL platform that you can use to connect SQL Server to Databricks in real time. With an intuitive interface, readily available connectors, and many-to-many integration support, Estuary Flow is a suitable choice for your varied data integration needs.
Let’s discuss some advantages of using Estuary Flow:
- Built-in Connectors: Estuary Flow offers 200+ ready-to-use connectors to cater to your data integration requirements and create custom data pipelines to streamline your data-loading process.
- Change Data Capture: Estuary Flow supports Change Data Capture (CDC) to help capture all changes in the source data and process them in real time. This ensures that all updates or changes to the source data are instantly reflected in the destination.
- Scalability: Estuary Flow scales up and down instantly, according to your needs. This facilitates the handling of massive and constantly expanding datasets with ease.
Let's look into the step-by-step process of loading your data from SQL Server to Databricks with Estuary Flow.
Prerequisites
Before you begin, ensure you have:
- SQL Server with CDC enabled on the database and the tables you want to capture.
- A user role with:
- VIEW DATABASE STATE or VIEW DATABASE PERFORMANCE STATE permissions.
- SELECT access on the CDC schema and data schemas.
- Access to CDC change tables.
- Tables with primary keys defined. If a table does not have a primary key, you must manually define one in the Flow collection when creating the capture.
- (Optional) db_owner role if you want the connector to automatically manage CDC capture instances and cleanup.
- A Databricks account with Unity Catalog, a SQL Warehouse, schema, and authentication credentials (PAT or service principal).
- An Estuary Flow account.
Step 1: Configuring SQL Server as the Source
- Log in to your active Estuary account to start configuring SQL Server as the source.
- Select the Sources option on the dashboard.
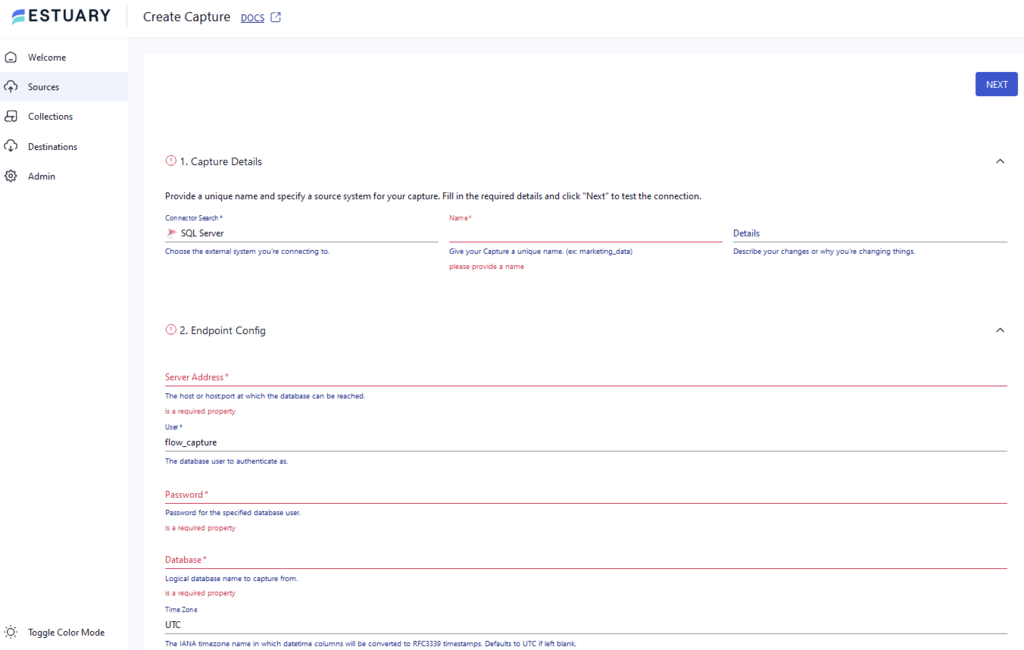
- On the Sources page, click on + NEW CAPTURE.
- Use the Search connectors box to find the SQL Server connector. When you see it in search results, click its Capture button.
- On the connector configuration page, provide the following:
- Name
- Server Address (host:1433)
- Database name
- User and Password
- Click NEXT > SAVE AND PUBLISH.
How it works:
The SQL Server connector uses CDC to continuously stream data changes from SQL Server change tables into Flow collections. On first run, it backfills historical data, then transitions to real-time capture. If schema changes occur (for example, new columns are added), the connector can detect and switch to a new CDC instance automatically if Automatic Capture Instance Management is enabled.
Step 2: Configuring Databricks as the Destination
- Upon completing a successful capture, you will see a pop-up window with the capture details. To proceed further with setting up the destination end of the pipeline, click MATERIALIZE COLLECTIONS in the pop-up window.
- You can also navigate to the Estuary dashboard and click Destinations > + NEW MATERIALIZATION.
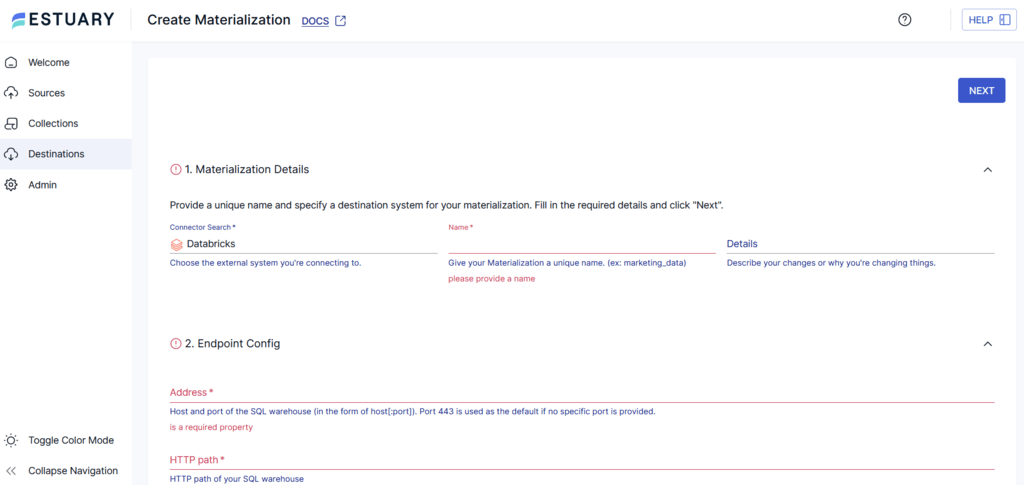
- Use the Search connectors box to search for the Databricks connector. When the desired connector appears in the search results, click its Materialization button.
- You will be redirected to the Databricks connector page. Fill in all the mandatory details such as Name, Address, HTTP path, Catalog Name, and Personal Access Token.
- You can also choose a capture to link to your materialization manually in the Source Collections section.
- Click NEXT > SAVE AND PUBLISH to materialize the data from Flow collections into tables in your Databricks warehouse.
Watch our quick video demo to streamline your Databricks data loading with Estuary Flow:
Ready to simplify your data pipelines and unlock the full potential of your SQL Server and Databricks data? Sign up for a free Estuary Flow trial and experience the ease of low-code ETL.
Method 2: Using CSV Export/Import to Connect SQL Server to Databricks
This method involves the manual transfer of data from SQL Server to Databricks. It is done by exporting your data from SQL Server in CSV files and then importing these CSV files into Databricks.
Here are the 2 easy steps involved for an Azure Databricks connect to on-premise SQL Server:
Step 1: Export SQL Server Data as CSV Files
- Open SQL Server Management Studio to connect with your database with the appropriate credentials.
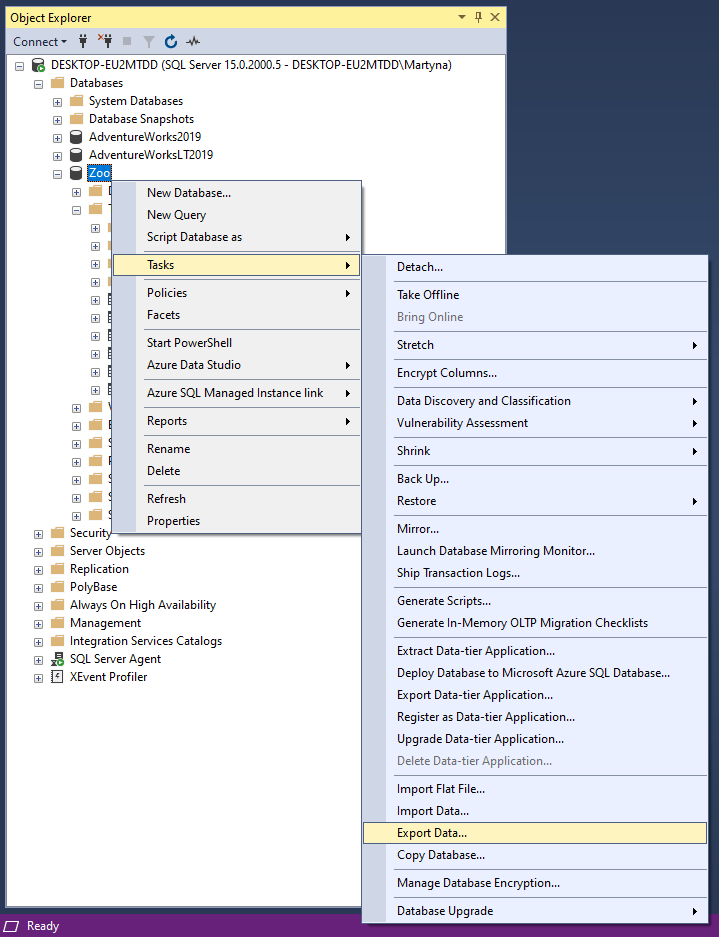
- Navigate to the Object Explorer and select the database to be exported. Right-click on the database and select Tasks > Export Data to start exporting your CSV files.
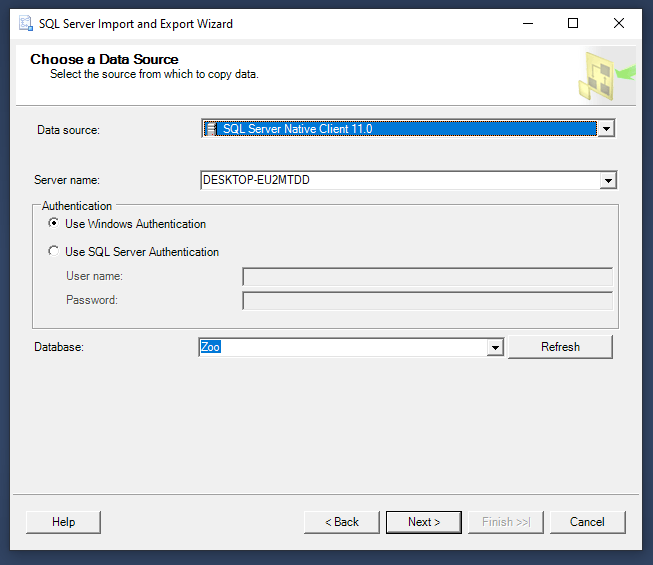
- Click on the Data source drop-down in the SQL Server Import and Export Wizard to select the data sources. Also, select the authentication method for accessing the data.
- From the Database drop-down menu, select the database from which you want to export data. Then, click Next to proceed.
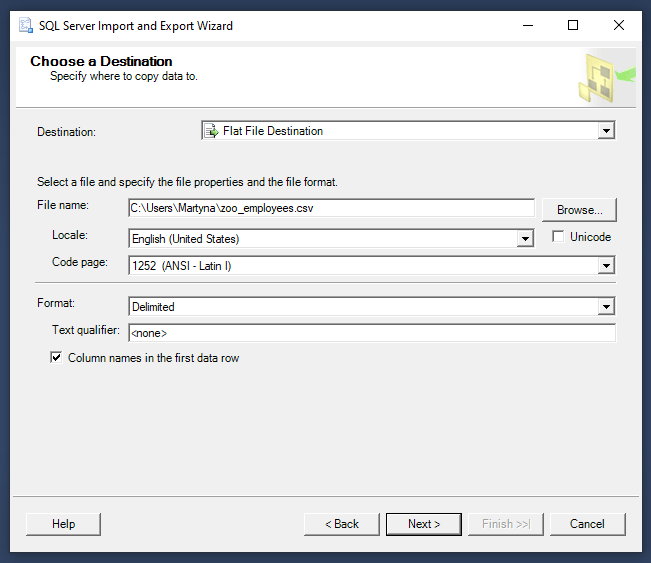
- In the Choose a Destination window, select the Flat File Destination option for the type of destination Specify the name and path of the CSV file where the data has to be exported. Click Next to continue.
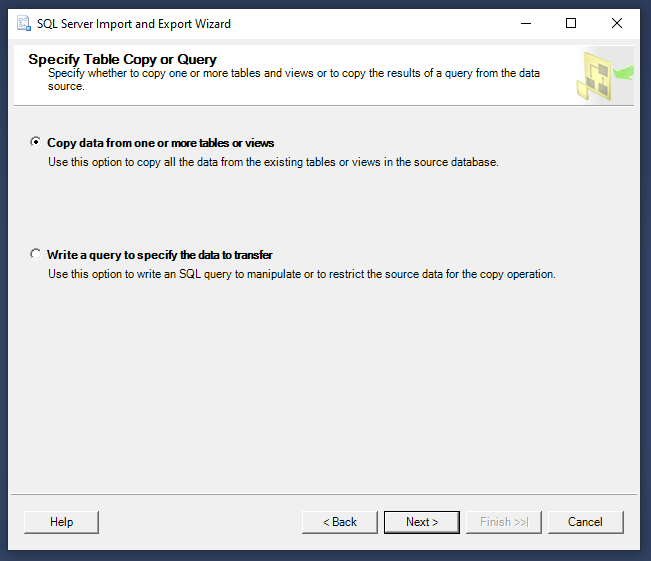
- Choose your export type from the Specify Table Copy or Query as one of the following:
- Copy data from one or more tables or views
- Write a query to specify the data to transfer
- Select the table to be exported from the Source table or view option and click Next.
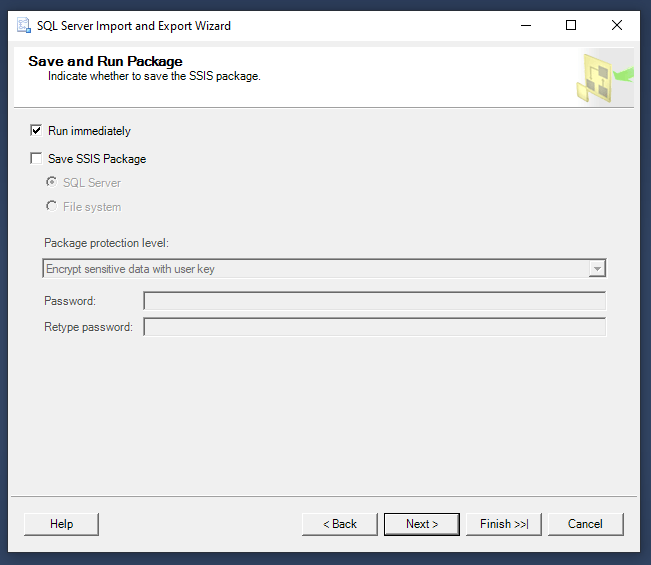
- Review the default settings on the Save and Run Package screen and click Next.
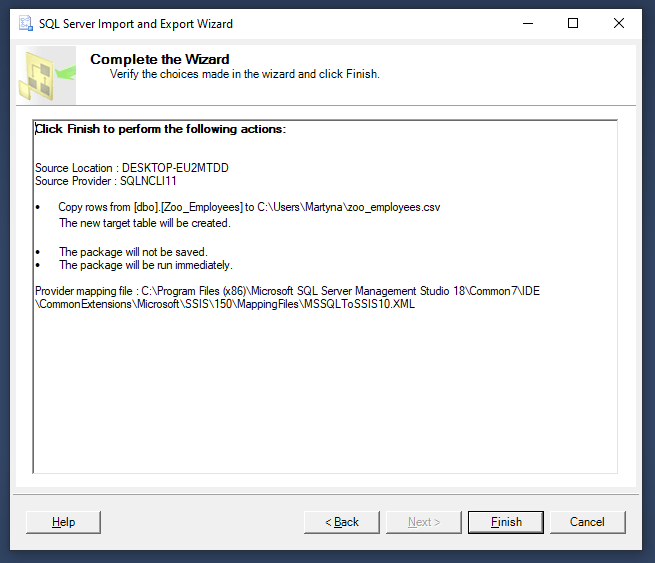
- Confirm all the settings in the Complete the Wizard window and click Finish to export your data as a CSV file.
Step 2: Import CSV to Databricks
- From the sidebar of your Databricks workspace, click on the Data tab. You will be redirected to the Data View window, where you can upload your CSV files.
- Click on Upload File button to choose the CSV file that you want to upload. Databricks will begin the upload process.
- By default, Databricks assigns a table name to the CSV file according to the file format. However, it allows you to add a custom table name or modify other settings if required.
- After the CSV file is successfully uploaded, you can view the table representing it from the Data tab in the Databricks workspace.
Limitations of using the CSV Export/Import Method
- Lacks Real-Time Integration: The CSV export/import method cannot integrate your data in real-time. Any subsequent source data changes won’t be updated in the destination until the next data transfer, causing data redundancy.
- Time-consuming: Integrating your data using CSV export/import takes considerable time and effort since this process is completely manual.
Conclusion
Connecting SQL Server with Databricks unlocks real-time analytics, advanced machine learning, and scalable data processing on top of your structured SQL Server data.
In this guide, you explored two methods: the manual CSV export/import, which is fine for small, occasional transfers but lacks real-time capabilities and requires ongoing effort, and Estuary Flow, which automates the process with Change Data Capture (CDC). Flow captures inserts, updates, and deletes in real time, manages large backfills efficiently, and even handles schema changes by switching to new CDC instances automatically when enabled.
For businesses that need continuous, reliable, and scalable pipelines, Estuary Flow is the superior option. With 200+ built-in connectors, support for SQL Server across self-hosted, Azure SQL, RDS, and Google Cloud SQL, and automatic pipeline management, it reduces maintenance while keeping your Databricks environment always up to date.
👉 Automate your SQL Server to Databricks integration with Estuary Flow and build real-time pipelines without the complexity of manual CDC setup.
Related Guides on Integrate Other Sources Data with Databricks:
FAQs
What is the easiest way to move data from SQL Server to Databricks?
Does Databricks support unstructured or semi-structured data from SQL Server?
How often should I update data from SQL Server to Databricks?

About the author
With over 15 years in data engineering, a seasoned expert in driving growth for early-stage data companies, focusing on strategies that attract customers and users. Extensive writing provides insights to help companies scale efficiently and effectively in an evolving data landscape.


