Introduction: Why Move Zendesk Data to Snowflake
The fastest way to turn customer support data into insights is to move it from Zendesk to Snowflake at the right time. With Estuary, teams can automatically sync ticket, chat, and satisfaction data into Snowflake without manual exports or complex ETL tools.
Zendesk holds your customer interactions, while Snowflake powers your analytics and AI models. Connecting the two gives every team a single, dependable source of truth.
Estuary makes this integration effortless and consistent. As a Right-Time Data Platform, it unifies streaming, batch, and CDC pipelines, keeping Zendesk data synchronized with Snowflake using exactly-once delivery and schema enforcement.
In this guide, you will learn how to connect Zendesk Support and Zendesk Chat to Snowflake using Estuary and start turning customer experience data into dependable insights.
Before You Begin: What You Need to Get Started
Before you start connecting Zendesk and Snowflake, make sure you have everything ready to set up a dependable and secure pipeline. Estuary makes the process simple, but having the right details on hand will save time during setup.
Requirements for Zendesk
You can capture data from Zendesk Support or Zendesk Chat. Each uses a slightly different setup, so check which one applies to your workflow.
For Zendesk Support
- Your Zendesk subdomain, found in the URL such as https://yourcompany.zendesk.com
- Either
- An API token and the email associated with your Zendesk account
- Or enter your Zendesk credentials using an OAuth workflow
- Permission to access the resources you plan to capture, such as tickets, users, and satisfaction ratings
For Zendesk Chat
- Start date to define when Estuary should begin capturing data
- Either
- Access token with read-only permissions for the accounts you want to sync
- Or enter your Zendesk credentials using an OAuth workflow
- Permission to access the resources you plan to capture, such as chats, agents, and roles
Requirements for Snowflake
To connect Estuary to Snowflake, you will need:
- Your Snowflake account URL in the format accountname.snowflakecomputing.com
- Database name, schema, and warehouse where the data will land
- The timestamp type to use with your Snowflake data
- A user with permission to create tables and insert data
- Authentication credentials for the user, such as a JWT token
Estuary Account Setup
If you do not already have one, create a free Estuary account. After signing in, you can access the Estuary web application where you will configure your sources and destinations. In the Estuary UI, all steps happen visually without code, and your credentials are stored securely.
What to Expect
Once connected, Estuary will continuously capture Zendesk data and stream it into Snowflake collections. You can select which Zendesk entities to sync, preview your data, and watch records flow into Snowflake.
Step-by-Step: Connect Zendesk to Snowflake Using Estuary
This section walks you through every step to move Zendesk data into Snowflake using Estuary. You will start by creating a capture from Zendesk, then configure a materialization to Snowflake, and finally verify that your data is flowing correctly.
All steps take place inside the Estuary web app, so you can complete the entire setup without writing any code.
Step 1: Open Sources and Create a New Capture
The first step is to create a capture in Estuary. A capture is the connection that continuously collects data from Zendesk and prepares it for delivery into Snowflake.
- Sign in to your Estuary account.
- In the left navigation menu, click Sources.
- Select + New Capture.
- In the connector library, search for Zendesk. You will see two connectors:
- Zendesk Support Real-Time (recommended)
- Zendesk Chat (optional if you also use chat data)
- Click Zendesk Support Real-Time to start configuration.
Once selected, Estuary will open a configuration screen where you can authenticate your Zendesk account and define how data should be captured.
In the next step, you will configure this connector to authenticate your account and select which Zendesk resources to sync, such as tickets, users, or satisfaction ratings.
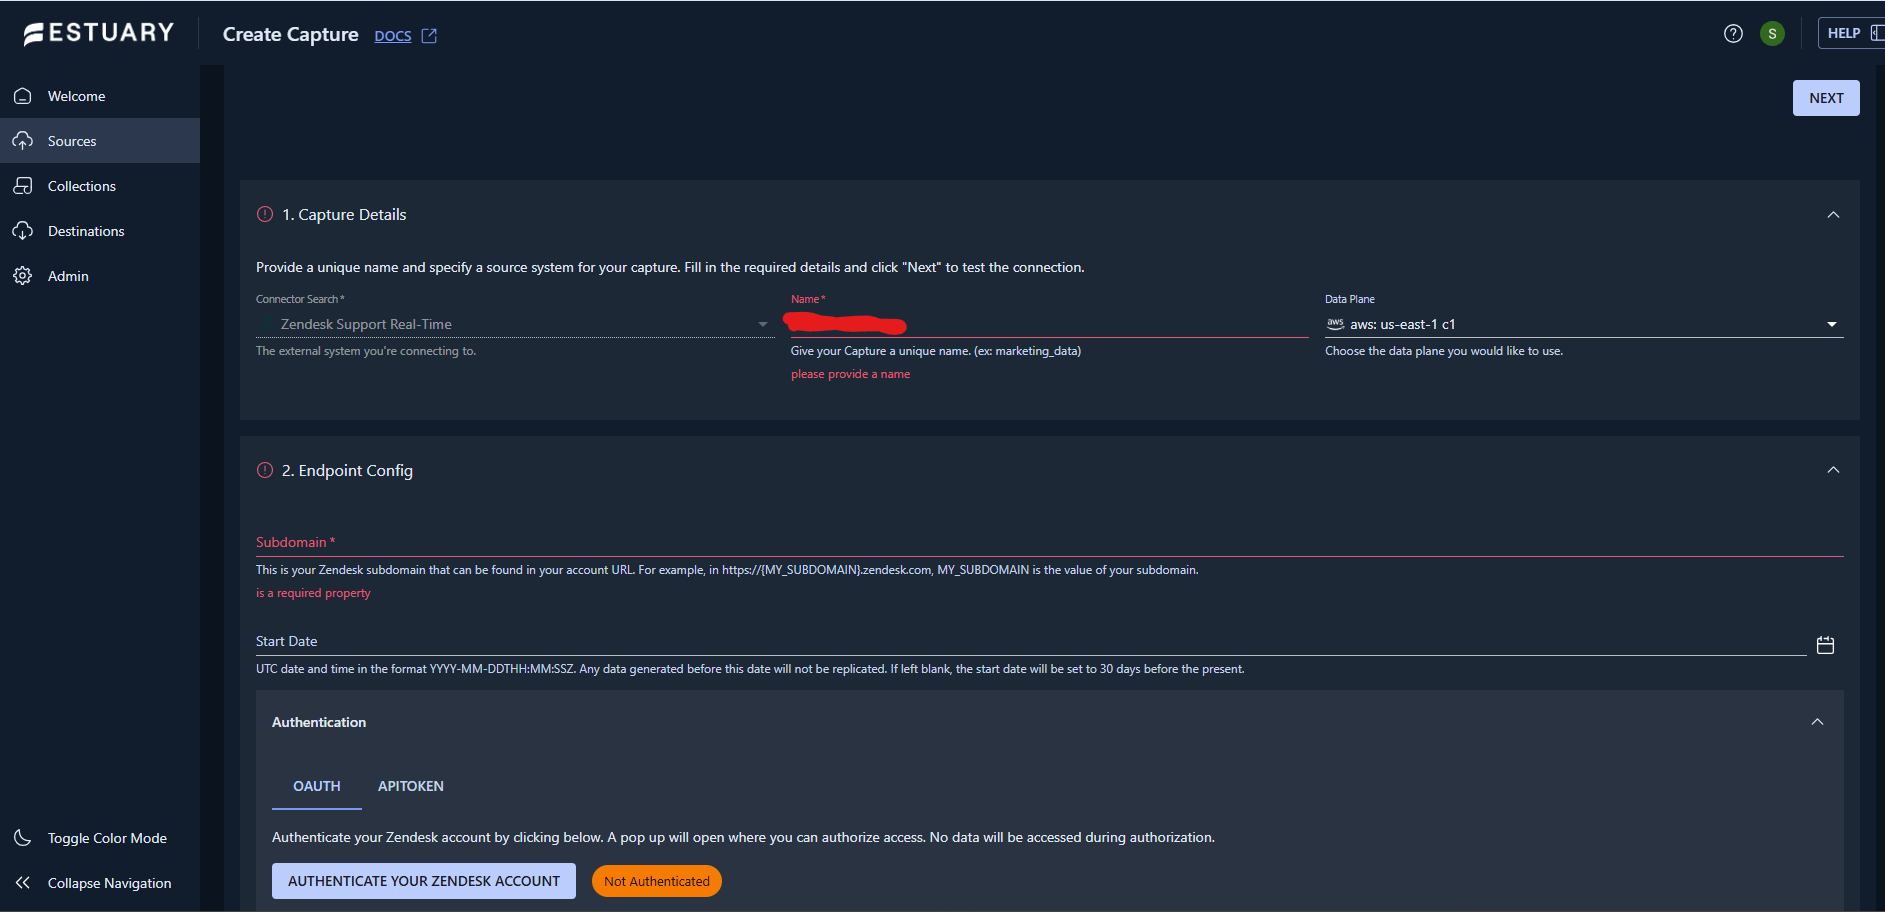
Step 2: Configure Zendesk Support Real-Time Capture
This step connects your Zendesk account to Estuary and defines which data resources will be captured. Once configured, Estuary begins streaming Zendesk data into data collections automatically.
1. Select the Connector
After you choose Zendesk Support Real-Time in the previous step, the configuration panel appears in the Estuary interface. This is where you provide connection details for your Zendesk account.
2. Enter Basic Details
Fill in the required fields:
- Subdomain: Your Zendesk subdomain, found in your account URL, such as yourcompany.zendesk.com.
- Start Date: Optionally enter the date and time from which you want to start replicating data. Example: 2025-01-01T00:00:00Z. This ensures only recent or relevant records are captured.
3. Authenticate Your Zendesk Account
Estuary offers two ways to authenticate your Zendesk Support connection:
Option 1. OAuth2 Authentication
- Click Authenticate Your Zendesk Account.
- A Zendesk login window will open.
- Enter your credentials and approve Estuary’s access.
Option 2. API Token Authentication
- Choose API Token as your method.
- Enter your Zendesk email address.
- Paste the API token generated in your Zendesk Admin settings.
Both methods are secure and use encrypted storage for credentials.
4. Adjust Advanced Settings (Optional)
Expand the Advanced section to fine-tune export settings if needed:
- Incremental Export Page Size: Default is 1000. You can change this value for large Zendesk accounts to optimize API performance.
5. Select Zendesk Resources to Capture
Once authenticated, Estuary automatically discovers all available Zendesk data resources.
Common resources include:
- Tickets
- Ticket Comments
- Users
- Organizations
- Satisfaction Ratings
- SLA Policies
- Ticket Metrics
Each resource will be represented as a separate Estuary collection. You can choose to capture all or only a subset, depending on your reporting needs.
6. Save and Continue
After you finish configuration:
- Review your details.
- Click Save and Publish.
- Estuary validates the connection and prepares to start capturing your data.
Once the validation succeeds, you will see your Zendesk Support capture listed in the Sources tab, ready to stream into data collections.
In the next step, you will configure the optional Zendesk Chat connector to bring in conversation data alongside ticket activity.
Step 3: Configure Zendesk Chat Capture (Optional)
If your support team uses Zendesk Chat in addition to Zendesk Support, you can capture chat sessions, agent data, and related metrics in the same pipeline. This allows you to combine both chat and ticket data inside Snowflake for a unified view of customer interactions.
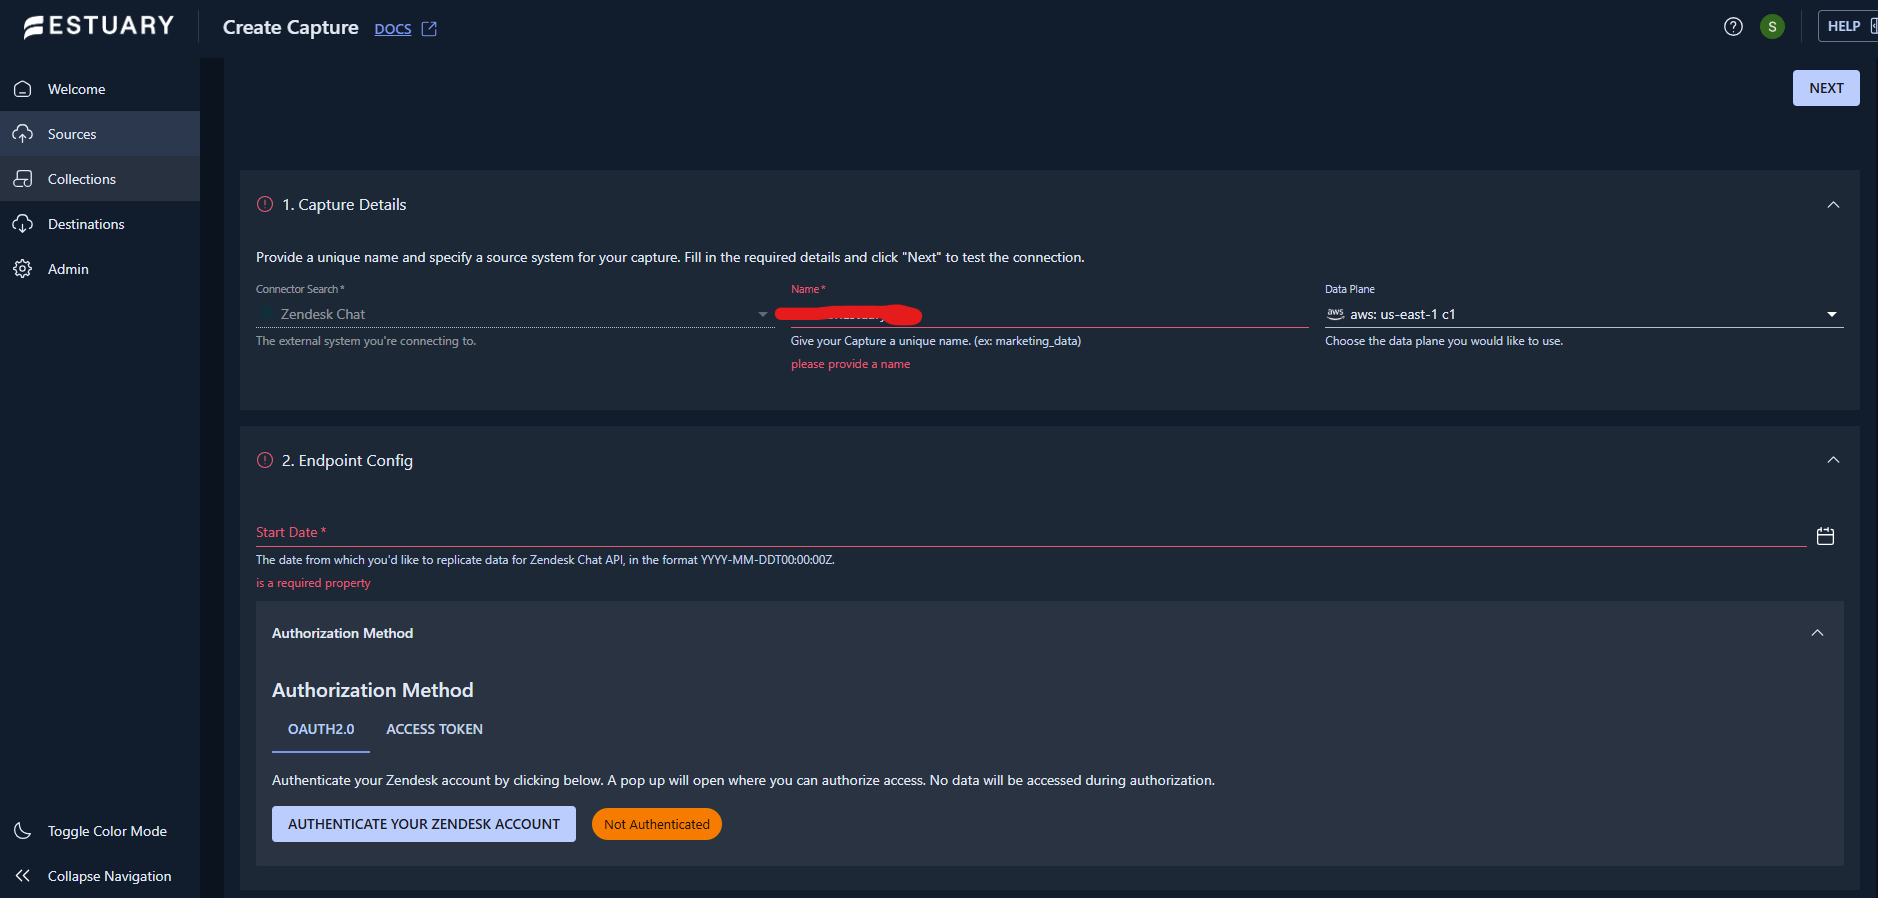
1. Add a New Capture
- In the Estuary interface, navigate again to Sources.
- Click + New Capture.
- In the connector library, search for Zendesk Chat.
- Select the Zendesk Chat connector. This connector is based on a reliable third-party integration optimized for Estuary’s real-time performance.
2. Enter Basic Connection Details
- Start Date: Define the date and time from which you want to begin capturing chat data. Use the format YYYY-MM-DDT00:00:00Z.
3. Authenticate Your Zendesk Chat Account
Estuary supports OAuth2 authentication or a read-only access token.
- For OAuth2, click Authenticate Your Zendesk Account, sign in, and approve access.
- For token-based authentication, paste your access token directly into the credential field.
Your credentials are stored securely in Estuary’s managed environment.
4. Choose Chat Streams to Capture
Once authenticated, Estuary displays all available Zendesk Chat resources. You can select the streams most relevant to your analytics. Common examples include:
- Accounts
- Agents
- Chats
- Departments
- Triggers
- Roles
- Routing Settings
Each stream will create a separate collection in Estuary. Capturing multiple streams allows you to combine chat performance metrics with ticket analytics later inside Snowflake.
5. Save and Validate
Click Save and Publish. Estuary tests the connection and validates your credentials. Once confirmed, you will see the Zendesk Chat capture appear in your Sources list, ready to begin streaming data.
By enabling both Zendesk Support and Zendesk Chat, you will have every customer interaction represented in one pipeline, making your Snowflake environment a complete source of customer truth.
In the next step, you will verify that both captures are running and successfully streaming data before connecting Snowflake as the destination.
Step 4: Verify Captures
After creating your Zendesk Support and optional Zendesk Chat captures, the next step is to verify that they are working correctly. Verification ensures that Estuary has successfully connected to Zendesk and that data is loading into your collections.
1. Review Your Captures in the Sources Page
In the Estuary web app, open the Sources page. You will see your newly created captures listed by name. Each capture will display its connector type, such as Zendesk Support Real-Time or Zendesk Chat, along with its current status.
- A green circle means the capture is connected and actively loading data.
- A yellow or red circle indicates that credentials may need review or that Estuary is still validating the connection.
Select a capture and view the Logs tab to view details or troubleshooting information directly in the interface.
2. Validate Your Collections
Each Zendesk resource that you chose during configuration is automatically stored as a separate Estuary collection. These collections act as the structured data sets that will later be written to Snowflake.
To confirm everything is set up correctly:
- Navigate to the Collections page in the Estuary web app.
- Look for collections such as zendesk_tickets, zendesk_users, or zendesk_chats.
- Confirm that records are appearing and updating as new events happen in Zendesk.
Here you can preview sample records from Zendesk to confirm that data is flowing correctly. If you see data appearing here, your connection is fully active.
3. Fix Any Connection Issues
If a capture shows an error or missing data, check your Zendesk credentials and permissions. Common fixes include reauthenticating or adjusting API scopes. Estuary provides detailed connection logs to help you identify and resolve issues quickly.
Once verification is complete, Zendesk data is streaming reliably into your Estuary collections. You are now ready to connect Snowflake as your destination and make this data instantly available for analytics and reporting.
Step 5: Create Snowflake Materialization
Now that Zendesk data is moving into Estuary collections, the next step is to connect Snowflake as the destination. This process is called materialization. Materializations define where Estuary delivers the data and how often updates occur.
Connecting Snowflake takes only a few minutes and requires no manual scripting. Once complete, Estuary automatically keeps Zendesk Support and Chat data up to date in your Snowflake warehouse.
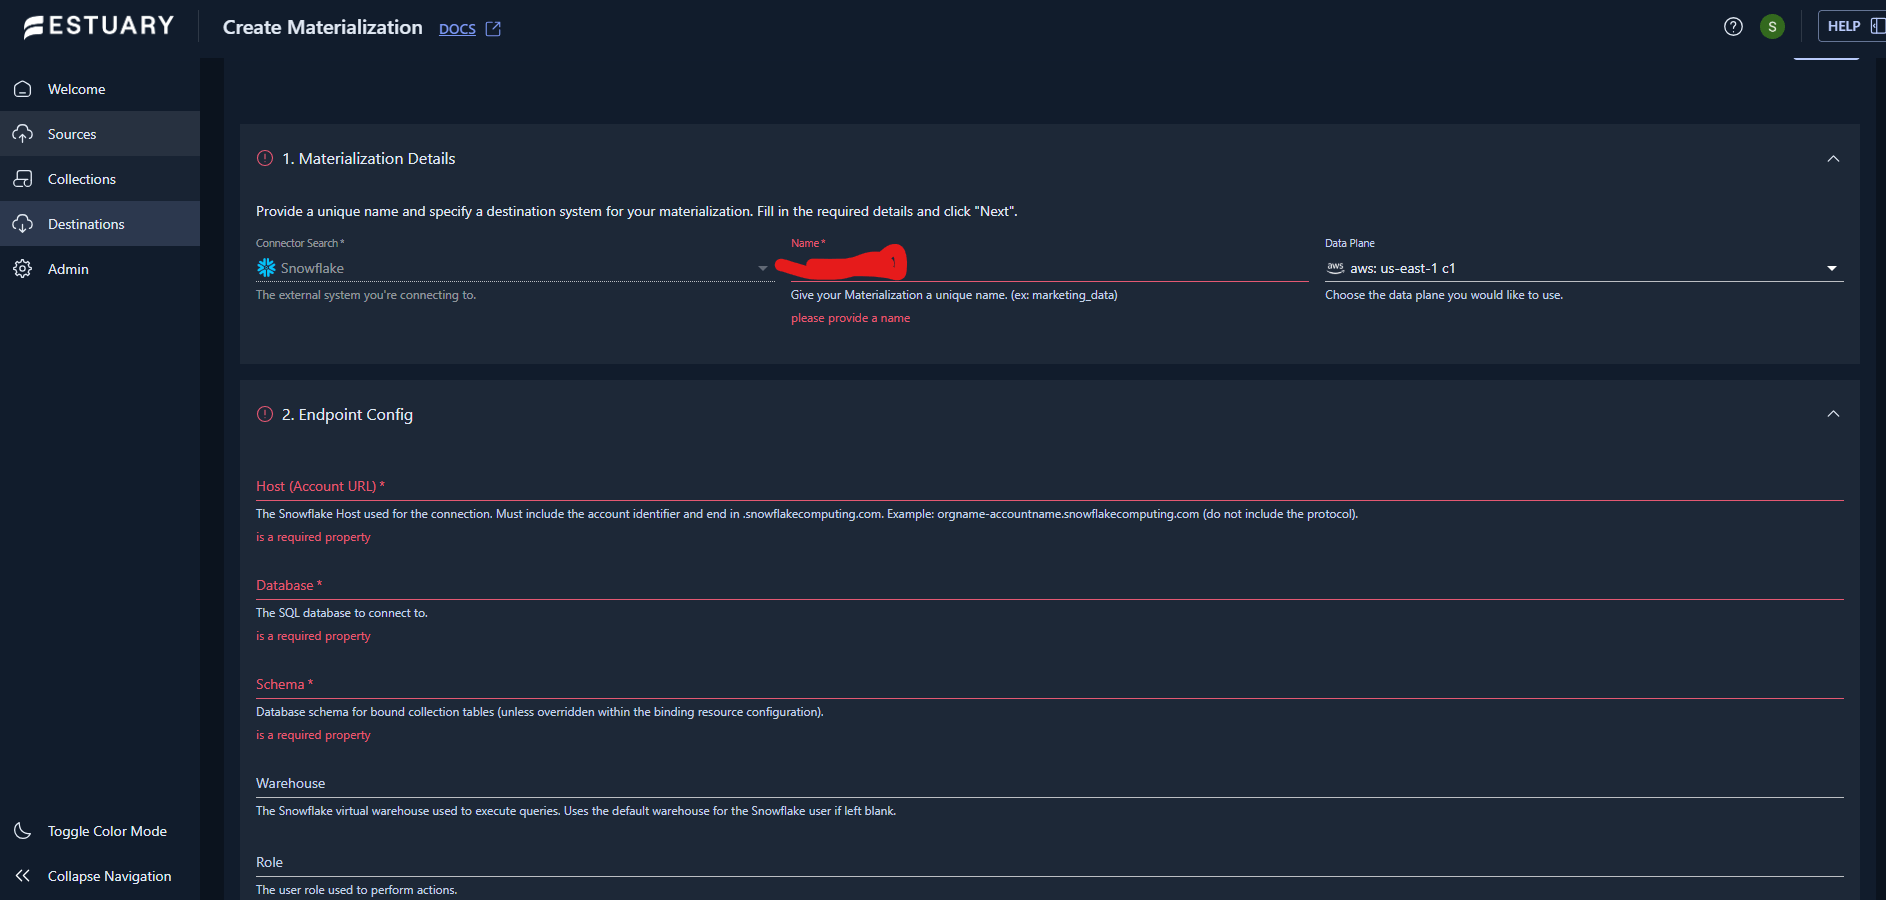
1. Open the Destinations Page
- In the Estuary web app, click Destinations in the left navigation menu. Select + New Materialization to create a new connection.
2. Choose Snowflake as the Destination
- In the connector library, search for Snowflake. You will see a list of available connector options. Choose Snowflake which provides right-time streaming and exactly-once delivery.
3. Enter Snowflake Connection Details
Provide the required connection information for your Snowflake account.
Required fields
- Host: Your Snowflake account URL, such as youraccount.snowflakecomputing.com
- Database: The database where your Zendesk data will be written
- Schema: The schema name, for example zendesk_data
- Snowflake Timestamp Type: Choose which data type to use to store timestamp columns
Authentication Options
Estuary supports a couple authentication methods used in Snowflake:
As the “Username and password” method is soon to be deprecated in Snowflake, the Private Key (JWT) method is preferred unless you’re simply setting up a quick connection check.
Credentials are stored securely inside Estuary and never shared externally.
4. Configure Additional Options
You can customize how Estuary writes Zendesk data into Snowflake.
Optional settings include:
- Warehouse: Define a warehouse to use apart from the default
- Role: Specify the user role to use to perform actions
- Hard Delete: Controls whether records deleted in Zendesk should also be deleted in Snowflake
These settings help you maintain schema consistency and compliance with your organization’s Snowflake standards.
In the next step, you will link specific Zendesk collections to your Snowflake destination and publish your pipeline.
Step 6: Configure Snowflake Endpoint and Link Source Collections
After setting up your Snowflake connection details, you need to tell Estuary which data from Zendesk should be written to Snowflake. This is done by linking the source collections you created earlier to the Snowflake materialization.
1. Find the Source Collections Section
In the Snowflake configuration view, scroll down to the Source Collections section. Find the currently empty Collections table and click the Add button.
2. Select Zendesk Collections
Estuary lists all available collections created by your captures. If you have multiple captures, you can filter the listed collections. These collections represent the individual data streams from Zendesk Support or Zendesk Chat.
Typical examples include:
- zendesk_tickets
- zendesk_ticket_comments
- zendesk_users
- zendesk_satisfaction_ratings
- zendesk_chats
Select the collections you want to replicate to Snowflake. You can choose one, several, or all available collections depending on your analytics needs.
3. Review Table Names and Schema
For each selected collection, Estuary automatically suggests a matching table name in Snowflake. You can edit these names or use your own naming convention to align with existing warehouse structures.
Estuary preserves your data schema, including field types and nested structures, so the Snowflake tables will match your Zendesk data model.
4. Adjust Sync Settings
You can optionally customize how often data is materialized. Estuary supports right-time data, allowing for both streaming and scheduled syncs.
- Delta updates mode delivers new Zendesk data into Snowflake within seconds using Snowpipe Streaming.
- Batch mode lets you set a schedule for periodic updates if you prefer to control warehouse costs. Customize this under Sync Schedule in the connector’s Endpoint Config section.
This flexibility helps you balance performance with cost predictability based on your workload.
5. Publish the Materialization
Once you confirm your selected collections and settings, click Publish.
Estuary deploys the materialization and begins writing Zendesk data into Snowflake immediately.
You can return to the Destinations page anytime to view the pipeline status, modify settings, or add more collections later.
At this stage, your Zendesk Support and Chat data is being loaded into Snowflake in a structured, query-ready format. In the next step, you will verify the pipeline and monitor your live data flow.
Step 7: Monitor and Validate Data Flow
After you publish the materialization, your pipeline begins moving Zendesk data into Snowflake automatically. Monitoring this process helps you confirm that the sync is stable, data volumes are correct, and Snowflake is receiving updates at the right time.
1. Check Materialization Status
In the Estuary web app, open the Destinations page. Locate your Snowflake materialization and confirm that its status shows Running.
A running state means the pipeline is active and Estuary is continuously delivering new Zendesk data to Snowflake.
If you see a pending or error status, click the materialization name to open its details. Estuary provides detailed logs and validation messages to help you identify and resolve any configuration issues.
2. View Live Metrics
Select your Snowflake materialization to view connector usage within a certain timeframe. You can also navigate to collections that the materialization reads from to preview ingested data.
These insights confirm that the pipeline is performing as expected. Estuary’s materialization monitoring interface updates based on the set materialization update delay, giving you complete visibility into data delivery performance.
3. Validate in Snowflake
Open your Snowflake account and run a quick query to verify that Zendesk data is being written correctly. For example:
plaintextSELECT COUNT(*) FROM zendesk_tickets;If records are appearing and updating over time, the pipeline is fully active.
You can also query joined tables to confirm relationships between different Zendesk entities, such as tickets, users, and satisfaction ratings.
4. Ongoing Observability
For long-term visibility, Estuary integrates with popular observability tools through its OpenMetrics API. You can export metrics to systems such as Prometheus, Datadog, or your preferred dashboard to track pipeline performance over time.
Estuary automatically manages recovery, checkpointing, and schema consistency, ensuring that your pipeline stays reliable even as your Zendesk data grows.
Once you have validated that data is flowing correctly, your right-time Zendesk to Snowflake integration is complete. In the next section, you will see an example query that helps you start analyzing customer support performance immediately.
Need help building your Zendesk to Snowflake pipeline?
Our data integration experts can help you design a secure, right-time setup that fits your environment. Contact Estuary
Example Query in Snowflake
Once your Zendesk data is loaded into Snowflake, you can immediately start running SQL queries to validate the integration and analyze customer interactions in real time.
1. Verify Data Arrival
To confirm that data is being written correctly, start with a simple count query:
plaintextSELECT COUNT(*) FROM zendesk_tickets;If you see an increasing number of records, your Estuary pipeline is fully active. This count will grow automatically as new tickets are created in Zendesk.
You can also check when the most recent record was added:
plaintextSELECT MAX(created_at) AS latest_ticket_time FROM zendesk_tickets;If the timestamp is only a few seconds or minutes old, your Snowflake table is receiving live updates.
2. Join Zendesk Entities for Insight
Once your data is verified, you can join Zendesk tables to build a richer picture of support performance.
For example, to combine ticket details with user information and satisfaction scores:
plaintextSELECT
  t.id AS ticket_id,
  u.name AS requester_name,
  s.score AS satisfaction_score,
  t.status,
  t.priority,
  t.created_at
FROM zendesk_tickets AS t
LEFT JOIN zendesk_users AS u
  ON t.requester_id = u.id
LEFT JOIN zendesk_satisfaction_ratings AS s
  ON t.id = s.ticket_id
ORDER BY t.created_at DESC;
This query produces a live view of your customer support performance. You can export it directly to your BI tools, build dashboards, or feed it into AI models for predictive analytics.
3. Example: Real-Time SLA Monitoring
Snowflake’s analytical power allows you to build dashboards that measure SLA compliance in near real time.
plaintextSELECT
  COUNT(*) AS open_tickets,
  AVG(response_time_in_minutes) AS avg_response_time,
  AVG(resolution_time_in_minutes) AS avg_resolution_time
FROM zendesk_ticket_metrics
WHERE status = 'open';
Because Estuary continuously streams updates from Zendesk, these metrics will always reflect the most recent state of your support operations.
With just a few queries, your Snowflake environment becomes a single source of truth for all customer support interactions, ready for dashboards, analytics, or LLM-powered insights.
Key Use Cases for Zendesk Data in Snowflake
Once your Zendesk data is unified inside Snowflake, it becomes much more than historical support records. It becomes a real-time foundation for understanding customer satisfaction, predicting churn, and improving service efficiency across the business.
1. Build a Complete Customer 360
When Zendesk data is combined with CRM, billing, and product usage data in Snowflake, you can create a full view of every customer interaction. Support teams gain instant context about each customer, while marketing and product teams can segment users based on engagement, satisfaction, or response trends.
2. Track SLA Compliance in Real Time
By continuously syncing ticket and metric data, Snowflake dashboards can show open tickets, resolution times, and SLA violations as they happen. This lets support leaders address bottlenecks before they impact customers and ensures accountability across teams.
3. Measure Agent Productivity
Analyzing ticket volume, assignment rates, and comment activity gives a real-time picture of team workload and agent performance. This helps managers allocate resources effectively and identify high-performing agents or training needs.
4. Monitor Customer Sentiment
With satisfaction ratings and chat transcripts flowing into Snowflake, you can track sentiment scores and feedback trends continuously. Combined with AI-based sentiment analysis, this data helps teams act on customer dissatisfaction quickly.
5. Predict and Prevent Churn
When Zendesk data is integrated with transactional or usage data, predictive models can identify customers most at risk of leaving. This enables proactive retention campaigns and better service recovery strategies.
6. Train and Improve AI Service Models
Zendesk tickets and chat logs stored in Snowflake can feed large language models and AI assistants. These models learn from real interactions, improving accuracy and contextual understanding for automated support and self-service applications.
Right-time Zendesk data inside Snowflake gives every department actionable visibility into the customer experience, enabling faster, data-driven decisions and measurable improvements in satisfaction and retention.
Conclusion: Build Dependable Customer Analytics on Snowflake
Customer experience data is only valuable when it arrives at the right time. When every ticket, chat, and satisfaction score from Zendesk lands in Snowflake within minutes, your analytics stop reflecting the past and start guiding real decisions in the present.
With Estuary, teams can unify Zendesk Support and Chat data inside Snowflake through a single, dependable platform. You can choose how and when data moves, whether as soon as possible for live dashboards or at scheduled intervals to manage costs. Every pipeline is built with exactly-once delivery, schema enforcement, and predictable performance, ensuring your data remains accurate and ready for action.
Right-time Zendesk data empowers your support, product, and analytics teams to see customers clearly, respond faster, and improve satisfaction without guesswork. Estuary makes that visibility possible — reliably, securely, and at any scale.
Ready to try it yourself?
Sign up for Estuary and start syncing Zendesk data to Snowflake in minutes.

About the author
Emily is a software engineer and technical content creator with an interest in developer education. She has experience across Developer Relations roles from her FinTech background and is always learning something new.


