Webhook data is one of the fastest ways to transmit real-time event information from APIs. From payment confirmations and order updates to alerts and user interactions, webhooks allow external services to push data instantly to your infrastructure. But capturing this high-velocity, unstructured stream and making it analytics-ready in a system like Databricks is often easier said than done.
With Estuary Flow, you can build a real-time, no-code pipeline that captures webhook events via an HTTP Webhook connector and syncs them directly into your Databricks lakehouse. The process is fast, flexible, and designed for scale — no manual ingestion scripts or brittle ETL jobs required.
In this guide, you’ll learn how to set up a webhook source in Estuary Flow, connect it to a third-party platform like Square, and configure a materialization to sync the incoming data into Databricks in real time, turning raw webhooks into structured, queryable insights with just a few clicks.
Why Send Webhook Data to Databricks?
Webhook data is inherently real-time, triggered the moment something happens, like a payment being processed, an order being placed, or a user logging in. These events hold immediate value, especially when they can be analyzed or acted upon without delay. Databricks, with its powerful lakehouse architecture, is well-suited for processing this type of high-volume, semi-structured data. It enables teams to run analytics, power dashboards, and train machine learning models using fresh data as it arrives.
By sending webhook data directly to Databricks, organizations can eliminate the lag between event generation and analysis. Instead of waiting for batch ETL jobs or dealing with manual ingestion processes, teams get a continuous stream of up-to-date information. This is especially useful for use cases like real-time order tracking, fraud detection, campaign performance monitoring, and operational analytics. Combined with Estuary Flow’s streaming infrastructure, webhook-to-Databricks pipelines offer a fast, scalable, and reliable way to bring real-time event data into the hands of analysts and data engineers, without writing custom integration code.
Setting Up a Webhook Source in Estuary Flow
To capture real-time webhook data and prepare it for Databricks, your first task is to create a webhook capture in Estuary Flow. Here's how:
Step 1: Navigate to the Sources Tab
Log in to your Estuary Flow workspace and go to the Sources section. Click the “New Capture” button to start configuring a new data source.
Step 2: Select the HTTP Webhook Connector
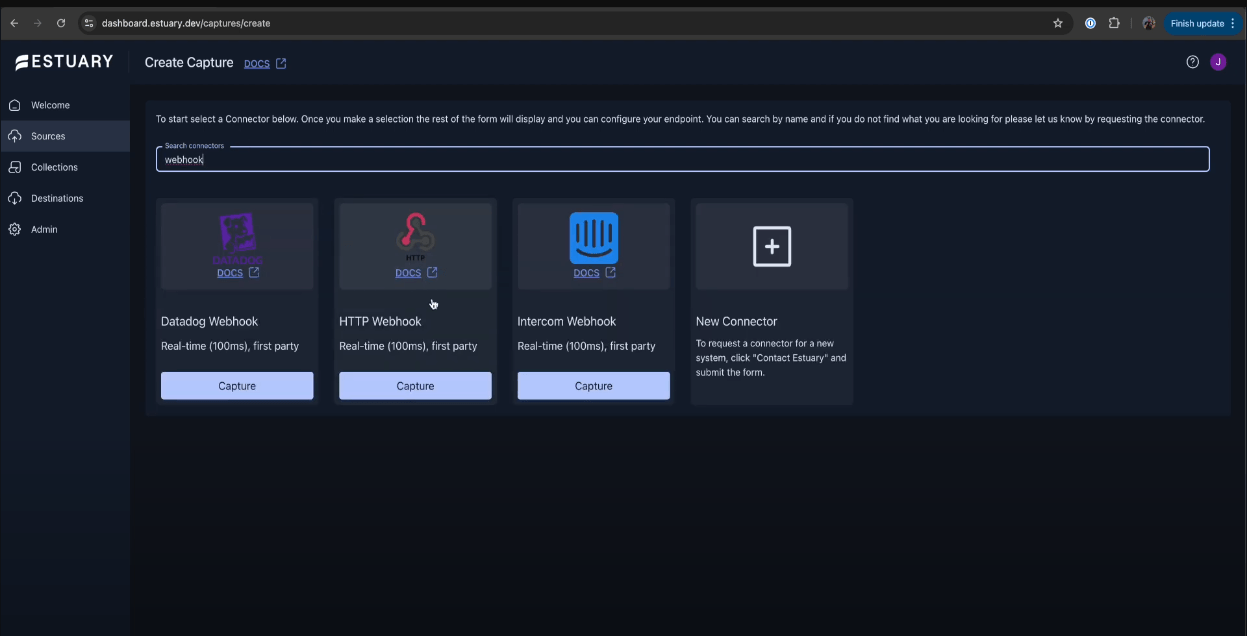
In the connector catalog, search for “Webhook” and choose the HTTP Webhook capture connector. This allows Estuary to accept incoming HTTP POST requests from any webhook-capable service.
Step 3: Name Your Capture and Configure URL Path(s)
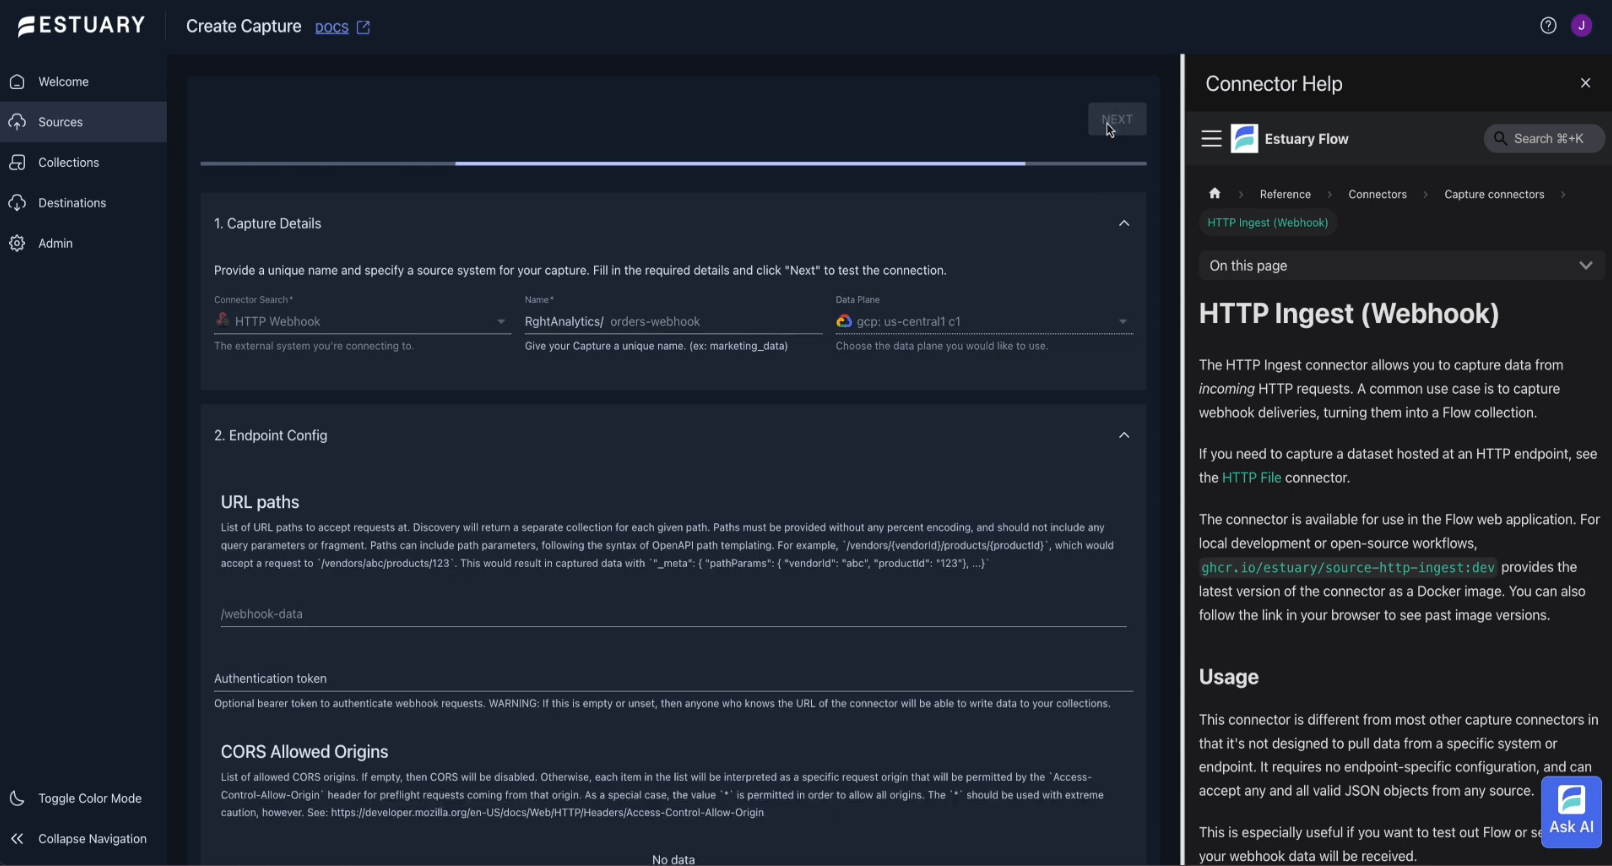
Give your capture a meaningful name (e.g., square-orders-webhook). Define the URL path where you want Flow to receive events. You can enter a single path or use multiple paths if capturing different event types. Click the “+” button to add more paths if needed.
Step 4: Add Security
You can optionally specify additional security configurations:
- Provide an authentication token: incoming webhooks will need to present this in order to add data to your collections
- Set up CORS Allowed Origins: enable CORS to restrict incoming requests based on their origin
Some security settings will depend on the source system you’re using. You can skip this step to quickly test out the connector, but it’s recommended to investigate which security options you can implement for a production use case.
Step 5: Review Bindings
After entering your paths, click Next. Estuary will generate bindings for them, each representing a data stream that maps to a Flow collection. You can perform additional configuration for these bindings in their Resource Configuration.
Step 6: Save and Publish the Capture
Once you’ve configured the bindings, click Save and Publish. Estuary Flow will generate a public webhook endpoint — a URL that external systems can POST data to.
This endpoint is now ready to receive real-time data from any webhook source, which Flow will store as structured documents in a live collection.
For full configuration options and schema details, check out the HTTP Webhook connector documentation.
Connecting to a Third-Party App (Square Example)
Now that your webhook source is set up in Estuary Flow, the next step is to configure a third-party application to send data to your newly generated webhook endpoint. In this example, we’ll walk through connecting Square, a popular payment processing platform.
Step 1: Copy Your Webhook Endpoint from Estuary Flow
After publishing your webhook capture, Estuary Flow displays a public webhook URL. This is the endpoint that will receive real-time data. Copy this URL, as well as the path(s) you created — you’ll need this information in the Square dashboard.
Step 2: Log in to Your Square Developer Dashboard
Open developer.squareup.com and navigate to the application where you want to set up the webhook. Go to “Webhooks” in the left-hand menu, then click “Subscriptions.”
Step 3: Create a New Webhook Subscription
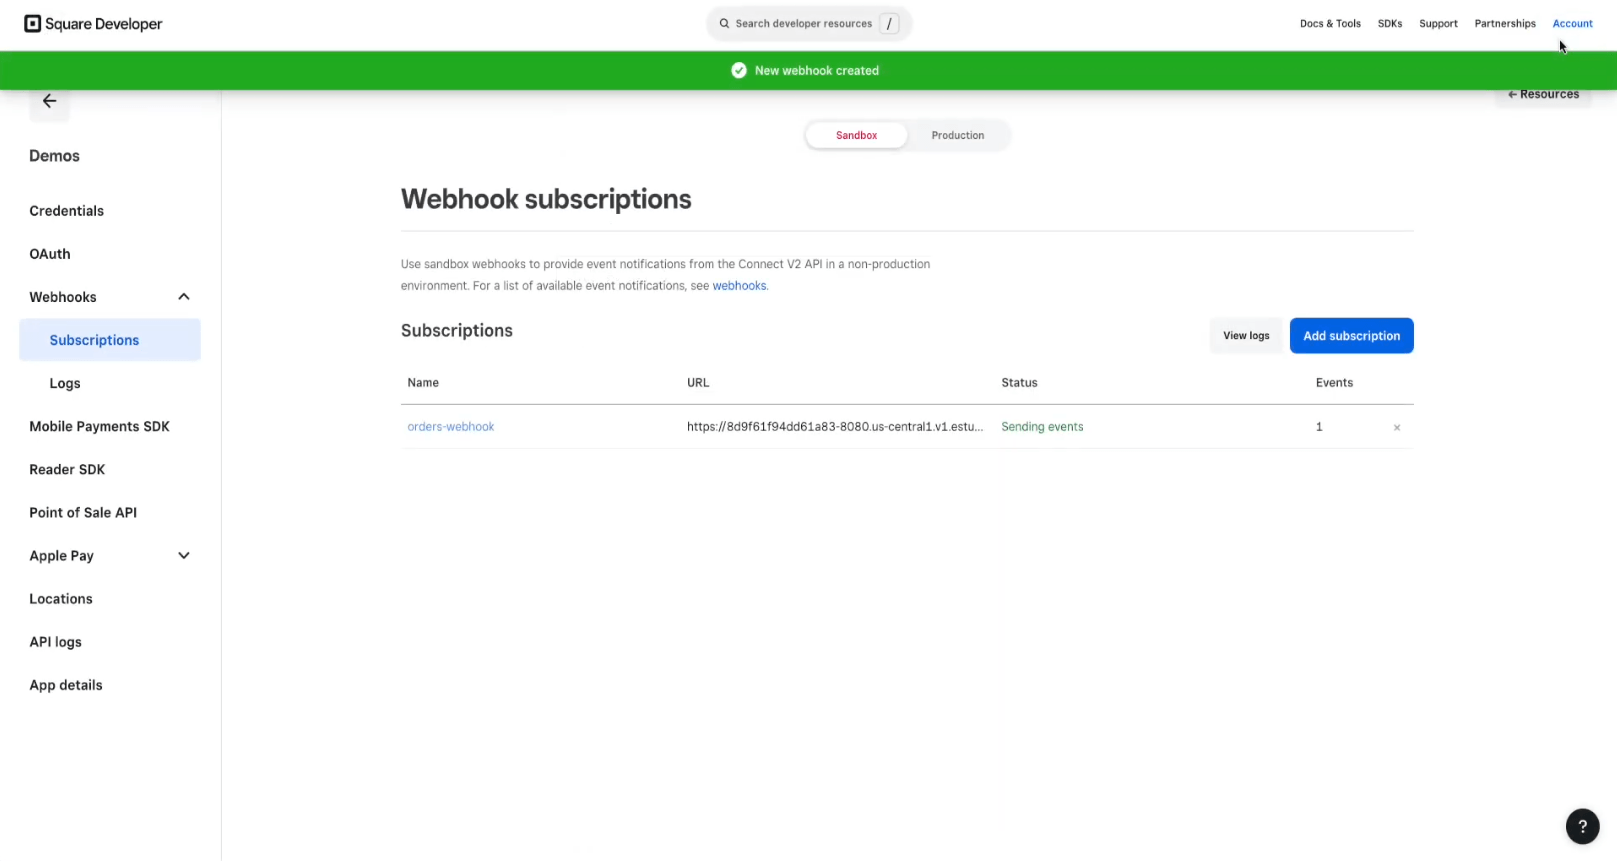
Click “Add Subscription” and give your webhook a descriptive name (e.g., order-events). Paste the Estuary-generated webhook URL with your specific path (e.g., abc123.region.v1.estuary-data.dev/webhook-data) into the Notification URL field.
Step 4: Select Events to Track
Choose the specific event types you want Square to send to the webhook, for example, order.created, payment.updated, or refund.completed. You can select multiple events depending on your use case.
Step 5: Save and Test the Webhook
Save the webhook subscription. Then use Square’s built-in “Send Test Event” feature to send a sample payload. You should see a 200 OK response to confirm that the webhook is working. You can also return to Estuary Flow and find the test event’s data in the corresponding collection – see the section below for instructions.
Once configured, Square will begin pushing live order data to Estuary Flow the moment events are triggered. These events are now part of your Flow collection and can be routed to Databricks or any other destination.
Viewing Webhook Data in Estuary Flow
Once your third-party app is sending webhook events to Estuary Flow, you can view the captured data in real time to confirm everything is working as expected.
Step 1: Navigate to the Collections Tab
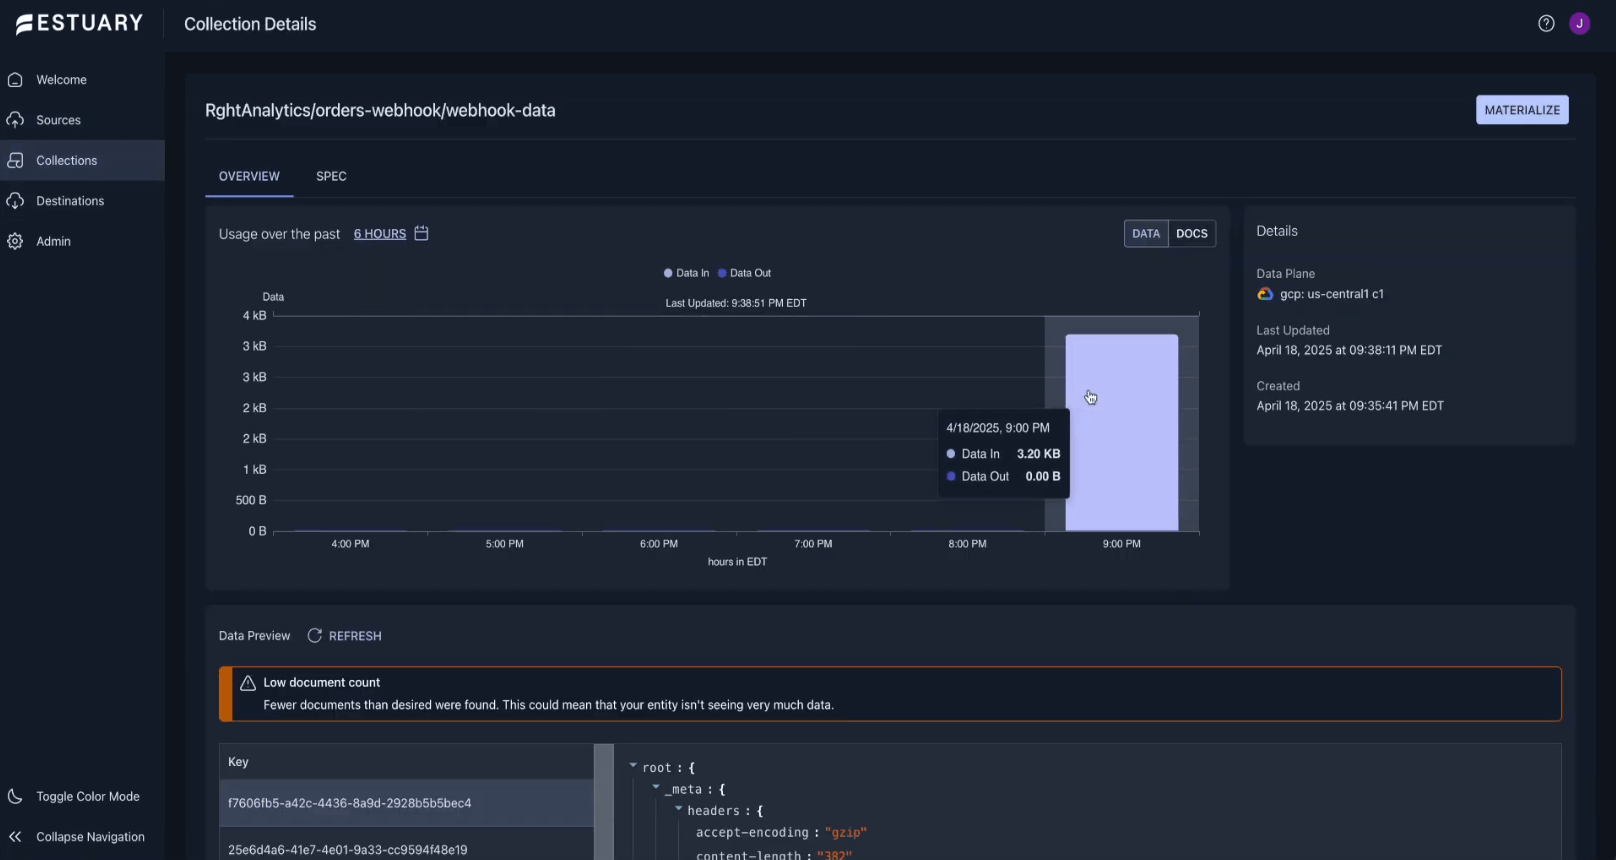
In the Estuary Flow web app, go to the “Collections” section. This is where all captured data from your webhook source is stored.
Step 2: Locate Your Webhook Collection
You’ll see a collection that matches the name of your webhook capture or the specific binding path you configured. For example, if you set up a webhook for Square order events, you might see something like square-orders.
Step 3: Inspect Incoming Documents
Click into the collection to view a stream of incoming documents. Each document represents a payload from your webhook, structured as JSON and validated against a schema. Flow automatically handles formatting and schema inference to keep the data clean and consistent.
Step 4: Confirm Real-Time Updates
If you trigger a new event from the connected service (e.g., placing a new order in Square), the corresponding document should appear in the collection almost instantly. This confirms that the webhook capture is live and streaming data properly.
With data now flowing into a collection, you’re ready to connect a destination, such as Databricks, for real-time materialization.
Creating a Databricks Materialization
With webhook data now flowing into Estuary Flow as a real-time collection, the final step is to stream that data into Databricks for analytics, transformation, or machine learning. This is done by creating a materialization — a real-time connector that writes data from Flow to your Databricks workspace.
Step 1: Go to the Destinations Tab
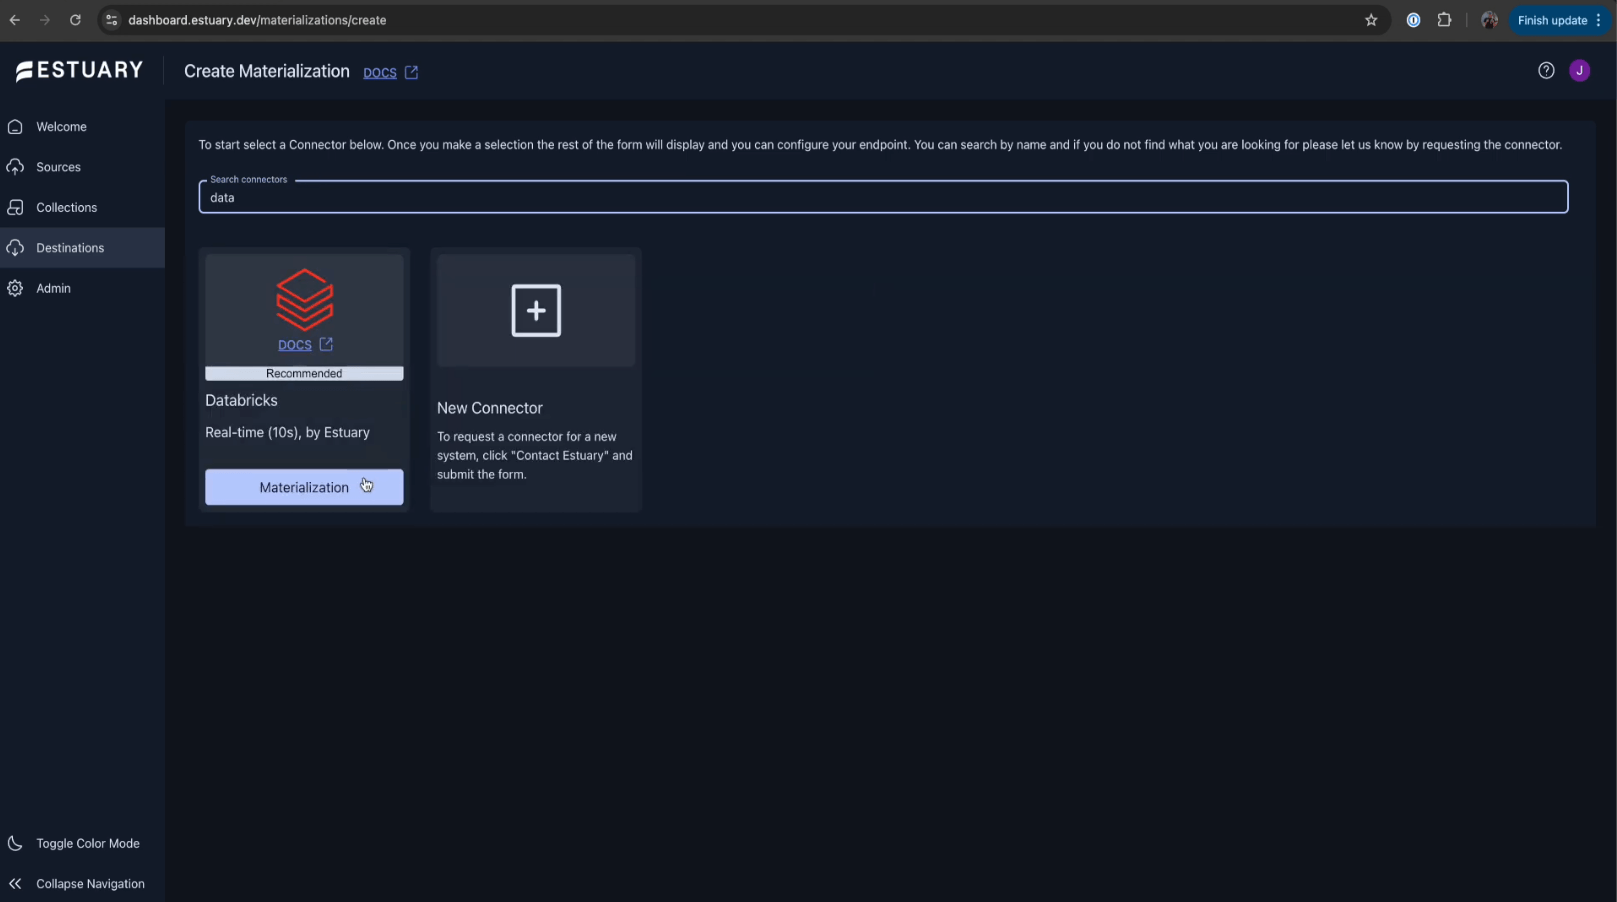
In the Estuary Flow web app, navigate to “Destinations”. Click the “New Materialization” button to begin setting up a new destination.
Step 2: Select the Databricks Connector
In the materialization catalog, search for “Databricks” and select it. This connector allows Flow to write to tables in your Databricks lakehouse via a Unity Catalog Volume.
Step 3: Configure Databricks Connection Settings
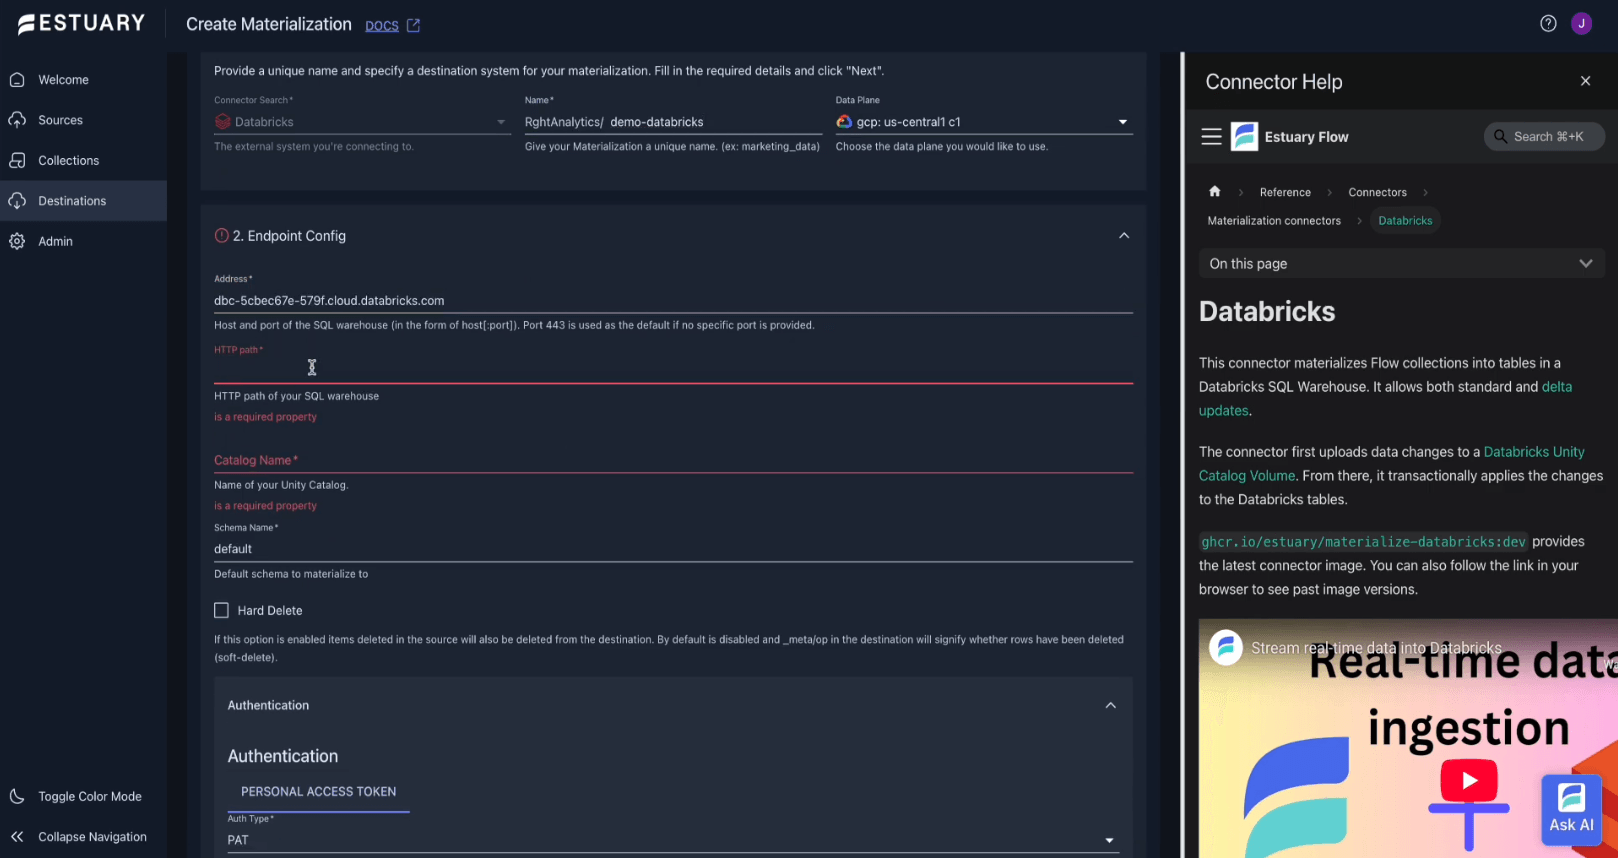
Fill in the required connection parameters:
- Address – Host and port for your SQL warehouse.
- HTTP Path – HTTP path for your SQL warehouse.
- Catalog Name – The name of your Unity Catalog.
- Access Token – A personal access token with write permissions.
Refer to the Estuary documentation or Databricks settings for more information about specific credentials.
Step 4: Bind the Source Collection
Choose the collection you created from your webhook source (e.g., square-orders). This tells Flow which stream of documents should be written to your Databricks table.
Step 5: Save and Publish the Materialization
Once your configuration is complete, click Save and Publish. Estuary Flow will immediately begin streaming new events into the target Databricks table on your configured sync schedule.
Step 6: Verify Data in Databricks
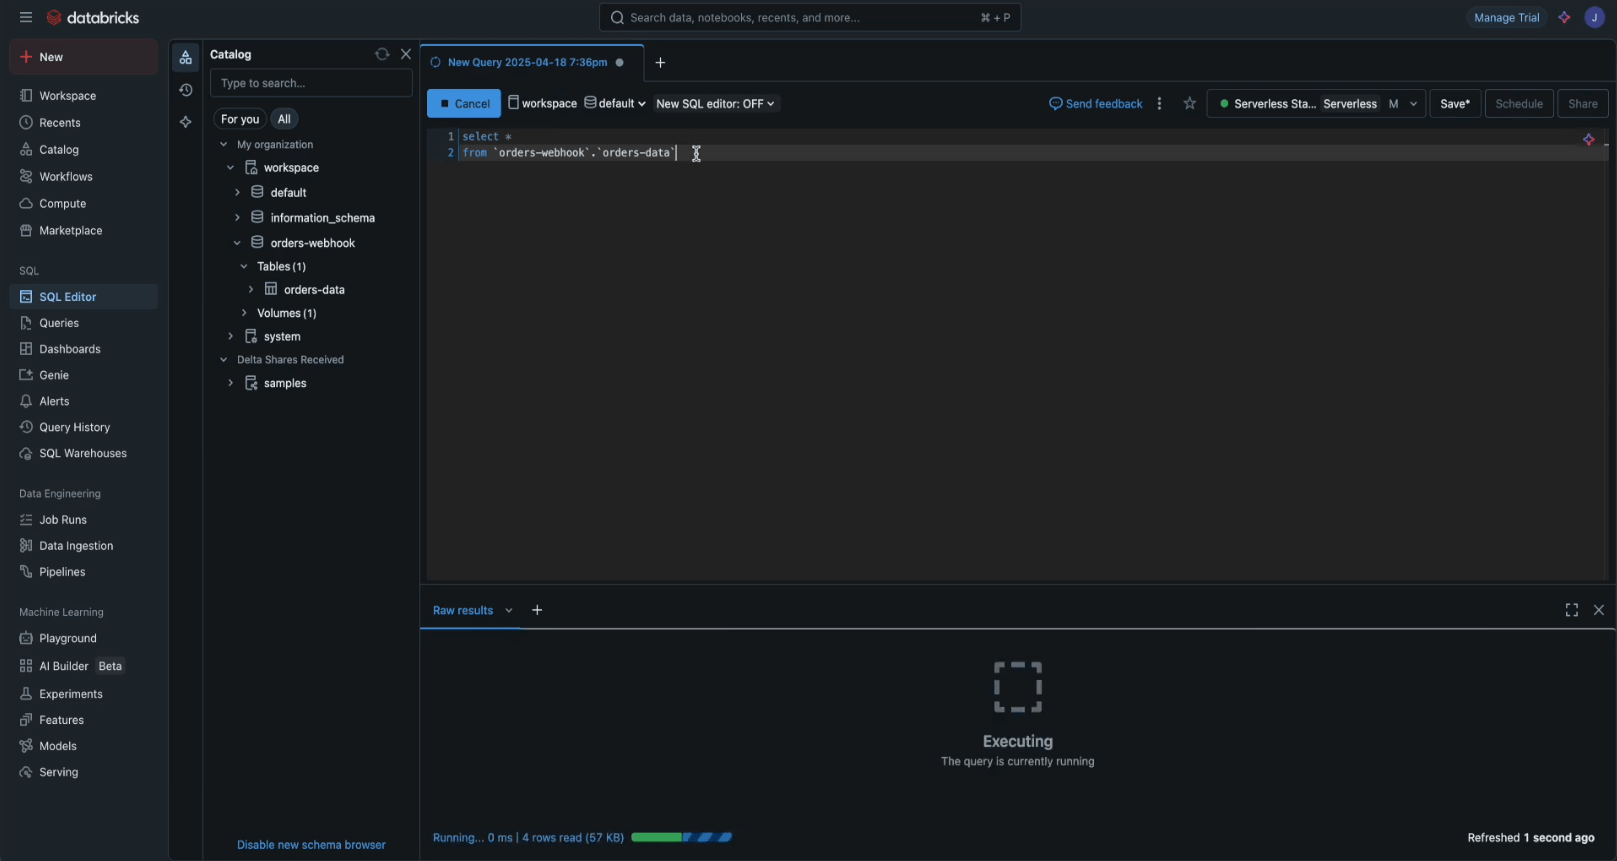
Open your Databricks workspace and query the target table. You should see live data entries appearing in real time, reflecting webhook events as they happen.
Want to see the full process in action? Watch this step-by-step walkthrough of capturing webhook data and streaming it to Databricks using Estuary Flow:
Benefits of Using Estuary Flow for Webhook to Databricks Integration
Integrating webhook data with Databricks typically requires building and maintaining custom pipelines, often involving middleware services, cloud functions, or message queues. Estuary Flow replaces that complexity with a seamless, no-code solution that’s built for speed, scalability, and data integrity.
- Real-Time Streaming by Default - Estuary Flow is designed around streaming-first architecture. As soon as a webhook event is received, it's pushed to Databricks with sub-second latency, enabling real-time dashboards, alerts, and machine learning workflows without delay.
- No-Code Configuration - With Flow’s intuitive UI and connector catalog, you can configure both your webhook source and Databricks destination in minutes — no Python scripts, no Airflow DAGs, no manual schema mapping.
- Built-In Schema Validation and Evolution - Flow collections enforce schemas to ensure consistency in your data model. As webhook payloads evolve, Flow can automatically adapt or guide you through schema changes, preventing downstream breakages.
- Scalable and Fault-Tolerant - Estuary Flow automatically scales with your data volume and includes built-in fault tolerance, retry logic, and backpressure handling, ensuring reliable delivery even under load.
- Unified Observability - Through Flow’s metrics dashboard and OpenMetrics API, you get full visibility into your pipeline: event throughput, errors, latency, and connector health — all trackable in tools like Prometheus and Datadog.
- One Platform, Many Connectors - Once your webhook data is in Flow, it can be streamed not only to Databricks but also to destinations like BigQuery, Snowflake, PostgreSQL, Kafka, or S3, with no additional setup required.
Common Use Cases & Industry Applications
Streaming webhook data to Databricks opens up real-time analytics possibilities across a wide range of industries and use cases. Whether you're working in e-commerce, finance, SaaS, or IoT, this integration can transform how you handle and act on time-sensitive data.
E-Commerce and Retail
Capture order events, payment confirmations, cart abandonments, and inventory changes from platforms like Square, Shopify, or Stripe. Use Databricks to power real-time dashboards for operations, fraud detection, or customer segmentation.
Financial Services
Stream transaction data, KYC events, or account activity logs into Databricks to support risk models, compliance monitoring, or real-time reporting pipelines.
SaaS and Product Analytics
Ingest product usage events, signups, error logs, or system alerts via webhooks from services like Segment, Intercom, or internal platforms. Analyze usage patterns or trigger automated workflows within Databricks.
IoT and Edge Monitoring
Collect sensor data, status updates, or alert notifications from edge devices and push them to Databricks for near real-time telemetry, anomaly detection, and predictive maintenance.
Marketing and Campaign Automation
Capture webhook data from platforms like HubSpot, Klaviyo, or Meta Ads to build up-to-the-minute campaign performance dashboards or personalize outreach based on real-time behavior.
No matter the source system or industry, Estuary Flow and Databricks together make it easy to turn webhook-driven events into structured, actionable data, without adding latency or complexity to your pipeline.
Final Thoughts
Webhooks are one of the most efficient ways to move event-driven data across systems — but without the right infrastructure, turning those raw events into analytics-ready insights in Databricks can be a slow, brittle process. Estuary Flow solves this by providing a real-time, no-code pipeline that connects any HTTP webhook source directly to your Databricks lakehouse in minutes. Whether you're capturing order events from Square, system alerts from internal tools, or marketing signals from SaaS platforms, Flow gives you a scalable and reliable path to stream that data into Databricks tables — all without writing code or managing infrastructure.
By combining the flexibility of webhooks with the analytical power of Databricks, and the operational simplicity of Estuary Flow, your team can unlock real-time insights faster, reduce engineering overhead, and move from raw data to business impact with ease.
To get started, explore the Estuary Flow documentation, or sign up to build your first real-time webhook pipeline today.
Related Articles

About the author
Dani is a data professional with a rich background in data engineering and real-time data platforms. At Estuary, Daniel focuses on promoting cutting-edge streaming solutions, helping to bridge the gap between technical innovation and developer adoption. With deep expertise in cloud-native and streaming technologies, Dani has successfully supported startups and enterprises in building robust data solutions.


