Introduction
As data teams scale their Snowflake environments, access control becomes the foundation for both security and performance. A well-designed role and permission model not only protects data but also enables faster, more efficient analytics across teams and tools. In modern data architectures, governed access is key to achieving real-time analytics that remain compliant and reliable at any scale.
This guide explains how Snowflake’s access control model works, how to structure users and roles effectively, and which best practices ensure long-term security, consistency, and automation.
TL;DR
- Build RBAC first (roles → users), add UBAC only for narrowly scoped collaboration scenarios. Activate managed access schemas and future grants to centralize and automate permissions.
- Keep ACCOUNTADMIN rare, non‑default, and out of automation; let SYSADMIN/SECURITYADMIN/USERADMIN do the day‑to‑day.
- Object creation uses your primary role; carefully switch roles before creating anything. Database roles can’t be activated directly—grant them to account roles.
- Minimum to query data = USAGE on database + schema, SELECT on objects, and USAGE on a warehouse; add MONITOR/OPERATE for warehouse ops as needed.
- Since 2024‑08 behavior bundles, the default DEFAULT_SECONDARY_ROLES tends to ALL (unless explicitly set). Set this explicitly to what you want.
- Provision users and groups from your IdP via SCIM, require SSO + MFA for humans, and use key‑pair (or OAuth) for service users.
Understanding Snowflake Users, Roles, and Privileges: The Core Access Control Model
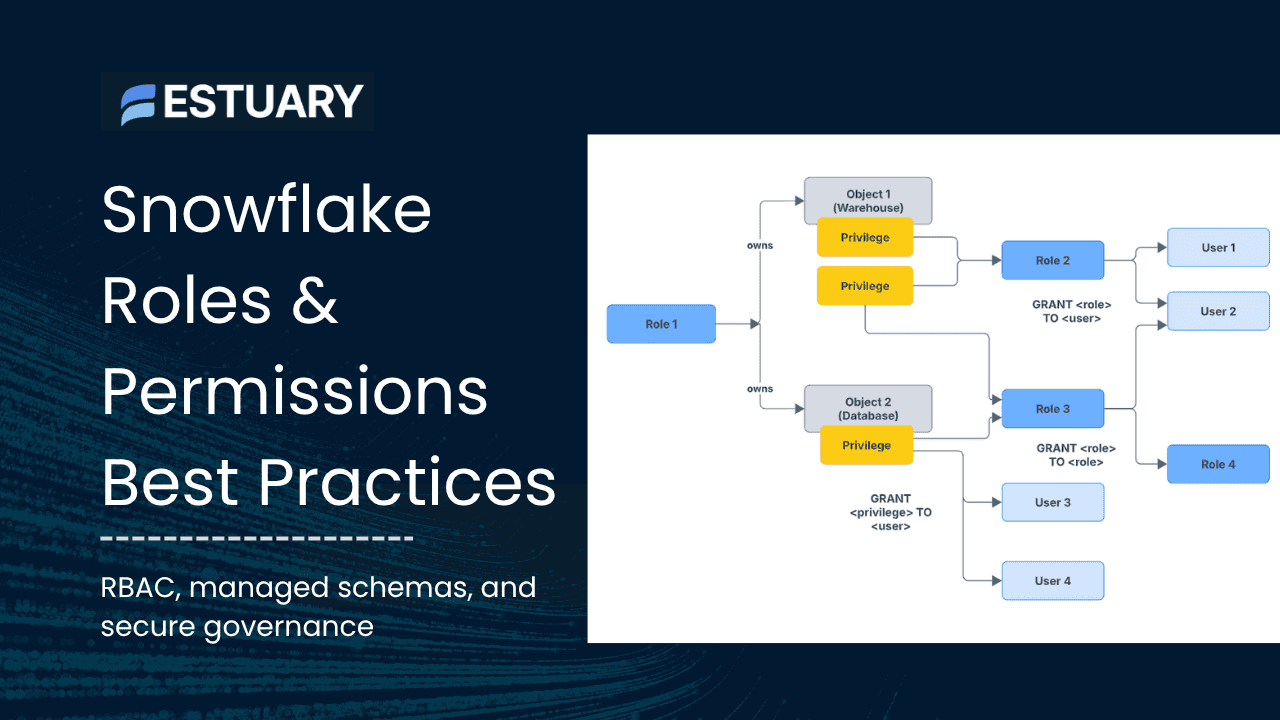
Before you start managing data access in Snowflake, it’s crucial to understand how users, roles, and privileges work together. Snowflake’s access control model combines multiple layers of security — DAC (Discretionary Access Control), RBAC (Role-Based Access Control), and optionally UBAC (User-Based Access Control) — to define who can access what data.
- DAC (Discretionary Access Control): Each object has an owner who can grant access to others.
- RBAC (Role-Based Access Control): The recommended model where privileges are granted to roles, and roles are granted to users.
- UBAC (User-Based Access Control): Allows privileges to be assigned directly to users but is only effective when secondary roles are active.
RBAC should be your foundation since it scales cleanly across teams and environments. Use UBAC only for short-lived or highly specific collaboration scenarios.
Key fundamentals to remember
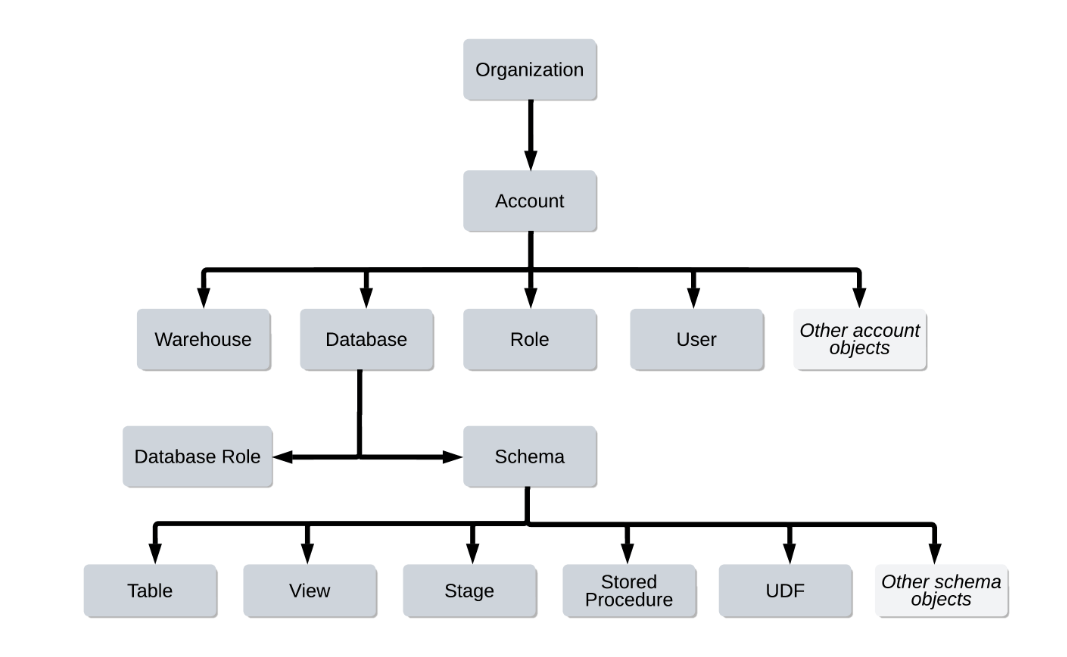
- Securable hierarchy:Organization → Account → Database → Schema → Objects. Access flows downward through USAGE privileges and object-level grants.
- Primary vs secondary roles: When a session starts, your default role and default secondary roles become active. Ownership (CREATE) actions are performed only under the primary role, so plan your role switching before running DDL statements.
- Database roles: These are scoped to a single database and cannot be activated directly in a session. To make them usable, grant them to account roles.
Why it matters: If you accidentally create objects while using the wrong primary role, ownership will transfer to that role — potentially breaking permissions and access chains later.
Snowflake System Roles Explained: How to Use Them Correctly
Snowflake provides several predefined system roles that serve as the foundation for access control across your account. Each role comes with a distinct scope of responsibility — from organization-level administration to everyday user management.
Understanding these roles and using them properly helps you maintain least-privilege access, secure automation, and predictable permission boundaries.
The main Snowflake system roles:
- GLOBALORGADMIN (or ORGADMIN): Manages organization-level configuration. Note: ORGADMIN is being phased out; use GLOBALORGADMIN for all new setups.
- ACCOUNTADMIN: The top-level administrative role in a Snowflake account. It manages all account-level objects and configurations but is not automatically a superuser across all data objects unless privileges are explicitly granted. Use sparingly — avoid assigning it as anyone’s default role or using it for day-to-day tasks.
- SECURITYADMIN: Controls user and role security, including global MANAGE GRANTS privileges. This is the primary role for managing access without full account-level power.
- USERADMIN: Creates and manages users and custom roles. Often delegated to team leads or platform admins responsible for onboarding.
- SYSADMIN: Handles warehouses, databases, and database objects. Most data engineering and operational workloads should run under this role rather than ACCOUNTADMIN.
- PUBLIC: Automatically assigned to every user by default. It offers only minimal privileges — avoid granting sensitive access to PUBLIC.
Best practice: Assign SYSADMIN for data and warehouse creation, SECURITYADMIN for access management, and keep ACCOUNTADMIN reserved for a few trusted users. This separation of duties reduces the risk of privilege escalation or configuration drift.
Designing a Scalable Snowflake Role Hierarchy
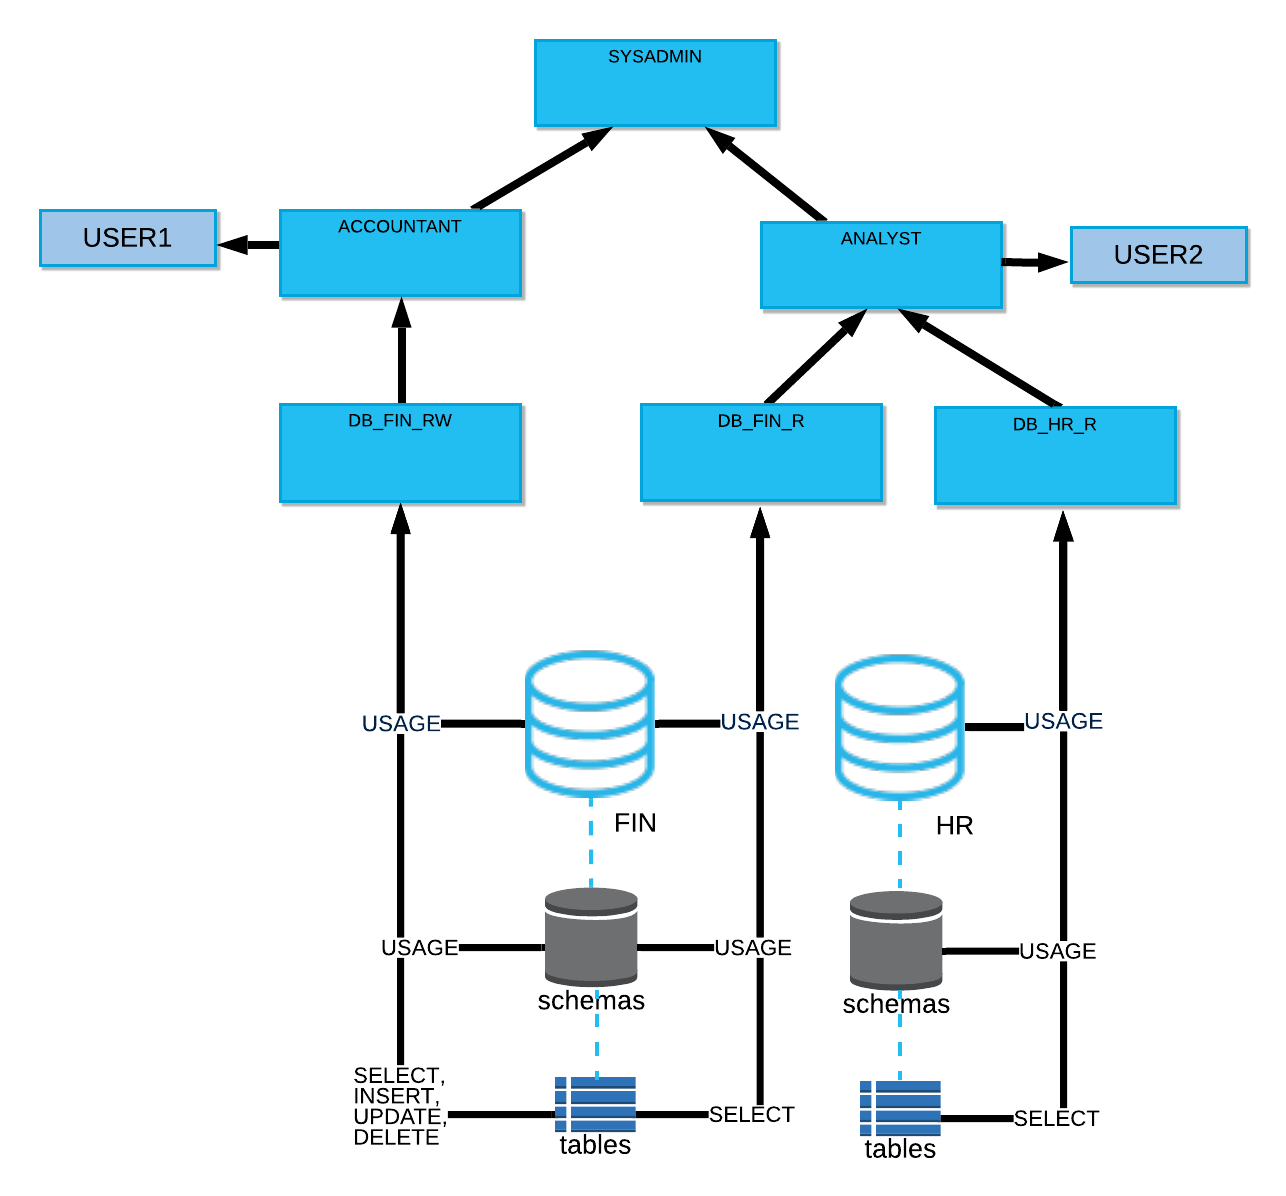
A well-structured Snowflake role hierarchy prevents privilege sprawl and makes onboarding easier as your organization grows. The key is to separate access roles (which define what a role can do) from functional roles (which define who uses them). You then layer these roles upward, with SYSADMIN sitting at the top of the hierarchy.
This approach is directly recommended in Snowflake documentation and is widely used in production environments.
Example: Access and Functional Roles in Snowflake
plaintext-- Access roles (object permissions)

CREATE ROLE db_hr_r;

CREATE ROLE db_fin_r;

CREATE ROLE db_fin_rw;


-- Functional roles (mapped to job functions)

CREATE ROLE analyst;

CREATE ROLE accountant;


-- Grant object access to access roles

GRANT USAGE ON DATABASE hr TO ROLE db_hr_r;

GRANT USAGE ON ALL SCHEMAS IN DATABASE hr TO ROLE db_hr_r;

GRANT SELECT ON ALL TABLES IN DATABASE hr TO ROLE db_hr_r;


GRANT USAGE ON DATABASE fin TO ROLE db_fin_r;

GRANT USAGE ON ALL SCHEMAS IN DATABASE fin TO ROLE db_fin_r;

GRANT SELECT ON ALL TABLES IN DATABASE fin TO ROLE db_fin_r;


GRANT USAGE ON DATABASE fin TO ROLE db_fin_rw;

GRANT USAGE ON ALL SCHEMAS IN DATABASE fin TO ROLE db_fin_rw;

GRANT SELECT, INSERT, UPDATE, DELETE ON ALL TABLES IN DATABASE fin TO ROLE db_fin_rw;


-- Compose: access roles -> functional roles

GRANT ROLE db_hr_r  TO ROLE analyst;

GRANT ROLE db_fin_r TO ROLE analyst;

GRANT ROLE db_fin_rw TO ROLE accountant;


-- Functional roles -> SYSADMIN (top)

GRANT ROLE analyst   TO ROLE SYSADMIN;

GRANT ROLE accountant TO ROLE SYSADMIN;
This hierarchy allows you to:
- Reuse access roles across teams.
- Keep functional roles aligned with job functions.
- Maintain clear visibility into who can do what across the Snowflake account.
By adopting this RBAC pattern, you create a scalable model that simplifies auditing, onboarding, and privilege reviews without compromising security.
Understanding Snowflake Database Roles and How to Use Them
Snowflake introduced database roles to help administrators implement least-privilege access and simplify permission management within individual databases. Unlike account-level roles that span the entire Snowflake account, database roles exist only inside a specific database and manage privileges for objects in that database.
Why database roles matter
Database roles provide a cleaner, more modular way to control access at the database level. You can use them to:
- Keep all privileges for a data domain contained within one database.
- Delegate access management to data owners without granting them account-wide privileges.
- Share specific schemas or tables externally in a more granular way than the older IMPORTED PRIVILEGES model.
Key points to remember
- A database role can include privileges on tables, views, and schemas inside a single database.
- You cannot activate a database role directly in a session. Instead, grant it to an account role that users or services can assume.
- For controlled data sharing, assign database roles that expose only the necessary objects to consumers.
Example use case:
A company might define a sales_reader database role within its sales_db database, then grant that role to an analyst account role. The analyst gains read-only access to sales data without receiving any broader account privileges.
Automating Permissions with Snowflake Managed Access Schemas and Future Grants
Managing access at scale in Snowflake becomes much easier when you combine managed access schemas with future grants. Together, they centralize permission control and automate privilege assignments for new objects, helping teams maintain consistent and secure access across databases.
Managed Access Schemas
A managed access schema shifts control of object grants from individual object owners to the schema owner, or to a role with the MANAGE GRANTS privilege. This prevents accidental permission drift and ensures that access management is centralized.
plaintext-- Create or convert to a managed access schema

CREATE SCHEMA finance.secure WITH MANAGED ACCESS;
From this point forward, only the schema owner or a role with MANAGE GRANTS can grant privileges on objects within the schema. This pattern helps enforce least-privilege access and consistent governance.
Future Grants
Future grants allow privileges to be automatically applied to objects created later in a schema or database. They are Snowflake’s “set it and forget it” mechanism for continuous access management.
plaintext-- Auto-grant SELECT on any new tables in schema s1 to role r1

GRANT SELECT ON FUTURE TABLES IN SCHEMA s1 TO ROLE r1;


-- Later, shift that responsibility from r1 to r2

GRANT SELECT ON FUTURE TABLES IN SCHEMA s1 TO ROLE r2;

GRANT SELECT ON ALL TABLES IN SCHEMA s1 TO ROLE r2;

REVOKE SELECT ON FUTURE TABLES IN SCHEMA s1 FROM ROLE r1;

REVOKE SELECT ON ALL TABLES IN SCHEMA s1 FROM ROLE r1;
When both database-level and schema-level future grants are defined for the same object type, the schema-level grants take precedence. To avoid confusion, design your future grants at only one level per object type.
Why this matters
By combining managed access schemas and future grants, Snowflake administrators can:
- Prevent unauthorized privilege changes
- Maintain consistent access patterns across environments
- Automate onboarding for new tables or views without manual intervention
- Support least-privilege principles for compliance and governance
For full syntax details and options such as WITH GRANT OPTION, refer to Snowflake’s GRANT documentation.
Minimum Privileges Required to Run Queries and Manage Warehouses in Snowflake
To successfully run queries in Snowflake, users must have a minimum set of privileges on databases, schemas, tables, and warehouses. Understanding these permissions helps prevent access errors and ensures users have only the rights they need.
Minimum privileges to query data
To read data from a specific table, a role must have:
- USAGE on the database
- USAGE on the schema
- SELECT on the table or view
- USAGE on a warehouse to execute the query
For example, to query mydb.myschema.mytable, the role must have the above privileges across all relevant objects. Without any of these, the query will fail with a “not authorized” error.
Warehouse privilege levels
Snowflake separates warehouse management from data access to support least-privilege principles. The main warehouse privileges are:
- USAGE: Allows users to run queries that use the warehouse.
- MONITOR: Lets users view warehouse status, query history, and usage metrics.
- OPERATE: Allows users to start, stop, suspend, resume, or abort queries on the warehouse.
- MANAGE WAREHOUSES: Grants full management capabilities across all warehouses in the account.
Assign these privileges carefully to ensure that developers and analysts can run queries without having unnecessary control over warehouse operations.
Best practice:
Use USAGE for analysts or BI tools, OPERATE for engineering and DevOps users, and MANAGE WAREHOUSES only for administrators responsible for scaling or cost optimization.
Managing the User Lifecycle and Identity in Snowflake: SSO, MFA, SCIM, and Key Pair Authentication
Snowflake provides several tools for managing user identities and securing authentication across your organization. Implementing these features correctly ensures that access control is both secure and compliant with enterprise standards.
Provisioning with SCIM
Snowflake integrates with major identity providers (IdPs) such as Okta, Microsoft Entra ID (Azure AD), and other SAML 2.0-compatible systems.
Use SCIM (System for Cross-domain Identity Management) to automatically provision and deprovision users and groups. Each group can map one-to-one with Snowflake roles, which keeps your identity directory as the single source of truth for access assignments.
Authentication Methods
- Single Sign-On (SSO): Snowflake supports SAML 2.0-based SSO, enabling users to log in using existing corporate credentials through providers such as Okta, AD FS, or Entra ID. This simplifies sign-in and enforces central authentication policies.
- Multi-Factor Authentication (MFA): Snowflake strongly recommends MFA for all human users using passkeys, TOTP apps, or Duo Push. Single-factor password authentication is being deprecated. Service accounts are excluded from MFA and should use alternative authentication methods such as key pairs.
- Service Users and Key Pair Authentication:
For non-interactive or programmatic access, create service users using TYPE = SERVICE. These users should authenticate via key pairs or OAuth, not passwords. Snowflake’s key pair authentication supports secure key rotation and can be used with SnowSQL, drivers, and connectors.
plaintextCREATE USER data_pipeline_user TYPE = SERVICE;

ALTER USER data_pipeline_user SET RSA_PUBLIC_KEY='MIIBIjANBgkqhkiG9w0BAQEFAAOCAQ8A...';
Session and Network Security
Enhance Snowflake security by enforcing session and network policies:
- Session policies: Define idle timeouts and connection lifetimes for users or accounts.
- Network policies: Restrict access to trusted IP ranges and prevent logins from unauthorized networks.
These are native Snowflake features that apply across all interfaces, including the web UI, drivers, and API connections.
Recommended Default Settings for Users
When creating users, always configure the following defaults:
- DEFAULT_ROLE (avoid setting it to ACCOUNTADMIN)
- DEFAULT_WAREHOUSE and DEFAULT_NAMESPACE for user convenience
Important Behavior Change (August 2024)
Starting in August 2024, if DEFAULT_SECONDARY_ROLES is not set, Snowflake defaults it to ALL depending on the account’s feature bundle.
To restrict users from automatically inheriting all assigned roles, explicitly configure the setting:
plaintextALTER USER some_user SET DEFAULT_SECONDARY_ROLES = ();You can also set it to ALL when appropriate for your organization’s security model. Always control this behavior explicitly to prevent unexpected privilege inheritance.
Understanding User-Based Access Control (UBAC) in Snowflake
While Role-Based Access Control (RBAC) is the recommended model in Snowflake, User-Based Access Control (UBAC) can be useful in specific scenarios that require direct, user-level privileges. Snowflake supports granting privileges directly to users, but with some important limitations and best practices to consider.
How UBAC works
UBAC allows privileges to be granted directly to a user instead of through a role. However, these privileges are only effective when secondary roles are enabled in the user’s session using the command:
plaintextUSE SECONDARY ROLES ALL;This ensures that both role-based and user-based privileges can be combined for that session. UBAC grants are not evaluated when secondary roles are disabled.
Limitations of UBAC
- No future grants: Snowflake does not support future grants for user-based privileges, meaning new tables or views created after the grant will not automatically inherit those permissions.
- Less scalable: Managing privileges directly at the user level increases administrative overhead, especially as the number of users grows.
- Best for ad-hoc access: UBAC is most appropriate for temporary collaboration or user-specific troubleshooting, not long-term access management.
Best practices for using UBAC
- Use UBAC sparingly and only for short-term or highly specific access needs.
- Continue to manage most privileges through roles to maintain a consistent, auditable RBAC structure.
- Regularly review user-level grants using the GRANTS_TO_USERS view to prevent privilege sprawl.
Example: If a data engineer needs one-time access to query a restricted dataset for debugging, granting them a temporary SELECT privilege directly through UBAC is acceptable. Long-term permissions, however, should always go through a defined role.
Auditing and Reviewing Access in Snowflake
Regularly auditing roles and privileges in Snowflake is essential for maintaining a secure and compliant environment. Snowflake provides multiple system views and commands that allow administrators to identify who has what access, when privileges were granted, and how data is being used.
Key views for auditing privileges
- GRANTS_TO_ROLES and GRANTS_TO_USERS
These views, available in the SNOWFLAKE.ACCOUNT_USAGE schema, show all role and user-level grants, including who granted them and when. They are refreshed approximately every two hours.
plaintextSELECT role, grantee_name, granted_on, privilege, granted_by

FROM SNOWFLAKE.ACCOUNT_USAGE.GRANTS_TO_ROLES;- Use these views to identify privilege inheritance and detect over-privileged roles.
- ACCESS_HISTORY and AGGREGATE_ACCESS_HISTORY
These Enterprise Edition features record which users or roles accessed specific data objects, including query-level detail. They can be used for security reviews, compliance reporting, and data lineage tracking.
plaintextSELECT user_name, object_name, direct_objects_accessed, query_id
FROM SNOWFLAKE.ACCOUNT_USAGE.ACCESS_HISTORY
WHERE event_time >= DATEADD(day, -7, CURRENT_TIMESTAMP());- SHOW GRANTS
Use this command to view current privileges at the object, user, or role level in real time. For example:
plaintextSHOW GRANTS TO USER alice;
SHOW GRANTS ON DATABASE finance;
SHOW GRANTS TO ROLE data_reader;
Building an access review process
To maintain governance and visibility across large accounts, Snowflake administrators should:
- Run regular access reviews: Schedule queries against ACCOUNT_USAGE views to verify that only the intended roles and users retain privileges.
- Detect privilege drift: Compare results over time to detect unauthorized or unplanned changes to roles.
- Investigate anomalies: Use ACCESS_HISTORY to trace when sensitive data was queried and by whom.
- Automate reporting: Export query results to a visualization or monitoring tool like Power BI, Tableau, or Estuary’s downstream integrations for continuous oversight.
Example:
To audit which users can modify data in the sales schema:
plaintextSELECT grantee_name, privilege, granted_on, name
FROM SNOWFLAKE.ACCOUNT_USAGE.GRANTS_TO_ROLES
WHERE privilege IN ('INSERT', 'UPDATE', 'DELETE')
AND name ILIKE '%sales%';
This returns a list of all roles and users with write access, allowing you to validate least-privilege compliance.
Common Snowflake Role and Permission Mistakes to Avoid
Even well-designed Snowflake environments can become hard to manage if privileges or roles are applied inconsistently. Avoiding these common Snowflake permission mistakes helps maintain security, compliance, and predictable role behavior.
1. Using ACCOUNTADMIN for daily tasks
ACCOUNTADMIN should only be used for account-level configuration and emergency fixes. It is not meant for creating databases, schemas, or routine data operations.
- Why it matters: Objects created under this role may inherit unintended ownership or privileges.
- Best practice: Use SYSADMIN for creating data objects and keep ACCOUNTADMIN restricted to a few trusted users.
2. Granting privileges to PUBLIC
PUBLIC is automatically assigned to every user in a Snowflake account.
- Why it matters: Any privilege granted to PUBLIC instantly becomes available to all users.
- Best practice: Avoid giving sensitive privileges to PUBLIC. Use specific access or functional roles instead.
3. Skipping managed access schemas
Without managed access schemas, individual object owners can grant privileges on their own, leading to inconsistent access policies.
- Best practice: Convert key schemas to managed access to centralize and control grants.
4. Assigning privileges directly to users
Granting privileges directly to users instead of roles breaks the RBAC model and leads to privilege sprawl.
- Best practice: Use roles for long-term access, reserving user-level grants (UBAC) only for short-term collaboration.
5. Forgetting warehouse privileges
Users may have SELECT on tables but still fail to query data if they lack USAGE on a warehouse.
- Best practice: Always pair data access with the necessary warehouse privileges (USAGE, MONITOR, OPERATE).
6. Overlapping future grants
If you define future grants at both the database and schema level for the same object type, the schema-level grant takes precedence.
- Best practice: Choose one level per object type to keep permission logic clear and predictable.
7. Misunderstanding database roles
Database roles cannot be activated directly in a session. They must be granted to an account role to take effect.
- Best practice: Always link database roles to account roles that correspond to actual user groups or services.
8. Ignoring DEFAULT_SECONDARY_ROLES settings
Since August 2024, if DEFAULT_SECONDARY_ROLES is not explicitly set, it defaults to ALL depending on bundle status. This can unintentionally expand user access.
- Best practice: Explicitly configure this setting:
plaintextALTER USER username SET DEFAULT_SECONDARY_ROLES = ();Setting Up Snowflake Roles and Privileges: A Safe Bootstrap Example
If you are starting from scratch or restructuring an existing Snowflake environment, this bootstrap configuration provides a secure and scalable foundation for your RBAC (Role-Based Access Control) model. It follows Snowflake’s own best practices for separating duties, enforcing least privilege, and maintaining predictable ownership.
Example: Creating a baseline Snowflake role structure
plaintext-- Step 1: Create administrative roles
CREATE ROLE platform_admin;     -- for warehouses, databases, and global operations
CREATE ROLE data_admin;         -- manages schema ownership and grants
CREATE ROLE data_reader;        -- read-only access
CREATE ROLE data_writer;        -- read and write access

-- Step 2: Build the role hierarchy
GRANT ROLE data_reader TO ROLE data_admin;
GRANT ROLE data_writer TO ROLE data_admin;
GRANT ROLE data_admin  TO ROLE SYSADMIN;

-- Step 3: Assign warehouse privileges
GRANT USAGE ON WAREHOUSE wh_analytics TO ROLE data_reader;
GRANT USAGE, OPERATE, MONITOR ON WAREHOUSE wh_analytics TO ROLE data_admin;

-- Step 4: Create a managed schema and automate grants
CREATE SCHEMA fin.secure WITH MANAGED ACCESS;
GRANT USAGE ON DATABASE fin TO ROLE data_reader;
GRANT USAGE ON SCHEMA fin.secure TO ROLE data_reader;
GRANT SELECT ON FUTURE TABLES IN SCHEMA fin.secure TO ROLE data_reader;

GRANT USAGE ON DATABASE fin TO ROLE data_writer;
GRANT USAGE ON SCHEMA fin.secure TO ROLE data_writer;
GRANT SELECT, INSERT, UPDATE, DELETE ON FUTURE TABLES IN SCHEMA fin.secure TO ROLE data_writer;

-- Step 5: Create users with proper defaults
CREATE USER alice DEFAULT_ROLE = data_reader MUST_CHANGE_PASSWORD = TRUE;
CREATE USER pipeline TYPE = SERVICE;

GRANT ROLE data_reader TO USER alice;
GRANT ROLE data_writer TO USER alice;

-- Step 6: Control secondary role inheritance
ALTER USER alice SET DEFAULT_SECONDARY_ROLES = ();  -- disables automatic ALL secondary roles
Why this bootstrap pattern works
- Separation of duties: Administrative roles are isolated from data access roles, which limits the scope of privilege misuse.
- Least privilege: Each role has only the permissions required for its function.
- Centralized governance: Managed access schemas and future grants simplify access administration.
- Scalability: The hierarchy can easily be extended to new databases, teams, or service accounts.
💡 Tip: You can adapt this setup to include environment-specific roles (for example, data_admin_dev or data_reader_prod) if your organization has separate Snowflake accounts for development and production.
Once your foundational roles and privileges are established, the next step is integrating secure data pipelines that operate within the same access model. Estuary provides a straightforward way to connect real-time data sources to Snowflake while fully respecting your RBAC framework.
Integrating Estuary with Your Snowflake Access Control Model
Once you’ve established a clean and scalable RBAC foundation in Snowflake, Estuary can slot directly into that model without disrupting your permissions architecture.
How Estuary works with Snowflake roles and permissions
- Connector-based materialization:Estuary’s Snowflake materialization connector writes data into Snowflake tables using your service account's credentials and roles. It respects your existing RBAC policies, so all writes, merges, and updates happen under the permissions granted to the Estuary user or role.
- Capture / change data capture (CDC) support: If your source is also Snowflake, Estuary’s capture connector can ingest table changes (using Snowflake streams, etc.). Permissions to read source tables and manage staging artifacts are handled via roles you grant to the Estuary capture user.
With Secure Data Sharing, you can even read from Snowflake tables that are shared with you while respecting the limitations of working with shared data. - Snowpipe Streaming & delta updates: Estuary supports delta update bindings that can use Snowpipe Streaming, offering near-real-time ingestion with low latency. Snowflake source and destination connectors both support key-pair (JWT) authentication, and configuring Snowpipe Streaming requires this type of authentication for optimized security.
Example Estuary integration steps (aligned with your RBAC)
Assume you have a role estuary_role already created. Here’s a sample snippet you might use to grant the role the proper permissions:
plaintext-- Grant Estuary access to your Snowflake environment
GRANT ROLE estuary_role TO ROLE SYSADMIN;

-- On your target database & schema
GRANT USAGE ON DATABASE mydb TO ROLE estuary_role;
GRANT USAGE ON SCHEMA mydb.secure_schema TO ROLE estuary_role;
GRANT SELECT, INSERT, UPDATE, DELETE ON FUTURE TABLES IN SCHEMA mydb.secure_schema TO ROLE estuary_role;

-- On your warehouse
GRANT USAGE ON WAREHOUSE my_wh TO ROLE estuary_role;

-- (If needed) grant other privileges such as CREATE INTEGRATION
USE ROLE ACCOUNTADMIN;
GRANT CREATE INTEGRATION ON ACCOUNT TO ROLE estuary_role;
This aligns with the design of your bootstrap roles and ensures that Estuary has precisely the permissions needed — no more, no less.
Benefits of embedding Estuary in your RBAC framework
- Least privilege retention: Estuary never bypasses your Snowflake role model — it uses the same roles you manage, and you control what it can and can’t do.
- Clear ownership & auditability: All Snowflake operations performed by Estuary are executed under the assigned role, making them visible in audit logs, ACCESS_HISTORY, and GRANTS_TO_ROLES.
- Minimal friction for operators: You don’t have to manage separate service accounts or duplicate permission models — your Snowflake roles can serve for both human and pipeline access.
- Future safe: As your RBAC model evolves, you can update the Estuary role’s grants (future grants, managed schemas, etc.) just like you do for any other service or user.
Try Estuary for free and build your first secure Snowflake pipeline.
Strengthening Snowflake Security Beyond RBAC
After building your role hierarchy and integrating secure access through tools like Estuary, you can further enhance Snowflake’s security posture using built-in features such as network policies, session policies, and multi-factor authentication (MFA). These safeguards complement RBAC by controlling how and from where users access your account.
1. Network Policies
Network policies in Snowflake restrict which IP addresses can connect to your account or specific users. This ensures that access is limited to trusted networks and corporate VPNs.
Example:
plaintextCREATE NETWORK POLICY corp_policy
  ALLOWED_IP_LIST = ('203.0.113.1', '203.0.113.2')
  BLOCKED_IP_LIST = ('0.0.0.0/0');
ALTER ACCOUNT SET NETWORK_POLICY = corp_policy;
Best practices:
- Apply network policies at both the account and user levels.
- Regularly audit allowed IPs and rotate them when infrastructure changes.
- Use separate network policies for production and development environments.
2. Session Policies
Session policies define how long users can remain connected and how idle timeouts are handled. They help reduce the risk of unauthorized access from inactive sessions.
Example:
plaintextCREATE SESSION POLICY strict_session
  SESSION_IDLE_TIMEOUT_MINS = 15
  SESSION_TIMEOUT_MINS = 60;
ALTER ACCOUNT SET SESSION_POLICY = strict_session;
Best practices:
- Apply stricter session policies for privileged roles such as ACCOUNTADMIN or SECURITYADMIN.
- Set shorter idle timeouts for shared or browser-based access.
- Regularly review and adjust policies based on organizational security standards.
3. Enforcing Multi-Factor Authentication (MFA)
MFA adds an additional verification step beyond username and password, greatly reducing the risk of credential theft.
Snowflake supports passkeys, authenticator apps (TOTP), and Duo Push notifications.
Recommendations:
- Enforce MFA for all human users through your IdP (Okta, Entra ID, or AD FS).
- Disable single-factor logins across all accounts.
- For service accounts, use key-pair or OAuth authentication instead of MFA.
Combined Security Strategy
When combined with RBAC and managed schemas:
- Network policies secure the perimeter.
- Session policies enforce controlled user behavior.
- MFA and key-pairs ensure strong authentication.
Together, they provide layered protection without impacting usability or performance.
Appendix A: Common Snowflake SQL Commands for Roles and Permissions
This appendix provides a quick reference to the Snowflake SQL commands you will use most often when managing users, roles, and privileges. These examples align with Snowflake’s RBAC framework and can be safely applied in production environments.
1. Switching Roles
Use the USE ROLE command to activate a specific role for your current session.
plaintextUSE ROLE data_admin;To control whether user-based privileges (UBAC) are active, enable or disable secondary roles:
plaintextUSE SECONDARY ROLES ALL;
USE SECONDARY ROLES NONE;
You can check your active roles at any time:
plaintextSELECT CURRENT_ROLE(), CURRENT_SECONDARY_ROLES();2. Granting and Revoking Privileges
The GRANT and REVOKE statements are central to Snowflake RBAC management.
plaintext-- Grant SELECT privilege on a table
GRANT SELECT ON TABLE sales.orders TO ROLE analyst;

-- Grant usage privileges on schema and warehouse
GRANT USAGE ON SCHEMA sales TO ROLE analyst;
GRANT USAGE ON WAREHOUSE wh_analytics TO ROLE analyst;

-- Revoke access when needed
REVOKE SELECT ON TABLE sales.orders FROM ROLE analyst;
3. Managing Future Grants
Automate access control with future grants so that new objects inherit the same privileges.
plaintextGRANT SELECT ON FUTURE TABLES IN SCHEMA sales TO ROLE analyst;
REVOKE SELECT ON FUTURE TABLES IN SCHEMA sales FROM ROLE old_analyst;
4. Managing Roles and Users
Create, modify, or inspect users and roles directly:
plaintext-- Create a new role
CREATE ROLE data_engineer;

-- Grant role to another role
GRANT ROLE data_engineer TO ROLE sysadmin;

-- Create a new user and assign defaults
CREATE USER johnsmith
  PASSWORD = 'TempPassword123'
  DEFAULT_ROLE = data_engineer
  DEFAULT_WAREHOUSE = wh_analytics
  MUST_CHANGE_PASSWORD = TRUE;
5. Viewing and Auditing Grants
Quickly inspect privileges using SHOW GRANTS or the ACCOUNT_USAGE views:
plaintextSHOW GRANTS TO ROLE data_engineer;
SHOW GRANTS ON SCHEMA sales;

SELECT * FROM SNOWFLAKE.ACCOUNT_USAGE.GRANTS_TO_ROLES
WHERE ROLE = 'DATA_ENGINEER';
Appendix: Quick Reference for Snowflake Access Management
A. Common SQL Commands
Use these commands frequently when working with Snowflake roles and privileges.
plaintext-- Activate a specific role or enable secondary roles
USE ROLE data_admin;
USE SECONDARY ROLES ALL;

-- Grant or revoke privileges
GRANT SELECT ON TABLE sales.orders TO ROLE analyst;
REVOKE SELECT ON TABLE sales.orders FROM ROLE analyst;

-- Inspect privileges
SHOW GRANTS TO ROLE data_admin;
SHOW GRANTS TO USER alice;
B. Warehouse Privileges
Snowflake provides granular warehouse-level permissions to control operations and visibility.
Privilege | Description |
| USAGE | Allows a role to run queries using the warehouse |
| MONITOR | Lets users view warehouse status and query history |
| OPERATE | Enables control actions like start, stop, resume, and abort queries |
| MANAGE WAREHOUSES | Grants full management access to all warehouses |
C. Auditing and Access Reviews
For visibility into who has access and how privileges are used, query Snowflake’s built-in views:
plaintextSELECT * FROM SNOWFLAKE.ACCOUNT_USAGE.GRANTS_TO_ROLES;
SELECT * FROM SNOWFLAKE.ACCOUNT_USAGE.GRANTS_TO_USERS;
SELECT * FROM SNOWFLAKE.ACCOUNT_USAGE.ACCESS_HISTORY;
These system views help track privilege changes, confirm least-privilege compliance, and support audit reporting.
Conclusion: Building Secure and Scalable Snowflake Access
Snowflake’s role and permission framework gives organizations precise control over how data is accessed and managed. By following best practices like separating administrative, functional, and access roles, using managed schemas, and automating future grants, teams can maintain both agility and compliance as their environment grows.
Security doesn’t stop at RBAC. Features such as network and session policies, MFA enforcement, and periodic access reviews ensure ongoing protection across users and workloads. Together, these capabilities create a foundation that balances productivity with governance.
Estuary complements this security model by integrating real-time data movement directly into your existing Snowflake RBAC structure. Every capture and materialization respects your defined roles, privileges, and managed schemas, giving you confidence that streaming data pipelines remain compliant and traceable from end to end.
Build a real-time Snowflake pipeline that respects your RBAC
Estuary streams data into Snowflake with key-pair authentication, managed access friendly schemas, and delta updates including Snowpipe Streaming. Only the privileges you grant.
[Start free] [Talk to an engineer]
Key Takeaways
- Snowflake’s RBAC model, combined with managed access schemas and future grants, ensures scalable and secure access control.
- Use least-privilege principles: restrict ACCOUNTADMIN, separate roles by function, and automate grants where possible.
- Network policies, session policies, and MFA strengthen your security posture.
- Estuary integrates seamlessly with your Snowflake RBAC, enabling real-time, schema-aware data streaming without compromising access controls.
To see how Snowflake stacks up against other leading warehouses, read our Data Warehouse Benchmark Report.
FAQs
What are Snowflake managed access schemas and why should I use them?
How do Snowflake future grants work?
What is the difference between account roles and database roles in Snowflake?

About the author
Team Estuary is a group of engineers, product experts, and data strategists building the future of real-time and batch data integration. We write to share technical insights, industry trends, and practical guides.


