How to Migrate Data Between PostgreSQL Servers: 3 Reliable Methods
Learn how to migrate PostgreSQL data across servers using pg_dump, native logical replication, and real-time CDC with Estuary Flow. Discover step-by-step instructions for zero-downtime PostgreSQL migration and integration.
PostgreSQL is one of the most trusted open-source databases for transactional workloads, operational analytics, and modern applications. Whether you are managing cloud-native microservices or a monolithic system, there will likely come a time when you need to migrate data from one PostgreSQL server to another.
There are many reasons why a business might need to perform this kind of migration. You might be moving from a self-hosted instance to a managed service like Amazon RDS or Google Cloud SQL. You could be upgrading to a newer PostgreSQL version or reorganizing your infrastructure across environments, such as staging to production. Some organizations also migrate PostgreSQL databases to replicate data across regions, improve fault tolerance, or separate analytical and transactional workloads.
This guide explores the most reliable ways to migrate data between PostgreSQL servers. We will walk through three popular approaches:
- Performing a one-time migration using pg_dump and pg_restore
- Setting up PostgreSQL native logical replication
- Using a modern real-time data pipeline with change data capture (CDC) powered by Estuary Flow
By the end of this article, you will understand when to use each method and how to implement them step by step. Whether you are migrating a small application or syncing terabytes of production data, this PostgreSQL data migration guide has you covered.
Understanding PostgreSQL to PostgreSQL Migration: Batch vs Streaming
Before choosing how to migrate data between PostgreSQL servers, it is important to understand the two primary strategies: batch migration and streaming replication. Each approach has its strengths, and the right method depends on your goals, data size, and tolerance for downtime.
Batch Migration
Batch migration involves copying data from a source PostgreSQL server and loading it into a target server all at once. Tools like pg_dump and pg_restore are often used for this process. Batch migrations are ideal for:
- One-time transfers
- Small or medium-sized databases
- Maintenance windows where temporary downtime is acceptable
While simple to implement, batch migration cannot capture ongoing changes made after the export. This makes it less suitable for systems that require zero downtime or have frequent write activity.
Streaming Replication and Real-Time Sync
Streaming migration, also known as continuous replication or real-time data sync, keeps two PostgreSQL servers in sync by capturing ongoing changes. PostgreSQL natively supports logical replication, which allows the source database to publish changes and the target to subscribe to them.
For more flexibility, many teams now use Change Data Capture (CDC) tools like Estuary Flow. These tools continuously capture inserts, updates, and deletes in real time, making them ideal for:
- Zero-downtime migrations
- Cross-cloud database replication
- Hybrid cloud or multi-region deployments
- Keeping reporting or analytical systems in sync
Streaming is especially useful when you need to maintain business continuity, reduce switchover time, or replicate data across environments without delay.
Choosing the Right Approach
Here is a quick comparison to help you decide:
Criteria | Batch Migration | Streaming or CDC-based Sync |
| Downtime | Required | Minimal or none |
| Complexity | Simple | Moderate to advanced |
| Handles ongoing changes | No | Yes |
| Ideal for | One-time transfers | Real-time replication |
| Tooling options | pg_dump, pg_restore | Logical replication, Estuary Flow |
Understanding these two strategies will help you choose the most effective PostgreSQL migration method for your specific use case.
Method 1: One-Time Migration Using pg_dump and pg_restore
The most straightforward way to migrate data between PostgreSQL servers is by using the built-in tools pg_dump and pg_restore. This method is commonly used for one-time migrations, especially when the database is not extremely large or when brief downtime is acceptable.
This approach works by creating a backup of your source PostgreSQL database in a specific format and then restoring that backup into the destination PostgreSQL server.
When to Use This Method
- Migrating development or staging databases
- Upgrading PostgreSQL versions with minimal complexity
- Moving workloads between on-premises and cloud environments
- Performing schema-only or data-only exports
Step 1: Export Data from the Source Server Using pg_dump
pg_dump is a PostgreSQL utility that creates a logical backup of your database. You can export the entire database or selected tables.
Basic command:
plaintextpg_dump -U source_user -h source_host -d source_db -F c -f backup.dumpOptions explained:
- -U: Source database user
- -h: Source host or IP address
- -d: Database name
- -F c: Custom format (recommended for pg_restore)
- -f: Output file name
For larger databases, consider using -j with pg_restore in the next step to enable parallelism.
Step 2: Transfer the Dump File to the Target Server
Use scp, rsync, or your preferred method to move the dump file to the machine or environment where your target PostgreSQL instance is running.
plaintextscp backup.dump user@target_host:/path/to/destinationStep 3: Restore the Data Using pg_restore
Once the file is transferred, use pg_restore to load the data into the destination PostgreSQL server.
Command:
plaintextpg_restore -U target_user -h target_host -d target_db -F c -j 4 /path/to/backup.dumpOptions explained:
- -F c: Indicates the custom format created with pg_dump
- -j 4: Run 4 parallel jobs for faster restore (adjust based on system resources)
Ensure that the target database exists before running the restore:
plaintextcreatedb -U target_user -h target_host target_dbTips for Large PostgreSQL Migrations
- Use --no-owner and --no-acl if migrating between environments with different user permissions.
- Compress the dump file to save transfer time:
pg_dump ... | gzip > backup.dump.gz - Consider exporting schema and data separately if you want to refactor before import:
- pg_dump -s for schema only
- pg_dump -a for data only
Limitations of Batch Migration
- Does not capture changes made after the dump is created
- Requires maintenance window or application downtime
- Can be time-consuming for very large databases
While pg_dump and pg_restore provide a reliable and widely supported solution, they are best suited for simple migrations or as part of an initial setup before implementing continuous data sync.
Method 2: Native Logical Replication
PostgreSQL supports native logical replication, which allows you to stream data changes from one PostgreSQL server to another. This method keeps the source and target databases in sync by publishing and subscribing to row-level change events. Unlike physical replication, logical replication works at the table level and is suitable for heterogeneous environments or cloud-to-cloud replication.
This method is ideal for ongoing data synchronization or when you need to reduce downtime during a PostgreSQL migration.
When to Use Native Logical Replication
- You need to sync specific tables between PostgreSQL servers
- You want to replicate data across cloud regions or providers
- You need minimal downtime for production switchover
- Your target PostgreSQL version is the same or newer than the source
Requirements
- PostgreSQL version 10 or newer on both source and target
- Source server must have wal_level set to logical
- Primary keys are required on all replicated tables
- Network connectivity between source and target
Step 1: Enable Logical Replication on the Source
Edit postgresql.conf on the source server:
plaintextwal_level = logical
max_replication_slots = 4
max_wal_senders = 4
Then reload or restart PostgreSQL:
plaintextsudo systemctl restart postgresqlEnsure that pg_hba.conf allows replication connections from the target host.
Step 2: Create a Replication Role
On the source server:
plaintextCREATE ROLE replicator WITH REPLICATION LOGIN PASSWORD 'your_password';Grant necessary privileges if needed:
plaintextGRANT SELECT ON ALL TABLES IN SCHEMA public TO replicator;Step 3: Create a Publication on the Source
A publication defines which tables will be replicated.
plaintextCREATE PUBLICATION my_publication FOR TABLE users, orders;Use FOR ALL TABLES to replicate all tables in the database:
plaintextCREATE PUBLICATION my_publication FOR ALL TABLES;Step 4: Create a Subscription on the Target
On the target server, connect to the destination database and run:
plaintextCREATE SUBSCRIPTION my_subscription
CONNECTION 'host=source_host port=5432 user=replicator password=your_password dbname=source_db'
PUBLICATION my_publication;
PostgreSQL will automatically begin replicating the specified tables. New rows, updates, and deletes will be continuously streamed from the source to the target.
Monitoring and Maintenance
Check replication status with:
plaintextSELECT * FROM pg_stat_subscription;To stop replication:
plaintextDROP SUBSCRIPTION my_subscription;Limitations of Logical Replication
- Tables must have primary keys
- Schema changes like column renames are not automatically synced
- DDL changes (e.g., creating new tables) are not replicated
- Initial data copy can take time for large datasets
Logical replication is a powerful built-in feature for real-time PostgreSQL synchronization. However, for more flexibility, automation, and support for schema drift and large-scale changes, you may want to consider a CDC-based approach like Estuary Flow.
Method 3: Continuous Data Sync with Estuary Flow
If you are looking for a modern and reliable way to migrate and sync data between PostgreSQL servers with zero downtime, Estuary Flow offers a powerful solution. Flow uses change data capture (CDC) to replicate inserts, updates, and deletes from your source PostgreSQL database to a target PostgreSQL server in real time.
💡 Need a one-time batch export instead? Estuary also supports batch-style migrations using its PostgreSQL Batch connector. This is useful when logical replication isn't available or when you want to migrate the result of an ad-hoc query or view.
Unlike manual methods or native logical replication, Estuary Flow provides end-to-end automation, built-in fault tolerance, schema evolution support, and a user-friendly interface or declarative YAML-based configuration.
This makes it ideal for production-grade migrations, hybrid cloud setups, and long-term integration between systems.
Key Features of the Estuary PostgreSQL Connector
- Supports PostgreSQL versions 10 and later
- Compatible with self-hosted PostgreSQL, Amazon RDS, Aurora, Google Cloud SQL, Azure PostgreSQL, and Supabase
- Uses CDC to capture changes in real time via the PostgreSQL write-ahead log (WAL)
- Supports backfill and incremental sync
- Can capture from primary or read-only replicas using read-only mode
- Secure connectivity with SSH tunneling and SSL modes
How Estuary Flow Works for PostgreSQL to PostgreSQL Sync
Estuary Flow creates a pipeline consisting of:
- A capture that connects to your source PostgreSQL server and reads change events
- A collection that stores those change events as structured documents
- A materialization that writes those documents into your target PostgreSQL server
This architecture ensures consistent, low-latency data movement across environments.
Comparison Table: PostgreSQL Migration Methods
Criteria | Batch Migration | Logical Replication | Estuary Flow |
| Real-time sync | No | Yes | Yes (CDC) |
| One-time batch support | Yes | No | Yes (via PostgreSQL Batch connector) |
| Downtime required | Yes | Minimal (initial sync) | No |
| Schema evolution | Manual | Limited | Built-in |
| Handles deletes/updates | No (only current snapshot) | Yes | Yes (CDC) / Depends (batch) |
| Automated setup | No | No | Yes (GUI or YAML) |
| Backfill support | Manual steps | Partial | Yes (CDC with historical backfill) |
| Cloud & hybrid support | Yes | Yes | Yes |
| Read replica support | No | No | Yes (read-only mode) |
| Ideal for | One-time migrations with downtime | Real-time sync with same schema | Flexible use cases: batch exports, real-time sync, cloud or hybrid setups |
Estuary Flow gives you the flexibility to handle complex migration needs while keeping data accurate and consistent across systems.
Next up, we will walk through how to configure this in practice using Estuary's Postgres capture and materialization connectors.
How to Set Up PostgreSQL to PostgreSQL Replication Using Estuary Flow
Estuary Flow makes it easy to build a continuous, real-time data pipeline between two PostgreSQL servers. Whether you're syncing from a self-hosted instance to a cloud-managed service, or replicating between regions, Flow enables you to capture changes and materialize them with minimal configuration.
In this section, you'll learn how to:
- Set up PostgreSQL as a capture (source)
- Set up PostgreSQL as a materialization (destination)
- Link the pipeline and enable real-time CDC replication
Step 1: Choose the PostgreSQL Capture Connector
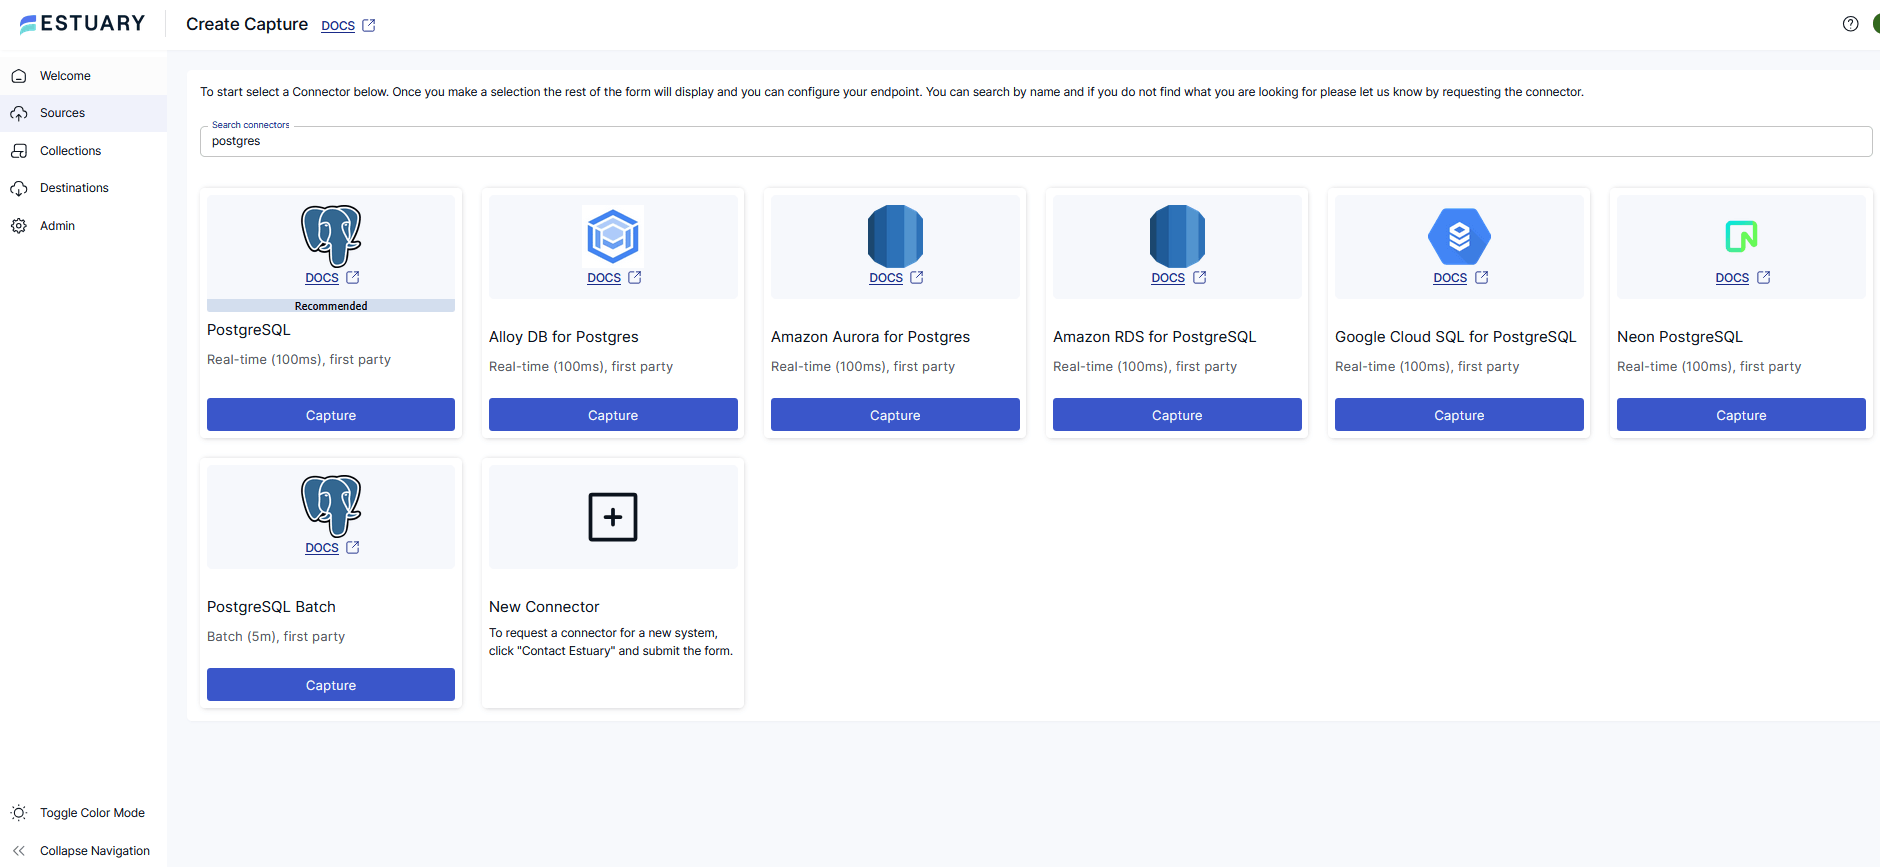
From the Estuary dashboard, click Sources in the left-hand menu, then click + New Capture. In the search bar, type “PostgreSQL” to view all available connectors.
You will see options such as:
- PostgreSQL
- Alloy DB for Postgres
- Amazon Aurora for Postgres
- Amazon RDS for PostgreSQL
- Google Cloud SQL for PostgreSQL
- Neon PostgreSQL
- PostgreSQL Batch
Choose the one that matches your source database type. For most real-time use cases, the standard PostgreSQL connector is recommended.
Click Capture to begin setup.
Step 2: Enter Your Source Database Connection Details
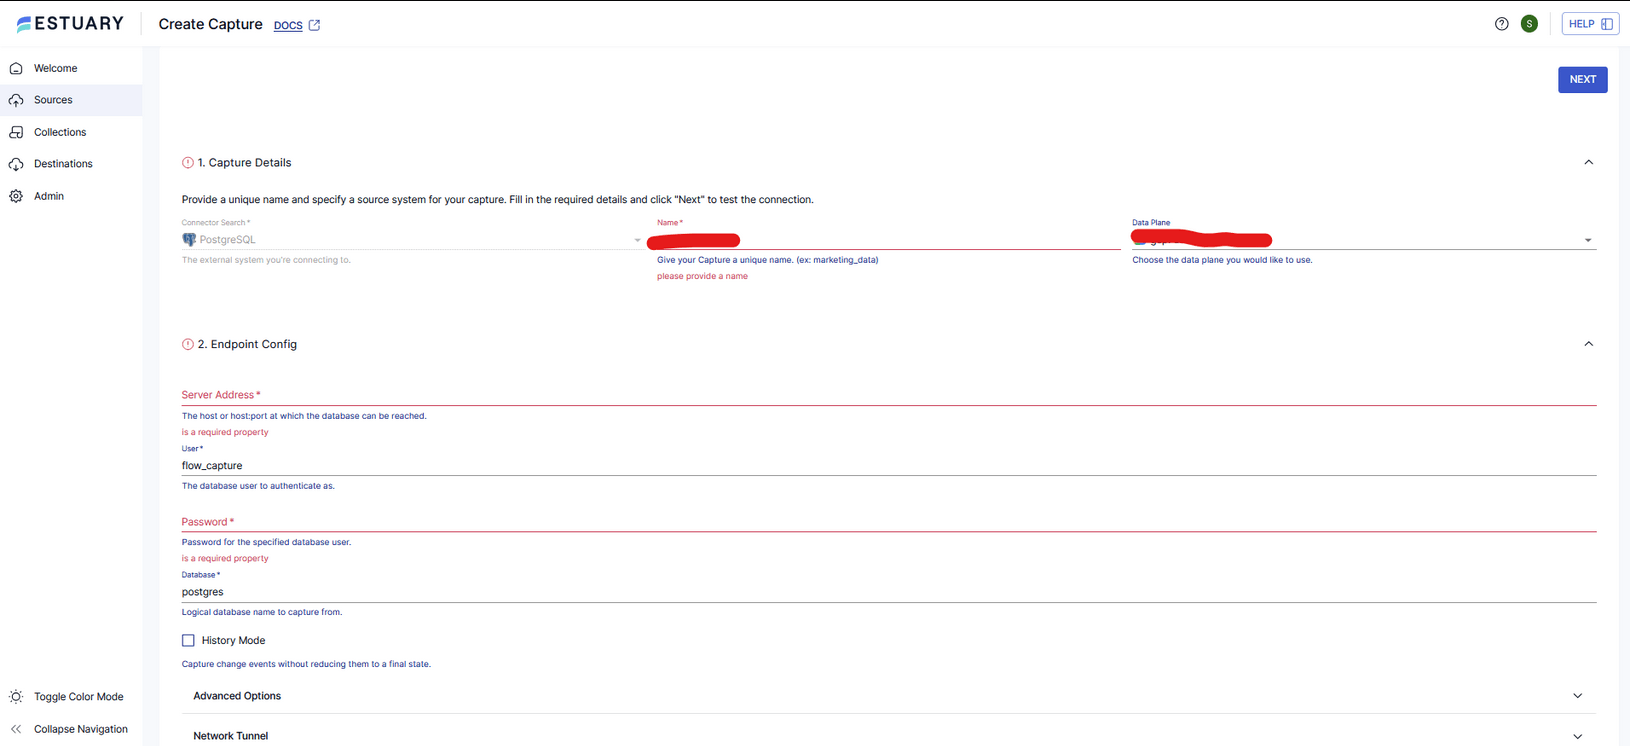
After selecting your connector, you’ll be prompted to fill in details for your source PostgreSQL server.
Fill in the following fields:
- Name: A unique name for your capture (e.g., pg_source_replication)
- Data Plane: Choose the data plane location for processing
- Server Address: The hostname or IP of your source server (e.g., localhost:5432)
- User: Your PostgreSQL user with replication permissions (e.g., flow_capture)
- Password: The password for the database user
- Database: The database name to capture from (e.g., postgres)
You can also optionally enable History Mode or configure an SSH tunnel under Advanced Options.
Click Next to test your connection and proceed.
Step 3: Choose the PostgreSQL Materialization Connector
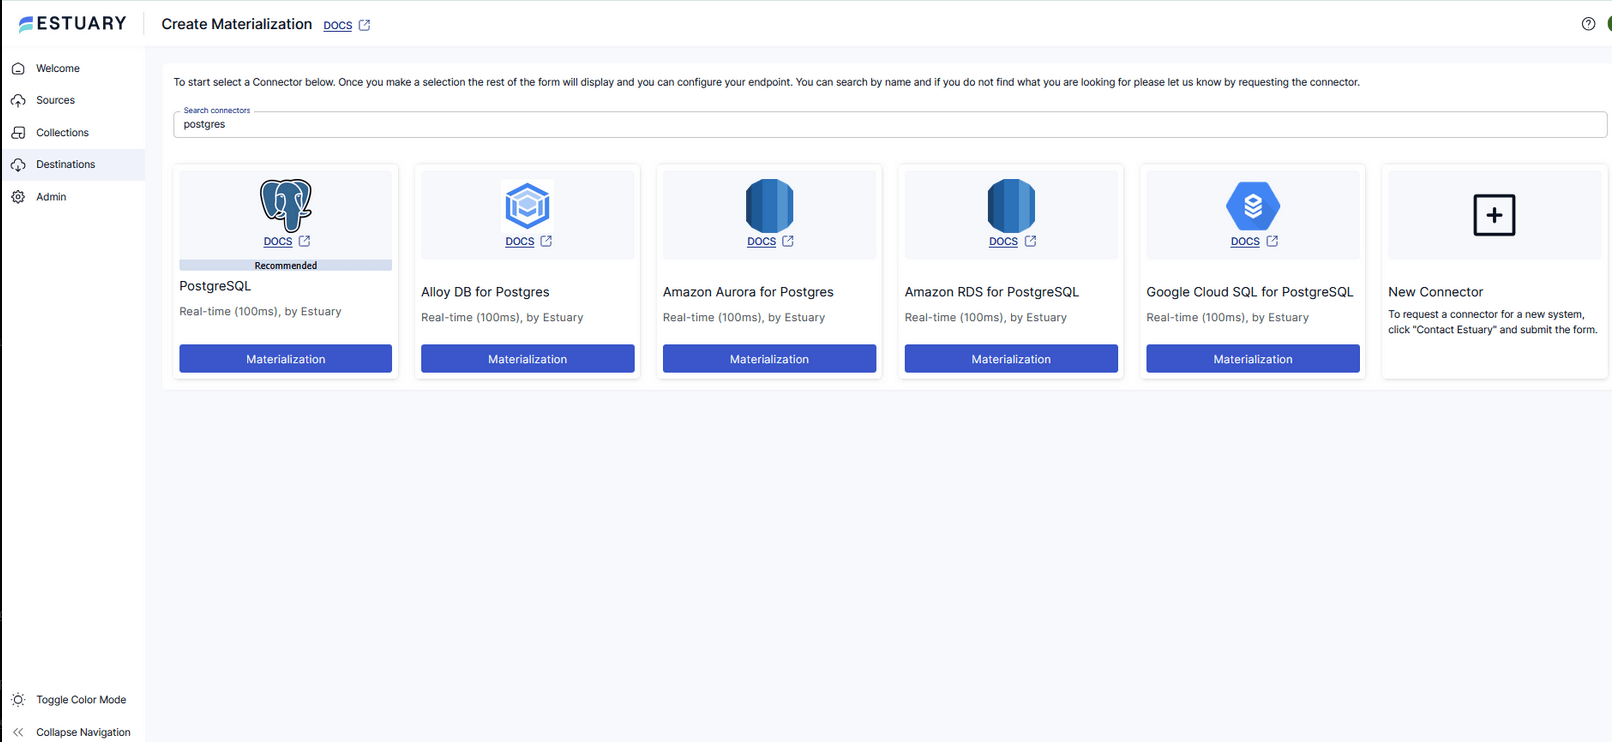
Once the source is configured, head to the Destinations tab and click + New Materialization.
Search for "PostgreSQL" and choose the destination type that fits your use case. Just like with capture connectors, Estuary supports standard PostgreSQL along with cloud platforms such as:
- AlloyDB for Postgres
- Amazon RDS for PostgreSQL
- Google Cloud SQL for PostgreSQL
Click Materialization on your selected connector to continue.
Step 4: Enter Your Target Database Details
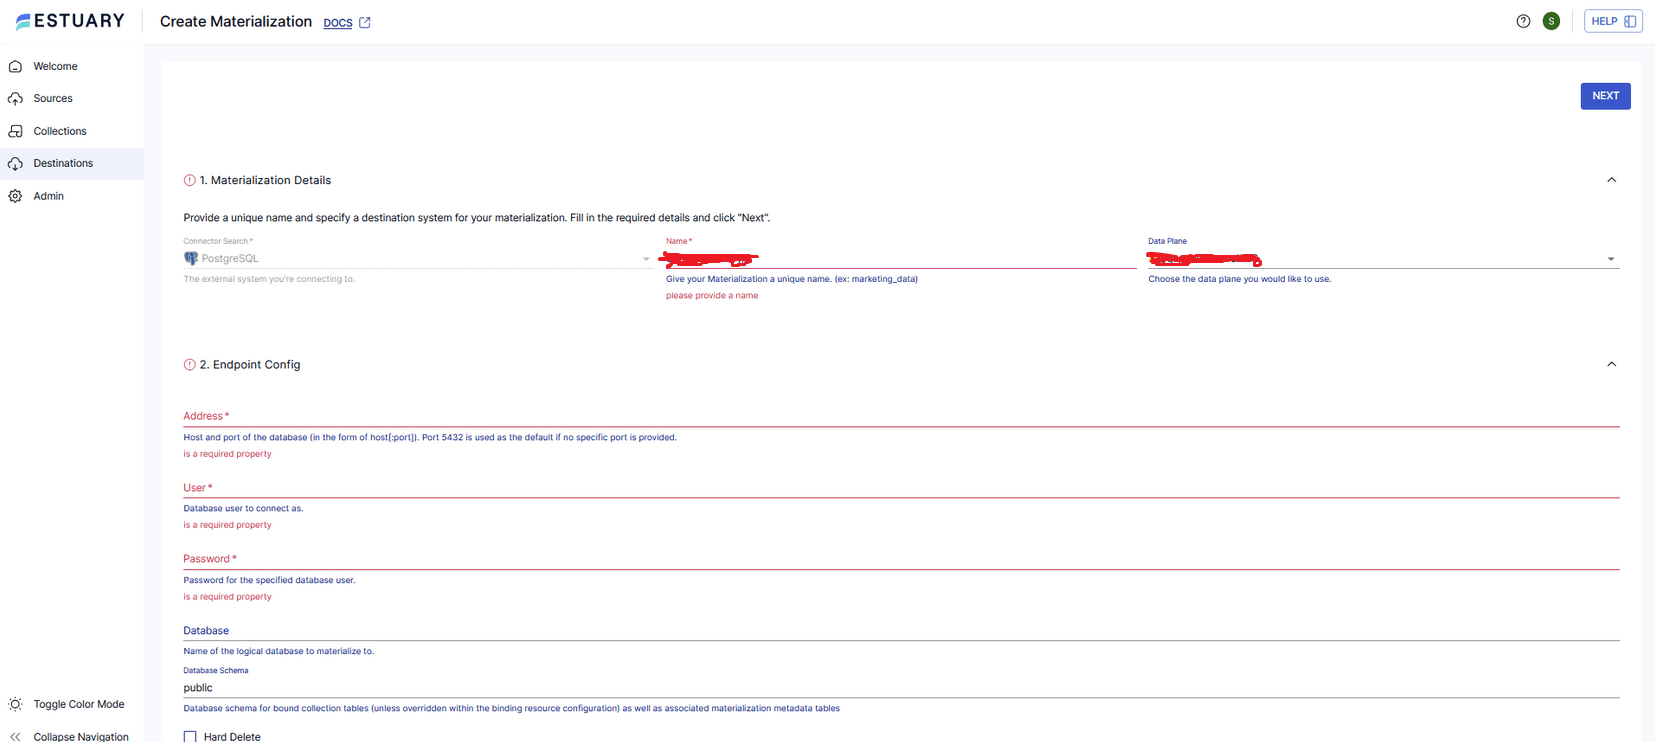
Now configure the materialization endpoint:
- Name: Give your materialization a unique name (e.g., pg_target_replication)
- Data Plane: Select the same or appropriate data plane
- Address: Host and port of the target PostgreSQL database
- User and Password: Credentials with permission to write new tables
- Database: Name of the target database
- Database Schema: Schema to write data into (e.g., public)
By default, Flow creates and manages tables automatically. You can also adjust options like hard deletes and SSL configuration if needed.
Click Next to test and save your configuration.
Step 5: Link Source Collections to the Materialization
Once your materialization is saved, Estuary will prompt you to link source collections. These are the data streams captured from your source PostgreSQL instance.
You can:
- Enable delta updates
- Mirror schema naming
- Add multiple collections
Click Modify to link your capture, then click Add to select the specific tables you want to replicate.
Step 6: Activate Your Flow
Once your capture and materialization are both set up and linked, Flow begins backfilling the selected tables. After that, it transitions to continuous real-time syncing using PostgreSQL’s logical replication stream.
You can monitor pipeline activity from the Collections or Admin tabs to ensure data is being processed successfully.
Advanced Tips for Production-Grade PostgreSQL Migrations
Migrating data between PostgreSQL servers might sound straightforward, but real-world environments often involve complexity such as schema drift, large volumes of historical data, continuous updates, and strict uptime requirements. Here are some key considerations and best practices to ensure your PostgreSQL-to-PostgreSQL migration is not just functional but enterprise-ready.
1. Enable Backfill and Real-Time Sync Together
If you're using a tool like Estuary Flow or any CDC-based system, make sure it supports both:
- Initial backfill: Loads all existing data from the source PostgreSQL server.
- Change data capture (CDC): Captures inserts, updates, and deletes as they happen.
Combining these ensures a smooth transition with zero data loss and no downtime.
2. Schema Evolution Support
Check if your migration solution supports schema changes. During long-running migrations or integrations, it's common for tables to evolve:
- New columns get added
- Data types are altered
- Indexes are updated
Tools like Estuary Flow offer schema validation and controlled evolution to help prevent sync failures.
3. Plan for Downtime Minimization
For production databases, aim to:
- Perform the bulk of the migration ahead of any cutover
- Validate synced data in a staging environment
- Do a short final switchover once both sides are in sync
This allows for a near-zero downtime migration, which is crucial for customer-facing apps or analytics systems.
4. Secure Your Connections
Always encrypt traffic between source and destination using SSL/TLS. If you're migrating between private VPCs or regions, consider:
- SSH tunneling
- VPNs
- VPC peering or PrivateLink (for cloud-native setups)
This ensures compliance and reduces risk.
5. Monitor Replication Lag and Throughput
Monitoring is critical in production. Use tools that expose:
- Lag metrics (how far behind the replica is)
- Throughput stats (records per second)
- Failure alerts (schema mismatches, credential errors, etc.)
Estuary Flow exposes OpenMetrics-compatible metrics for Prometheus, Datadog, and other monitoring tools.
Conclusion: Migrate PostgreSQL to PostgreSQL with Confidence
Migrating data between PostgreSQL servers is a common yet critical task for growing businesses, SaaS applications, and data-driven platforms. Whether you're moving workloads to a more scalable cloud environment, syncing multiple databases across teams, or setting up real-time analytics pipelines, having a reliable migration strategy is essential.
This guide walked through several methods to move data from one PostgreSQL server to another — from simple pg_dump and pg_restore workflows to real-time change data capture solutions like Estuary Flow. Each approach comes with trade-offs in terms of complexity, downtime, and automation.
If your use case demands continuous replication, fast setup, and robust schema handling, consider using Estuary Flow to automate the entire process. You’ll gain the benefits of real-time PostgreSQL data sync with minimal setup and zero operational burden.
Try Estuary Flow for free and start building seamless PostgreSQL-to-PostgreSQL pipelines today. 👉 Get Started with Estuary Flow
FAQs
Can I migrate PostgreSQL databases without downtime?
Is pg_dump safe for large production migrations?
How do I handle schema changes during PostgreSQL migration?

About the author
Team Estuary is a group of engineers, product experts, and data strategists building the future of real-time and batch data integration. We write to share technical insights, industry trends, and practical guides.


