Integrating BigQuery into Snowflake allows you to overcome limitations with semi-structured data in BigQuery while leveraging Snowflake’s advanced analytics and robust support for structured and semi-structured data.
This guide explores two efficient methods to move data from BigQuery to Snowflake: a real-time ETL solution using Estuary Flow and a batch method using GCS and the COPY INTO command. By connecting BigQuery to Snowflake, you can enhance data performance and operational efficiency through advanced analytics and global query caching in Snowflake.
What is BigQuery?
Google BigQuery is a cloud-based data warehouse designed to manage large-scale data analytics workloads efficiently.
The BigQuery architecture separates storage and compute resources, allowing you to scale each independently. When combined with columnar storage, these features enable efficient querying by accessing only the relevant data for your queries.
The driving factor behind BigQuery’s impressive performance is Dremel, Google’s proprietary distributed system developed for interactive querying of extensive datasets. This technology allows BigQuery to perform swift scans of billions of rows, facilitating fast data analysis.
Although BigQuery is highly efficient in performing fast queries on structured data, when compared to Snowflake, its handling of semi-structured data can be limited, sparking the BigQuery vs Snowflake debate.
These capabilities collectively make BigQuery accessible to developers for building and integrating data workflows. Business users can also use BigQuery for performing ad-hoc queries and gaining valuable insights.
Refer to our detailed guide to master BigQuery data types.
What is Snowflake?
Snowflake is a cloud data platform designed for data storage, processing, and analytics. Its high performance and scalability are achieved through a unique architecture that separates storage and compute resources. This separation allows independent scaling and efficient resource usage, ensuring you only pay for what you use.
The Snowflake architecture consists of three key layers:
- Database Storage: This layer involves optimizing and compressing data for efficient storage. The data is stored in a way that enhances performance while reducing storage costs.
- Query Processing: In this layer, Snowflake employs virtual warehouses, which are independent compute clusters. These clusters enable concurrent querying without any performance degradation, providing fast and reliable access to data.
- Cloud Services: This layer involves managing authentication, infrastructure management, and query optimization tasks. It ensures secure data transactions within the platform.
Using a BigQuery to Snowflake connector, you can easily move diverse data types, including structured and semi-structured data, into Snowflake for advanced analysis. It also offers robust data-sharing capabilities and easily integrates with various tools and platforms. Due to its robust support for semi-structured data, Snowflake often stands out in the BigQuery vs Snowflake comparison, offering greater flexibility for diverse data types.
These features make it a versatile choice for many use cases, from BI and data warehousing to large-scale data analytics.
To learn more, check out our Snowflake Data Ingestion Guide.
Why Load Data From BigQuery to Snowflake?
Benefits of Moving Data From BigQuery to Snowflake:
- Global Caching: While BigQuery offers user-specific caching, Snowflake supports global query result caching. Once a query is run in Snowflake, its results are available to different users or roles running the same query. This reduces the need to re-run such queries, hence saving computational costs.
- Advanced Security Features: Snowflake provides robust security features, including role-based access control (RBAC). This security model is easier to manage for small teams than BigQuery’s IAM model. It’s easier for a smaller team to develop and maintain a robust data governance strategy.
- Zero Copy Cloning: Snowflake’s unique Zero Copy Cloning feature allows you to create copies of tables, schemas, and databases without duplicating the actual data. This capability helps in reducing storage costs and facilitating efficient data management.
- SQL Flexibility: Snowflake offers more flexibility in SQL usage; you can perform varied tasks using standard SQL. On the other hand, BigQuery often requires additional custom APIs for simple tasks that could be otherwise directly handled in SQL. The increased SQL capability in Snowflake simplifies workflows and improves overall efficiency.
Methods to Connect BigQuery to Snowflake
You can connect BigQuery to Snowflake using two primary methods:
- Method 1: Using Estuary Flow to Connect BigQuery to Snowflake
- Method 2: Using GCS and Snowflake’s COPY INTO command to Load BigQuery to Snowflake
Method 1: Using Estuary Flow to Connect BigQuery to Snowflake
If you’re looking for an easy-to-use low-code solution to load data from BigQuery to Snowflake, consider Estuary Flow. This ETL platform specializes in combining data from various sources to your choice destination in real-time.
Prerequisites
- A BigQuery-enabled Google Cloud Project
- A Snowflake account with a target database, schema, virtual warehouse, and user role
- An Estuary Flow account
Step 1: Configure BigQuery as the Source
- Login to your Estuary account.
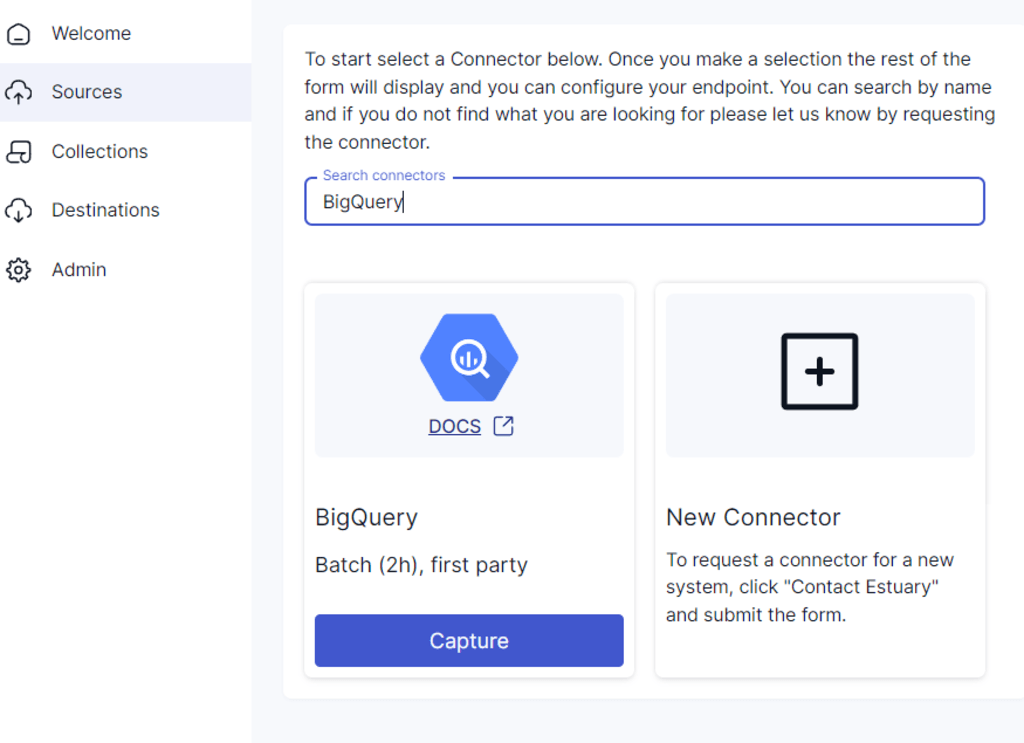
- Select the Sources option on the dashboard sidebar and click the + NEW CAPTURE button.
- In the Search connectors field, type BigQuery. Click the connector’s Capture button to start configuring it as the source end of your integration pipeline.
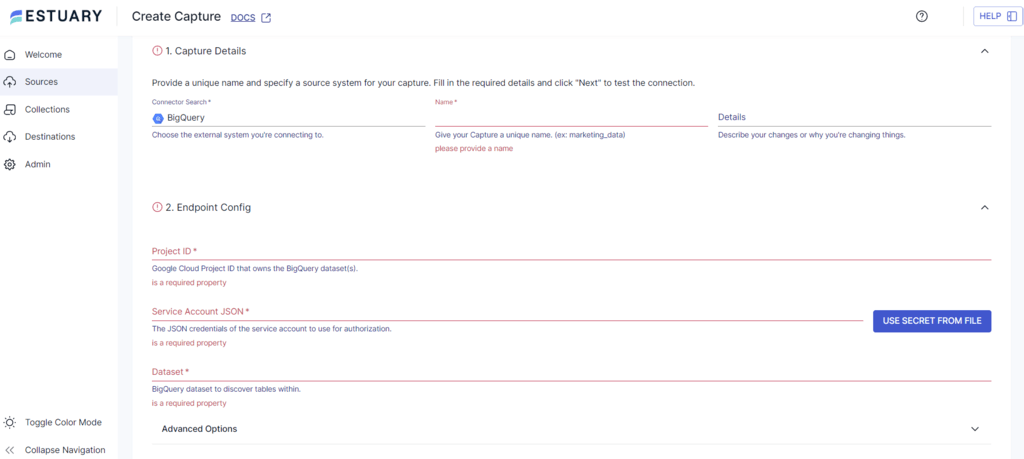
- In the BigQuery connector configuration page, enter the specified details such as Name, Project ID, Dataset, etc.
- Now, click NEXT > SAVE AND PUBLISH to complete setting up BigQuery as the source.
This will allow the connector to capture updates from BigQuery into Flow collections. The process involves periodically executing queries and translating the results into JSON documents.
Step 2: Configure Snowflake as the Destination
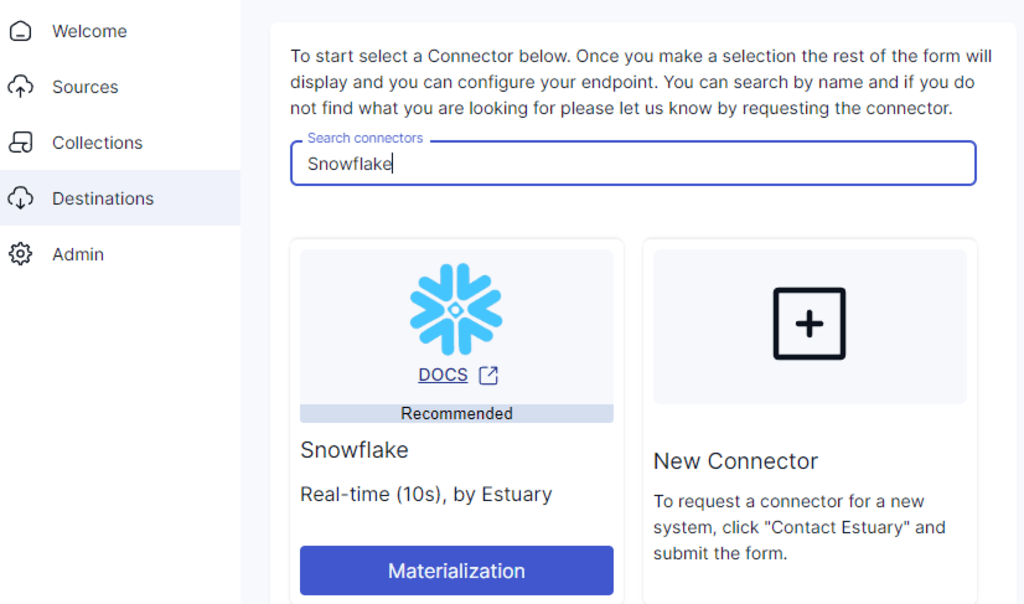
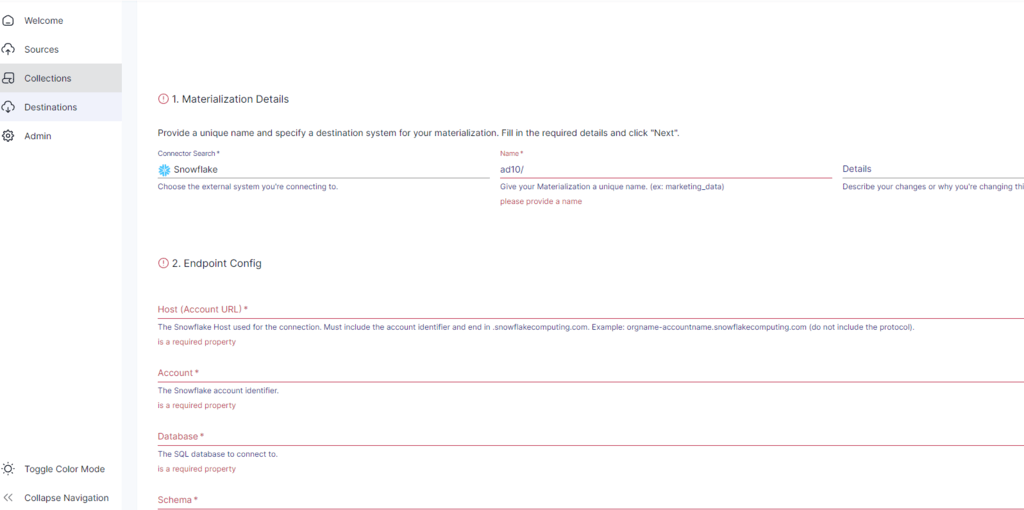
- Select Destinations from the sidebar and click on the + NEW MATERIALIZATION button.
- Search for Snowflake using the Search connectors field. Click the connector’s Materialization button to start configuring it as the destination.
- On the Snowflake connector configuration page, enter details such as Name, Host (Account URL), Database, etc.
- To manually link a capture to your materialization, click on the SOURCE FROM CAPTURE button in the Source Collections section.
- Finally, click NEXT > SAVE AND PUBLISH to complete the configuration.
This process creates a real-time BigQuery to Snowflake integration, allowing data to flow seamlessly between the two platforms.
Benefits of Estuary Flow
- Real-time Data processing with CDC: Estuary Flow supports real-time data integration using Change Data Capture (CDC). This allows data to be captured, transformed, and loaded with minimal latency. Estuary’s CDC capability is especially beneficial if you require real-time data for analysis and reporting.
- High Scalability: Estuary Flow is designed to handle large volumes of data. The platform can process data at speeds of up to 7GB/s, making it suitable for enterprises with high throughput requirements.
- Extensive Pre-built Connectors: Estuary Flow includes over 200+ pre-built connectors for various sources. You can extract data from databases, SaaS platforms, data warehouses, and more. The no-code connectors facilitate an almost effortless approach to setting up your data pipelines.
Method 2: Using GCS and Snowflake’s COPY INTO Command to Load BigQuery into Snowflake
This method involves exporting data from BigQuery to Google Cloud Storage (GCS). Then, you can use the COPY INTO command to load the data into Snowflake.
Prerequisites
- You must have the necessary IAM roles and permissions to export data into Google Cloud Storage and load it into Snowflake.
- Your BigQuery dataset and the Google Cloud Storage bucket must be in the same region.
Step 1: Export Data from BigQuery to Google Cloud Storage
- Launch the Google Cloud Console and navigate to the BigQuery page.
- In the Explorer panel, locate your project and dataset. Click on the table you want to export.
- Within the details panel of the selected table, click on Export > Export to Cloud Storage.
- Enter the Google Cloud Storage bucket location where you will save your exported data.
- Choose the format of the exported data as CSV, JSON, or Avro.
- Select a compression format if needed.
- Click Export to start exporting your data to the specified GCS location.
Step 2: Import Data from Google Cloud Storage to Snowflake
Prerequisites
- Your Snowflake account must have the necessary permissions to create a database, table, and other objects.
- Install the SnowSQL command-line tool to execute SQL commands.
To load your CSV data into a Snowflake table:
Create File Format Object
Creating a file format allows you to specify how the file will be interpreted and processed in Snowflake. Use the following SQL command:
plaintextCREATE OR REPLACE FILE FORMAT mycsvformat
  TYPE = 'CSV'
  FIELD_DELIMITER = '|'
  SKIP_HEADER = 1;
Create Stage Object
A stage is a temporary storage location where data files are uploaded before being loaded into target tables. Create a CSV stage object with this command:
plaintextCREATE OR REPLACE STAGE my_csv_stage
  FILE_FORMAT = mycsvformat;
Stage Data Files from the Local System
You can use the PUT command to upload your local CSV files to the stage you created.
- For Linux or macOS
plaintextPUT file:///tmp/load/file1*.csv @my_csv_stage AUTO_COMPRESS=TRUE;- For Windows
plaintextPUT file://C:/temp/load/file1*.csv @my_csv_stage AUTO_COMPRESS=TRUE;Copy Data into Snowflake Table
Finally, transfer the data from the staged area into your target Snowflake table using the COPY INTO <table> command.
plaintextCOPY INTO mycsvtable
  FROM @my_csv_stage/file1.csv.gz
  FILE_FORMAT = (FORMAT_NAME = mycsvformat)
  ON_ERROR = 'skip_file';
After copying the data into the Snowflake table, remove the data files from stage objects using the REMOVE command.
Limitations of Using GCS and Snowflake’s COPY INTO Command
- The method does not support real-time data integration. This eventually leads to inconsistencies and outdated data in Snowflake. If your business requires real-time data synchronization, this method may be unsuitable.
- The process is time-consuming, with each step requiring manual intervention. It can be labor-intensive, especially for large datasets or frequent updates. The lack of automation capabilities also adds to the operational overhead, potentially slowing down data-driven decision-making.
Conclusion
Connecting BigQuery to Snowflake allows you to use Snowflake’s advanced capabilities, including global caching and granular access control. It also provides flexible SQL support and cost-saving features such as zero-copy cloning. These features help manage data effectively, especially for heavy workloads and significantly boost data performance and security.
To connect BigQuery to Snowflake, you can move data through Google Cloud Storage and use the COPY INTO command. However, the process is time-consuming and requires manual efforts. It involves manually staging your BigQuery data in GCS before importing it into Snowflake.
A better alternative is to use an ETL tool such as Estuary Flow, which automates the process of connecting BigQuery to Snowflake. It streamlines data integration between the two platforms and supports real-time data synchronization.
Sign up with Estuary Flow to try out its CDC and transformation offerings apart from the range of ready-to-use connectors. Optimizing workflows can’t get easier than with Estuary!
FAQs
How do you load data faster in Snowflake?
To load local data into Snowflakes quickly, first, use the PUT command to upload your files to a Snowflake stage. Then, use the COPY INTO <TABLE> command to load the data from the staged files into your Snowflake database.
Does Snowflake run on GCP?
While Snowflake is not a service provided by Google, it can be hosted on Google Cloud Platform (GCP). You can set up, configure, and manage your Snowflake account through Snowflake's interface while leveraging GCP's infrastructure.
Related Tutorials:

About the author
Rob has worked extensively in marketing and product marketing on database, data integration, API management, and application integration technologies at WS02, Firebolt, Imply, GridGain, Axway, Informatica, and TIBCO.


