Authors: Dani Pálma, Jobin George
Estuary Flow is a real-time data integration platform. Over 3,000 active users rely on Estuary for real-time streaming at scale across hundreds of different sources and destinations. Our largest data pipeline streams 7GB+/per second with sub-100ms latency.
Google BigQuery is one of our top 2 destinations. We’ve been seeing more and more demand for using BigQuery not just as a data warehouse for analytics, but as a source of data and a compute engine. Our integration with Pub/Sub allows us to access this data.
BigQuery continuous queries, an overview
BigQuery continuous queries operate continuously processing SQL statements, allowing companies to analyze, transform, and replicate data in real time as new events arrive in BigQuery. They use familiar SQL syntax to define the data analysis and can handle large volumes of data efficiently. Companies can synchronize their data immediately as it reaches BigQuery and push that data via Estuary to the downstream applications and tools after enriching the data as they need it. This unlocks real-time use cases powered by data in BigQuery, such as immediate personalization, anomaly detection, real-time analytics, and reverse ETL, etc.
How does BigQuery continuous queries works with Estuary
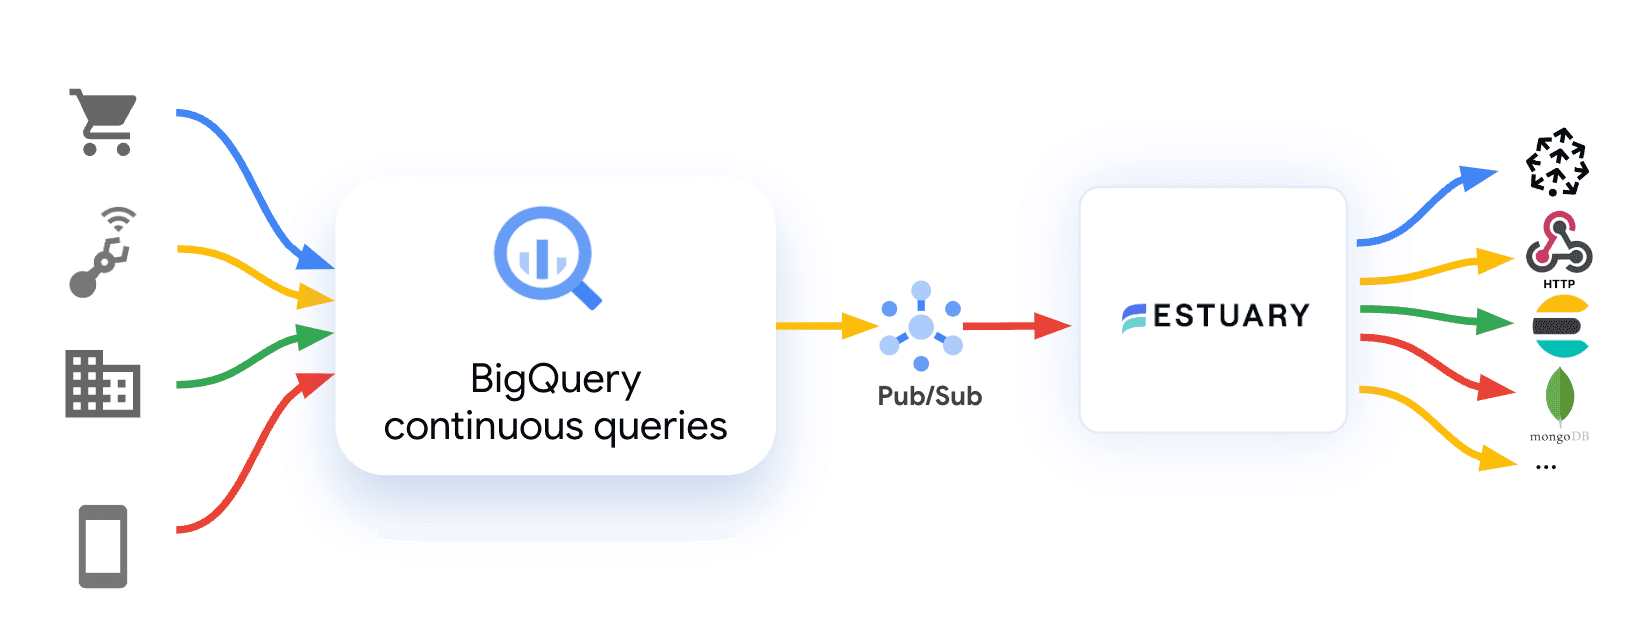
For most of our joint customers, data streams from different sources into BigQuery, which then processes the data. Once data streams into BigQuery, continuous queries process the data. As BigQuery streams the data out via Pub/Sub, Estuary receives the messages and streams them into different destinations.
Here’s a high-level overview of the architecture:
- Capture Connector Initialization
- A new capture connector is created to capture documents from Google Pub/Sub topics.
- Unlike typical capture connectors, this one operates more like a webhook, given the stateless nature of Google Pub/Sub message delivery.
- Message Handling
- Google Pub/Sub does not support offset tracking or checkpointing. Instead, once a receipt channel is opened, Pub/Sub sends any unacknowledged messages to the recipient.
- Discovery and Binding
- The connector discovers all available Pub/Sub topics and represents them as bindings within Estuary Flow.
- For each enabled binding, a subscription with a unique yet deterministic (for durability) name is created.
- These subscriptions are used to receive messages from Pub/Sub topics.
How Estuary users can benefit from BigQuery continuous query integration
BigQuery ML lets you create and run machine learning models by using GoogleSQL queries. It also lets you access Vertex AI models and Cloud AI APIs to perform artificial intelligence (AI) tasks. For example, BigQuery can use its AI & ML features to detect anomalies. As the results stream out via Pub/Sub, Estuary Flow receives the data as a stream and materializes into various downstream systems as a live data stream.
Estuary customers use this today to materialize data live for operations, to support operational decisions or automate processes. Estuary Flow writes the stream into different databases - such as BigQuery, Elastic, Google Cloud SQL, or databases in other clouds - as live data with sub-second latency, or kicks off alerts.
With Estuary Flow and BigQuery continuous queries, you can create these end-to-end flows from the raw data to the live views of the anomalies inside an operational app in minutes.
Get started with Estuary and BigQuery continuous queries
Setting up and running BigQuery continuous queries
At the time this blog was written, the continuous queries feature is in preview and subjected to the "Pre-GA Offerings Terms". To enroll in the continuous queries preview, fill out the request form.
1) Estuary Pub/Sub connector would be using a service account to connect and consume data from Pub/Sub, you can configure a single service account for running continuous queries and consume from Pub/Sub by assigning relevant permissions to the user. You can configure the service account with permissions listed here. Make sure you create a JSON key to configure the connection in Estuary in the later step.
2) To run continuous queries, BigQuery requires a slot reservation with a “CONTINUOUS” assignment type. Follow steps here if you are not sure how to create a reservation
3) Navigate to the Pub/Sub topic page and click on “Create Topic” button on the top center of the page, and provide a name (say ‘continuous_query_topic’, also create a default subscription if needed)
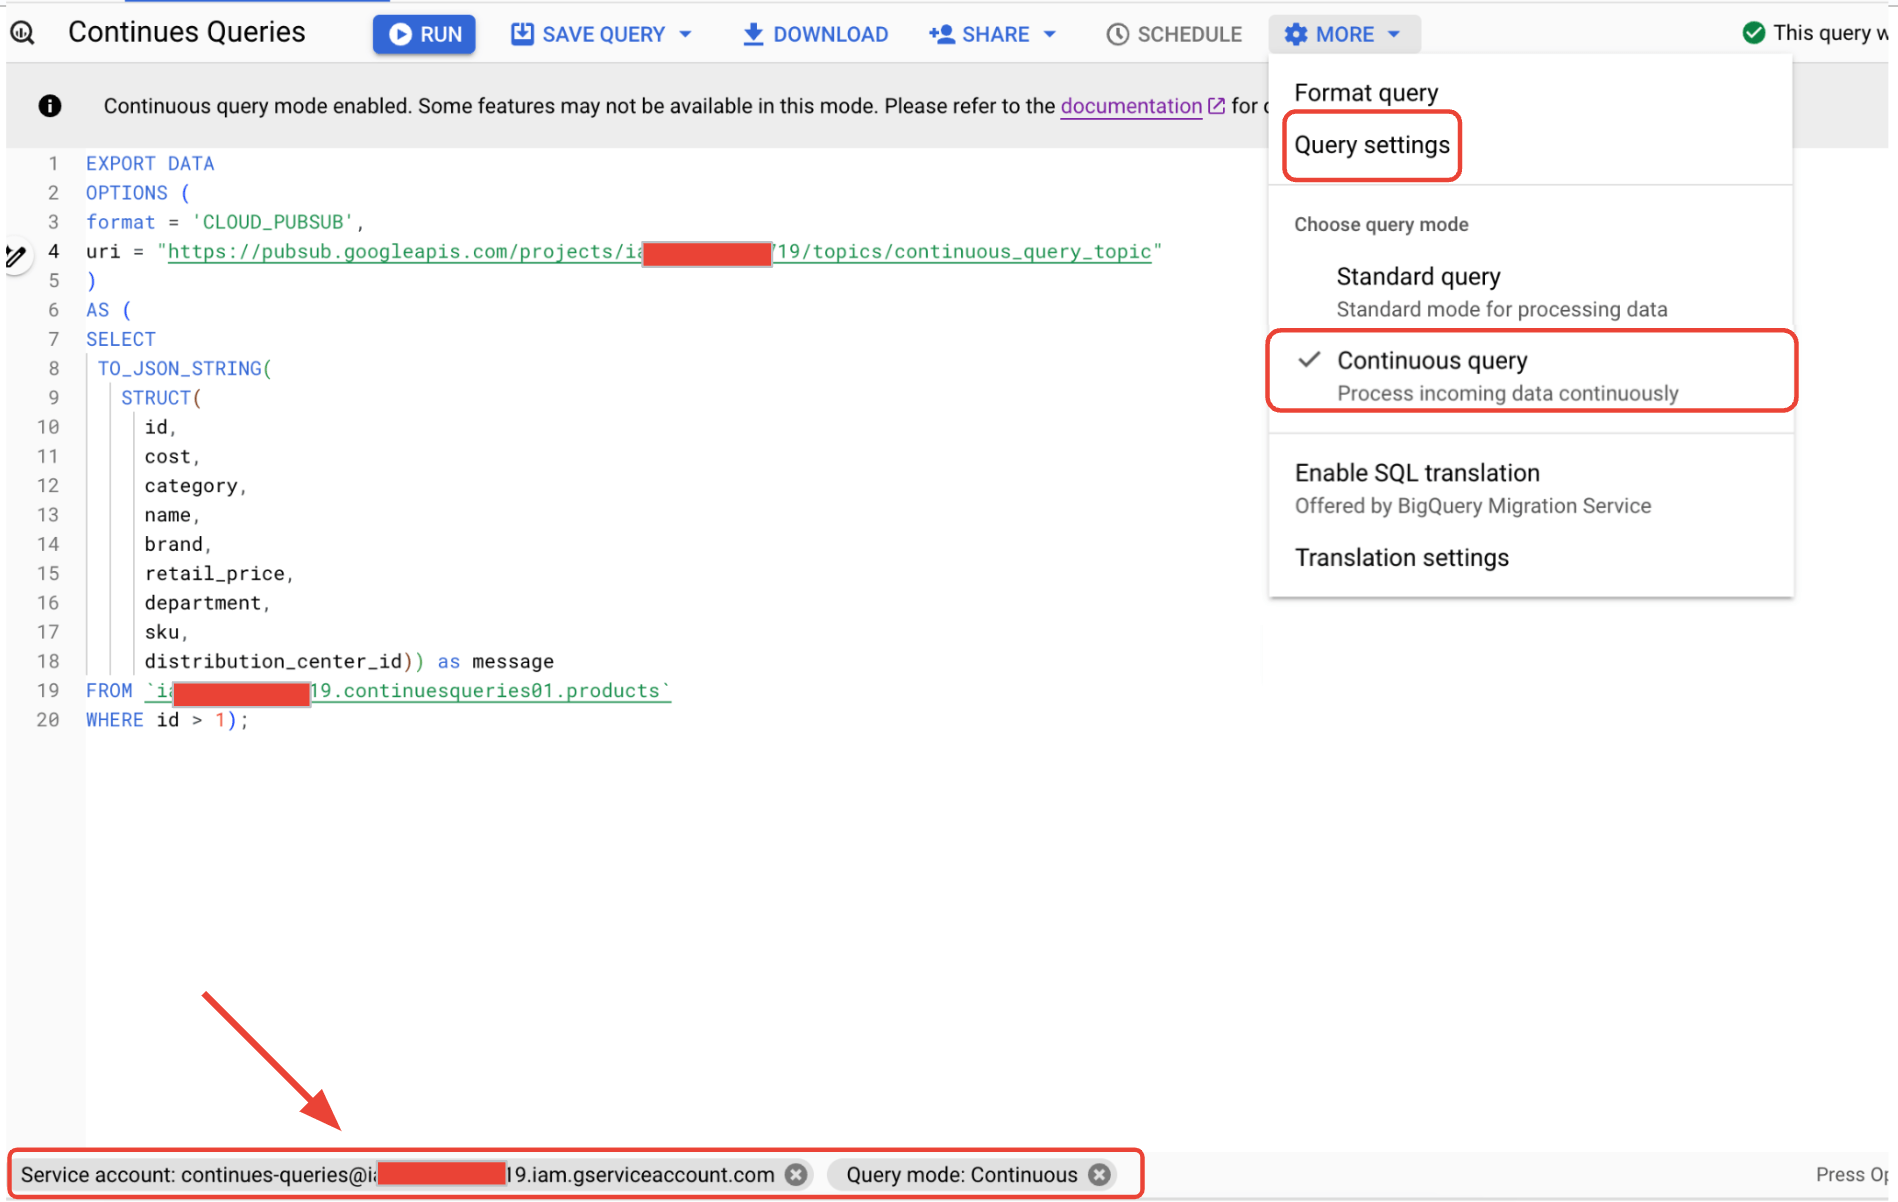
4) Navigate to BigQuery service page and design the query as an export to pub/sub
|
In the More Settings as shown below, select the query mode as continuous query and in the query settings select the service account created above to run the query. You can also choose the timeout required if any.
Before we execute the query, make sure the below steps are done to ensure data continuously generated can be captured by the Estuary cloud Pub/Sub connector.
Configure Estuary Pub/Sub Capture connector
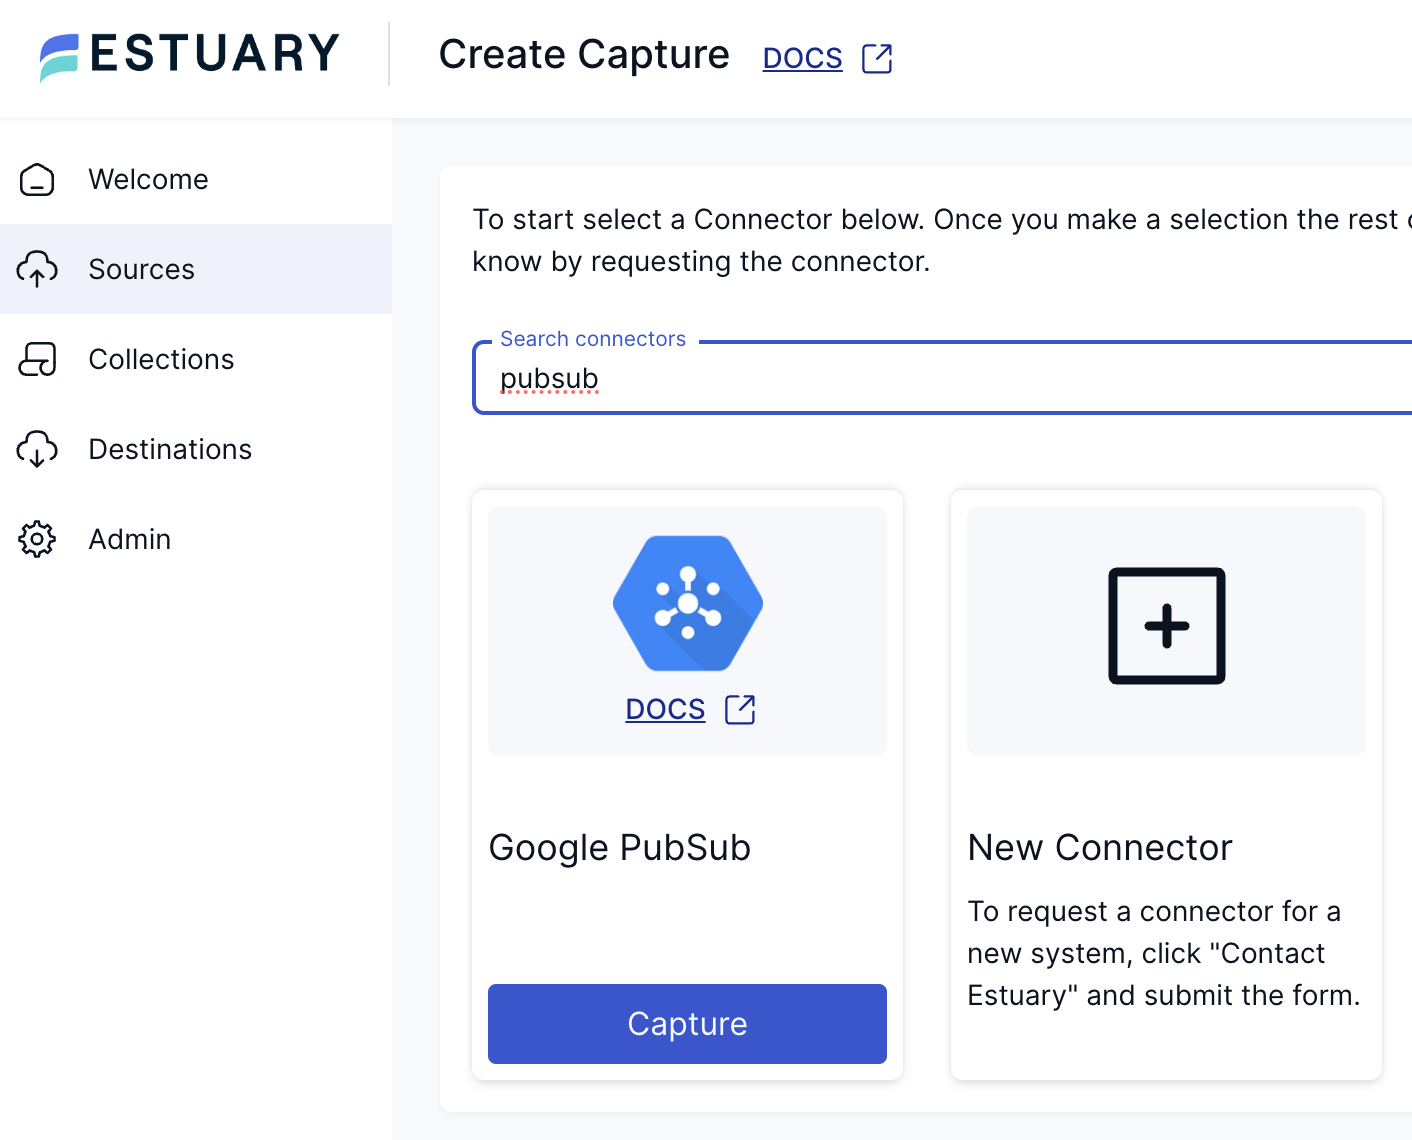
To start capturing real-time data from the Pub/Sub topic, head over to the Estuary Flow dashboard, navigate to the Sources page, and press NEW CAPTURE.
In the list of connectors, search for Google Pub/Sub, then press Capture.
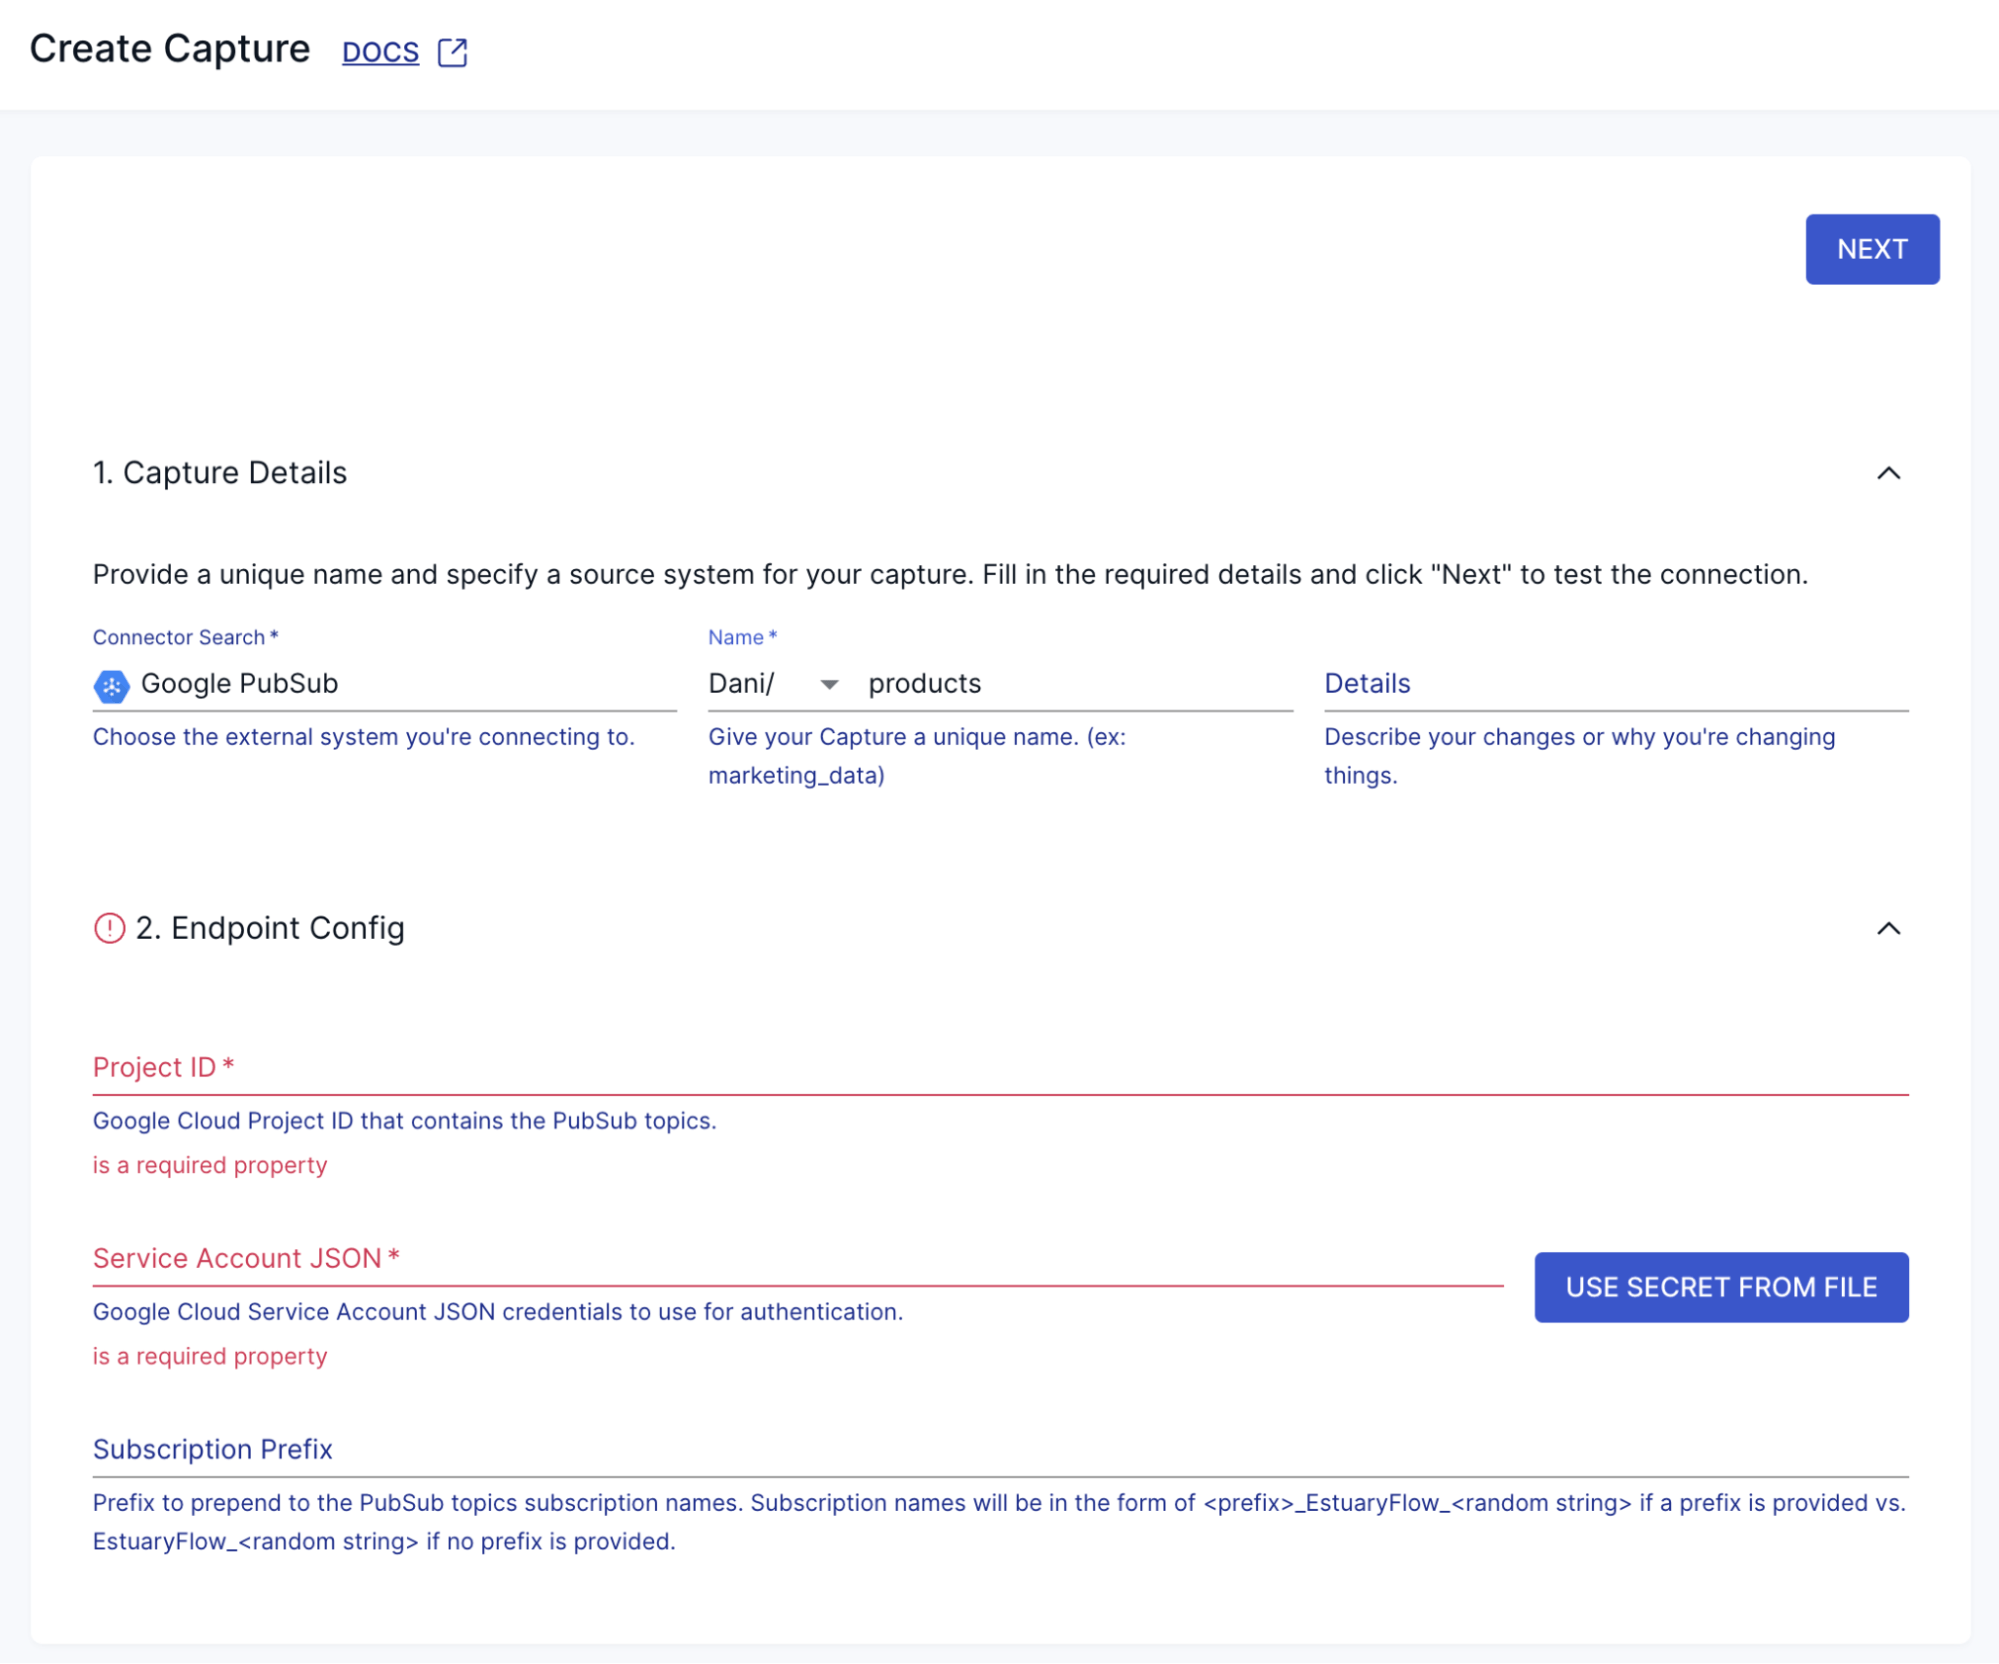
This will bring you to the connector configuration page. Fill out the required fields and press Next, then Save and Publish.
After a few seconds, the capture connector will be provisioned and it will immediately start collecting data in real-time coming from the Pub/Sub topic and Estuary Flow will persist incoming records in a durable, scalable object storage behind the scenes.
Enrich data using Derivations
Sometimes, the collections generated by a capture might not meet your specific requirements. You may need to filter certain documents, add calculations, unpack nested arrays, or aggregate data from multiple documents. You might also need to merge data across several collections using a common key or apply business logic to make real-time decisions. Flow derivations enable you to perform various transformations, from simple remapping to complex, self-referential, and stateful transaction processing.
In essence, a derivation is a collection constructed by applying transformations to one or more source collections. Derivations operate continuously, updating in real-time as changes occur in the source collections.
This section will show how to enrich a product collection with additional details from another collection. For our example, we'll enrich a product collection with supplier information. The source of this data can be any of Estuary Flow’s hundreds of supported data sources - once it is ingested into Flow, the method of joining them is the same.
Install Required Tools
Ensure you have a text editor and flowctl (Flow's CLI tool) installed. Refer to the Estuary Flow documentation for installation instructions.
Sign In and Enable Access
Sign in to the Estuary Flow dashboard. Verify access by running:
plaintextflowctl collections read --collection demo/products/sample-data --uncommittedYou should see a stream of JSON documents. Press Ctrl+C to stop the stream.
Writing the Derivation
Create a working directory and navigate into it. Create a flow.yaml file with the following content:
plaintextcollections:
  your-namespace/product-enriched:
    schema: product-enriched.schema.yaml
    key:
      - /id
    derive:
      using:
        typescript:
          module: product-enriched.ts
      transforms:
        - name: enrich_with_supplier
          source: demo/products/sample-data
          shuffle: any
          join:
            supplier_info:
              source: demo/suppliers/sample-data
              key: /supplier_id
Define Schema
Create a product-enriched.schema.yaml file with the following content:
plaintext$schema: "http://json-schema.org/draft-07/schema#"
properties:
  id:
    type: integer
  brand:
    type: string
  category:
    type: string
  cost:
    type: number
  department:
    type: string
  distribution_center_id:
    type: integer
  name:
    type: string
  retail_price:
    type: number
  sku:
    type: string
  supplier:
    type: object
    properties:
      supplier_id:
        type: integer
      name:
        type: string
      contact:
        type: string
      address:
        type: string
type: object
Generate TypeScript Stubs
Run the following command to generate TypeScript stubs:
plaintextflowctl generate --source flow.yamlImplement Transformation Logic
Edit product-enriched.ts with the following code:
javascriptimport { IDerivation, Document, SourceEnrichWithSupplier, SupplierInfo } from 'flow/your-namespace/product-enriched';

export class Derivation extends IDerivation {
    enrichWithSupplier(_read: { doc: SourceEnrichWithSupplier, joins: { supplier_info: SupplierInfo } }): Document[] {
        return [{
            id: _read.doc.id,
            brand: _read.doc.brand,
            category: _read.doc.category,
            cost: _read.doc.cost,
            department: _read.doc.department,
            distribution_center_id: _read.doc.distribution_center_id,
            name: _read.doc.name,
            retail_price: _read.doc.retail_price,
            sku: _read.doc.sku,
            supplier: _read.joins.supplier_info ? {
                supplier_id: _read.joins.supplier_info.supplier_id,
                name: _read.joins.supplier_info.name,
                contact: _read.joins.supplier_info.contact,
                address: _read.joins.supplier_info.address
            } : null
        }];
    }
}
Verification and Publishing
Verify Transformation
Use flowctl to preview the transformation:
javascriptflowctl preview --source flow.yaml --name your-namespace/product-enrichedPublish Derivation
Publish your derivation to Flow:
javascriptflowctl catalog publish --source flow.yamlNote: Publishing the derivation will initialize the transformation on the live, real-time product stream. Ensure to delete it after completing the tutorial.
View in Dashboard
Go to the Collections page on the Estuary Flow Web UI to see your derivation in action and preview the results.
Create a Materialization connector
After configuring the derivation, the next step is to materialize the results into our target system. Let’s say you want to hydrate an Elasticsearch instance with the transformed data. Here’s how you can do so in just a few minutes:
If you are on the page of the derived collection, to proceed with setting up the destination end of the pipeline, click on the MATERIALIZE button in the top right corner.
Alternatively, you can navigate back to the dashboard and select Destinations > + NEW MATERIALIZATION.
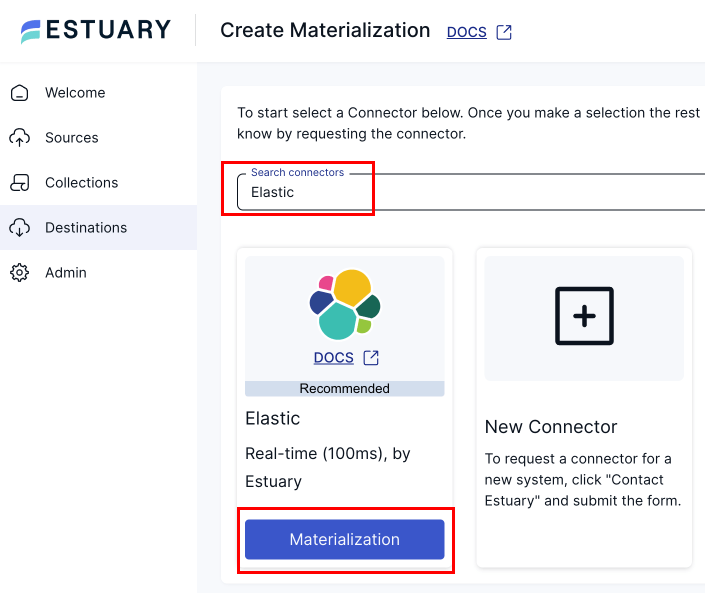
Search for the Elastic connector and click its Materialization button when you see it in the search results.
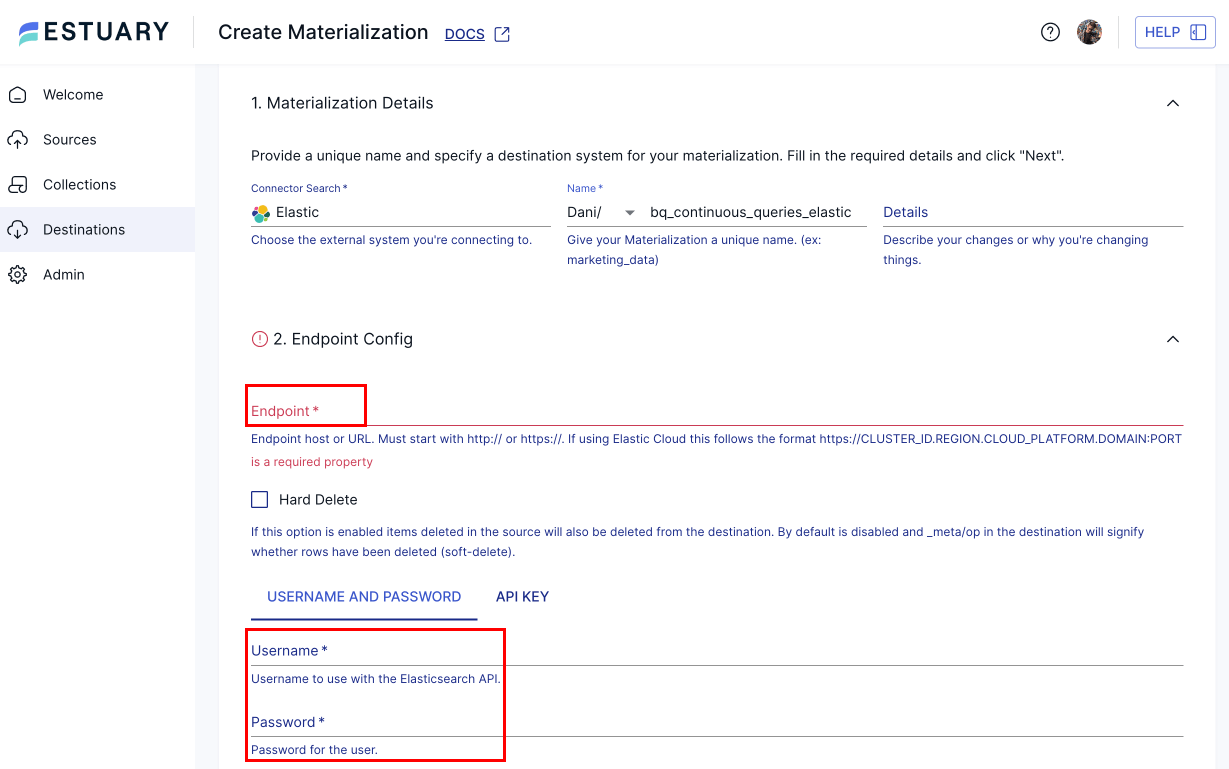
You will be redirected to the Materialization configuration page, where you must provide all the relevant details, such as the Endpoint User, and Password, among others.
While collections added to your capture will automatically be added to your materialization, you can use the Source Collections section to select a capture to link to your materialization.
Then, click on NEXT > SAVE AND PUBLISH. The connector will materialize Flow collections into Elasticsearch, completing the integration.
Within a few seconds, the materialization connector will execute the initial backfill to load all data already captured and after it will switch into a continuous, incremental load mode and will keep the target dataset fresh in real-time.
Conclusion
Getting access to real-time data has become really easy with tools like Estuary Flow. The combination of Estuary Flow with Google BigQuery continuous queries and its integration with Vertex AI has made it possible for data engineers to add new real-time and AI-enabled features literally in minutes, from the raw data to the end application. If you've identified ways AI could boost your business efficiency using data, BigQuery continuous queries can take it to the next level with real-time capabilities.

About the authors
Dani is a data professional with a rich background in data engineering and real-time data platforms. At Estuary, Daniel focuses on promoting cutting-edge streaming solutions, helping to bridge the gap between technical innovation and developer adoption. With deep expertise in cloud-native and streaming technologies, Dani has successfully supported startups and enterprises in building robust data solutions.
Rob has worked extensively in marketing and product marketing on database, data integration, API management, and application integration technologies at WS02, Firebolt, Imply, GridGain, Axway, Informatica, and TIBCO.


