Amazon S3 to Snowflake migration offers a robust combination of cloud-based storage and advanced data warehousing capabilities. Leveraging S3 as a scalable and cost-effective storage solution, you can efficiently store and access various data types, including structured and unstructured data. On the other hand, Snowflake’s advanced data warehousing features enable high-performance analytics and seamless data processing. Together they empower you to optimize data management for enhanced analytics workflows.
In this guide, you'll explore how to efficiently transfer data from Amazon S3 to Snowflake, leveraging both automated and manual methods for seamless data integration.
Amazon S3 Overview
Amazon S3 (Simple Storage Service) is a widely used and versatile cloud-based storage service offered by Amazon Web Services (AWS). It delivers a secure and reliable platform for storing, accessing, and retrieving any type of data, such as documents, images, videos, and logs. In Amazon S3, data is stored in buckets, which act as a container for objects. Each object in S3 comprises the object data, metadata, and a unique identifier (key name). This object-based storage model allows you to efficiently manage and access data. With this flexible storage model, Amazon S3 becomes an ideal choice for building data storage and supporting large-scale applications.
Snowflake Overview
Snowflake is one of the leading cloud-based Software-as-a-Service data platforms that provide a fully-managed solution for cloud-based storage, data warehousing, and analytics services. Its Cloud Data Warehouse is built on a unique architecture called the Multi-Cluster Shared Data architecture. This architecture separates storage and computation, enabling these components to scale independently. Snowflake allows you to store, access, and analyze massive data seamlessly, making it a preferred choice for efficient cloud data management solutions. With a SQL-based interface and secure data-sharing capabilities, Snowflake also simplifies data collaboration and analysis across various use cases.
How to Load Data From Amazon S3 to Snowflake
While there are several approaches for loading data from Amazon S3 to Snowflake, we will explore the more popular methods in this article.
- Automated Method: Using Estuary Flow to Load Data from Amazon S3 to Snowflake
- Manual Method: Using Snowpipe for Amazon S3 to Snowflake Data Transfer
Automated Method: Using Estuary Flow to Load Data from Amazon S3 to Snowflake
To overcome the challenges associated with manual methods, you can use automated, streaming ETL (extract, transform, load) tools like Estuary Flow. It provides automated schema management, data deduplication, and integration capabilities for real-time data transfer. By using Flow’s wide range of built-in connectors, you can also connect to data sources without writing a single line of code.
Here are some key features and benefits of Estuary Flow:
- Simplified User-Interface: It offers a user-friendly and intuitive interface that automates data capturing, extraction, and updation of data. It eliminates the need for writing complex manual scripts, saving time and effort.
- Real-Time Data Integration: Flow uses real-time ETL and Change Data Capture (CDC), allowing you to have up-to-date and synchronized data across systems. This enables real time analytics, reporting, and decision-making on fresh data.
- Schema Management: It continuously monitors the source data for any changes in the schema and dynamically adapts the migration process to accommodate any changes.
- Flexibility and Scalability: Flow is designed to adapt to varying data integration tasks while scaling efficiently to handle increasing data volumes. Its low-latency performance, even in high-demand scenarios, ensures near-instant data transfer, making it a valuable tool for real-time analytics.
Let's explore the step-by-step process to set up Amazon S3 to Snowflake ETL data pipeline.
Step 1: Log in to your Estuary account, and if you don’t have one, register to try it out for free.
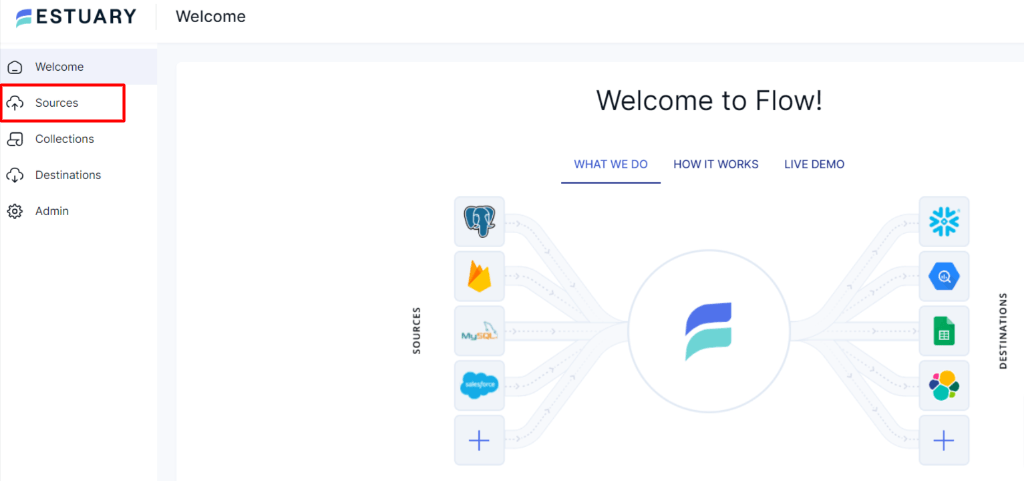
Step 2: After a successful login, you’ll be directed to Estuary’s dashboard. To set up the source end of the pipeline, simply navigate to the left-side pane of the dashboard and click on Sources.
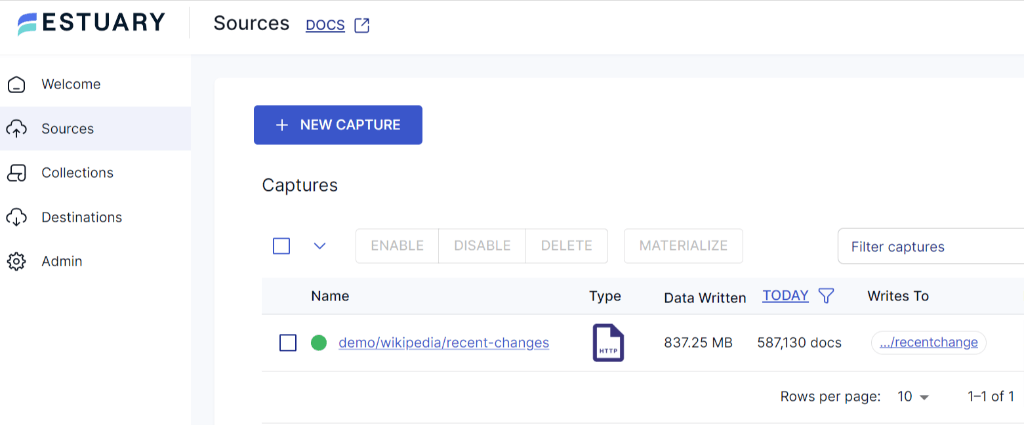
Step 3: On the Sources page, click on the + New Capture button.
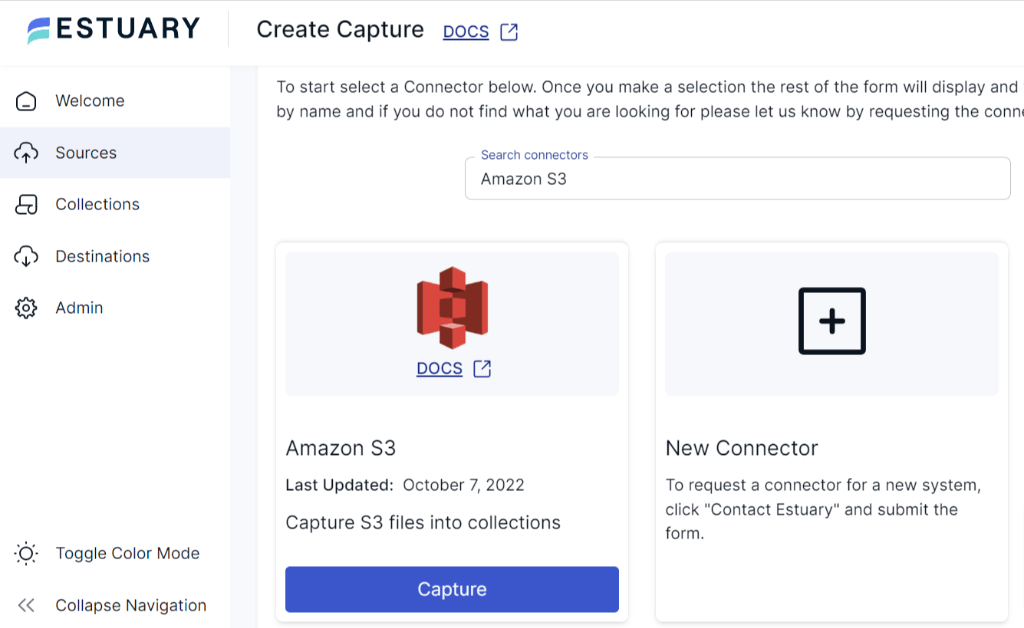
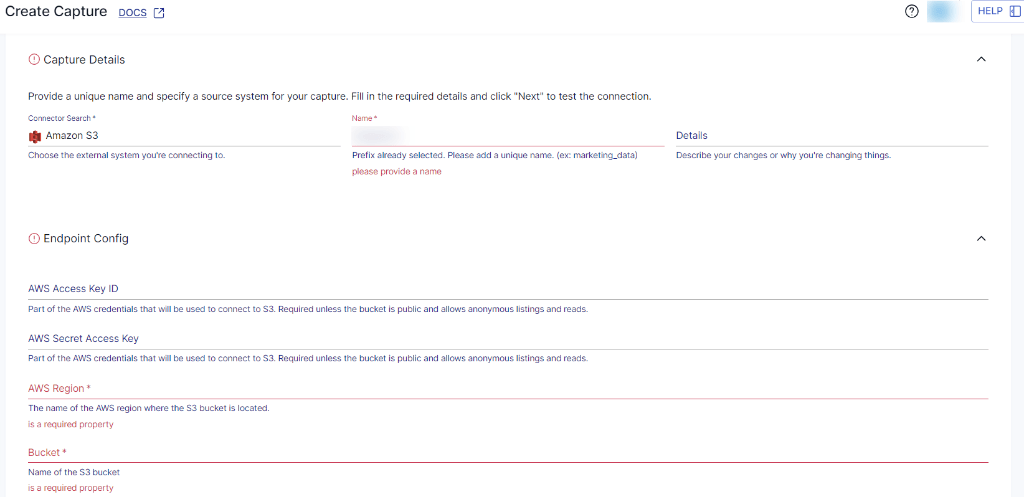
Step 4: Now, you’ll be redirected to the Create Capture page. Search and select the Amazon S3 connector in the Search Connector box. Click on the Capture button.
Step 5: On the Amazon S3 connector page, enter a Name for the connector and the endpoint config details like AWS access key ID, AWS secret access key, AWS region, and bucket name. Once you have filled in the details, click on Next > Save and Publish.
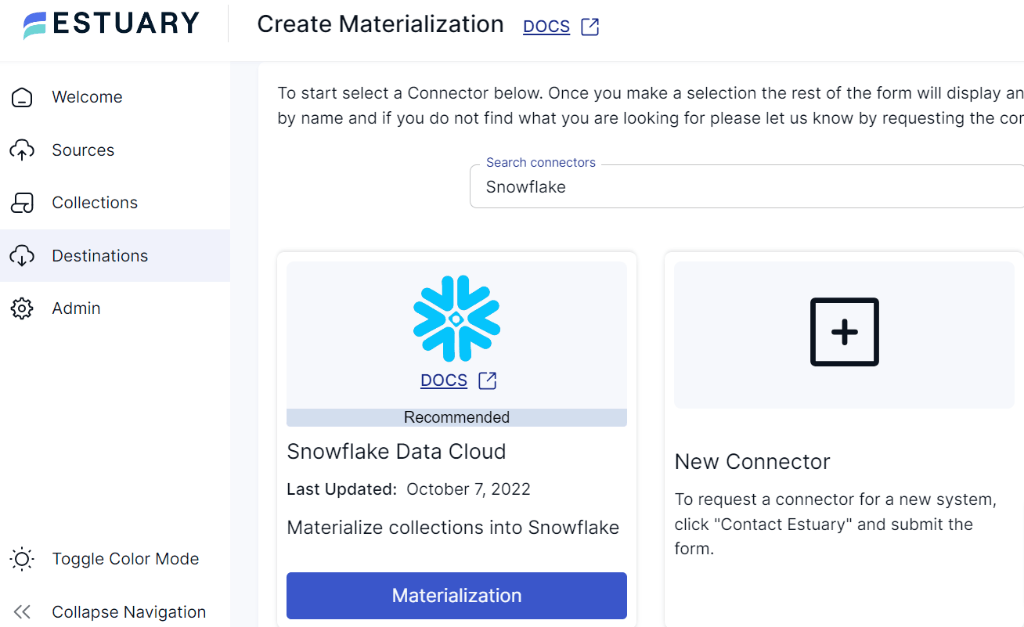
Step 6: Now, you need to configure the Snowflake as the destination. On the left-side pane on the Estuary dashboard, click on Destinations. Then, click on the + New Materialization button.
Step 7: As you are transferring your data from Amazon S3 to Snowflake, locate Snowflake in the Search Connector box and proceed to click on the Materialization button. This will redirect you to the Snowflake materialization page.
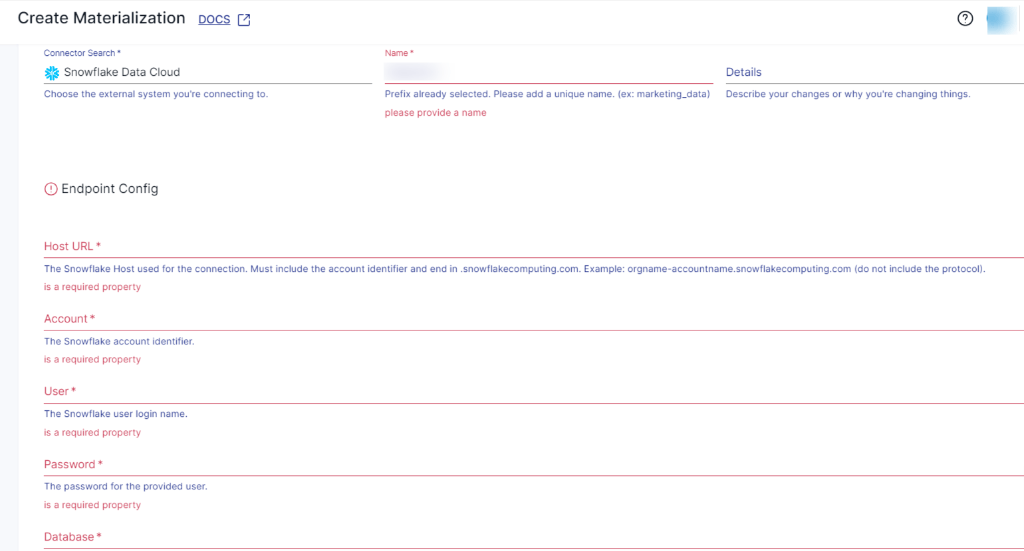
Step 8: On the Snowflake materialization connector page, complete the necessary fields, including a unique name for your materialization. Provide the Endpoint Config details, such as the Snowflake Account identifier, User login name, Password, Host URL, SQL Database, and Schema information.
Step 9: Once the required information is filled in, click on Next, followed by Save and Publish. By following these steps, Estuary Flow will continuously replicate your data from Amazon S3 to Snowflake dataflow in real time.
That’s all! With Estuary Flow’s source and destination configuration, your Amazon S3 data will be successfully loaded into the Snowflake database.
For detailed information on creating an end-to-end Data Flow, see Estuary's documentation:
Manual Method: Using Snowpipe for Amazon S3 to Snowflake Data Transfer
Before you load data from Amazon S3 to Snowflake using Snowpipe, you need to ensure that the following prerequisites are met:
- Access to Snowflake account.
- Snowpipe should be enabled in your Snowflake account.
- Active AWS S3 account.
- AWS Access Key ID and AWS Secret Key for the S3 bucket where the data files are located.
- To access files within a folder in an S3 bucket, you need to set the appropriate permissions on both the S3 bucket and the specific folder. Snowflake requires s3:GetBucketLocation, s3:GetObject, s3:GetObjectVersion, and s3:ListBucket permissions.
- Well-defined schema design and target table in Snowflake.
The method of moving data from Amazon S3 to Snowflake includes the following steps:
- Step1: Create an External Stage
- Step 2: Create a Pipe
- Step 3: Grant Permissions
- Step 4: Data Ingestion
The below image represents the overall steps involved in this process.
Here's a high-level overview of the Amazon S3 to Snowflake migration process:
Step1: Create an External Stage
- Log in to your Snowflake account using SnowSQL, which is a command-line tool provided by Snowflake. Next, create an external stage that serves as the source for Snowpipe to ingest data. A Snowpipe is a feature in Snowflake that enables real-time data ingestion from various sources into Snowflake tables within minimal latency. It automates the process of loading data into Snowflake tables, enabling near real-time data processing and analysis.
- To create an external stage that points to the location in Amazon S3 where your data files are stored, use the following syntax:
plaintextCREATE STAGE external_stage
URL = 's3://s3-bucket-name/folder-path/'
CREDENTIALS = (
AWS_KEY_ID = 'aws_access_key_id'
AWS_SECRET_KEY = 'aws_secret_access_key'
)
FILE_FORMAT = (TYPE = CSV);
Replace s3-bucket-name, folder-path, AWS_KEY_ID, and AWS_SECRET_ACCESS_KEY, with your specific AWS S3 credentials.
Step 2: Create a Pipe
- Create a pipe in Snowflake that specifies how data will be ingested into the target table from the external stage.
plaintextCREATE OR REPLACE PIPE pipe_name
AUTO_INGEST = TRUE
AS
COPY INTO target_table
FROM @external_stage
FILE_FORMAT = (TYPE = CSV);
Replace target_table with the name of your target table in Snowflake.
Step 3: Grant Permissions
- Ensure that the necessary permissions are granted that will be using Snowpipe to load data.
plaintextGRANT USAGE ON SCHEMA schema_name TO ROLE role;
GRANT USAGE ON STAGE external_stage TO ROLE role;
GRANT USAGE ON FILE FORMAT file_format TO ROLE role;
GRANT USAGE, MODIFY ON PIPE pipe_name TO ROLE role;
GRANT INSERT, SELECT ON TABLE target_table TO ROLE role;
Replace schema_name, role, file_format, pipe_name, and target_table with the appropriate names in your Snowflake environment.
Snowpipe will continuously check the external stage for new data. It will automatically load it into the Snowflake table as data becomes available in the S3 bucket.
Step 4: Data Ingestion
Once the data is loaded, you can monitor the ingestion process and view any potential errors by querying the Snowflake table SNOWPIPE_HISTORY and SNOWPIPE_ERRORS.
plaintextSELECT * FROM TABLE(INFORMATION_SCHEMA.PIPE_HISTORY(TABLE_NAME=>'TARGET_TABLE'));That’s it! You’ve successfully executed Amazon S3 to Snowflake Migration using Snowpipe.
While Snowpipe is a powerful tool for real time data ingestion, it does have some limitations. Snowpipe does not provide built-in data deduplication mechanisms. If duplicate data exists in the source files, it can be loaded into the target table. On the other hand, the COPY command is limited to handling data transfers from JSON, AVRO, and CSV data sources. Other formats may require pre-processing before loading.
Conclusion
The methods covered in this article can help you to streamline Amazon S3 to Snowflake integration for enhanced analytics.
The manual method describes how you can use Snowpipe to connect Amazon S3 Snowflake. Although this method can be used to achieve real time data processing requirements, it requires additional configurations and optimizations for large data files.
Flow’s no-code, real-time ETL platform lets you replicate data from various sources and load them into targets like Amazon Redshift, S3, Google Sheets, etc. With its in-built connectors, you can automate the data extraction and replication from Amazon S3 to Snowflake tables in just a few steps.
Whatever approach you choose, Estuary Flow allows you to connect data from Amazon S3 to Snowflake seamlessly. It offers a no-code solution that helps save time and effort. Start free today!

About the author
With over 15 years in data engineering, a seasoned expert in driving growth for early-stage data companies, focusing on strategies that attract customers and users. Extensive writing provides insights to help companies scale efficiently and effectively in an evolving data landscape.


