There is an increase in demand for efficient and cost-effective project management. This is resolved with the use of database management platforms like Airtable, which enable you to customize and manage your projects efficiently. However, the major shortcoming of Airtable is its inability to use large and complex datasets.
Loading your data from Airtable to Snowflake opens up many possibilities for handling massive workloads, centralizing your data, and gaining valuable insights. With this data integration, you can leverage Snowflake's analytical capabilities, data visualization features, and machine learning support to provide better analytical workflows for your business.
In this tutorial, we’ll dive into the ways to achieve Airtable to Snowflake integration as we go through every step to simplify the process of migrating your data.
Overview of Airtable
Airtable is a cloud-based database management platform that seamlessly merges the power of relational databases with the ease of handling spreadsheets. This allows you to create, manage, and store databases effortlessly. Its user-friendly interface, low-code property, and advanced functionalities make it accessible to users with limited technical expertise.
Apart from these handy features, Airtable offers a wide range of built-in templates, helping you automate repetitive tasks for streamlined workflows. Some of these templates include Project Tracker, Customer Relationship Management (CRM), Event Planning, and Expense Tracker.
Let's take a look at some of Airtable's key features:
- Customizable Databases: Airtable allows you to create bases, which are custom databases used for storing and organizing data as per your requirements
- Real-time Collaboration: Airtable makes it possible to collaborate with your team in real time. This feature is a time saver as it allows multiple users to work on the same base at the same time.
- Flexible Data Views: The platform offers various data views, including grid view, calendar view, kanban view, gallery view, and more. Depending on your needs and preferences, Airtable lets you seamlessly switch between views to visualize and interact with your data.
Overview of Snowflake
Snowflake is a highly scalable cloud data warehouse. In contrast to the conventional data warehousing platforms, it operates entirely in the cloud, providing high scalability, flexibility, and better performance without the need of investment in any infrastructure.
Snowflake has a unique architecture, which separates storage, compute, and service layers. This separation allows it to scale all its resources independently and instantly provide the storage capacity to meet any sudden requirements. This approach enables you to manage petabytes of data and ensure optimized workflows.
Snowflake supports both structured and semi-structured data, enabling you to store and manage diverse data types. Additionally, its compatibility with the leading cloud service providers—Amazon AWS, Google Cloud Platform, and Microsoft Azure—facilitates effortless deployment.
Snowflake’s top features:
- Zero Copy Cloning: Snowflake offers a zero-copy cloning feature that instantly creates copies of your database for testing and deployment purposes. The copy shares the same storage as the original data, saving you from paying for the additional storage of the replicated data.
- Built-in Security: Snowflake offers security features such as role-based access control and data encryption to protect your data from unauthorized access. These features ensure the security of your confidential information, protecting it from misconduct or theft.
- Consumption-based Pricing Model: Snowflake follows a pay-per-use pricing model, where you only pay for the resources you use, making it highly economical and feasible.
What Are the Benefits of Airtable to Snowflake Integration?
Here are some benefits of loading your data from Airtable to Snowflake.
- Scalability: Snowflake’s architecture can scale up or down quickly, enabling you to handle vast volumes of data from Airtable according to your requirements.
- Integration Flexibility: Compared to Airtable, Snowflake enables seamless integration with a broader range of data visualization tools and platforms. These integration options include Google Data Studio, Qlik, Power BI, Tableau, and Looker.
- Data Warehousing: Snowflake provides various data warehousing features, such as clustering, indexing, and data partitioning. These features enable you to store, manage, and retrieve the data you loaded from Airtable with ease.
- Real-time Updates: Snowflake offers real-time updates to ensure that the data loaded from Airtable reflects all the latest changes and complete information added to your datasets. This helps you perform real-time analytics, improving decision-making.
How to Load Data From Airtable to Snowflake
You can load data from Airtable to Snowflake Data Cloud using one of the following methods:
- The Automated Way: Using Estuary Flow to Load Data From Airtable to Snowflake
- The Manual Approach: Using CSV File Export/Import to Load Data From Airtable to Snowflake
The Automated Way: Using Estuary Flow to Load Data From Airtable to Snowflake
Estuary Flow is a fully-managed, real-time ETL (extract, transform, load) platform that helps streamline your data migration process. With an intuitive interface, no-code configuration connectors, and real-time integration capabilities, it requires minimal effort to set up a data migration pipeline.
Let’s explore the step-by-step process of how to load your data from Airtable to Snowflake using Estuary Flow.
Prerequisites
Step 1: Configuring Airtable as Source
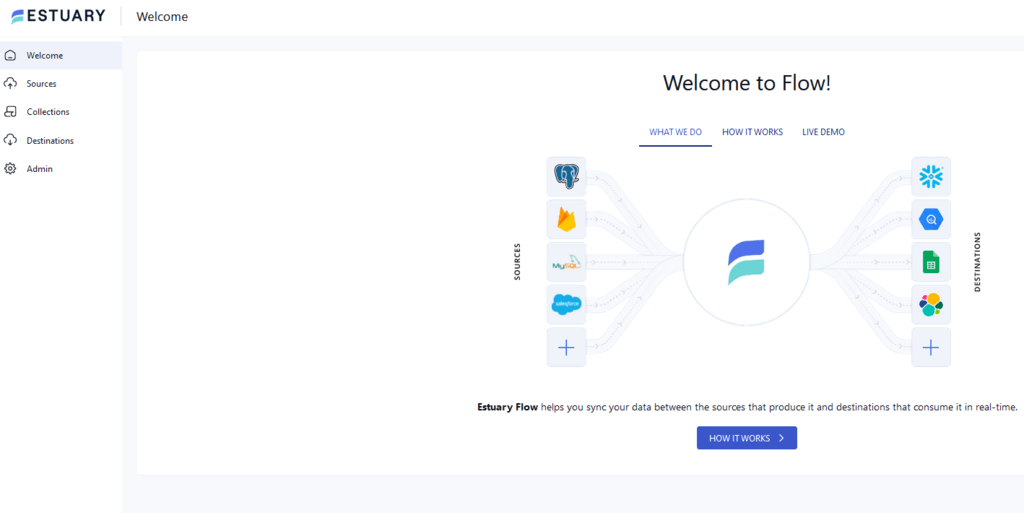
- Sign up or log in to your Estuary Flow account to start configuring Airtable as the source.
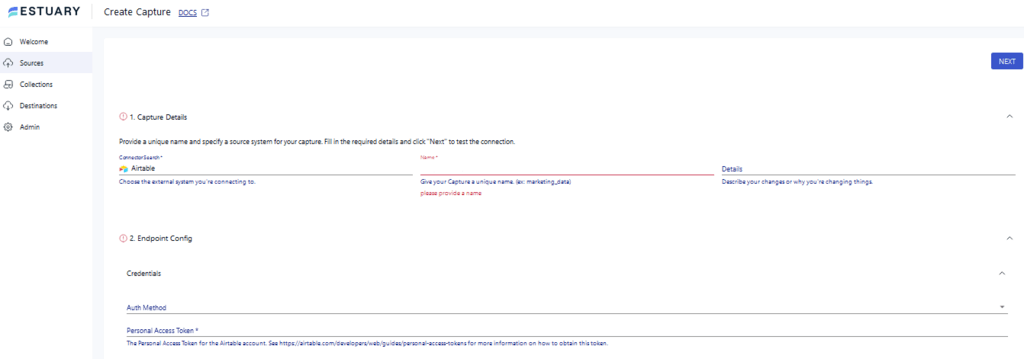
- Click on the Sources tab on the dashboard.
- On the Sources page, click on the + NEW CAPTURE button.
- Using the Search connectors box, search for the Airtable connector and click on the connector’s Capture button when you see it.
- You will be redirected to the Airtable connector configuration page. Fill in all the specified fields like a unique Name for your capture and Personal Access Token.
- Click on NEXT > SAVE AND PUBLISH. The connector will capture your Airtable data into Flow collections.
Step 2: Configuring Snowflake as Destination
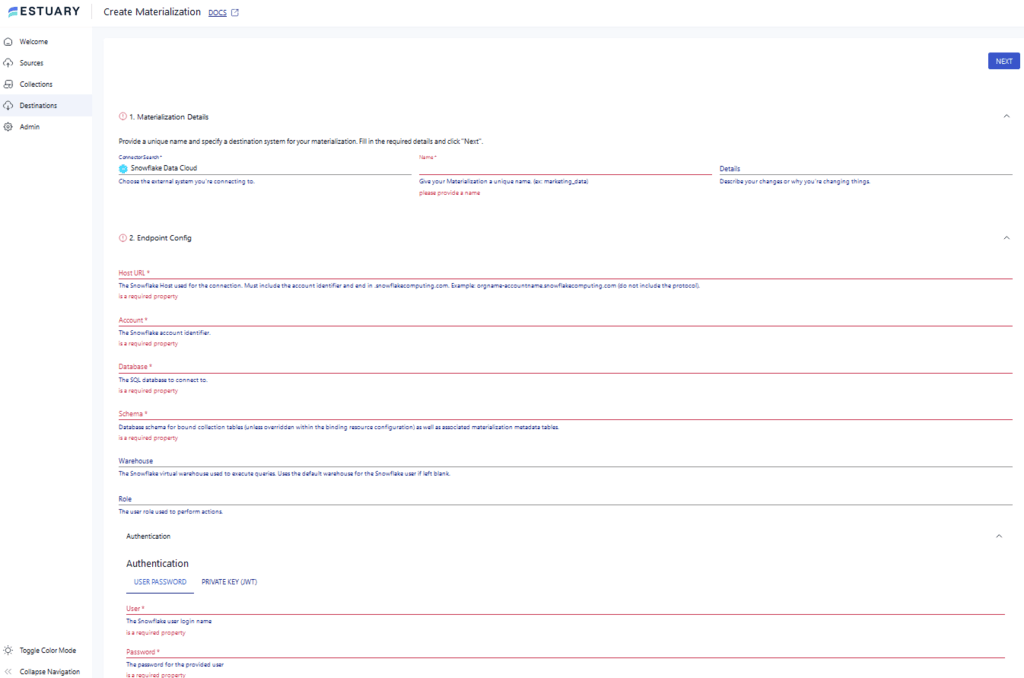
- To begin configuring the destination end of the data pipeline, click MATERIALIZE COLLECTIONS on the pop-up window that appears after a successful capture. Alternatively, you can click the Destinations tab on the left-side pane of the dashboard.
- On the Destinations page, click on the + NEW MATERIALIZATION button.
- Using the Search connectors box, search for the Snowflake connector. When it appears in the search results, click on its Materialization button.
- You will be redirected to the Snowflake connector page. Fill in all the specified fields, such as Host URL, Account, Database, and Schema. Also, select an Authentication option: USER PASSWORD or PRIVATE KEY (JWT).
- If you want to manually link a capture to your materialization, click SOURCE FROM CAPTURE in the Source Collections section.
- Then, click on NEXT > SAVE AND PUBLISH. This will materialize data from Flow collections to your Snowflake tables.
Initially, the connector uploads data changes to a Snowflake table stage; thereafter, it transactionally applies the changes to a Snowflake table.
Benefits of Using Estuary Flow
- Built-in Connectors: Estuary Flow offers more than 300 ready-to-use connectors you can configure to build data integration pipelines effortlessly.
- Built-in Testing: It offers robust features like built-in testing for quality checks. This ensures that the data loaded from Airtable to Snowflake does not have any errors or lack of accuracy.
- Real-time Processing: Flow lets you transfer your Airtable data to Snowflake in real time. This ensures that the supporting applications are updated with the latest information and there is no redundancy.
The Manual Approach: Using CSV File Export/Import to Load Data From Airtable to Snowflake
Custom loading data from Airtable to Snowflake using the CSV export/import method involves exporting Airtable data as CSV files. After performing any required data transformation, you can load the data into Snowflake.
Step 1: Export Data From Airtable as CSV Files
- Sign in to your Airtable account.
- Navigate to your Airtable base.
- Open the table/view containing the data that you want to export.
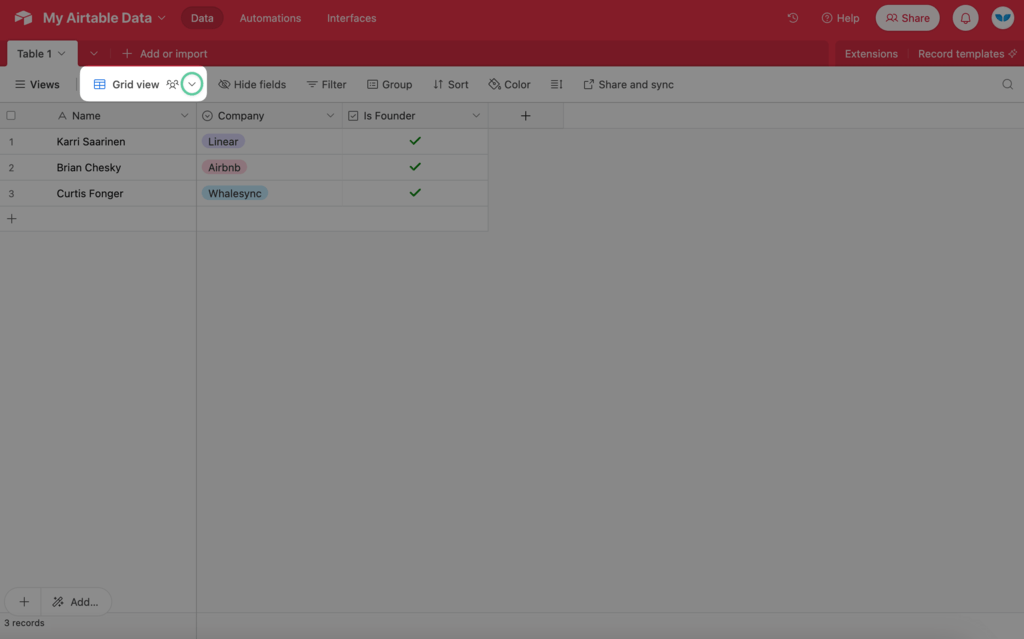
- Click on the arrow icon next to the Views label.
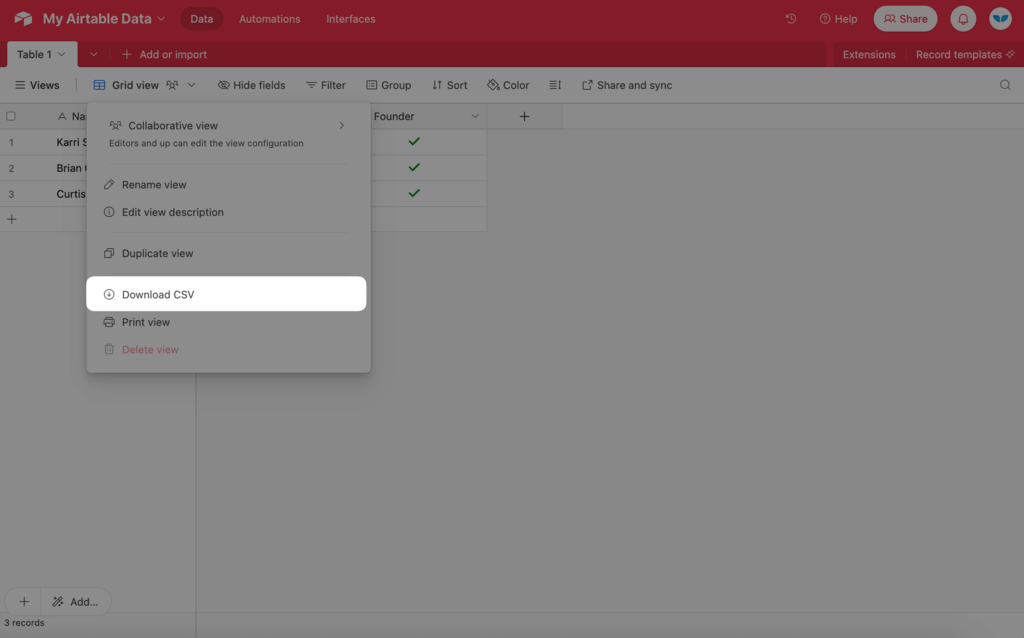
- Click the Download CSV option to download the data as a CSV file to your local machine.
Step 2: Import CSV Data to Snowflake using Snowsight
- Log in to your Snowsight account.
- Select the database into which you want to import your data. In the navigation menu, select Data > Databases. This will display all the available databases.
- Set the context of your data loading by selecting the desired database and schema from the displayed list.
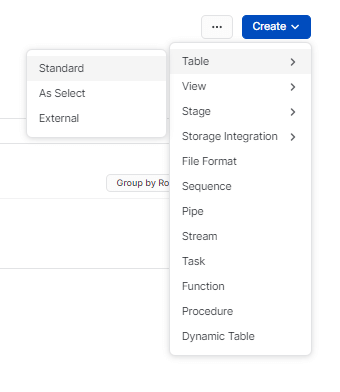
- Create a new standard table using the interface or select an existing table.
- You can also write a query to create a table. Here is an example:
plaintextcreate or replace TABLE MY_DATABASE.MY_SCHEMA.CSV_LOAD_DEMO (
  student_id INTEGER,
  first_name VARCHAR(50),
  last_name VARCHAR(50),
  date_of_birth DATE,
  email VARCHAR(100),
  address VARCHAR(200)
);- Select the table into which you want to load this data.
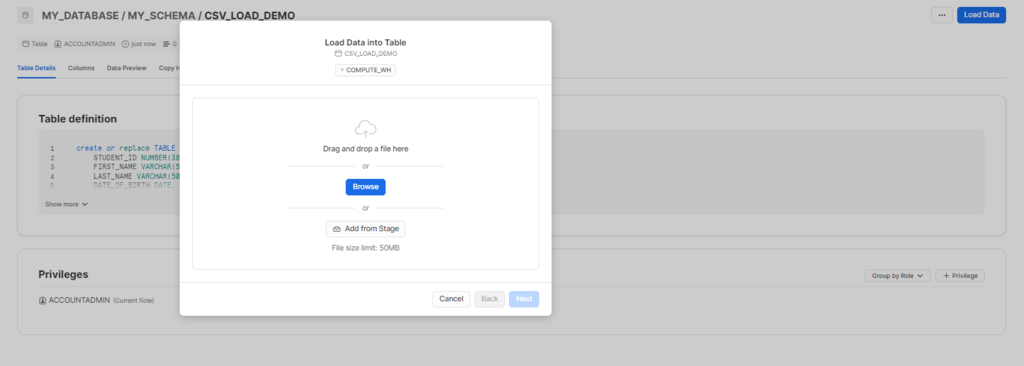
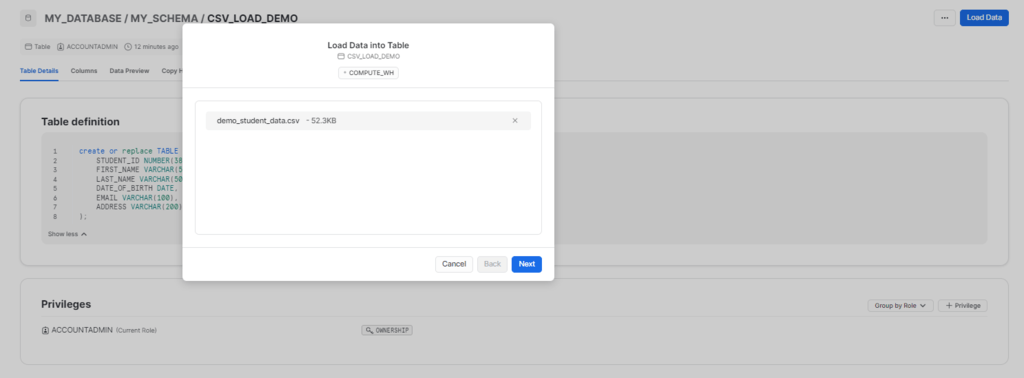
- To begin with the data loading, click on the Load Data option.
- To upload structured or semi-structured data files, choose the Upload a File option from the Load Data into Table dialog box.
- Use the drag-and-drop functionality or the file selection dialog box to upload your data files.
- If you haven’t set a default warehouse, select from the available options and click the Next button.
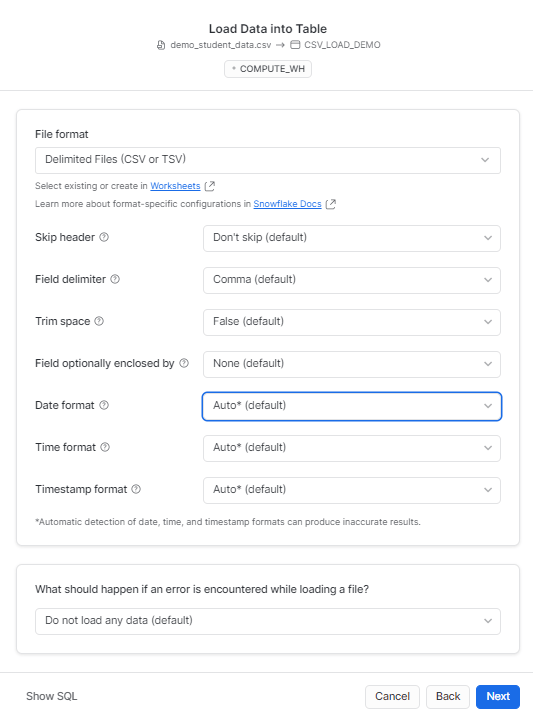
- Select a predefined file format or customize a file type to set an appropriate file format for your data and click Next to proceed.
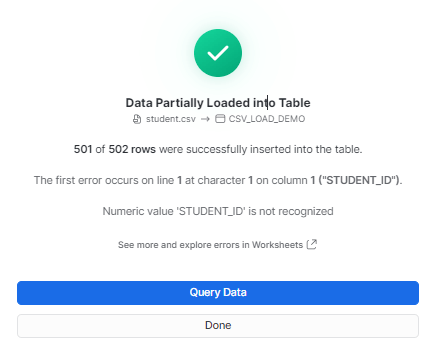
- Snowsight will begin loading the file and display the number of rows successfully inserted into the selected table.
- After the completion of data loading, you can proceed in any of these two ways:
- Select Query Data to open a worksheet with SQL syntax for querying your table.
- Select Done to close the dialog box and complete the data loading process.
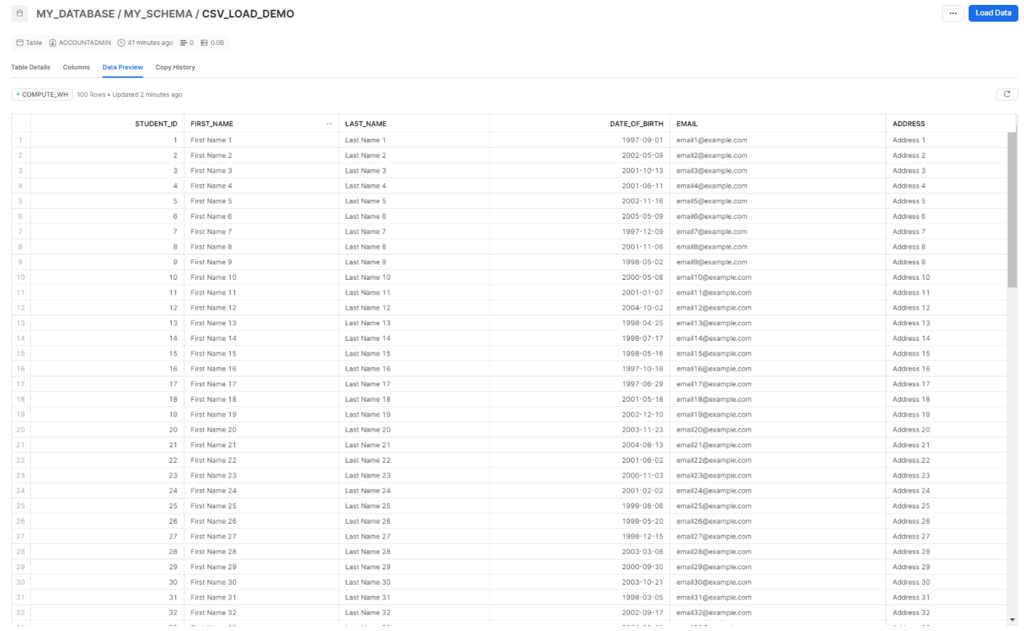
- This will successfully import the CSV file in Snowflake.
Limitations of Using CSV File Export/Import to Load Data From Airtable to Snowflake
- Time- and Effort-intensive: The CSV export/import method is time-consuming and effort-intensive, as you can export only one table/view at a time. Additionally, you have to perform repetitive tasks due to the lack of automation.
- Data Volumes: The manual process of connecting Airtable with Snowflake is only feasible when you are dealing with smaller datasets. For larger datasets, there may be a possible loss of data or precision during the extraction, transformation, and loading of the data.
- No Real-time Sync: The manual CSV export/import process lacks real-time synchronization while loading your data from Airtable to Snowflake. This results in lagging data updates and may also cause human errors and mismatches.
Want to connect Airtable to other platforms? Check out these guides:
In Summary
Integrating Airtable to Snowflake provides a seamless solution for managing and analyzing data efficiently. It enables you to maximize operational efficiency by leveraging Snowflake's robust data warehousing capabilities.
To recap, we looked at two methods to load your data from Airtable to Snowflake. One is the manual CSV export/import process, which involves exporting the data from Airtable as a CSV file and then importing this file in Snowflake. This method is effort-intensive and may result in data inconsistency.
Using powerful data integration tools like Estuary Flow to transfer your data from Airtable to Snowflake is an alternative approach. Flow’s high scalability, intuitive user-interface, and real-time capabilities streamline the entire migration process, requiring just a few clicks.
Automate your data loading using Estuary Flow to get the most out of its impressive capabilities for your varied data integration needs. Register for free to build your first pipeline today!
FAQs
- Which is better for storing data, Airtable or Snowflake?
Airtable is a better choice for a simpler and user-friendly data management interface. However, for advanced analytical capabilities and high scalability, Snowflake is a good fit. It is highly recommended for large-scale projects and complex analysis.
- Which is cheaper for data management, Airtable or Snowflake?
Airtable is a more cost-effective option for projects with moderate data storage and collaboration needs. On the contrary, Snowflake, with its pay-as-you-go pricing model, acts as a cost-effective solution for projects with complex requirements.
- What type of data can I load from Airtable to Snowflake?
You can load multiple types of data from Airtable to Snowflake, such as numbers, text, dates, and attachments. This enables you to centralize the diverse data from multiple sources in Airtable into Snowflake tables.

About the author
With over 15 years in data engineering, a seasoned expert in driving growth for early-stage data companies, focusing on strategies that attract customers and users. Extensive writing provides insights to help companies scale efficiently and effectively in an evolving data landscape.


